Page 350 of 503

717
What to do in an emergency
You may not be able to identify a low
tire by simply looking at it. Always
use a good quality tire pressure
gauge to measure the tire's inflation
pressure. Please note that a tire that
is hot (from being driven) will have a
higher pressure measurement than a
tire that is cold (from sitting station-
ary for at least 3 hours and driven
less than 1.6 km (1 mile) during that
3 hour period).
Allow the tire to cool before measur-
ing the inflation pressure. Always be
sure the tire is cold before inflating to
the recommended pressure.
A cold tire means the vehicle has
been sitting for 3 hours and driven for
less than 1.6 km (1 mile) in that 3
hour period.
Never use tire sealant if your vehicle
is equipped with a Tire Pressure
Monitoring System. The liquid
sealant can damage the tire pres-
sure sensors. The TPMS cannot alert you to
severe and sudden tire damage
caused by external factors such as
nails or road debris.
If you feel any vehicle instability, immediately take your foot off the
accelerator, apply the brakes grad-
ually and with light force, and slow-
ly move to a safe position off the
road.
✽ ✽ NOTICE - Protecting TPMS
Tampering with, modifying, or dis-
abling the Tire Pressure Monitoring
System (TPMS) components may
interfere with the system's ability to
warn the driver of low tire pressure
conditions and/or TPMS malfunc-
tions. Tampering with, modifying,
or disabling the Tire Pressure
Monitoring System (TPMS) compo-
nents may void the warranty for
that portion of the vehicle.
This device complies with
Industry Canada licence-exempt
RSS standard(s).
Operation is subject to the following
two conditions:
(1) This device may not cause inter-
ference, and
(2) This device must accept any interference, including interfer-
ence that may cause undesired
operation of the device.
SC CAN (ENG) 7.qxp 7/18/2018 5:38 PM Page 17
Page 351 of 503
What to do in an emergency
18
7
IF YOU HAVE A FLAT TIRE (WITH TIRE MOBILITY KIT, IF EQUIPPED)
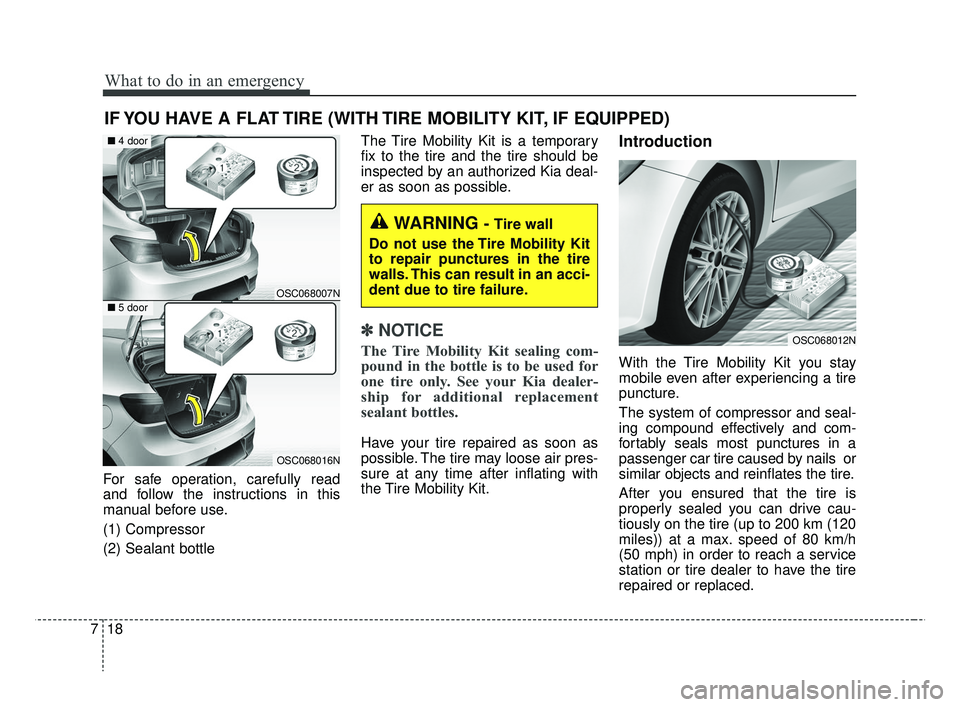
For safe operation, carefully read
and follow the instructions in this
manual before use.
(1) Compressor
(2) Sealant bottle The Tire Mobility Kit is a temporary
fix to the tire and the tire should be
inspected by an authorized Kia deal-
er as soon as possible.
✽ ✽
NOTICE
The Tire Mobility Kit sealing com-
pound in the bottle is to be used for
one tire only. See your Kia dealer-
ship for additional replacement
sealant bottles.
Have your tire repaired as soon as
possible. The tire may loose air pres-
sure at any time after inflating with
the Tire Mobility Kit.
Introduction
With the Tire Mobility Kit you stay
mobile even after experiencing a tire
puncture.
The system of compressor and seal-
ing compound effectively and com-
fortably seals most punctures in a
passenger car tire caused by nails or
similar objects and reinflates the tire.
After you ensured that the tire is
properly sealed you can drive cau-
tiously on the tire (up to 200 km (120
miles)) at a max. speed of 80 km/h
(50 mph) in order to reach a service
station or tire dealer to have the tire
repaired or replaced.
OSC068007N
OSC068016N
■ 4 door
■5 door
WARNING - Tire wall
Do not use the Tire Mobility Kit
to repair punctures in the tire
walls. This can result in an acci-
dent due to tire failure.
OSC068012N
SC CAN (ENG) 7.qxp 7/18/2018 5:38 PM Page 18
Page 358 of 503

725
What to do in an emergency
- To reduce the inflation pres-sure: Press the button (9) on the
compressor.Technical Data
System voltage: DC 12 V
Working voltage: DC 10 - 15 V
Amperage rating: max. 10A ± 1A
(at DC 12V operation)
Suitable for use at temperatures: -30 ~ +70°C (-22 ~ +158°F)
Max. working pressure: 6 bar (87 psi)
Size
Compressor: 161 X 150 X 55.8 mm
(6.3 X 5.9 X 2.2 in.)
Sealant bottle: 81 x 85 ø mm (3.2 x 3.3 ø in.)
Compressor weight: 735 g ± 25 g (1.62 lbs ± 0.06 lbs)
Sealant volume:
200 ml (12.2 cu. in.) ❈
Sealant and spare parts can be
obtained and replaced at an
authorized vehicle or tire dealer.
Empty sealant bottles may be dis-
posed of at home. Liquid residue
from the sealant should be dis-
posed of by your vehicle or tire
dealer or in accordance with local
waste disposal regulations.
CAUTION - Tire pressure
sensor
When you use the Tire MobilityKit including sealant notapproved by Kia, the tire pres-sure sensors may be damagedby sealant. The sealant on thetire pressure sensor and wheelshould be removed when youreplace the tire with a new oneand inspect the tire pressuresensors at an authorized dealer.
SC CAN (ENG) 7.qxp 7/18/2018 5:39 PM Page 25
Page 372 of 503
739
What to do in an emergency
Emergency towing precautions
Turn the ignition switch to ACC sothe steering wheel isn’t locked.
Place the transmission shift lever in N (Neutral).
Release the parking brake.
Press the brake pedal with more force than normal since you will
have reduced brake performance.
More steering effort will be required because the power steer-
ing system will be disabled.
If you are driving down a long hill, the brakes may overheat and brake
performance will be reduced. Stop
often and let the brakes cool off.
If the car is being towed with all four
wheels on the ground, it can be
towed only from the front. Be sure
that the transmission is in neutral. Be
sure the steering is unlocked by plac-
ing the ignition switch in the ACC
position. A driver must be in the
towed vehicle to operate the steering
and brakes.WARNING- Emergency
Towing Precautions
Use extreme caution when tow-
ing the vehicle.
Avoid sudden starts or erratic driving maneuvers which
would place excessive stress
on the emergency towing hook
and towing cable or chain. The
hook and towing cable or
chain may break and cause
serious injury or damage.
If the disabled vehicle is unable to be moved, do not
forcibly continue the towing.
In this case, contact an
authorized Kia dealer or a
commercial tow truck service
for assistance.
Tow the vehicle as straight ahead as possible.
Keep away from the vehicle during towing.CAUTION- Automatic
Transmission
To avoid serious damage to the Automatic Transmission,limit the vehicle speed to 10mph (15 km/h) and drive lessthan 1 mile (1.5 km/h) whentowing.
Before towing, check for an Automatic Transmission fluidleak under your vehicle. If theAutomatic Transmission fluidis leaking, a flatbed equipmentor towing dolly must be used.
SC CAN (ENG) 7.qxp 7/18/2018 5:40 PM Page 39
Page 375 of 503
• Side marker (rear) (LED type) bulb replacement (Rear combination lamp Type B) (for 4 door) . . . . 8-92
• Back-up lamp bulb replacement (for 4 door) . . . . . . 8-92
• Tail lamp (Bulb type) bulb replacement (for 4 door) . 8-93
• Stop and tail lamp (LED type) bulb replacement (for 4 door) . . . . . . . . . . . . . . . . . . . . . . . . . . . . . . . . . 8-94
• High mounted stop lamp bulb replacement (for 4 door) . . . . . . . . . . . . . . . . . . . . . . . . . . . . . . . . . 8-94
• Trunk lamp bulb replacement (for 4 door) . . . . . . . 8-95
• Map lamp bulb replacement . . . . . . . . . . . . . . . . . . . 8-95
• Vanity mirror lamp bulb replacement . . . . . . . . . . . 8-96
• Room lamp bulb replacement . . . . . . . . . . . . . . . . . . 8-97
• Glove box lamp bulb replacement . . . . . . . . . . . . . . 8-97
• Tailgate room lamp bulb replacement (for 5 door) . 8-98
Appearance care . . . . . . . . . . . . . . . . . . . . . . . . . . . 8-99
• Exterior care . . . . . . . . . . . . . . . . . . . . . . . . . . . . . . . . 8-99
• Interior care . . . . . . . . . . . . . . . . . . . . . . . . . . . . . . . . 8-104
Emission control system . . . . . . . . . . . . . . . . . . . 8-107
• Crankcase emission control system . . . . . . . . . . . . . 8-107
• Evaporative emission control (including ORVR: Onboard Refueling Vapor Recovery) system . . . . 8-107
• Exhaust emission control system . . . . . . . . . . . . . . . 8-108
8
SC CAN (ENG) 8.qxp 7/18/2018 5:32 PM Page 3
Page 380 of 503
Maintenance
88
If any slipping or changes in theoperation of your transmission
occurs, check the transmission
fluid level.
Check manual transmission opera- tion, including clutch operation.
Check the automatic transmission P (Park) function.
Check the parking brake.
Check for fluid leaks under your vehicle (water dripping from the air
conditioning system during or after
use is normal).At least monthly:
Check the coolant level in theengine coolant reservoir.
Check the operation of all exterior lights, including the stoplights, turn
signals and hazard warning flash-
ers.
Check the inflation pressures of all tires including the spare for tires
that are worn, show uneven wear,
or are damaged.
Check for loose wheel lug nuts.
At least twice a year (i.e., every Spring and Fall) :
Check the radiator, heater and air conditioning hoses for leaks or
damage.
Check the windshield washer spray and wiper operation. Clean
the wiper blades with clean cloth
dampened with washer fluid.
Check the headlight alignment.
Check the muffler, exhaust pipes, shields and clamps.
Check the lap/shoulder belts for wear and function.
SC CAN (ENG) 8.qxp 7/18/2018 5:32 PM Page 8
Page 381 of 503
89
Maintenance
At least once a year :
Clean the body and door drainholes.
Lubricate the door hinges and check the hood hinges.
Lubricate the door and hood locks and latches.
Lubricate the door rubber weather- strips.
Check the air conditioning system.
Inspect and lubricate automatic transmission linkage and controls.
Clean the battery and terminals.
Check the brake/clutch fluid level.
SC CAN (ENG) 8.qxp 7/18/2018 5:32 PM Page 9
Page 384 of 503
Maintenance
12
8
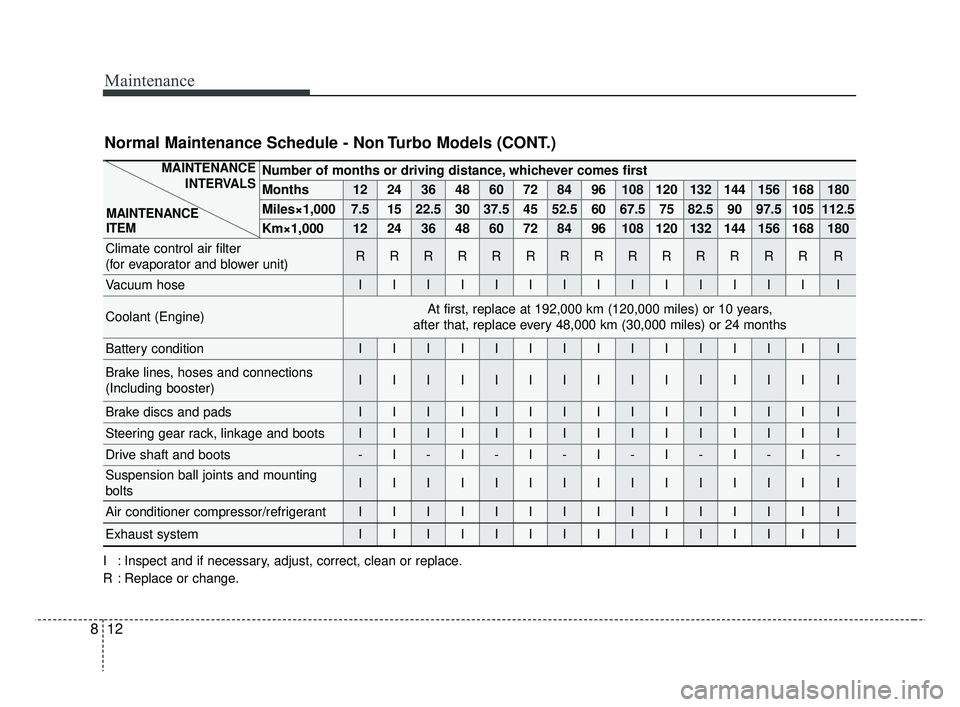
Normal Maintenance Schedule - Non Turbo Models (CONT.)
Number of months or driving distance, whichever comes first
Months1224364860728496108120132144156168180
Miles×1,0007.51522.530 37.5 45 52.5 60 67.5 75 82.5 90 97.5 105 112.5
Km×1,00012 24 36 48 60 72 84 96 108 120 132 144 156 168 180
Climate control air filter
(for evaporator and blower unit)RRRRRRRRRRRRRRR
Vacuum hoseIIIIIIIIIIIIIII
Coolant (Engine)At first, replace at 192,000 km (120,000 miles) or 10 years,
after that, replace every 48,000 km (30,000 miles) or 24 months
Battery conditionIIIIIIIIIIIIIII
Brake lines, hoses and connections
(Including booster)IIIIIIIIIIIIIII
Brake discs and padsIIIIIIIIIIIIIII
Steering gear rack, linkage and bootsIIIIIIIIIIIIIII
Drive shaft and boots-I-I-I-I-I-I-I-
Suspension ball joints and mounting
boltsIIIIIIIIIIIIIII
Air conditioner compressor/refrigerantIIIIIIIIIIIIIII
Exhaust systemIIIIIIIIIIIIIII
I : Inspect and if necessary, adjust, correct, clean or replace.
R : Replace or change.
MAINTENANCE INTERVALS
MAINTENANCE
ITEM
SC CAN (ENG) 8.qxp 7/18/2018 5:32 PM Page 12