2019 KIA RIO HATCHBACK turn signal
[x] Cancel search: turn signalPage 16 of 503

Your vehicle at a glance
62
INSTRUMENT PANEL OVERVIEW
OSC018004N
1. Instrument cluster.............................4-57
2. Horn .................................................4-52
3. Driver’s front air bag .........................3-48
4. Light control/Turn signals .................4-92
5. Wiper/Washer ...................................4-98
6. Ignition switch .....................................6-6ENGINE START/STOP button .............6-8
7. Hazard warning flasher switch ................7-2
8. Audio ..................................................5-8
9. Central door lock switch ...................4-21
10. Climate control system .....4-109, 4-119
11. AUX, USB port .................................5-3
12. Manual Transmission ......................6-15 Automatic Transmission..................6-18
13. Parking brake lever ........................6-26
14. Passenger’s front air bag ...............3-48
15. Power outlet .................................4-138
16. Glove box .....................................4-133
17. Steering wheel audio control ............. 5-11
18. Seat warmer .................................4-137
19. Heated steering wheel switch ........4-53
20. Sport mode system ........................6-55
21. USB charger.................................4-139
22. Center console storage ................4-133
23. Cruise control button ......................6-50
SC CAN (ENG) 2.qxp 7/18/2018 5:30 PM Page 6
Page 51 of 503

Safety features of your vehicle
34
3
How does the air bag system
operate
Air bags are activated (able to
inflate if necessary) only when the
ignition switch is turned to the ON
or START the appropriate position.
Air bags inflate instantly in the event of serious frontal or side col-
lision (if equipped with side air bag
or curtain air bag) in order to help
protect the occupants from serious
physical injury.
Generally, air bags are designed to
inflate based upon the severity of a
collision and its direction. These
two factors determine whether the
sensors produce an electronic
deployment/ inflation signal. Air bag deployment depends on a
number of complex factors includ-
ing vehicle speed, angles of impact
and the density and stiffness of the
vehicles or objects which your
vehicle hits in the collision. Though,
factors are not limited to those
mentioned above. Airbags deploy
depending on the severity and
angle of the impact.
Airbags do not deploy in every
impact situation.
The front air bags will completely inflate and deflate in an instant.
It is virtually impossible for you to
see the air bags inflate during an
accident. It is much more likely that
you will simply see the deflated air
bags hanging out of their storage
compartments after the collision. In addition to inflating in certain
side collisions, vehicles equipped
with a rollover sensor, side and
curtain air bags will inflate if the
sensing system detects a rollover.
When a rollover is detected, side and
curtain air bags will remain inflated
longer to help provide protection
from ejection, especially when used
in conjunction with the seat belts.
In order to help provide protection in a severe collision, the air bags
must inflate rapidly. The speed of
air bag inflation is a consequence
of extremely short time in which a
collision occurs and the need to
get the air bag between the occu-
pant and the vehicle structures
before the occupant impacts those
structures. This speed of inflation
reduces the risk of serious or life-
threatening injuries in a severe col-
lision and is thus a necessary part
of air bag design.
SC CAN (ENG) 3.QXP 7/18/2018 5:56 PM Page 34
Page 80 of 503
Steering wheel . . . . . . . . . . . . . . . . . . . . . . . . . . . . . 4-51
• Electric Power Steering (EPS) . . . . . . . . . . . . . . . . . . 4-51
• Tilt and telescopic steering . . . . . . . . . . . . . . . . . . . . . 4-52
• Horn . . . . . . . . . . . . . . . . . . . . . . . . . . . . . . . . . . . . \
. . . 4-52
• Heated steering wheel . . . . . . . . . . . . . . . . . . . . . . . . . 4-53
Mirrors . . . . . . . . . . . . . . . . . . . . . . . . . . . . . . . . . . 4-54\
• Inside rearview mirror . . . . . . . . . . . . . . . . . . . . . . . . 4-54
• Outside rearview mirror. . . . . . . . . . . . . . . . . . . . . . . 4-54
Instrument cluster . . . . . . . . . . . . . . . . . . . . . . . . . 4-57
• Instrument Cluster Control . . . . . . . . . . . . . . . . . . . . 4-58
• LCD window control . . . . . . . . . . . . . . . . . . . . . . . . . . 4-58
• Gauges . . . . . . . . . . . . . . . . . . . . . . . . . . . . . . . . . . . . \
. 4-59
• Transmission shift indicator . . . . . . . . . . . . . . . . . . . . 4-62
LCD windows . . . . . . . . . . . . . . . . . . . . . . . . . . . . . 4-64
• Over view . . . . . . . . . . . . . . . . . . . . . . . . . . . . . . . . . . . 4-\
64
• Trip information (Trip computer) . . . . . . . . . . . . . . . 4-64
• LCD modes (for type B cluster) . . . . . . . . . . . . . . . . . 4-69
• Service mode . . . . . . . . . . . . . . . . . . . . . . . . . . . . . . . . 4-70
• User settings mode (for type B cluster) . . . . . . . . . . . 4-70
Warning and indicator lights . . . . . . . . . . . . . . . . 4-79
• Warning lights . . . . . . . . . . . . . . . . . . . . . . . . . . . . . . . 4-79
• Indicator lights. . . . . . . . . . . . . . . . . . . . . . . . . . . . . . . 4-87
Rear view monitor . . . . . . . . . . . . . . . . . . . . . . . . . 4-91
• Rear view monitor . . . . . . . . . . . . . . . . . . . . . . . . . . . . 4-91
Lighting . . . . . . . . . . . . . . . . . . . . . . . . . . . . . . . . . . 4-92\
• Battery saver function. . . . . . . . . . . . . . . . . . . . . . . . . 4-92
• Headlight escort function . . . . . . . . . . . . . . . . . . . . . . 4-92
• Headlight welcome function . . . . . . . . . . . . . . . . . . . . 4-92
• Daytime running light . . . . . . . . . . . . . . . . . . . . . . . . . 4-93
• Lighting control . . . . . . . . . . . . . . . . . . . . . . . . . . . . . . 4-93
• High beam operation. . . . . . . . . . . . . . . . . . . . . . . . . . 4-95
• Turn signals and lane change signals . . . . . . . . . . . . 4-96
• Front fog light . . . . . . . . . . . . . . . . . . . . . . . . . . . . . . . 4-97
Wipers and washers . . . . . . . . . . . . . . . . . . . . . . . . 4-98
• Windshield wipers . . . . . . . . . . . . . . . . . . . . . . . . . . . . 4-99
• Windshield washers (front) . . . . . . . . . . . . . . . . . . . 4-100
• Rear window wiper and washer switch (for 5 door) . . . . . . . . . . . . . . . . . . . . . . . . . . . . . . . . 4-102
Interior light . . . . . . . . . . . . . . . . . . . . . . . . . . . . . 4-103
• Automatic turn off function . . . . . . . . . . . . . . . . . . . 4-103
• Map lamp . . . . . . . . . . . . . . . . . . . . . . . . . . . . . . . . . . 4-10\
3
• Room lamp . . . . . . . . . . . . . . . . . . . . . . . . . . . . . . . . . 4-104
• Luggage room lamp . . . . . . . . . . . . . . . . . . . . . . . . . 4-106
• Glove box lamp . . . . . . . . . . . . . . . . . . . . . . . . . . . . . 4-106
• Vanity mirror lamp . . . . . . . . . . . . . . . . . . . . . . . . . . 4-107
Defroster . . . . . . . . . . . . . . . . . . . . . . . . . . . . . . . . 4-108
• Rear window defroster . . . . . . . . . . . . . . . . . . . . . . . 4-108
4
SC CAN (ENG) 4.QXP 7/18/2018 5:45 PM Page 2
Page 92 of 503
Features of your vehicle
14
4
Immobilizer system
Your vehicle may be equipped with
an electronic engine immobilizer sys-
tem to reduce the risk of unautho-
rized vehicle use.
Your immobilizer system is com-
prised of a small transponder in the
ignition key and electronic devices
inside the vehicle.
With the immobilizer system, when-
ever you insert your ignition key into
the ignition switch and turn it to ON,
it checks and determines and verifies
that the ignition key is valid.
If the key is determined to be valid,
the engine will start.
If the key is determined to be invalid,
the engine will not start.
To deactivate the immobilizer
system:
Insert the ignition key into the key
cylinder and turn it to the ON position.
To activate the immobilizer sys-tem:
Turn the ignition key to the OFF posi-
tion. The immobilizer system acti-
vates automatically. Without a valid
ignition key for your vehicle, the
engine will not start.
Your Immobilizer password is a cus-
tomer unique password and should
be kept confidential. Do not leave this
number anywhere in your vehicle.
✽ ✽ NOTICE
Keep each key separately in order to
avoid a starting malfunction.
Do not put metal accessories near
the ignition switch.
Metal accessories may interrupt the
transponder signal and may prevent
the engine from being started.
If you need additional keys or lose
your keys, consult an authorized Kia
dealer.
CAUTION - Immobilizer
alterations
Do not change, alter or adjustthe immobilizer system becauseit could cause the immobilizersystem to malfunction.
CAUTION - Immobilizer
damage
Do not expose your immobilizersystem to moisture, static elec-tricity or rough handling. Thismay damage your immobilizer.
SC CAN (ENG) 4.QXP 7/18/2018 5:45 PM Page 14
Page 150 of 503
Features of your vehicle
72
4
Automatically Unlock
- Disable : The auto door unlock
operation will be canceled.
- Vehicle Off/On, Key out : All doors will be automatically unlocked
when the ignition key is removed
from the ignition switch or the
Engine Start/Stop button is set to
the OFF position.
- On Shift to P : All doors will be automatically unlocked if the
Automatic Transmission shift lever
is shifted to the P (Park) position. Two Press Unlock (if equipped)
- Off : The two press unlock function
will be deactivated. Therefore, all
doors will unlock if the unlock but-
ton on the driver's door is pressed.
- On : The driver's door will unlock if the unlock button on the driver's
door is pressed. When the same
button is pressed again within 4
seconds, all doors will unlock.
Horn Feedback (if equipped) :If
this item is checked, the door lock
sound function will be activated
when locking doors.
Smart Trunk (if equipped) :To
activate or deactivate the Smart
Trunk system.
❈ For more details, refer to “Smart
Trunk” in this chapter. Lights
One Touch Turn Signal
- Off : The one touch turn signal
function will be deactivated.
- 3, 5, 7 Flashes : The lane change signals will blink 3, 5, or 7 times
when the turn signal lever is moved
slightly.
❈ For more details, refer to “Light” in
this chapter
Head Lamp Delay
- If this item is checked, the head lamp delay function will be activat-
ed.
SC CAN (ENG) 4.QXP 7/18/2018 5:49 PM Page 72
Page 167 of 503
489
Features of your vehicle
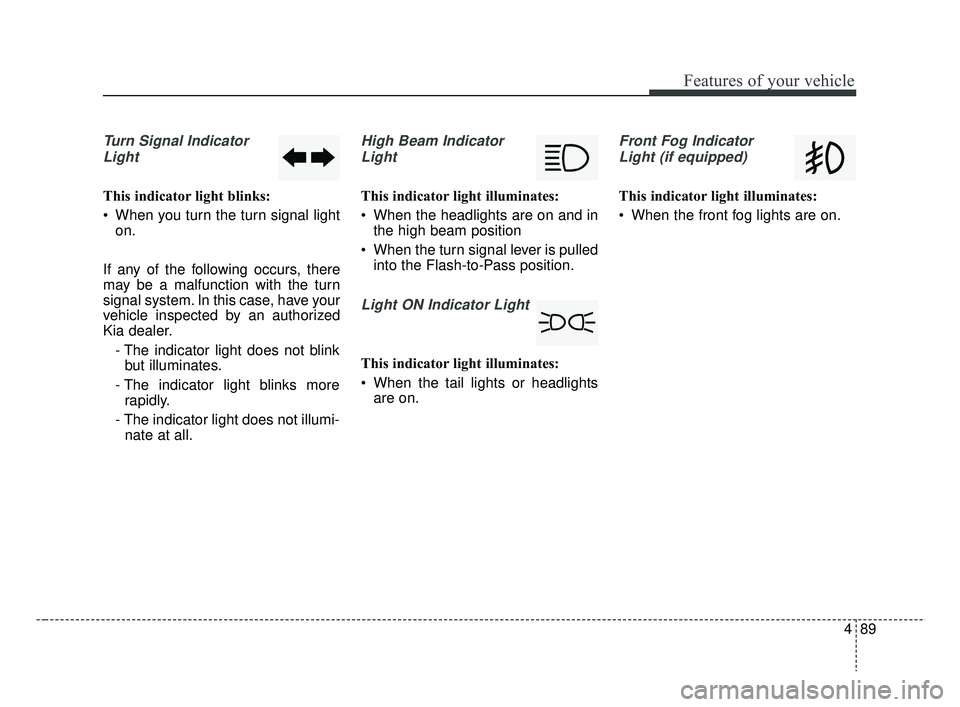
Turn Signal IndicatorLight
This indicator light blinks:
When you turn the turn signal light on.
If any of the following occurs, there
may be a malfunction with the turn
signal system. In this case, have your
vehicle inspected by an authorized
Kia dealer. - The indicator light does not blinkbut illuminates.
- The indicator light blinks more rapidly.
- The indicator light does not illumi- nate at all.
High Beam Indicator
Light
This indicator light illuminates:
When the headlights are on and in the high beam position
When the turn signal lever is pulled into the Flash-to-Pass position.
Light ON Indicator Light
This indicator light illuminates:
When the tail lights or headlightsare on.
Front Fog Indicator
Light (if equipped)
This indicator light illuminates:
When the front fog lights are on.
SC CAN (ENG) 4.QXP 7/18/2018 5:49 PM Page 89
Page 174 of 503
Features of your vehicle
96
4
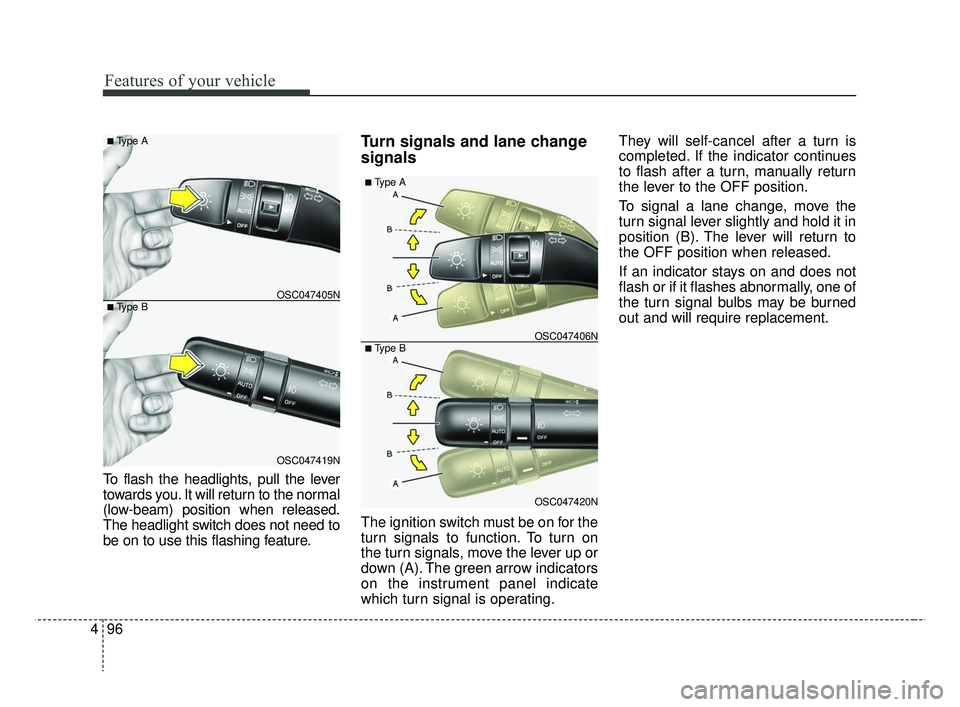
To flash the headlights, pull the lever
towards you. It will return to the normal
(low-beam) position when released.
The headlight switch does not need to
be on to use this flashing feature.
Turn signals and lane change
signals
The ignition switch must be on for the
turn signals to function. To turn on
the turn signals, move the lever up or
down (A). The green arrow indicators
on the instrument panel indicate
which turn signal is operating. They will self-cancel after a turn is
completed. If the indicator continues
to flash after a turn, manually return
the lever to the OFF position.
To signal a lane change, move the
turn signal lever slightly and hold it in
position (B). The lever will return to
the OFF position when released.
If an indicator stays on and does not
flash or if it flashes abnormally, one of
the turn signal bulbs may be burned
out and will require replacement.
OSC047420N
OSC047406N
■ Type A
■ Type B
OSC047419N
OSC047405N
■ Type A
■ Type B
SC CAN (ENG) 4.QXP 7/18/2018 5:50 PM Page 96
Page 175 of 503
497
Features of your vehicle
One-touch lane change function
To activate a one-touch lane change
function, move the turn signal lever
slightly and then release it. The lane
change signals will blink 3, 5 or 7
times.
You can choose one-touch lane
change blinking function in “One
touch turn signal” of “User setting”.
Refer to “User setting” in chapter 4.
(if equipped)
✽ ✽NOTICE
If an indicator flash is abnormally
quick or slow, the bulb may be
burned out or have a poor electrical
connection in the circuit.
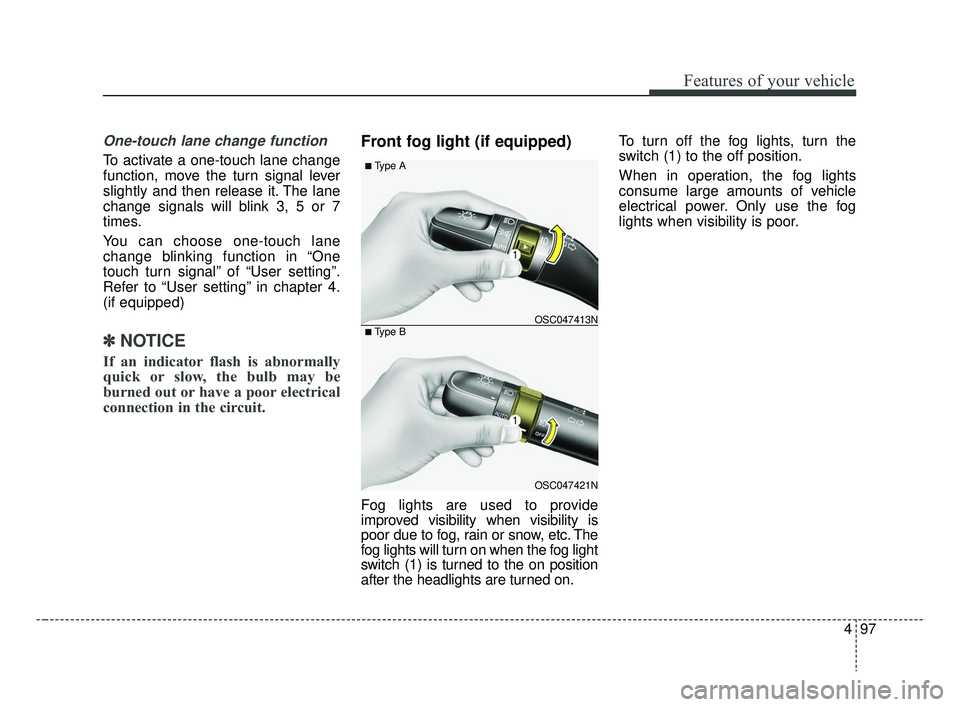
Front fog light (if equipped)
Fog lights are used to provide
improved visibility when visibility is
poor due to fog, rain or snow, etc. The
fog lights will turn on when the fog light
switch (1) is turned to the on position
after the headlights are turned on. To turn off the fog lights, turn the
switch (1) to the off position.
When in operation, the fog lights
consume large amounts of vehicle
electrical power. Only use the fog
lights when visibility is poor.
OSC047421N
OSC047413N
■ Type A
■ Type B
SC CAN (ENG) 4.QXP 7/18/2018 5:50 PM Page 97