2019 KIA K900 lights
[x] Cancel search: lightsPage 428 of 580
What to do in an emergency
26
ROAD WARNING
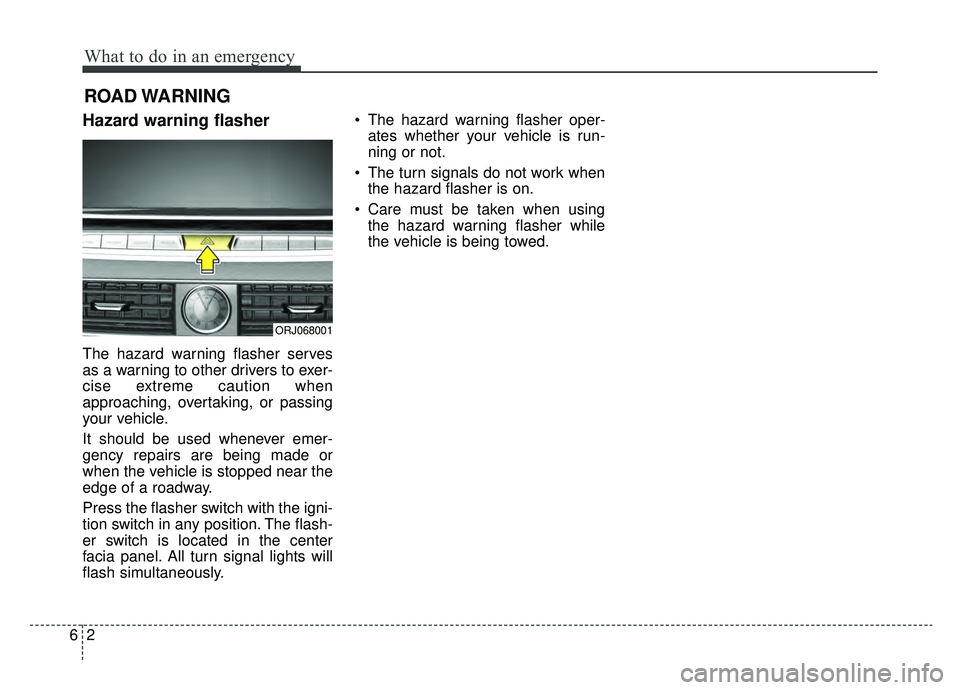
Hazard warning flasher
The hazard warning flasher serves
as a warning to other drivers to exer-
cise extreme caution when
approaching, overtaking, or passing
your vehicle.
It should be used whenever emer-
gency repairs are being made or
when the vehicle is stopped near the
edge of a roadway.
Press the flasher switch with the igni-
tion switch in any position. The flash-
er switch is located in the center
facia panel. All turn signal lights will
flash simultaneously.• The hazard warning flasher oper-
ates whether your vehicle is run-
ning or not.
The turn signals do not work when the hazard flasher is on.
Care must be taken when using the hazard warning flasher while
the vehicle is being towed.
ORJ068001
Page 463 of 580
79
Maintenance
At least monthly:
Check the coolant level in theengine coolant reservoir.
Check the operation of all exterior lights, including the stoplights, turn
signals and hazard warning flash-
ers.
Check the inflation pressures of all tires including the spare.
At least twice a year
(i.e., every Spring and Fall) :
Check the radiator, heater and air conditioning hoses for leaks or
damage.
Check the windshield washer spray and wiper operation. Clean
the wiper blades with clean cloth
dampened with washer fluid.
Check the headlight alignment.
Check the muffler, exhaust pipes, shields and clamps.
Check the lap/shoulder belts for wear and function.
Check for worn tires and loose wheel lug nuts.
At least once a year :
Clean the body and door drainholes.
Lubricate the door hinges and check the hood hinges.
Lubricate the door and hood locks and latches.
Lubricate the door rubber weather- strips.
Check the air conditioning system.
Inspect and lubricate automatic transmission linkage and controls.
Clean the battery and terminals.
Check the brake fluid level.
Page 507 of 580

753
Maintenance
FUSES
❈Left side : Normal , Right side : Blown
A vehicle’s electrical system is pro-
tected from electrical overload dam-
age by fuses.
This vehicle has 4 (or 5) fuse panels,
one located in the driver’s side panel
bolster, the other in the engine com-
partment near the battery.
If any of your vehicle’s lights, acces-
sories, or controls do not work, check
the appropriate circuit fuse. If a fuse
has blown, the element inside the
fuse will melt.
If the electrical system does not
work, first check the driver’s side
fuse panel.
If the replacement fuse blows, this
indicates an electrical problem. Avoid
using the system involved and imme-
diately consult an authorized K900
Kia dealer.
Three kinds of fuses are used: blade
type for lower amperage rating, car-tridge type, and multi fuse for higheramperage ratings.
WARNING- Fuse replace-
ment
Never replace a fuse with any- thing but another fuse of the
same rating.
A higher capacity fuse could cause damage and possibly a
fire.
Never install a wire or alu- minum foil instead of the
proper fuse - even as a tem-
porary repair. It may cause
extensive wiring damage and
a possible fire.
Do not arbitrarily modify or add-on electric wiring to the
vehicle.
CAUTION
Do not use a screwdriver or anyother metal object to removefuses because it may cause ashort circuit and damage thesystem.
OCK077071
■
Blade type
■ Cartridge type
■ Multi fuse
■ BFT
Page 510 of 580

Maintenance
56
7
3. Pull the suspected fuse straight
out. Use the removal tool provided
on the engine compartment fuse
panel cover.
4. Check the removed fuse; replace it if it is blown.
Spare fuses are provided in theengine compartment fuse panel.
5. Push in a new fuse of the same rating, and make sure it fits tightly
in the clips.
If it fits loosely, consult an authorized
K900 Kia dealer.
If you do not have a spare, use a fuse of the same rating from a circuityou may not need for operating thevehicle, such as the cigarette lighterfuse.
If the headlights or taillights, stop-
lights, courtesy lamp, day time run-
ning lights (D.R.L) do not work and
the fuses are not blown, check the
fuse panel in the engine compart-
ment. If a fuse is blown, it must be
replaced.
✽ ✽ NOTICE
If the headlamp, turn signal lamp,
or tail lamp malfunction even with-
out any problem to the lamps, have
the vehicle checked by an author-
ized K900 Kia dealer for assistance.
Fuse switch
Always set the fuse switch to the ON
position before using the vehicle.
If you move the switch to the OFF
position, some items such as audio
and digital clock must be reset and
transmitter (or smart key) may not
work properly. When the switch is
Off, the caution indicator will be dis-
played on the instrument cluster.
ORJ078017
ORJ078018
Page 532 of 580
Maintenance
78
7
✽ ✽
NOTICE
• If the light bulb or lamp connector
is removed while the lamp is still
on, the fuse box's electronic sys-
tem may log it as a malfunction.
Therefore, a lamp malfunction
incident may be recorded as a
Diagnostic Trouble Code (DTC) in
the fuse box.
• It is normal for an operating lamp to flicker momentarily. This is due
to a stabilization function of the
vehicle’s electronic control device.
If the lamp lights up normally
after momentarily blinking, then
it is functioning as normal.
However, if the lamp continues to
flicker several times or turns off
completely, there may be an error
in the vehicle’s electronic control
device. Please have the vehicle
checked by an authorized K900
Kia dealer immediately.
✽ ✽ NOTICE
We recommend that the headlight
aiming be adjusted after an accident
or after the headlight assembly is rein-
stalled at an authorized K900 Kia
dealer.
✽ ✽NOTICE
After driving in heavy rain or wash-
ing, headlamp and taillight lenses
could appear foggy. This condition is
caused by the temperature differ-
ence between the lamp inside and
outside. This is similar to the con-
densation on your windows inside
your vehicle during the rain and
doesn’t indicate a problem with your
vehicle. If the water leaks into the
lamp bulb circuitry, we recommend
that you have the vehicle checked by
an authorized K900 Kia dealer.
If you don’t have the necessary tools,
the correct bulbs and the expertise,
consult an authorized K900 Kia deal-
er. In many cases, it is difficult to
replace vehicle light bulbs because
other parts of the vehicle must be
removed before you can get to the
bulb. This is especially true if you
have to remove the headlamp
assembly to get to the bulb(s).
Removing/installing the headlamp
assembly can result in damage to
the vehicle.
If non-genuine parts or substandard
bulbs are used, it may lead to blow-
ing a fuse or other wiring damages.
Do not install extra lamps or LEDs to
the vehicle. If additional lights are
installed, it may lead to lamp mal-
functions and flickering. Additionally,
the fuse box and other writing may
be damaged.
Page 572 of 580
I7
Index
Gauges . . . . . . . . . . . . . . . . . . . . . . . . . . . . . . . . . . . . \
. 4-71
Glove box . . . . . . . . . . . . . . . . . . . . . . . . . . . . . . . . . . 4-15\
1
Glove box lamp. . . . . . . . . . . . . . . . . . . . . . . . . . . . . . 4-129
Glove box lamp (LED type) bulb replacement . . . . . . 7-83
Hazard warning flasher . . . . . . . . . . . . . . . . . . . . . . . . . . 6-2
Hazardous driving conditions . . . . . . . . . . . . . . . . . . . 5-148
Headlamp (LED type) bulb replacement . . . . . . . . . . . 7-80
Headlight (Headlamp) escort function . . . . . . . . . . . . 4-130
Headlight leveling device . . . . . . . . . . . . . . . . . . . . . . 4-121
Headlight position. . . . . . . . . . . . . . . . . . . . . . . . . . . . 4-115
Headrest (front). . . . . . . . . . . . . . . . . . . . . . . . . . . . . . . 3-16
Heated steering wheel. . . . . . . . . . . . . . . . . . . . . . . . . . 4-56
High - beam operation . . . . . . . . . . . . . . . . . . . . . . . . 4-116
High beam assist . . . . . . . . . . . . . . . . . . . . . . . . . . . . . 4-117
High mounted stop lamp (LED type) bulb replacement . . . . . . . . . . . . . . . . . . . . . . . . . . . . . . . 7-81
Highway driving . . . . . . . . . . . . . . . . . . . . . . . . . . . . . 5-151
Hill-start Assist Control (HAC) . . . . . . . . . . . . . . . . . . 5-51
Hood . . . . . . . . . . . . . . . . . . . . . . . . . . . . . . . . . . . . \
. . . 4-42
Horn . . . . . . . . . . . . . . . . . . . . . . . . . . . . . . . . . . . . \
. . . 4-57 Immobilizer system . . . . . . . . . . . . . . . . . . . . . . . . . . . 4-12
Important safety precautions . . . . . . . . . . . . . . . . . . . . . 3-2
Indicator lights . . . . . . . . . . . . . . . . . . . . . . . . . . . . . . 4-100
Inflation condition (Air bags) . . . . . . . . . . . . . . . . . . . . 3-71
Inner panel fuse replacement . . . . . . . . . . . . . . . . . . . . 7-55
Inside rearview mirror . . . . . . . . . . . . . . . . . . . . . . . . . 4-58
Installing a Child Restraint System (CRS) . . . . . . . . . . 3-43
Instrument cluster . . . . . . . . . . . . . . . . . . . . . . . . . . . . . 4-69
LCD window control . . . . . . . . . . . . . . . . . . . . . . . . 4-70
Gauges . . . . . . . . . . . . . . . . . . . . . . . . . . . . . . . . . . . 4-\
71
LCD windows . . . . . . . . . . . . . . . . . . . . . . . . . . . . . 4-76
LCD modes . . . . . . . . . . . . . . . . . . . . . . . . . . . . . . . 4-80
Service mode . . . . . . . . . . . . . . . . . . . . . . . . . . . . . . 4-82
Set Up mode . . . . . . . . . . . . . . . . . . . . . . . . . . . . . . . 4-84
Trip computer . . . . . . . . . . . . . . . . . . . . . . . . . . . . . . 4-76
Trip modes . . . . . . . . . . . . . . . . . . . . . . . . . . . . . . . . 4-76
Warning and indicator lights . . . . . . . . . . . . . . . . . . 4-91
Warning lights . . . . . . . . . . . . . . . . . . . . . . . . . . . . . 4-91
Indicator lights . . . . . . . . . . . . . . . . . . . . . . . . . . . . 4-100
Instrument panel overview . . . . . . . . . . . . . . . . . . . . . . . 2-5
Interior care. . . . . . . . . . . . . . . . . . . . . . . . . . . . . . . . . . 7-89\
Interior features. . . . . . . . . . . . . . . . . . . . . . . . . . . . . . 4-153 Cup holder . . . . . . . . . . . . . . . . . . . . . . . . . . . . . . . 4-153
Seat warmer . . . . . . . . . . . . . . . . . . . . . . . . . . . . . . 4-154
Air ventilation seat . . . . . . . . . . . . . . . . . . . . . . . . . 4-155
Sunvisor . . . . . . . . . . . . . . . . . . . . . . . . . . . . . . . . . 4-156
H
GI
Page 579 of 580
Vacuum crankcase ventilation hoses . . . . . . . . . . . . . . 7-18
Valve clearance . . . . . . . . . . . . . . . . . . . . . . . . . . . . . . . 7-18
Vanity mirror lamp . . . . . . . . . . . . . . . . . . . . . . . . . . . 4-128
Vanity mirror lamp (front) (LED type) bulb replacement . . . . . . . . . . . . . . . . . . . . . . . . . . . . . . . 7-82
Vapor hose and fuel filler cap . . . . . . . . . . . . . . . . . . . . 7-17
Vehicle load limit . . . . . . . . . . . . . . . . . . . . . . . . . . . . 5-157 Tire and loading information label. . . . . . . . . . . . . 5-157
Certification label . . . . . . . . . . . . . . . . . . . . . . . . . . 5-160
Vehicle Stability Management (VSM) . . . . . . . . . . . . . 5-49
Vehicle weight . . . . . . . . . . . . . . . . . . . . . . . . . . . . . . 5-161
Warning and Indicator lights . . . . . . . . . . . . . . . . . . . . 4-91
Warning lights . . . . . . . . . . . . . . . . . . . . . . . . . . . . . . . . 4-91
Warning Messages . . . . . . . . . . . . . . . . . . . . . . . . . . . . 4-85
Washer fluid . . . . . . . . . . . . . . . . . . . . . . . . . . . . . . . . . 7-27 Checking the washer fluid level . . . . . . . . . . . . . . . . 7-27
Welcome system . . . . . . . . . . . . . . . . . . . . . . . . . . . . . 4-130 Headlight (Headlamp) escort function . . . . . . . . . . 4-130
Interior light . . . . . . . . . . . . . . . . . . . . . . . . . . . . . 4-130
Pocket lamp . . . . . . . . . . . . . . . . . . . . . . . . . . . . . . 4-130
Wheel alignment and tire balance . . . . . . . . . . . . . . . . 7-41
Wheel replacement . . . . . . . . . . . . . . . . . . . . . . . . . . . . 7-43 Windows . . . . . . . . . . . . . . . . . . . . . . . . . . . . . . . . . . . . \
4-37
Auto up/down window . . . . . . . . . . . . . . . . . . . . . . . 4-39
Power window lock button. . . . . . . . . . . . . . . . . . . . 4-40
Windshield defrosting and defogging. . . . . . . . . . . . . 4-146 Automatic climate control system . . . . . . . . . . . . . 4-146
Defogging logic . . . . . . . . . . . . . . . . . . . . . . . . . . . 4-147
Windshield washers . . . . . . . . . . . . . . . . . . . . . . . . . . 4-125
Windshield wipers . . . . . . . . . . . . . . . . . . . . . . . . . . . 4-123
Winter driving . . . . . . . . . . . . . . . . . . . . . . . . . . . . . . . 5-152 Snow tires . . . . . . . . . . . . . . . . . . . . . . . . . . . . . . . . 5-152
Tire chains . . . . . . . . . . . . . . . . . . . . . . . . . . . . . . . 5-153
Wiper blades . . . . . . . . . . . . . . . . . . . . . . . . . . . . . . . . . 7-31 Blade inspection . . . . . . . . . . . . . . . . . . . . . . . . . . . . 7-31
Blade replacement . . . . . . . . . . . . . . . . . . . . . . . . . . 7-31
Wipers and washers . . . . . . . . . . . . . . . . . . . . . . . . . . 4-123 Windshield wipers . . . . . . . . . . . . . . . . . . . . . . . . . 4-123
Windshield washers . . . . . . . . . . . . . . . . . . . . . . . . 4-125
Wireless smart phone charging system . . . . . . . . . . . 4-159
I14
Index
W
V