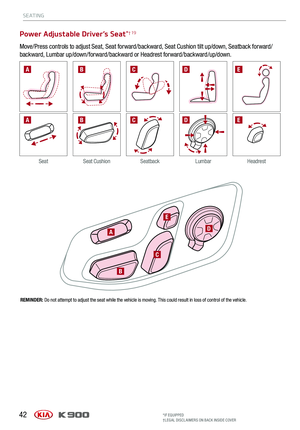
Page 33 of 64
CENTER PANEL
31
Provides access to all navigation and audio system control unit
features.
A Controller – In addition to the touchscreen, the controller
serves as a means for navigating K900’s UVO luxe Services with
Navigation. The controller has multiple functions: A scroll knob –
for scrolling the keyboard and menus and zooming in and out on
the map screen; and a push button (up, down, left, right, in) – for
selecting the highlighted feature
B Home – Displays the audio control unit’s Home menu which
provides access to the following options: Map, Navigation,
Radio, Media, Data Services, Phone Projection, Phone, UVO,
Climate, Voice Memo, Favorites and Setup
C Menu – Provides access to additional functions when available
D Back – Returns to the previous screen
Driver Information System (DIS) Controls
BACKMENUHOME
OFFVIEW
DRIVE
MODE AUTO
HOLD
P
A
BCD
Page 34 of 64

CENTER PANEL
32
12V1BOW
USB10:2812V18OW
For more information on the Aux/USB/iPod® Port, Power Outlets and USB Charger, refer to the Owner’s Manual.
REMINDERS:
-
Using the power outlets (accessory plugs) for prolonged periods of time with the Engine Start /Stop button in the ACC position (Engine OFF ) may cause the battery to discharge
-
Use manufacturer cables only that came with your device. Third party cables may cause damage to device. It is recommended to always update your phone to the latest operating system release
Quick Tip
The power outlets are inactive when ignition is in the OFF position.
A
A
C
B
(Located in center console in front of gearshift)
Aux/USB/iPod® Ports, Power Outlets & USB Charger
Power Outlets A: Use the power outlets for mobile phones
and other devices designed to operate on a 12V (180W max)
power outlet.
Aux/USB/iPod® Port B: Use the Aux port to connect audio
devices and the USB port to connect USB audio devices,
smartphones and iPod® devices.
USB Charger C: Devices can be recharged using a USB
cable. The Engine Start /Stop button needs to in the ACC/ON/
START position to operate the USB Charger.
Clock
Center Panel Clock Setup:
Clock setup is completed through the navigation system
screen. See below or refer to the Car Navigation System
Owner’s Manual for more information.
UVO luxe with Premium Navigation System Clock Setup:
Select SETUP on the audio control unit. Select Date/ Time.
Select TIME SET TINGS and set the time, then select OK.
XIIIIIIIIIIIIVVIVIIVIIIVIIIIXXI
REMINDERS:
§ Daylight Savings must be enabled or disabled in the Clock Settings screen
§ The Center Panel Digital Clock and Navigation System Clock are not synchronized and may differ slightly
Refer to the Car Multimedia System User’s Manual for more information.
Page 35 of 64

CENTER PANEL
33ALWAYS CHECK THE OWNER’S MANUAL FOR COMPLE TE OPERATING INFORMATION AND SAFETY WARNINGS.
To access vehicle settings, go to Vehicle Settings Mode on the audio control unit by pressing the Settings
menu when the vehicle is at a standstill and with the Engine Start /Stop button in the ON position. Scroll
through the selections by rotating the Center Panel DIS Control knob located below the gear shift or use the
touch screen.
User Settings Modes:
Head-Up Display (HUD)*: Enable HUD, Display Height, Rotation, Brightness, Contents Selection, Speed Size, Speed Color
Driving Assist: Smart Cruise Control with Stop & Go Response, Driver Attention Warning, Lane Keeping Assist*, Forward Collision-Avoidance Assist, Forward Collision Warning (FCW ), Blind-Spot Collision Warning* Rear Cross-Traffic Collision Warning, Blind-Spot Collision Warning* Sound
Door/Trunk: Smart Trunk
Lights: One-Touch Turn Signal, Headlamp Delay, Ambient Light Brightness, Ambient Light Color
Convenience: Seat Easy Access*, Steering Easy Access*, Welcome Mirror/Light*, Wiper/Light Display*, Gear Position Pop-Up*, Icy Road Warning*
Service Interval: Service Interval On/Off, Adjust Service Interval, Reset
Cluster: Fuel Economy Auto Reset, Fuel Economy Unit, Temperature Unit, Tire Pressure Unit, Torque Unit*
General: Choose the language
Reset: Reset User Settings to factory default
Vehicle Settings Mode (User Settings)
MAPN AV
RADIO MEDIA
Vehicle
Navigation
Bluetooth
Page 36 of 64

34
12V
USB
10:2818OW
REMINDERS:
§ The smartphone must be a compatible phone with QI function available
§ Avoid placing other metal items in the bin while charging as to not impede the charging area
§ This vehicle is equipped with wireless charging technology which allows for a device to be charged using inductive charging, however, device compatibility varies. See your owner’s manual for more detailed information and the back page for legal disclaimers
§ Inductive charging systems are less efficient than conventional charging through cable. As a result, higher device operating temperatures may be experienced during use
§ Charging Performance – Device position on the wireless charging system can affect charging performance. Other factors that may affect the charging rate includes foreign objects, such as coins or pens, and phone case thickness
§ Typically this feature will operate unless ignition is on or in the ACC position
Wireless Smartphone Charging System*
1. Slide open tray cover A
2. Place a compatible smartphone on the center of the
charging pad B
3. Indicator light C will change to amber once the wireless
charging begins
4. Once charging is complete, the orange light C will change
to green
B
A
C
www.youtube.com/KiaFeatureVideos
WIRELESS SMARTPHONE CHARGING VIDEO
To view a video on your mobile device, snap this QR Code or visit the listed website. Refer to page 2 for more information.
CENTER PANEL
*IF EQUIPPED
CENTER PANEL
*IF EQUIPPED
Page 37 of 64
 Climate Control button
B Front Windshield Defrost button
C Rear Window Defrost button
D Air Conditioning button
E Re")
35
AUTOOFFA/C
SYNC
PASSENGER
AIR BAGOFF
ALMBGH
I
CD
EF
J
A AUTO (Automatic) Climate Control button
B Front Windshield Defrost button
C Rear Window Defrost button
D Air Conditioning button
E Recirculated Air button
F Driver Mode Selection button
G System OFF button
H Fan Speed Control buttons
I Passenger Mode Select button
J SYNC (Synchronize All Zones) Temperature
Control button
Automatic Climate Control System
Climate Control Auto Function
Press AUTO A to select full auto operation. In
AUTO mode the driver and front passenger have
full control of their own temperature zones. The
mode, fan speed, air intake and air conditioning
will activate and adjust accordingly to achieve the
temperature settings for each zone.
To set temperatures:
§ Press L to set the driver’s zone temperature
§ Press M to set the front passenger’s zone
temperature
REMINDERS:
§
Pressing any button during AUTO operation will deactivate the AUTO function and switch to manual mode, except for Temperature Control
§ When in AUTO mode, Air Flow Mode and Fan Speed do not display on the Climate Control Display
§ Cold or warm ambient air may flow in through vents if Recirculated Air button is not pressed ON (LED lit).
Front Climate Control
Defrost Outside Windshield
1. Set temperature to hot L
2. Press the front defrost button B
Defog Inside Windshield
1. Set desired fan speed H
2. Set desired temperature L
3. Press the front defrost button B
Face-Level F lo o r- L evel
Bi-Level Floor/Defrost-Level
Air Flow Modes
To select air flow modes, press the Mode Select
button F:
Tri-Zone Climate Control
Pressing the SYNC button J synchronizes both
climate control zones (driver and passenger) to
the driver's temperature control.
CENTER PANEL
*IF EQUIPPED ALWAYS CHECK THE OWNER’S MANUAL FOR COMPLE TE OPER ATING INFORMATION AND SAFE T Y WARNINGS.
Page 38 of 64

REMINDER: Your automatic climate control system may differ from the image. See your Owner’s Manual for more details.
Quick Tips
-
Keep inside glass")
36
Automatic Climate Control System (continued)
REMINDER: Your automatic climate control system may differ from the image. See your Owner’s Manual for more details.
Quick Tips
-
Keep inside glass as clean as possible to help reduce window fogging
-
Defrost Mode activates A /C and opens the fresh air vent to help dehumidify the air and improve defroster performance
Rear Climate Control
A Fan Speed Control knob
B Rear Climate Control OFF button
C Rear Temperature Control knob
D AUTO (Automatic) Climate Control button
E Climate Control RE AR LOCK button
Turn the rear temperature control knob C to set the rear
passenger’s zone temperature.
The rear seat, rear audio and rear climate controls can be
activated or deactivated by using the LOCK button E .
RE AR LOCK settings can also be changed in the audio
control unit settings.
To set from the audio control unit:
§ Press the CLIMATE button
§ Deselect the Rear Climate option
LOCK settings return to the default setting when ignition is
cycled.
REMINDER: If the rear climate controls have been deactivated through the audio control unit, they must be activated the same way.
LOCK
OFF
AUTOFRONTFRONT
ABCD
E
CENTER PANEL
*IF EQUIPPED
CENTER PANEL
*IF EQUIPPED
Page 39 of 64

Quick Tips
§ Press the Unlock button A when shifting from P (Park) to any gear
§ The instrument cluster and the light on top of the shift lever identifi")
37
Automatic Transmission (Shift by Wire)
Quick Tips
§ Press the Unlock button A when shifting from P (Park) to any gear
§ The instrument cluster and the light on top of the shift lever identifies the gear the vehicle is currently in
REMINDERS:
§
When in P (Park), if the Unlock button is not pressed while shifting, the transmission does not shift
§
If the vehicle is turned off while in Neutral without shifting into Park, it will remain in Neutral until the driver’s door is opened. At that point it will automatically shift into Park
§
If going through a car wash, remind the attendant to keep the vehicle in Neutral (N) and keep the engine running. Also, disable the power Trunk lid control, turn off the auto rain sensing wipers and fold in the mirrors
To shift into any gear from Park, depress the brake pedal,
then press the Unlock button A, located on the side of the
gear shift lever, and shift.
P: Park – To shift into Park from any gear, press the P button B on the gear shift while vehicle is stationary and the brake
pedal is depressed (Shift by Wire only).
R: Reverse – To shift into Reverse, depress brake pedal,
press the Unlock button A, and move the shift lever forward
twice to skip over Neutral and into Reverse.
N: Neutral
D: Drive
Paddle Shifters: With the gear shift in Drive, pull the paddle
shifter C to manually change gears.
[+]: Manual Mode Upshift
[–]: Manual Mode Downshift
REMINDERS:
§ Press and hold the [+} right paddle shifter to return to Automatic mode
§ When in Manual mode, pulling the left and right paddle shifters at the same time will NOT shift gears
A
B
C
C
CENTER PANEL
*IF EQUIPPED ALWAYS CHECK THE OWNER’S MANUAL FOR COMPLE TE OPER ATING INFORMATION AND SAFE T Y WARNINGS.
Page 40 of 64
")
38
ELECTRIC PARKING BRAKE / AUTO HOLD VIDEO
To view a video on your mobile device, snap this QR Code or visit the listed website. Refer to page 2 for more information.
The Electric Parking Brake (EPB) system utilizes an electric
motor to engage the parking brake.
Applying the Parking Brake
Depress the brake pedal and pull up the EPB switch A.
Ensure that the indicator light is illuminated on the
instrument cluster.
Releasing the Parking Brake
The EPB will automatically release when the shifter is placed
in Reverse or Drive. To release EPB manually, depress the
brake pedal, then press the EPB switch A, with the ignition
switch in the ON position. Ensure that the indicator light
i s O F F.
Electric Parking Brake (EPB)
Quick Tips
§
Pull up and hold EPB switch again to increase brake pressure if parked on a decline or incline.
§ When leaving your keys with parking lot attendants or valet, make sure to inform them how to operate the EPB
§ If parked on a steep incline, pull up the EPB switch for more than 3 seconds for a firmer EPB application
REMINDERS:
§ As a bulb check, the EPB malfunction indicator will illuminate for approximately 3 seconds when the ignition switch is turned ON
§ If the warning light does not illuminate temporarily or remains continuously lit, take your vehicle to an authorized Kia dealer and have the system checked
§ The EPB should not be operated while the vehicle is moving
§ A click or electric brake motor sound may be heard while operating or releasing the EPB. These conditions are normal and indicate that the EPB is functioning properly
www.youtube.com/KiaFeatureVideos
REMINDER: If the steering wheel becomes too warm, turn the system off. The heated steering wheel may cause burns even at low temperatures, especially if used for long periods of time.
Heated Steering Wheel
While the Engine Start /Stop button is in the ON position, press B to turn the steering wheel
heater ON. The button indicator will illuminate.
The steering wheel heater will turn off automatically in 30 minutes, or when the button is pressed
again to deactivate.
PULL
AUTOOFFA/C
SYNC
PASSENGER
AIR BAGOFF
A
B
CENTER PANEL
*IF EQUIPPED
CENTER PANEL
*IF EQUIPPED