2019 JEEP WRANGLER UNLIMITED radio
[x] Cancel search: radioPage 166 of 348

• When you turn ParkSense OFF, the instru-
ment cluster display will read
“PARKSENSE OFF.” Furthermore, once
you turn ParkSense OFF, it remains off until
you turn it on again, even if you cycle the
ignition.
• ParkSense, when on, will reduce the vol-
ume of the radio when it is sounding a tone.
• Clean the ParkSense sensors regularly, tak-
ing care not to scratch or damage them.
The sensors must not be covered with ice,
snow, slush, mud, dirt or debris. Failure to
do so can result in the system not working
properly. The ParkSense system might not
detect an obstacle behind the fascia/
bumper, or it could provide a false indica-
tion that an obstacle is behind the fascia/
bumper.
• Use the ParkSense switch to turn the
ParkSense system OFF if objects such as
bicycle carriers, trailer hitches, etc. are
placed within 12 inches (30 cm) from the
rear fascia/bumper. Failure to do so can
result in the system misinterpreting a close
object as a sensor problem, causing the“PARKSENSE UNAVAILABLE SERVICE
REQUIRED” message to be displayed in
the instrument cluster display.
• The operation of the rear sensors is auto-
matically deactivated when the trailer's
electric plug is inserted in the vehicle's tow
hook socket. The rear sensors are automati-
cally reactivated when the trailer's cable
plug is removed.
WARNING!
• Drivers must be careful when backing up
even when using ParkSense. Always
check carefully behind your vehicle,
look behind you, and be sure to check
for pedestrians, animals, other vehicles,
obstructions, and blind spots before
backing up. You are responsible for
safety and must continue to pay atten-
tion to your surroundings. Failure to do
so can result in serious injury or death.
• Before using ParkSense, it is strongly
recommended that the ball mount and
hitch ball assembly is disconnected
from the vehicle when the vehicle is not
used for towing. Failure to do so can
WARNING!
result in injury or damage to vehicles or
obstacles because the hitch ball will be
much closer to the obstacle than the
rear fascia when the loudspeaker sounds
the continuous tone. Also, the sensors
could detect the ball mount and hitch
ball assembly, depending on its size and
shape, giving a false indication that an
obstacle is behind the vehicle.
CAUTION!
• ParkSense is only a parking aid and it is
unable to recognize every obstacle, in-
cluding small obstacles. Parking curbs
might be temporarily detected or not
detected at all. Obstacles located above
or below the sensors will not be detected
when they are in close proximity.
• The vehicle must be driven slowly when
using ParkSense in order to be able to
stop in time when an obstacle is de-
tected. It is recommended that the
driver looks over his/her shoulder when
using ParkSense.STARTING AND OPERATING
164
Page 184 of 348

Cavity Cartridge Fuse Micro Fuse Description
F05 – 5 Amp Tan Security Gateway
(*)
F06 – – Spare
F07 – 15 Amp Blue Low Temp Radiator Cooling Pump (LTR) — If Equipped
(*)
F08 – 15 Amp Blue Trans Control Module TCM-8HP CYGNUS
(*)
F09 – – Spare
F10 – 15 Amp Blue Key Ignition Node (KIN)/Radio Frequency Hub(RF HUB)/
Electric Steering Column Lock (ESCL)
(*)
F11 – 10 Amp Red UCI Port (USB & AUX)
F12 – 25 Amp Clear HIFI Amplifier
F13 – – Spare
F14 – – Spare
F15 – 15 Amp Blue Instrument Panel Cluster (IPC)/Switch Bank-Heavy Duty
Electrical Pkg (SWITCH BANK-HD ELEC)
(*)
F16 – – Spare
F17 – – Spare
F18 – 10 Amp Red Air Conditioning Clutch (AC CLUTCH)
(*)
F19 – – Spare
F20 30 Amp Pink – Central Body Controller (CBC) 1-INTERIOR LIGHTS
F21 – 20 Amp Yellow REAR WIPER
IN CASE OF EMERGENCY
182
Page 190 of 348

Cavity Cartridge Fuse Micro Fuse Description
F90 20 Amp Blue – TRAILER TOW PARK LMP — If Equipped
F91 – 20 Amp Yellow HORN
F92 40 Amp Green – HD ACCY #2 — If Equipped
(*)
F93 40 Amp Green – HD ACCY #1 — If Equipped
(*)
F94 – 10 Amp Red Tire Pressure Monitor (TPM)/RF Hub system (CORAX)
(*)
F95 – – Spare
F96 – 10 Amp Red PWR MIRROR SW
F97 – 20 Amp Yellow RADIO/TBM
F98 – 10 Amp Red SW BANK-HD ELEC/OFF ROAD
(*)
F99 – – Spare
F100 30 Amp Pink – ESC-ECU & VALVES
(*)
F101 30 Amp Pink – DriveTrain Control Module (DTCM)
(*)
F102 – 15 Amp Blue DUAL USB PORT
F103 – 15 Amp Blue HD ACCY #3 — If Equipped
(*)
F104 – 15 Amp Blue PPU COOL PUMP — If Equipped
(*)
IN CASE OF EMERGENCY
188
Page 199 of 348

CAUTION!
Do not use a portable battery booster pack
or any other booster source with a system
voltage greater than 12 Volts or damage to
the battery, starter motor, alternator or
electrical system may occur.
NOTE:
When using a portable battery booster pack,
follow the manufacturer's operating instruc-
tions and precautions.
Preparations For Jump Start
The battery in your vehicle is located in the
left rear of the engine compartment, behind
the Power Distribution Center.NOTE:
The positive battery post is covered with a
protective cap. Lift up on the cap to gain
access to the post.
WARNING!
• Take care to avoid the radiator cooling
fan whenever the hood is raised. It can
start anytime the ignition switch is ON.
You can be injured by moving fan blades.
WARNING!
• Remove any metal jewelry such as rings,
watch bands and bracelets that could
make an inadvertent electrical contact.
You could be seriously injured.
• Batteries contain sulfuric acid that can
burn your skin or eyes and generate
hydrogen gas which is flammable and
explosive. Keep open flames or sparks
away from the battery.
NOTE:
Never use a fast battery charger to start the
engine, as this could damage the electronic
systems of your vehicle, particularly the igni-
tion and engine fuel supply control units.
1. Apply the parking brake, shift the auto-
matic transmission into PARK and turn
the ignition OFF.
2. Turn off the heater, radio, and all unnec-
essary electrical accessories.
3. If using another vehicle to jump start the
battery, park the vehicle within the jumper
cable’s reach, apply the parking brake and
make sure the ignition is OFF.
Positive Battery Post
197
Page 245 of 348

Plastic And Coated Parts
Use a specific product to clean vinyl
upholstery.
CAUTION!
• Direct contact of air fresheners, insect
repellents, suntan lotions, or hand sani-
tizers to the plastic, painted, or deco-
rated surfaces of the interior may cause
permanent damage. Wipe away immedi-
ately.
• Damage caused by these type of prod-
ucts may not be covered by your New
Vehicle Limited Warranty.
Cleaning Plastic Instrument Cluster Lenses
The lenses in front of the instruments in this
vehicle are molded in clear plastic. When
cleaning the lenses, care must be taken to
avoid scratching the plastic.1. Clean with a wet soft cloth. A mild soap
solution may be used, but do not use high
alcohol content or abrasive cleaners. If
soap is used, wipe clean with a clean
damp cloth.
2. Dry with a soft cloth.
Leather Parts
Your leather upholstery can be best preserved
by regular cleaning with a damp soft cloth.
Small particles of dirt can act as an abrasive
and damage the leather upholstery and
should be removed promptly with a damp
cloth. Care should be taken to avoid soaking
your leather upholstery with any liquid.
Please do not use polishes, oils, cleaning
fluids, solvents, detergents, or ammonia-
based cleaners to clean your leather uphol-
stery. Application of a leather conditioner is
not required to maintain the original condi-
tion.
NOTE:
If equipped with light colored leather, it tends
to show any foreign material, dirt, and fabric
dye transfer more so than darker colors. The
leather is designed for easy cleaning.
CAUTION!
Do not use Alcohol and Alcohol-based
and/or Ketone based cleaning products to
clean leather seats, as damage to the seat
may result.
Glass Surfaces
All glass surfaces should be cleaned on a
regular basis with any commercial
household-type glass cleaner. Never use an
abrasive type cleaner. Use caution when
cleaning the inside rear window equipped
with electric defrosters or windows equipped
with radio antennas. Do not use scrapers or
other sharp instruments that may scratch the
elements.
When cleaning the rear view mirror, spray
cleaner on the towel or cloth that you are
using. Do not spray cleaner directly on the
mirror.
243
Page 265 of 348

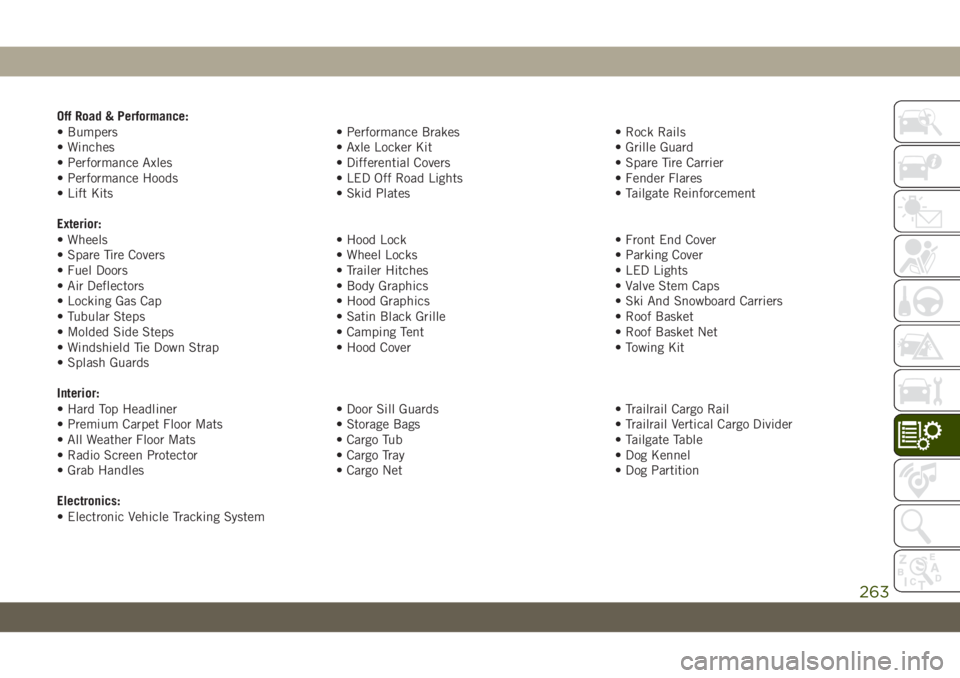
Off Road & Performance:
• Bumpers • Performance Brakes • Rock Rails
• Winches • Axle Locker Kit • Grille Guard
• Performance Axles • Differential Covers • Spare Tire Carrier
• Performance Hoods • LED Off Road Lights • Fender Flares
• Lift Kits • Skid Plates • Tailgate Reinforcement
Exterior:
• Wheels • Hood Lock • Front End Cover
• Spare Tire Covers • Wheel Locks • Parking Cover
• Fuel Doors • Trailer Hitches • LED Lights
• Air Deflectors • Body Graphics • Valve Stem Caps
• Locking Gas Cap • Hood Graphics • Ski And Snowboard Carriers
• Tubular Steps • Satin Black Grille • Roof Basket
• Molded Side Steps • Camping Tent • Roof Basket Net
• Windshield Tie Down Strap • Hood Cover • Towing Kit
• Splash Guards
Interior:
• Hard Top Headliner • Door Sill Guards • Trailrail Cargo Rail
• Premium Carpet Floor Mats • Storage Bags • Trailrail Vertical Cargo Divider
• All Weather Floor Mats • Cargo Tub • Tailgate Table
• Radio Screen Protector • Cargo Tray • Dog Kennel
• Grab Handles • Cargo Net • Dog Partition
Electronics:
• Electronic Vehicle Tracking System
263
Page 267 of 348

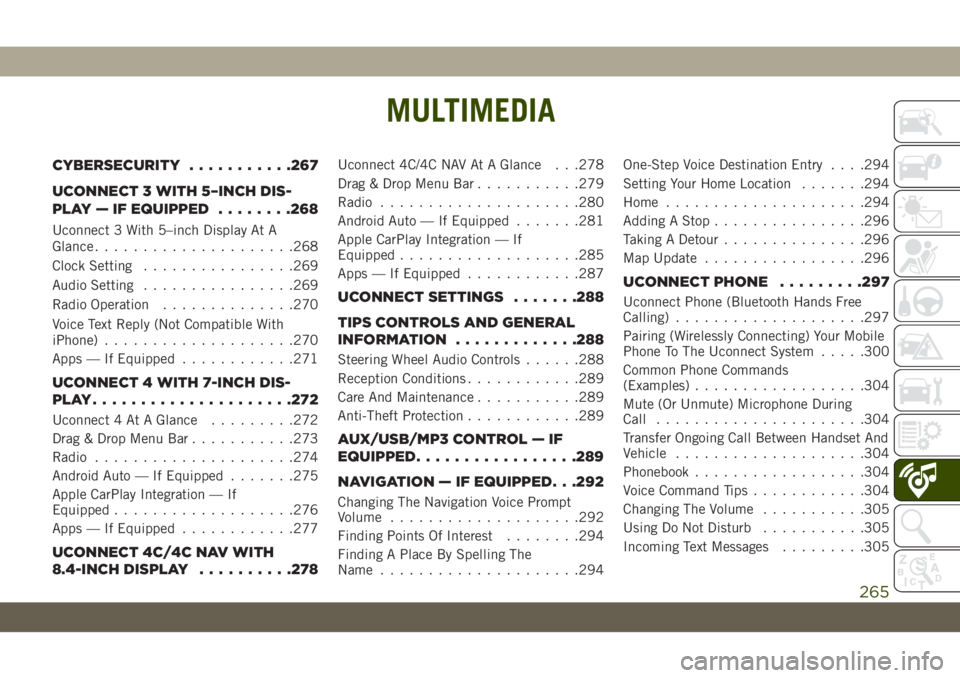
MULTIMEDIA
CYBERSECURITY...........267
UCONNECT 3 WITH 5–INCH DIS-
PLAY — IF EQUIPPED........268
Uconnect 3 With 5–inch Display At A
Glance.....................268
Clock Setting................269
Audio Setting................269
Radio Operation..............270
Voice Text Reply (Not Compatible With
iPhone)....................270
Apps — If Equipped............271
UCONNECT 4 WITH 7-INCH DIS-
PLAY.....................272
Uconnect 4 At A Glance.........272
Drag & Drop Menu Bar...........273
Radio.....................274
Android Auto — If Equipped.......275
Apple CarPlay Integration — If
Equipped...................276
Apps — If Equipped............277
UCONNECT 4C/4C NAV WITH
8.4-INCH DISPLAY..........278
Uconnect 4C/4C NAV At A Glance . . .278
Drag & Drop Menu Bar...........279
Radio.....................280
Android Auto — If Equipped.......281
Apple CarPlay Integration — If
Equipped...................285
Apps — If Equipped............287
UCONNECT SETTINGS.......288
TIPS CONTROLS AND GENERAL
INFORMATION.............288
Steering Wheel Audio Controls......288
Reception Conditions............289
Care And Maintenance...........289
Anti-Theft Protection............289
AUX/USB/MP3 CONTROL — IF
EQUIPPED.................289
NAVIGATION — IF EQUIPPED. . .292
Changing The Navigation Voice Prompt
Volume....................292
Finding Points Of Interest........294
Finding A Place By Spelling The
Name.....................294One-Step Voice Destination Entry. . . .294
Setting Your Home Location.......294
Home.....................294
Adding A Stop................296
Taking A Detour...............296
Map Update.................296
UCONNECT PHONE.........297
Uconnect Phone (Bluetooth Hands Free
Calling)....................297
Pairing (Wirelessly Connecting) Your Mobile
Phone To The Uconnect System.....300
Common Phone Commands
(Examples)..................304
Mute (Or Unmute) Microphone During
Call......................304
Transfer Ongoing Call Between Handset And
Vehicle....................304
Phonebook..................304
Voice Command Tips............304
Changing The Volume...........305
Using Do Not Disturb...........305
Incoming Text Messages.........305
MULTIMEDIA
265
Page 268 of 348

Helpful Tips And Common Questions To
Improve Bluetooth Performance With Your
Uconnect System..............306
UCONNECT VOICE RECOGNITION
QUICK TIPS...............307
Introducing Uconnect...........307
Get Started..................308Basic Voice Commands...........309
Radio.....................309
Media.....................309
Phone.....................310
Voice Text Reply...............311
Climate....................312Navigation (4C NAV)............312
Siri Eyes Free — If Equipped......313
Using Do Not Disturb............313
Android Auto — If Equipped.......314
Apple CarPlay — If Equipped.......314
Additional Information...........315MULTIMEDIA
266