Page 207 of 378
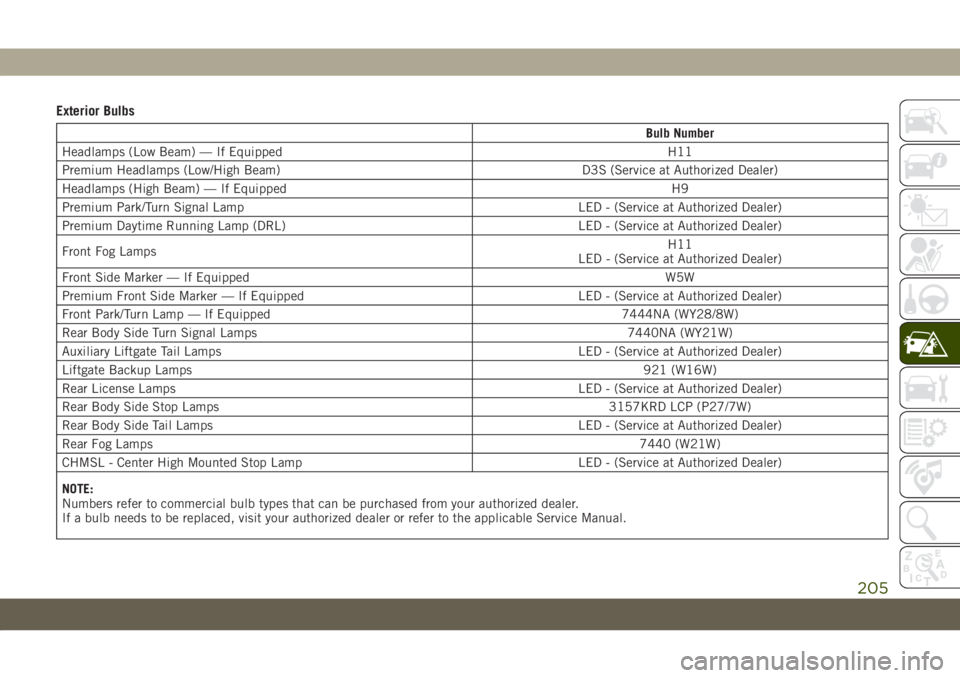
Exterior Bulbs
Bulb Number
Headlamps (Low Beam) — If Equipped H11
Premium Headlamps (Low/High Beam) D3S (Service at Authorized Dealer)
Headlamps (High Beam) — If Equipped H9
Premium Park/Turn Signal Lamp LED - (Service at Authorized Dealer)
Premium Daytime Running Lamp (DRL) LED - (Service at Authorized Dealer)
Front Fog LampsH11
LED - (Service at Authorized Dealer)
Front Side Marker — If EquippedW5W
Premium Front Side Marker — If Equipped LED - (Service at Authorized Dealer)
Front Park/Turn Lamp — If Equipped 7444NA (WY28/8W)
Rear Body Side Turn Signal Lamps 7440NA (WY21W)
Auxiliary Liftgate Tail Lamps LED - (Service at Authorized Dealer)
Liftgate Backup Lamps921 (W16W)
Rear License Lamps LED - (Service at Authorized Dealer)
Rear Body Side Stop Lamps 3157KRD LCP (P27/7W)
Rear Body Side Tail Lamps LED - (Service at Authorized Dealer)
Rear Fog Lamps7440 (W21W)
CHMSL - Center High Mounted Stop Lamp LED - (Service at Authorized Dealer)
NOTE:
Numbers refer to commercial bulb types that can be purchased from your authorized dealer.
If a bulb needs to be replaced, visit your authorized dealer or refer to the applicable Service Manual.
205
Page 208 of 378

Bulb Replacement
High Intensity Discharge Headlamps (HID)
—
If Equipped
The headlamps are a type of high voltage
discharge tube. High voltage can remain in
the circuit even with the headlamp switch off
and the key removed.Because of this, you
should not attempt to service a headlamp bulb
yourself. If a headlamp bulb fails, take your
vehicle to an authorized dealer for service.
WARNING!
A transient high voltage occurs at the bulb
sockets of High Intensity Discharge (HID)
headlamps when the headlamp switch is
turned ON. It may cause serious electrical
shock or electrocution if not serviced prop-
erly. See your authorized dealer for
service.NOTE:
On vehicles equipped with High Intensity
Discharge (HID) headlamps, when the head-
lamps are turned on, there is a blue hue to
the lamps. This diminishes and becomes
more white after approximately 10 seconds,
as the system charges.
Halogen Headlamps — If Equipped
NOTE:
We advise referring to an authorized dealer.
NOTE:
Lens fogging can occur under certain atmo-
spheric conditions. This will usually clear as
atmospheric conditions change to allow the
condensation to change back to vapor. Turn-
ing the lamps on will usually accelerate the
clearing process.
1. Open the hood.
2. Access the back of the headlamp.NOTE:
• The air filter housing must be removed.
• The windshield washer reservoir may
need to be rotated out of the way by
removing the fastener.
• Coolant reservoir (if equipped) will
need to be repositioned by removing
the fasteners, and moving the unit out
of the way.
3. To access the low beam bulb you must
remove the rubber boot seal from back-
side of the lamp housing.
NOTE:
Ensure the rubber boot is properly rein-
stalled to prevent water and moisture from
entering the lamp.
CAUTION!
•Do not contaminate the bulb glass by
touching it with your fingers or by allow-
ing it to contact other oily surfaces.
Shortened bulb life will result.
IN CASE OF EMERGENCY
206
Page 209 of 378

CAUTION!
• Always use the correct bulb size and type
for replacement. An incorrect bulb size
or type may overheat and cause damage
to the lamp, the bulb socket, or the lamp
wiring.
4. Turn the low or high beam bulb one–
quarter turn counterclockwise to remove
from housing.
5. Disconnect the electrical connector and
replace the bulb.
Front Turn Signal Lamp
SRT vehicles are equipped with front turn
signal lamps are LEDs. See your authorized
dealer for service.
NOTE:
We advise referring to an authorized dealer.
1. Open the hood.
2. Access the back of the headlamp.NOTE:
• The air filter housing must be removed.
• The windshield washer reservoir may
need to be rotated out of the way by
removing the fastener.
• Coolant reservoir (if equipped) will
need to be repositioned by removing the
fasteners, and moving the unit out of
the way.
3. Turn the turn signal bulb one–quarter turn
counterclockwise to remove from housing.
4. Disconnect the electrical connector and
replace the bulb.
CAUTION!
Do not touch the new bulb with your fin-
gers. Oil contamination will severely
shorten bulb life. If the bulb comes in
contact with any oily surface, clean the
bulb with rubbing alcohol.
Front Fog Lamps
Please see your authorized dealer for service.
Rear Tail, Stop, and Turn Signal Lamps
1. Raise the liftgate.
2. Remove the two push-pins from the tail
lamp housing.
3. Grasp the tail lamp and pull firmly rear-
ward to disengage the lamp from the ap-
erture panel.
4. Twist socket counter clockwise and re-
move from lamp.
Tail Lamp Push Pins
207
Page 372 of 378

Ignition.....................15
Switch...................15
Instrument Cluster..............67
Descriptions................83
Display...................66
Instrument Panel Lens Cleaning.....276
Interior Appearance Care.........275
Intermittent Wipers (Delay Wipers)....41
Introduction...................1
Jacking Instructions............218
Jack Location................217
Jack Operation.........217, 218, 262
Jump Starting................225
Key Fob
Arm The System.............18
Disarm The System............18
Keyless Enter-N-Go..............21
Passive Entry...............21
Keys.......................14
Replacement...............15
LaneSense..................181
Lap/Shoulder Belts.............110
Latches....................143
Hood....................59Lead Free Gasoline.............282
Leaks, Fluid.................143
Life Of Tires.................266
Liftgate.....................59
Closing...................60
Opening..................59
Power....................61
Liftgate Window Wiper/Washer.......43
Light Bulbs..................143
Lights.....................143
AirBag ............73, 117, 141
Automatic Headlights..........38
Brake Assist Warning...........92
Brake Warning...............73
Bulb Replacement...........204
Cruise.................82, 84
Daytime Running.............37
Electronic Stability Program(ESP)
Indicator..................75
Exterior..............
.36, 143
F
og ...................40, 81
Hazard Warning Flasher........203
Headlights On With Wipers.......39
High Beam/Low Beam Select . . .37, 38
Hill Descent Control Indicator.....94
Lights On Reminder...........40
Low Fuel..................77Malfunction Indicator
(Check Engine)..............78
Park..................39, 82
Passing...................38
Seat Belt Reminder...........75
Security Alarm..............76
Service..................204
Side Marker...............207
Traction Control..............92
Turn Signals......40, 83, 143, 207
Warning Instrument Cluster
Descriptions.............75, 83
Locks
Child Protection..............24
Luggage Carrier................64
Lug Nuts/Bolts................278
Maintenance...............55, 58
Maintenance Free Battery.........256
Maintenance Schedule. . . .236, 240, 244
Malfunction Indicator Light
(Check Engine)...............78
Memory Feature (Memory Seats)......25
Memory Seat..................25
Methanol...................283
Methanol Fuel................283
Mirrors.....................35
INDEX
370