2019 JEEP GRAND CHEROKEE LIMITED sport mode
[x] Cancel search: sport modePage 134 of 626
CAUTION!(Continued)
•To avoid damage to the roof rack and vehicle, do not
exceed the maximum roof rack load capacity of 150 lb
(68 kg). Always distribute heavy loads as evenly as
possible and secure the load appropriately.
• Long loads which extend over the windshield, such
as wood panels or surfboards, or loads with large
frontal area should be secured to both the front and
rear of the vehicle.
• Place a blanket or other protection between the
surface of the roof and the load.
• Travel at reduced speeds and turn corners carefully
when carrying large or heavy loads on the roof rack.
Wind forces, due to natural causes or nearby truck
traffic, can add sudden upward lift to a load. This is
especially true on large flat loads and may result in
damage to the cargo or your vehicle.
• The use of Sport Mode is not recommended when
using the Roof Luggage Rack to carry a load.
132 GETTING TO KNOW YOUR VEHICLE
Page 211 of 626
WARNING!
•Never place a rear-facing child restraint in front of an
air bag. A deploying passenger front air bag can
cause death or serious injury to a child 12 years or
younger, including a child in a rear-facing child
restraint.
• Never install a rear-facing child restraint in the front
seat of a vehicle. Only use a rear-facing child re-
straint in the rear seat. If the vehicle does not have a
rear seat, do not transport a rear-facing child restraint
in that vehicle.
How To Engage The Automatic Locking Mode
1. Buckle the combination lap and shoulder belt.
2. Grasp the shoulder portion and pull downward until the entire seat belt is extracted.
3. Allow the seat belt to retract. As the seat belt retracts, you will hear a clicking sound. This indicates the seat
belt is now in the Automatic Locking Mode. How To Disengage The Automatic Locking Mode
Unbuckle the combination lap/shoulder belt and allow it
to retract completely to disengage the Automatic Locking
Mode and activate the vehicle sensitive (emergency) lock-
ing mode.
Page 282 of 626
•Normal Ride Height (NRH) – This is the standard
position of the suspension and is meant for normal
driving.
• Off-Road 1 (OR1) (Raises the vehicle approximately
1.1 inches (28 mm)) – This is the primary position for all
off-road driving until OR2 is needed. A smoother and
more comfortable ride will result. Push the “UP” button
once from the NRH position while the vehicle speed is
below 38 mph (61 km/h). When in the OR1 position, if
the vehicle speed remains between 40 mph (64 km/h)
and 50 mph (80 km/h) for greater than 20 seconds or if
the vehicle speed exceeds 50 mph (80 km/h), the vehicle
will be automatically lowered to NRH. Refer to “Driving
Tips” in “Starting And Operating” for further informa-
tion.
• Off-Road 2 (OR2) (Raises the vehicle approximately
2.2 inches (55 mm)) – This position is intended for
off-roading use only where maximum ground clearance
is required. To enter OR2, push the “UP” button twice
from the NRH position or once from the OR1 position
while vehicle speed is below 20 mph (32 km/h). While
in OR2, if the vehicle speed exceeds 25 mph (40 km/h)
the vehicle height will be automatically lowered to OR1.
Refer to “Driving Tips” in “Starting And Operating” for
further information. •
Aero Mode (Lowers the vehicle approximately
0.6 inches (15 mm)) – This position provides improved
aerodynamics by lowering the vehicle. The vehicle will
automatically enter Aero Mode when the vehicle speed
remains between 52 mph (83 km/h) and 56 mph
(90 km/h) for greater than 20 seconds or if the vehicle
speed exceeds 56 mph (90 km/h). The vehicle will return
to NRH from Aero Mode if the vehicle speed remains
between 20 mph (32 km/h) and 25 mph (40 km/h) for
greater than 20 seconds or if the vehicle speed falls
below 20 mph (32 km/h). The vehicle will enter Aero
Mode, regardless of vehicle speed if the vehicle is in
“SPORT” mode.
• Entry/Exit Mode (Lowers the vehicle approximately
1.6 inches (40 mm) – This position lowers the vehicle for
easier passenger entry and exit as well as lowering the
rear of the vehicle for easier loading and unloading of
cargo. To enter Entry/Exit Mode, push the “DOWN”
button once from (NRH) while the vehicle speed is
below 25 mph (40 km/h). Once the vehicle speed goes
below 15 mph (24 km/h) the vehicle height will begin to
lower. If the vehicle speed remains between 15 mph
(24 km/h) and 25 mph (40 km/h) for greater than 60
seconds, or the vehicle speed exceeds 25 mph (40 km/h)
the Entry/Exit Mode change will be cancelled. To exit
280 STARTING AND OPERATING
Page 284 of 626
WARNING!
The air suspension system uses a high pressure vol-
ume of air to operate the system. To avoid personal
injury or damage to the system, see your authorized
dealer for service.
Air Suspension Modes
The Air Suspension system has multiple modes to protect
the system in unique situations:
Tire/Jack Mode
To assist with changing a spare tire, the air suspension
system has a feature which allows the automatic leveling to
be disabled. Refer to “Uconnect Settings” in “Multimedia”
for further information.
NOTE:This mode is intended to be enabled with engine
running.
Auto Entry/Exit Mode
To assist in entering and exiting the vehicle, the air
suspension system has a feature which automatically low-
ers the vehicle to entry/exit ride height. Refer to “Uconnect
Settings” in “Multimedia” for further information. NOTE:
This mode is intended to be enabled with engine
running.
Transport Mode
To assist with flat bed towing, the air suspension system
has a feature which will put the vehicle into Entry/Exit
height and disable the automatic load leveling system.
Refer to “Uconnect Settings” in “Multimedia” for further
information.
NOTE: This mode is intended to be enabled with engine
running.
Suspension Display Messages Mode
The “Suspension Display Messages” setting allows you to
only display suspension warnings. Refer to “Uconnect
Settings” in “Multimedia” for further information.
NOTE: This mode is intended to be enabled with engine
running.
Wheel Alignment Mode
Before performing a wheel alignment this mode must be
enabled. Refer to “Uconnect Settings” in “Multimedia” for
further information.
282 STARTING AND OPERATING
Page 286 of 626
Automatic height changes will occur based on vehicle
speed and the current vehicle height. The indicator lamps
and instrument cluster display messages will operate the
same for automatic changes and user requested changes.
•Off-Road 2 (OR2) – Indicator lamps 4, 5, and 6 will be
illuminated when the vehicle is in OR2.
• Off-Road 1 (OR1) – Indicator lamps 4 and 5 will be
illuminated when the vehicle is in OR1.
• Normal Ride Height (NRH) – Indicator lamp 4 will be
illuminated when the vehicle is in this position.
• Entry/Exit Mode – Indicator lamp 3 will be illuminated
when the vehicle is in Entry/Exit Mode. If Entry/Exit
Mode is requested while vehicle speed is between 15
mph (24 km/h) and 25 mph (40 km/h), indicator lamp 4
will remain on solid and indicator lamp 3 will flash as
the system waits for the vehicle to reduce speed. If
vehicle speed is reduced to, and kept below, 15 mph
(24 km/h) indicator lamp 4 will turn off and indicator lamp 3 will flash until Entry/Exit Mode is achieved at
which point indicator lamp 3 will go solid. If during the
height change to Entry/Exit Mode, the vehicle speed
exceeds 15 mph (24 km/h), the height change will be
paused until the vehicle speed either goes below 15 mph
(24 km/h) and the height change continues to Entry/
Exit Mode, or exceeds 25 mph (40 km/h) and the vehicle
height will return to NRH. Entry/Exit Mode may be
selected while the vehicle is not moving provided that
the engine is still running and all doors remain closed.
• Transport Mode - No indicator lamps will be illumi-
nated. Customer driving will disable Transport Mode.
• Tire/Jack Mode - Indicator lamps 3 and 6 will be
illuminated. Customer driving will disable Tire/Jack
Mode.
• Wheel Alignment Mode - Indicator lamps 3 and 4 will be
illuminated. Customer driving will disable Wheel Align-
ment Mode.
284 STARTING AND OPERATING
Page 379 of 626
NOTE:
•When towing your vehicle, always follow applicable
state and provincial laws. Contact state and provincial
Highway Safety offices for additional details.
• Vehicles equipped with Quadra-Lift must be placed in
Transport Mode before tying them down (from the
body) on a trailer or flatbed truck. Refer to “Quadra-
Lift” in “Starting and Operating” for more information.
If the vehicle cannot be placed in Transport mode (for
example, engine will not run), tie-downs should be
fastened over the tires using specific straps (not to the
body). Failure to follow these instructions may cause
fault codes to be set and/or cause loss of proper
tie-down tension.
Recreational Towing — Two Wheel Drive Models
DO NOT flat tow this vehicle. Damage to the drivetrain
will result.
Recreational towing (for two-wheel drive models) is al-
lowed ONLY if the rear wheels are OFF the ground. This
may be accomplished using a tow dolly or vehicle trailer. If
using a tow dolly, follow this procedure: 1. Properly secure the dolly to the tow vehicle, following
the dolly manufacturer’s instructions.
NOTE: If vehicle is equipped with Quadra-Lift air suspen-
sion, ensure the vehicle is set to Normal Ride Height.
2. Drive the rear wheels onto the tow dolly.
3. Firmly apply the parking brake. Shift the transmission into PARK.
4. Turn the ignition OFF.
5. Properly secure the rear wheels to the dolly, following the dolly manufacturer ’s instructions.
6. Install a suitable clamping device, designed for towing, to secure the front wheels in the straight position.
Page 384 of 626
10. Disconnect vehicle from the tow vehicle.
11. Start the engine.
12. Press and hold the brake pedal.
13. Release the parking brake.
14. Shift the transmission into DRIVE, release the brakepedal, and check that the vehicle operates normally.
NOTE:
• Steps 1 through 5 are requirements that must be met
before pushing the NEUTRAL (N) button, and must
continue to be met until the shift has been completed. If
any of these requirements are not met before pushing
the NEUTRAL (N) button or are no longer met during
the shift, the NEUTRAL (N) indicator light will flash
continuously until all requirements are met or until the
NEUTRAL (N) button is released.
• The ignition must be in the ON/RUN mode for a shift to
take place and for the position indicator lights to be
operable. If the ignition is not in the ON/RUN mode, the
shift will not take place and no position indicator lights
will be on or flashing. •
A flashing NEUTRAL (N) position indicator light indi-
cates that shift requirements have not been met.
DRIVING TIPS
On-Road Driving Tips
Utility vehicles have higher ground clearance and a nar-
rower track to make them capable of performing in a wide
variety of off-road applications. Specific design character-
istics give them a higher center of gravity than conven-
tional passenger cars.
An advantage of the higher ground clearance is a better
view of the road, allowing you to anticipate problems.
They are not designed for cornering at the same speeds as
conventional passenger cars any more than low-slung
sports cars are designed to perform satisfactorily in off-
road conditions. Avoid sharp turns or abrupt maneuvers.
As with other vehicles of this type, failure to operate this
vehicle correctly may result in loss of control or vehicle
rollover.
382 STARTING AND OPERATING
Page 432 of 626
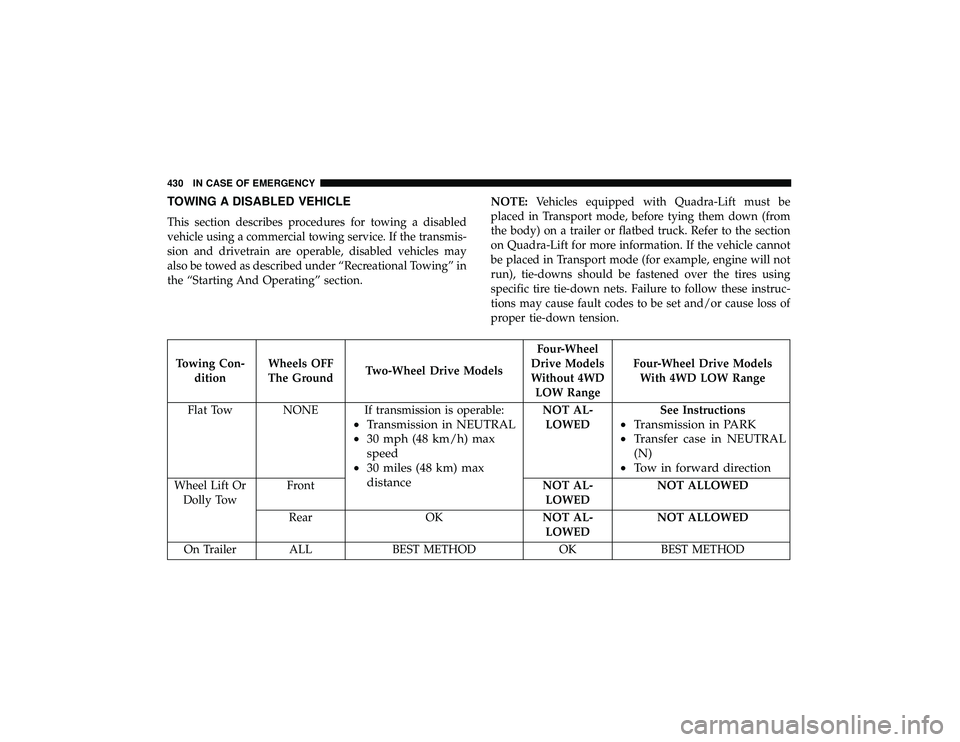
TOWING A DISABLED VEHICLE
This section describes procedures for towing a disabled
vehicle using a commercial towing service. If the transmis-
sion and drivetrain are operable, disabled vehicles may
also be towed as described under “Recreational Towing” in
the “Starting And Operating” section.NOTE:
Vehicles equipped with Quadra-Lift must be
placed in Transport mode, before tying them down (from
the body) on a trailer or flatbed truck. Refer to the section
on Quadra-Lift for more information. If the vehicle cannot
be placed in Transport mode (for example, engine will not
run), tie-downs should be fastened over the tires using
specific tire tie-down nets. Failure to follow these instruc-
tions may cause fault codes to be set and/or cause loss of
proper tie-down tension.