Page 374 of 626

•Check the trailer tires for proper tire inflation pressures
before trailer usage.
• Check for signs of tire wear or visible tire damage before
towing a trailer. Refer to “Tires” in “Servicing And
Maintenance” for the proper inspection procedure.
• When replacing tires, refer to “Tires” in “Servicing And
Maintenance” for the proper tire replacement proce-
dures. Replacing tires with a higher load carrying capac-
ity will not increase the vehicle’s GVWR and GAWR
limits.
Towing Requirements — Trailer Brakes
•Do not interconnect the hydraulic brake system or
vacuum system of your vehicle with that of the trailer.
This could cause inadequate braking and possible per-
sonal injury.
• An electronically actuated trailer brake controller is
required when towing a trailer with electronically actu-
ated brakes. When towing a trailer equipped with a
hydraulic surge actuated brake system, an electronic
brake controller is not required. •
Trailer brakes are recommended for trailers over
1,000 lbs (453 kg) and required for trailers in excess of
2,000 lbs (907 kg).
CAUTION!
If the trailer weighs more than 1,000 lbs (453 kg)
loaded, it should have its own brakes and they should
be of adequate capacity. Failure to do this could lead to
accelerated brake lining wear, higher brake pedal
effort, and longer stopping distances.
372 STARTING AND OPERATING
Page 379 of 626

NOTE:
•When towing your vehicle, always follow applicable
state and provincial laws. Contact state and provincial
Highway Safety offices for additional details.
• Vehicles equipped with Quadra-Lift must be placed in
Transport Mode before tying them down (from the
body) on a trailer or flatbed truck. Refer to “Quadra-
Lift” in “Starting and Operating” for more information.
If the vehicle cannot be placed in Transport mode (for
example, engine will not run), tie-downs should be
fastened over the tires using specific straps (not to the
body). Failure to follow these instructions may cause
fault codes to be set and/or cause loss of proper
tie-down tension.
Recreational Towing — Two Wheel Drive Models
DO NOT flat tow this vehicle. Damage to the drivetrain
will result.
Recreational towing (for two-wheel drive models) is al-
lowed ONLY if the rear wheels are OFF the ground. This
may be accomplished using a tow dolly or vehicle trailer. If
using a tow dolly, follow this procedure: 1. Properly secure the dolly to the tow vehicle, following
the dolly manufacturer’s instructions.
NOTE: If vehicle is equipped with Quadra-Lift air suspen-
sion, ensure the vehicle is set to Normal Ride Height.
2. Drive the rear wheels onto the tow dolly.
3. Firmly apply the parking brake. Shift the transmission into PARK.
4. Turn the ignition OFF.
5. Properly secure the rear wheels to the dolly, following the dolly manufacturer ’s instructions.
6. Install a suitable clamping device, designed for towing, to secure the front wheels in the straight position.
Page 390 of 626
If you stall or begin to lose forward motionwhile
climbing a steep hill, allow your vehicle to come to a stop
and immediately apply the brakes. Restart the engine, and
shift into REVERSE. Back slowly down the hill, allowing
the compression braking of the engine to help regulate
your speed. If the brakes are required to control vehicle
speed, apply them lightly and avoid locking or skidding
the tires.
Page 391 of 626
•Completely inspect the underbody of your vehicle.
Check tires, body structure, steering, suspension, and
exhaust system for damage.
• Inspect the radiator for mud and debris and clean as
required.
• Check threaded fasteners for looseness, particularly on
the chassis, drivetrain components, steering, and sus-
pension. Retighten them, if required, and torque to the
values specified in the Service Manual.
• Check for accumulations of plants or brush. These things
could be a fire hazard. They might hide damage to fuel
lines, brake hoses, axle pinion seals, and propeller shafts.
• After extended operation in mud, sand, water, or similar
dirty conditions, have the radiator, fan, brake rotors,
wheels, brake linings, and axle yokes inspected and
cleaned as soon as possible.
Page 431 of 626

NOTE:Shifts between DRIVE and REVERSE can only be
achieved at wheel speeds of 5 mph (8 km/h) or less.
Whenever the transmission remains in NEUTRAL for more
than two seconds, you must press the brake pedal to
engage DRIVE or REVERSE.
Use the least amount of accelerator pedal pressure that will
maintain the rocking motion without spinning the wheels
or racing the engine.
NOTE: Push the �ESC Off� switch, to place the Electronic
Stability Control (ESC) system in �Partial Off�mode, before
rocking the vehicle. Refer to “Electronic Brake Control” in
“Safety” for further information. Once the vehicle has been
freed, push the �ESC Off�switch again to restore �ESC On�
mode.CAUTION!
• Racing the engine or spinning the wheels may lead
to transmission overheating and failure. Allow the
engine to idle with the transmission in NEUTRAL
for at least one minute after every five rocking-
motion cycles. This will minimize overheating and
reduce the risk of transmission failure during pro-
longed efforts to free a stuck vehicle.
• When “rocking” a stuck vehicle by shifting between
DRIVE and REVERSE, do not spin the wheels faster
than 15 mph (24 km/h), or drivetrain damage may
result.
• Revving the engine or spinning the wheels too fast
may lead to transmission overheating and failure. It
can also damage the tires. Do not spin the wheels
above 30 mph (48 km/h) while in gear (no transmis-
sion shifting occurring).
7
IN CASE OF EMERGENCY 429
Page 432 of 626
TOWING A DISABLED VEHICLE
This section describes procedures for towing a disabled
vehicle using a commercial towing service. If the transmis-
sion and drivetrain are operable, disabled vehicles may
also be towed as described under “Recreational Towing” in
the “Starting And Operating” section.NOTE:
Vehicles equipped with Quadra-Lift must be
placed in Transport mode, before tying them down (from
the body) on a trailer or flatbed truck. Refer to the section
on Quadra-Lift for more information. If the vehicle cannot
be placed in Transport mode (for example, engine will not
run), tie-downs should be fastened over the tires using
specific tire tie-down nets. Failure to follow these instruc-
tions may cause fault codes to be set and/or cause loss of
proper tie-down tension.
Page 440 of 626
At Every Oil Change Interval As Indicated By Oil Change Indicator System:
•Change oil and filter.
• Rotate the tires. Rotate at the first sign of irregular wear, even if it occurs before the oil indicator system turns
on.
• Inspect battery and clean and tighten terminals as required.
• Inspect brake pads, shoes, rotors, drums, hoses and park brake.
• Inspect engine cooling system protection and hoses.
• Inspect exhaust system.
• Inspect engine air cleaner if using in dusty or off-road conditions.
438 SERVICING AND MAINTENANCE
Page 473 of 626

TIRES
Tire Safety Information
Tire safety information will cover aspects of the following
information: Tire Markings, Tire Identification Numbers,
Tire Terminology and Definitions, Tire Pressures, and Tire
Loading.
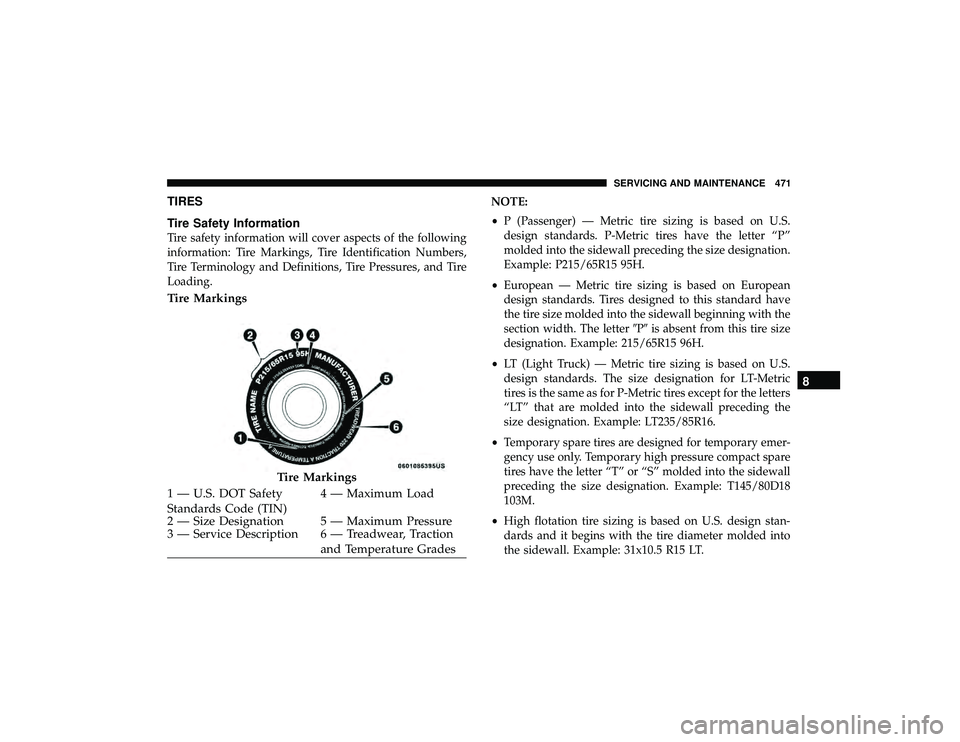
Tire Markings
NOTE:
•P (Passenger) — Metric tire sizing is based on U.S.
design standards. P-Metric tires have the letter “P”
molded into the sidewall preceding the size designation.
Example: P215/65R15 95H.
• European — Metric tire sizing is based on European
design standards. Tires designed to this standard have
the tire size molded into the sidewall beginning with the
section width. The letter �P�is absent from this tire size
designation. Example: 215/65R15 96H.
• LT (Light Truck) — Metric tire sizing is based on U.S.
design standards. The size designation for LT-Metric
tires is the same as for P-Metric tires except for the letters
“LT” that are molded into the sidewall preceding the
size designation. Example: LT235/85R16.
• Temporary spare tires are designed for temporary emer-
gency use only. Temporary high pressure compact spare
tires have the letter “T” or “S” molded into the sidewall
preceding the size designation. Example: T145/80D18
103M.
• High flotation tire sizing is based on U.S. design stan-
dards and it begins with the tire diameter molded into
the sidewall. Example: 31x10.5 R15 LT.