Page 16 of 546

I IN
NS
ST
TR
RU
UM
ME
EN
NT
T
P
PA
AN
NE
EL
L
O
OV
VE
ER
RV
VI
IE
EW
W
The actual shape may differ from the illustration.
1-5
Your vehicle at a glance
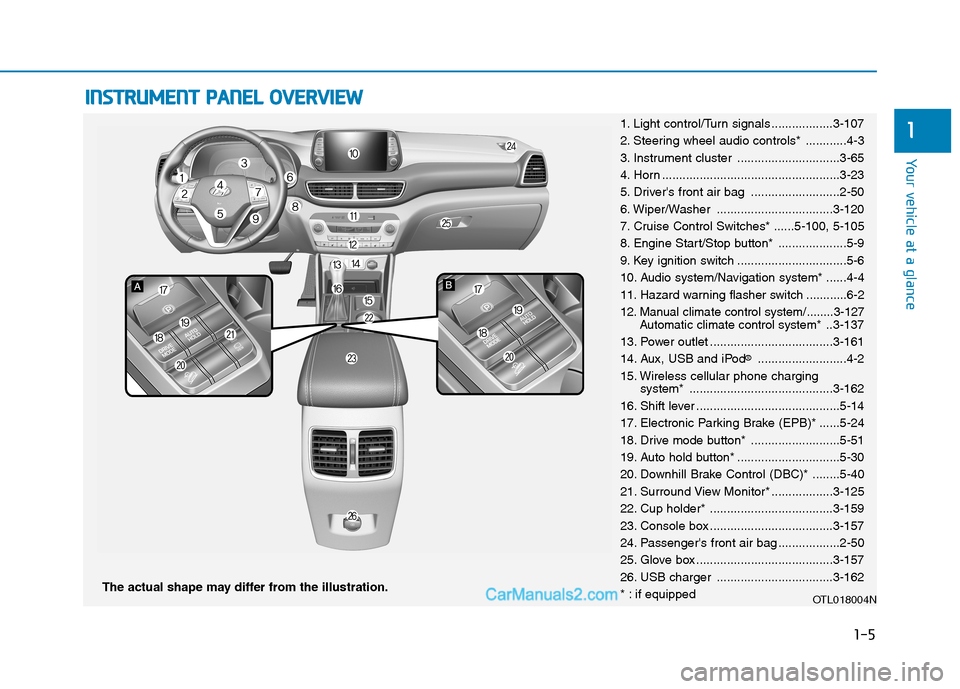
11. Light control/Turn signals ..................3-107
2. Steering wheel audio controls* ............4-3
3. Instrument cluster ..............................3-65
4. Horn ....................................................3-23
5. Driver's front air bag ..........................2-50
6. Wiper/Washer ..................................3-120
7. Cruise Control Switches* ......5-100, 5-105
8. Engine Start/Stop button* ....................5-9
9. Key ignition switch ................................5-6
10. Audio system/Navigation system* ......4-4
11. Hazard warning flasher switch ............6-2
12. Manual climate control system/........3-127
Automatic climate control system*..3-137
13. Power outlet ....................................3-161
14. Aux, USB and iPod
®..........................4-2
15. Wireless cellular phone charging
system* ..........................................3-162
16. Shift lever ..........................................5-14
17. Electronic Parking Brake (EPB)* ......5-24
18. Drive mode button* ..........................5-51
19. Auto hold button* ..............................5-30
20. Downhill Brake Control (DBC)* ........5-40
21. Surround View Monitor* ..................3-125
22. Cup holder* ....................................3-159
23. Console box ....................................3-157
24. Passenger's front air bag ..................2-50
25. Glove box ........................................3-157
26. USB charger ..................................3-162
* : if equipped
OTL018004N
Page 116 of 546
3-25
Convenient features of your vehicle
3
Pull the day/night lever toward you to
reduce glare from the headlights of
the vehicles behind you during night
driving.
Remember that you lose some
rearview clarity in the night position.Blue Link®center (if equipped)
For details, refer to the Blue Link®
Owner's Guide, Navigation Manual
or Audio Manual.
Electrochromic mirror (ECM)
with homelink system
(if equipped)
To operate the electric rearview
mirror
Press the I button (1) to turn the
automatic- dimming function on. The
mirror indicator light will illuminate.
Press the O button (2) to turn the
automatic- dimming function off. The
mirror indicator light will turn off.
OHD046025N
OOSEV048040N
■Type A
OOSEV048039N
■Type B
Page 183 of 546

3-92
Convenient features of your vehicle
Modes SymbolExplanation
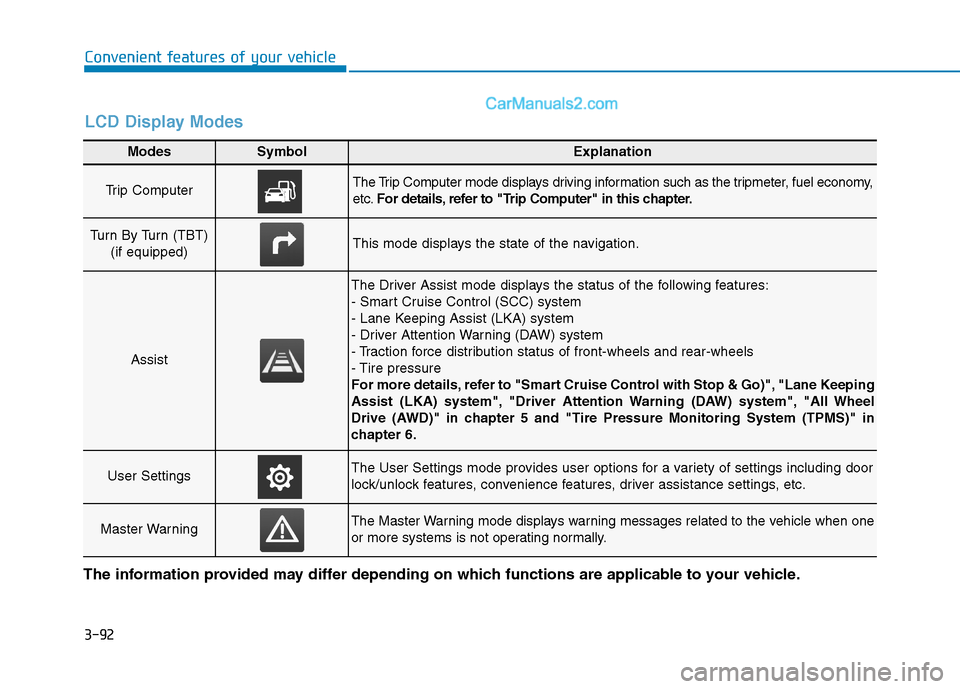
Trip Computer The Trip Computer mode displays driving information such as the tripmeter, fuel economy,
etc.For details, refer to "Trip Computer" in this chapter.
Turn By Turn (TBT)
(if equipped)This mode displays the state of the navigation.
Assist
The Driver Assist mode displays the status of the following features:
- Smart Cruise Control (SCC) system
- Lane Keeping Assist (LKA) system
- Driver Attention Warning (DAW) system
- Traction force distribution status of front-wheels and rear-wheels
- Tire pressure
For more details, refer to "Smart Cruise Control with Stop & Go)", "Lane Keeping
Assist (LKA) system", "Driver Attention Warning (DAW) system", "All Wheel
Drive (AWD)" in chapter 5 and "Tire Pressure Monitoring System (TPMS)" in
chapter 6.
User SettingsThe User Settings mode provides user options for a variety of settings including door
lock/unlock features, convenience features, driver assistance settings, etc.
Master WarningThe Master Warning mode displays warning messages related to the vehicle when one
or more systems is not operating normally.
The information provided may differ depending on which functions are applicable to your vehicle.
LCD Display Modes
Page 184 of 546
3-93
Convenient features of your vehicle
3
Trip Computer Mode
The trip computer mode displays
information related to vehicle driving
parameters including range, fuel
economy, trip meter information and
vehicle speed.
For more details, refer to "Trip
Computer" in this chapter.
Turn By Turn (TBT) Mode
This mode displays the state of the
navigation.
Assist mode
SCC/LKA/DAW
This mode displays the state of the
Smart Cruise Control (SCC), Lane
Keeping Assist (LKA) and Driver
Attention Warning (DAW).
For more details, refer to each
system information in chapter 5.
OIK047124NOIK047147NOTLE058213R
Page 256 of 546
3-165
Convenient features of your vehicle
3
Clock
Set the clock on the multimedia dis-
play by pressing the SETUP button
on the side of the audio unit and
selecting Date/Time icon on the dis-
play.
For more details, refer to the
"Multimedia System" in chapter 4 or
Navigation System (AVN) Manual
that was supplied with your vehicle.
Clothes Hanger
To hang items, pull the hanger down.
These hangers are not designed to
hold large or heavy items.Do not hang other objects such
as hangers or hard objects
except clothes. Also, do not put
heavy, sharp or breakable
objects in the clothes pockets.
In an accident or when the cur-
tain air bag is inflated, it may
cause vehicle damage or per-
sonal injury.
WARNING
OOS047066Do not adjust the clock while
driving, you may lose your
steering control and cause an
accident that results in severe
personal injury or death.
WARNING
OTL045099
■Rear
OTL045270
■Door post
Page 263 of 546
Multimedia System
Multimedia System.................................................4-3
AUX, USB and iPod® ®Port ...............................................4-2
Antenna ...............................................................................4-2
Steering Wheel Audio Control........................................4-3
Audio / Video / Navigation System (AVN) ..................4-4
Bluetooth® ®Wireless Technology Hands-Free ...........4-4
4
Page 266 of 546
4-4
(1) Call / Answer button
(2) Call end button
(3) Microphone
Detailed information for the
Bluetooth hands-free is described in
a separately supplied manual with
the vehicle.
Audio (Display Audio) / Video /
Navigation System (AVN)
(if equipped)
Detailed information for the AVN sys-
tem is described in a separately sup-
plied manual with the vehicle. Multimedia System
OTL045240
OTL045241
■Type A
OTL045262
Bluetooth®Wireless Technology
■ Type B
Page 421 of 546

6-12
What to do in an emergency
The TPMS Malfunction Indicator
may illuminate after blinking for
one minute if the vehicle is near
electric power supply cables or
radio transmitters such as police
stations, government and public
offices, broadcasting stations,
military installations, airports,
transmitting towers, etc.
Additionally, the TPMS Malfunction
Indicator may illuminate if snow
chains are used or electronic
devices such as computers, charg-
ers, remote starters, navigation,
etc. This may interfere with normal
operation of the TPMS.
Changing a Tire with TPMS
If you have a flat tire, the Low Tire
Pressure and LCD position indicator
will come on. Have the flat tire
repaired by an authorized HYUNDAI
dealer as soon as possible or
replace the flat tire with the spare
tire.
The spare tire does not come with a
tire pressure monitoring sensor.
When the low pressure tire or the flat
tire is replaced with the spare tire,
the Low Tire Pressure LCD position
indicator will remain on. Also, the
TPMS Malfunction Indicator will illu-
minate after blinking for one minute if
the vehicle is driven at speed above
15.5 mph (25 km/h) for approximate-
ly 20 minutes.Once the original tire equipped with
a tire pressure monitoring sensor is
reinflated to the recommended pres-
sure and reinstalled on the vehicle,
the Low Tire Pressure LCD position
indicator and TPMS Malfunction
Indicator will go off within a few min-
utes of driving.
If the indicators do not disappear
after a few minutes, please visit an
authorized HYUNDAI dealer.
Each wheel is equipped with a tire
pressure sensor mounted inside the
tire behind the valve stem (except for
the spare tire). You must use TPMS
specific wheels. It is recommended
that you always have your tires serv-
iced by an authorized HYUNDAI
dealer.
A cold tire means the vehicle has
been sitting for 3 hours and driven for
less than 1 mile (1.6 km) in that 3
hour period.
Allow the tire to cool before measur-
ing the inflation pressure. Always be
sure the tire is cold before inflating to
the recommended pressure.
NOTICE
Never use a puncture-repairing
agent not approved by HYUNDAI
dealer to repair and/or inflate a
low pressure tire. Tire sealant
not approved by HYUNDAI deal-
er may damage the tire pressure
sensor.
CAUTION