2019 Hyundai Tucson replace mirror
[x] Cancel search: replace mirrorPage 117 of 546

3-26
Convenient features of your vehicle
HomeLink®Wireless Control System
Your new mirror comes with an inte-
grated HomeLink Universal
Transceiver, which allows you to pro-
gram the mirror to activate your
garage door(s), estate gate, home
lighting, etc. The mirror actually
learns the codes from your various
existing transmitters.Retain the original transmitter for
future programming procedures (i.e.,
new vehicle purchase). It is also sug-
gested that upon the sale of the vehi-
cle, the programmed HomeLink but-
tons be erased for security purposes
(follow step 1 in the "Programming"
portion of this text).
Programming
Your vehicle may require the ignition
switch to be turned to the ACC posi-
tion for programming and/or operation
of HomeLink. It is also recommended
that a new battery be replaced in the
hand-held transmitter of the device
being programmed to HomeLink for
quicker training and accurate trans-
mission of the radio-frequency.
Follow these steps to train your
HomeLink mirror:
When programming the
HomeLink®Wireless Control
System, you may be operating
a garage door or gate operator.
Make sure that people and
objects are out of the way of
the moving door or gate to pre-
vent potential harm or damage.
Do not use HomeLink with
any garage door opener that
lacks the safety stop and
reverse feature as required by
U.S. federal safety standards.
(This includes any garage
door opener model manufac-
tured before April 1, 1982.) A
garage door opener which
cannot detect an object, sig-
naling the door to stop and
reverse, does not meet cur-
rent U.S. federal safety stan-
dards. Using a garage door
opener without these features
increases risk of serious
injury or death. For more
details, call 1-800-355-3515 or
on the internet at www.home-
link.com.
WARNING
OHD046305N Glare detection sensor
Indicator light
Homelink buttons
Page 122 of 546

3-31
Convenient features of your vehicle
3
Your mirror will automatically dim
upon detecting glare from the vehi-
cles traveling behind you. The auto-
dimming function can be controlled
by pressing the Dimming ON/OFF
button:
1. Pressing and holding the button
for 3 seconds turns the auto-dim-
ming function OFF which is indi-
cated by the green Status
Indicator LED turning off.
2. Pressing and holding the button
for 3 seconds again turns the auto-
dimming function ON which is indi-
cated by the green Status Indicator
LED turning on.
The mirror defaults to the ON posi-
tion each time the vehicle is started.Integrated HomeLink®Wireless
Control System
The HomeLink®Wireless Control
System can replace up to three
hand-held radio-frequency (RF)
transmitters with a single built-in
device. This innovative feature will
learn the radio frequency codes of
most current transmitters to operate
devices such as gate operators,
garage door openers, entry door
locks, security systems, even home
lighting. Both standard and rolling
code-equipped transmitters can be
programmed by following the out-
lined procedures.
Additional HomeLink
®information
can be found at: www.homelink.com
or by calling 1-800-355-3515.
Retain the original transmitter of the
RF device you are programming for
use in other vehicles as well as for
future HomeLink
®programming. It is
also suggested that upon the sale of
the vehicle, the programmed
HomeLink
®buttons be erased for
security purposes.
Before programming
HomeLink®to a garage door
opener or gate operator, make
sure people and objects are out
of the way of the device to pre-
vent potential harm or damage.
Do not use the HomeLink
®with
any garage door opener that
lacks the safety stop and
reverse features required by
U.S. federal safety standards
(this includes any garage door
opener model manufactured
before April 1, 1982). A garage
door that cannot detect an
object - signaling the door to
stop and reverse - does not
meet current U.S. federal safety
standards. Using a garage door
opener without these features
increases the risk of serious
injury or death.
WARNING
Page 203 of 546

3-112
Convenient features of your vehicle
When the vehicle is driven on
a narrow curved road or rough
road.
When the vehicle is driven on
an uphill road or downhill
road.
When only part of the vehicle
in front is visible on a cross-
road or curved road.
When there is a traffic light,
reflecting sign, flashing sign
or mirror.
When the road conditions are
bad such as being wet or cov-
ered with snow.
When a vehicle suddenly
appears from a curve.
When the vehicle is tilted from
a flat tire or being towed.
When the Lane Keeping
Assist (LKA) system warning
light illuminates.
When the light from the on-
coming or front vehicle is not
detected because of exhaust
fume, smoke, fog, snow, etc.
When the front window is cov-
ered with foreign matters
such as ice, dust, fog, or is
damaged.
3) When the forward visibility is
poor. Such examples may
include:
When the headlamps of an on-
coming vehicle or a vehicle in
front is not detected due to
poor outside visibility (smog,
smoke, dust, fog, heavy rain,
snow, etc.).
When the windshield visibility
is poor.
Do not attempt to disassem-
ble the front view camera
without the assistance of an
authorized HYUNDAI dealer
technician. If camera is
removed for any reason, the
system may need to be re-cal-
ibrated. Have the system
inspected by an authorized
HYUNDAI dealer.
If the windshield of your vehi-
cle is replaced, most likely the
front view camera will need to
be re-calibrated. If this occurs,
have your vehicle inspected
and have the system re-cali-
brated by an authorized
HYUNDAI dealer.
Be careful that water doesn't
get into the High Beam Assist
(HBA) unit and do not remove
or damage related parts of the
High Beam Assist (HBA) sys-
tem.
WARNING
Page 204 of 546

3-113
Convenient features of your vehicle
3
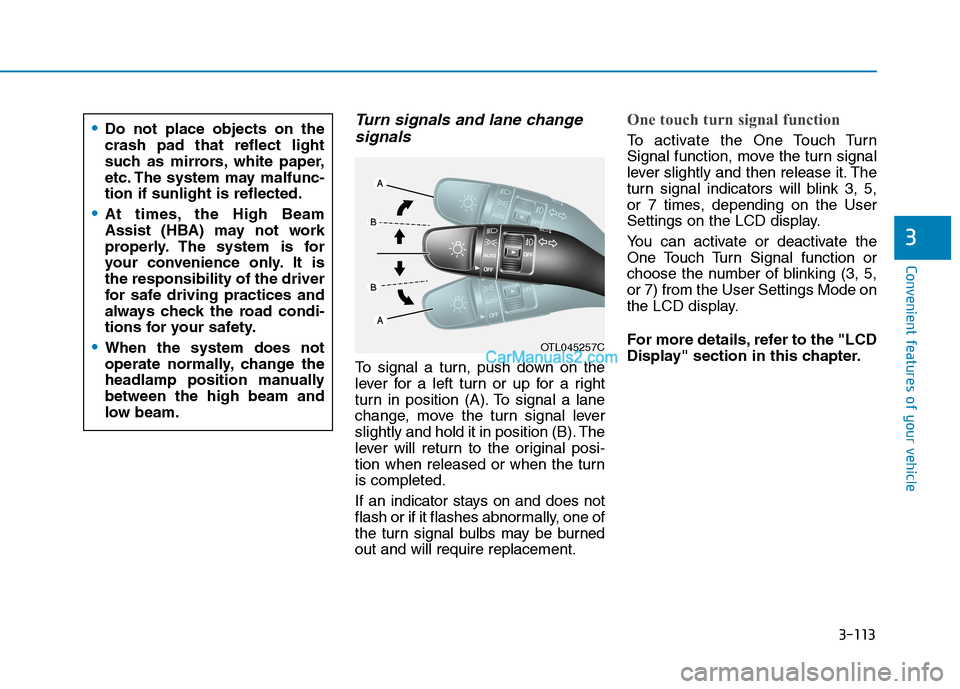
Turn signals and lane change
signals
To signal a turn, push down on the
lever for a left turn or up for a right
turn in position (A). To signal a lane
change, move the turn signal lever
slightly and hold it in position (B). The
lever will return to the original posi-
tion when released or when the turn
is completed.
If an indicator stays on and does not
flash or if it flashes abnormally, one of
the turn signal bulbs may be burned
out and will require replacement.
One touch turn signal function
To activate the One Touch Turn
Signal function, move the turn signal
lever slightly and then release it. The
turn signal indicators will blink 3, 5,
or 7 times, depending on the User
Settings on the LCD display.
You can activate or deactivate the
One Touch Turn Signal function or
choose the number of blinking (3, 5,
or 7) from the User Settings Mode on
the LCD display.
For more details, refer to the "LCD
Display" section in this chapter.
OTL045257C
Do not place objects on the
crash pad that reflect light
such as mirrors, white paper,
etc. The system may malfunc-
tion if sunlight is reflected.
At times, the High Beam
Assist (HBA) may not work
properly. The system is for
your convenience only. It is
the responsibility of the driver
for safe driving practices and
always check the road condi-
tions for your safety.
When the system does not
operate normally, change the
headlamp position manually
between the high beam and
low beam.
Page 322 of 546

5-56
Driving your vehicle
Information
• The warning chime will turn off
when:
- The detected vehicle moves out of
the sensing area or
- when the vehicle is right behind
your vehicle or
- when the vehicle is not approach-
ing your vehicle or
- when the other vehicle slows down.
• The system may not operate proper-
ly due to other factors or circum-
stances. Always pay attention to
your surroundings.
• If the sensing area near the rear
bumper is blocked by either a wall
or barrier or by a parked vehicle,
the system sensing area may be
reduced. The system may not work prop-
erly when the bumper has been
damaged, or if the rear bumper
has been replaced or repaired.
The sensing range differs some-
what according to the width of
the road. When the road is nar-
row, the system may detect
other vehicles in the next lane
OR when the road is wide, the
system may not detect other
vehicles in the next lane.
The system may turn off due to
strong electromagnetic waves.
NOTICE
i
The warning light on the outer
side view mirror will illumi-
nate whenever a vehicle is
detected at the rear side by
the system.
To avoid accidents, do not
focus only on the warning
light and neglect to see the
surrounding of the vehicle.
Drive safely even though the
vehicle is equipped with a
Blind-Spot Collision Warning
(BCW) system and Rear
Cross-Traffic Collision
Warning (RCCW). Do not sole-
ly rely on the system but
check your surrounding
before changing lanes or
backing the vehicle up.
The system may not alert the
driver in some conditions so
always check your surround-
ings while driving.
The Blind-Spot Collision
Warning (BCW) system and
Rear Cross-Traffic Collision
Warning (RCCW) are not a
substitute for proper and safe
driving practices. Always
drive safely and use caution
when changing lanes or back-
ing up your vehicle. The Blind-
Spot Collision Warning (BCW)
system may not detect every
object alongside the vehicle.WARNING
Page 331 of 546

5-65
Driving your vehicle
5
FCA Sensor
In order for the FCA system to oper-
ate properly, always make sure the
view on the windshield near the cam-
era is clean and free of dirt, snow,
and debris.
Dirt, snow, or foreign substances on
the front camera sensor may
adversely affect the performance of
the system.The sensing performance of the
sensor may be affected if the fol-
lowing instructions are not fol-
lowed.
Always keep the camera sensor
clean and free of dirt and debris.
Use only genuine parts to repair
or replace a damaged camera
sensor.
Be careful not to apply unneces-
sary force on the camera sensor. If
the sensor is forcibly moved out
of proper alignment, the FCA sys-
tem may not operate correctly. In
this case, a warning message may
not be displayed. Have the vehicle
inspected by an authorized
HYUNDAI dealer. Do not tint the window or install
stickers, accessories around the
inside mirror where the camera
is installed.
NEVER locate any reflective
objects (i.e. white paper, mirror)
over the dashboard. Any light
reflection may cause a malfunc-
tion of the system.
Pay extreme caution to keep the
camera out of water.
NEVER arbitrarily disassemble
the camera assembly, nor apply
any impact on the camera
assembly.
The FCA warning chime may be
difficult to hear if the audio sys-
tem volume is set to a high level.
NOTICE
NOTICE
NOTICE
OTLE058182
■ Front camera
Page 345 of 546

5-79
Driving your vehicle
5
Do not tint the window or install
stickers, accessories around the
inside mirror where the camera
is installed.
NEVER locate any reflective
objects (i.e. white paper, mirror)
over the dashboard. Any light
reflection may cause a malfunc-
tion of the system.
Pay extreme caution to keep the
camera out of water.
NEVER arbitrarily disassemble
the camera assembly, nor apply
any impact on the camera
assembly.
The FCA warning chime may be
difficult to hear if the audio sys-
tem volume is set to a high level.
Information
Have the system checked by an
authorized HYUNDAI dealer when:
• The windshield glass is replaced.
• The front bumper is replaced.
• The radar sensor or cover gets dam-
aged or replaced.
Warning message and warning
light
Forward Collision-Avoidance Assist
(FCA) system disabled.
Radar blocked
When the sensor cover is blocked
with dirt, snow, or debris, the FCA
system operation may be temporarily
disabled. If this occurs, a warning
message will appear on the LCD dis-
play.
Remove any dirt, snow, or debris and
clean the radar sensor cover before
operating the FCA system.The FCA may not properly operate in
an area (e.g. open terrain), where
any substances are not detected
after turning ON the vehicle.
i
NOTICE
OIK057090L
The FCA system may not acti-
vate according to road condi-
tions, inclement weather, driv-
ing conditions or traffic condi-
tions.
WARNING
Page 389 of 546

5-123
Driving your vehicle
5
Information
The ESC system must be turned OFF
before rocking the vehicle.
If you are still stuck after rocking
the vehicle a few times, have the
vehicle pulled out by a tow vehicle
to avoid engine overheating, possi-
ble damage to the transmission,
and tire damage. See "Towing" in
chapter 6.
Smooth cornering
Avoid braking or gear changing in
corners, especially when roads are
wet. Ideally, corners should always
be taken under gentle acceleration.
Driving at night
Night driving presents more hazards
than driving in the daylight. Here are
some important tips to remember:
Slow down and keep more dis-
tance between you and other vehi-
cles, as it may be more difficult to
see at night, especially in areas
where there may not be any street
lights.
Adjust your mirrors to reduce the
glare from other driver's head-
lamps.
Keep your headlamps clean and
properly aimed. Dirty or improperly
aimed headlamps will make it
much more difficult to see at night.
Avoid staring directly at the head-
lamps of oncoming vehicles. You
could be temporarily blinded, and it
will take several seconds for your
eyes to readjust to the darkness.
Driving in the rain
Rain and wet roads can make driving
dangerous. Here are a few things to
consider when driving in the rain or
on slick pavement:
Slow down and allow extra follow-
ing distance. A heavy rainfall
makes it harder to see and increas-
es the distance needed to stop
your vehicle.
Turn OFF your Cruise Control.
Replace your windshield wiper
blades when they show signs of
streaking or missing areas on the
windshield.
Be sure your tires have enough
tread. If your tires do not have
enough tread, making a quick stop
on wet pavement can cause a skid
and possibly lead to an accident.
See "Tire replacement" in chap-
ter 7.
Turn on your headlamps to make it
easier for others to see you.
Driving too fast through large pud-
dles can affect your brakes. If you
must go through puddles, try to
drive through them slowly.
NOTICE
i