Page 110 of 522

3-25
Convenient features of your vehicle
3
M
MI
IR
R R
RO
O R
RS
S
Inside Rearview Mirror
Before you start driving, adjust the
rearview mirror to the center on the
view through the rear window.
When cleaning the mirror, use a
paper towel or similar material
dampened with glass cleaner. Do
not spray glass cleaner directly on
the mirror as that may cause the
liquid cleaner to enter the mirror
housing.
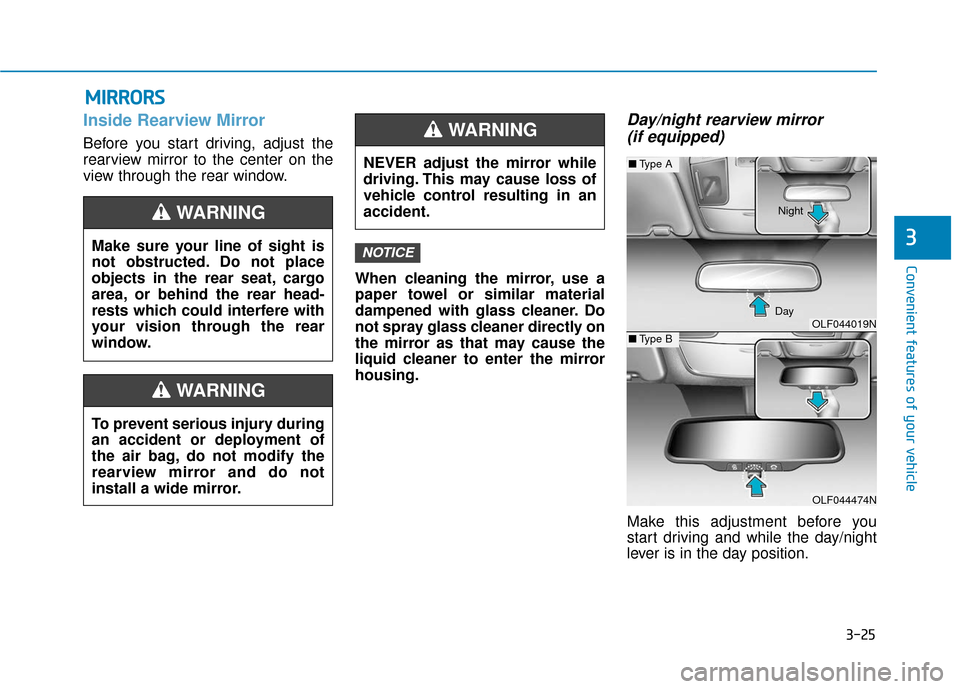
Day/night rearview mirror (if equipped)
Make this adjustment before you
start driving and while the day/night
lever is in the day position.
NOTICEMake sure your line of sight is
not obstructed. Do not place
objects in the rear seat, cargo
area, or behind the rear head-
rests which could interfere with
your vision through the rear
window.
WARNING
NEVER adjust the mirror while
driving. This may cause loss of
vehicle control resulting in an
accident.
WARNING
To prevent serious injury during
an accident or deployment of
the air bag, do not modify the
rearview mirror and do not
install a wide mirror.
WARNING
OLF044019N
OLF044474N
■ Type A
■Type B
DayNight
Page 111 of 522
3-26
Convenient features of your vehicle
Pull the day/night lever toward you to
reduce glare from the headlights of
the vehicles behind you during night
driving.
Remember that you lose some
rearview clarity in the night position.
Blue Link®center (if equipped)
For details, refer to the Blue Link®
Owner’s Guide, Navigation Manual
or Audio Manual.
Electric chromic mirror (ECM) with HomeLink®system,
compass and Blue Link®
(for U.S.A)
Your vehicle may be equipped with a
Gentex Automatic-Dimming Mirror
with a Z-Nav™ Electronic Compass
Display and an Integrated HomeLink
®
Wireless Control System. During
nighttime driving, this feature will
automatically detect and reduce
rearview mirror glare while the com-
pass indicates the direction the vehi-
cle is pointed. The HomeLink
®
Universal Transceiver allows you to
activate your garage door(s), electric
gate, home lighting, etc.
OLF044021
Page 127 of 522
3-42
Convenient features of your vehicle
Side view mirrors control
Adjusting the rearview mirrors:
1. Move the lever (1) towards theL(Left) or R(Right) to select the
rearview mirror you would like to
adjust.
2. Use the mirror adjustment control switch to position the selected mir-
ror up, down, left or right.
3. After adjustment, place the lever (1) in the center to prevent inad-
vertent adjustment. The mirrors stop moving when
they reach the maximum adjust-
ing angles, but the motor contin-
ues to operate while the switch
is pressed. Do not press the
switch longer than necessary,
the motor may be damaged.
Do not attempt to adjust the side view mirrors by hand or the
motor may be damaged.
Folding the side view mirrors
To fold the side view mirrors, grasp
the housing of the mirror and then
fold it toward the rear of the vehicle.
NOTICE
OLF044025NOLF044026
Page 152 of 522
3-67
Convenient features of your vehicle
3
Do not operate the engine within
the tachometer's RED ZONE. This
may cause severe engine damage.
Engine Coolant TemperatureGauge
This gauge indicates the tempera-
ture of the engine coolant when the
ignition switch or Engine Start/Stop
button is ON. If the gauge pointer moves
beyond the normal range area
toward the "H" position, it indi-
cates overheating that may dam-
age the engine.
Do not continue driving with an
overheated engine. If your vehicle
overheats, refer to "If the Engine
Overheats" in chapter 6.
NOTICENOTICE
OLF047107
OLF047506
■
Type A, B
■ Type C, D
Never remove the radiator cap
when the engine is hot. The
engine coolant is under pres-
sure and could severely burn.
Wait until the engine is cool
before adding coolant to the
reservoir.
WARNING
Page 189 of 522
3-104
Convenient features of your vehicle
High beam operation
To turn on the high beam headlamp,
push the lever away from you. The
lever will return to its original position.
The high beam indicator will light
when the headlamp high beams are
switched on.
To turn off the high beam headlamp,
pull the lever towards you. The low
beams will turn on.To flash the high beam headlamp,
pull the lever towards you, then
release the lever. The high beams
will remain ON as long as you hold
the lever towards you.
Smart High Beam
(if equipped)
The Smart High Beam is a system
that automatically adjusts the head-
lamp range (switches between high
beam and low beam) according to
the brightness of other vehicles and
road conditions.
OLF044088N
OLF044090N
Do not use high beam when there
are other vehicles approaching
you. Using high beam could
obstruct the other driver's vision.
WARNING
OLF044089N
Page 191 of 522

3-106
Convenient features of your vehicleThe system may not operate nor-
mally in the below conditions.
When the light from the on-
coming or front vehicle is not
detected because of lamp dam-
age, hidden from sight, etc.
When the lamp of the on-com-
ing or front vehicle is covered
with dust, snow or water.
When the light from the on-
coming or front vehicle is not
detected because of exhaust
fume, smoke, fog, snow, etc.
When the front window is cov-
ered with foreign matters such
as ice, dust, fog, or is damaged. (Continued)
CAUTION(Continued)
When there is a similar shape
lamp with the front vehicle’s
lamps.
When it is hard to see because
of fog, heavy rain or snow.
When the headlamp is not
repaired or replaced at an
authorized dealer.
When headlamp aiming is not
properly adjusted.
When driving on a narrow
curved road or rough road.
When driving downhill or uphill.
When only part of the vehicle
in front is visible on a cross-
road or curved road.
When there is a traffic light,
reflecting sign, flashing sign
or mirror.(Continued)
(Continued)
When the road conditions are
bad such as being wet or cov-
ered with snow.
When the front vehicle's head-
lamps are off but the fog lamps
on.
When a vehicle suddenly
appears from a curve.
When the vehicle is tilted from
a flat tire or being towed.
When the LKAS (Lane
Keeping Assist System) warn-
ing light illuminates. (if
equipped)
Page 201 of 522

3-116
Convenient features of your vehicle
Windshield Washers
In the OFF position, pull the lever
gently toward you to spray washer
fluid on the windshield and to run the
wipers 1-3 cycles. The spray and
wiper operation will continue until
you release the lever. If the washer
does not work, you may need to add
washer fluid to the washer fluid
reservoir.If equipped with the Headlamp
Washer, washer fluid will be sprayed
on the headlamp at the same time you
operate the windshield washer when:
1. The ignition switch is in the ON
position.
2. The light switch is in the headlamp position. To prevent possible damage to
the washer pump, do not oper-
ate the washer when the fluid
reservoir is empty.
To prevent possible damage to the wipers or windshield, do not
operate the wipers when the
windshield is dry.
To prevent damage to the wiper arms and other components, do
not attempt to move the wipers
manually.
To prevent possible damage to the wipers and washer system,
use anti-freezing washer fluids
in the winter season or cold
weather.
NOTICE
When the outside temperature is
below freezing, ALWAYS warm
the windshield using the
defroster to prevent the washer
fluid from freezing on the wind-
shield and obscuring your vision
which could result in an acci-
dent and serious injury or death.
WARNING
OLF044095N
Page 209 of 522

3-124
Convenient features of your vehicle
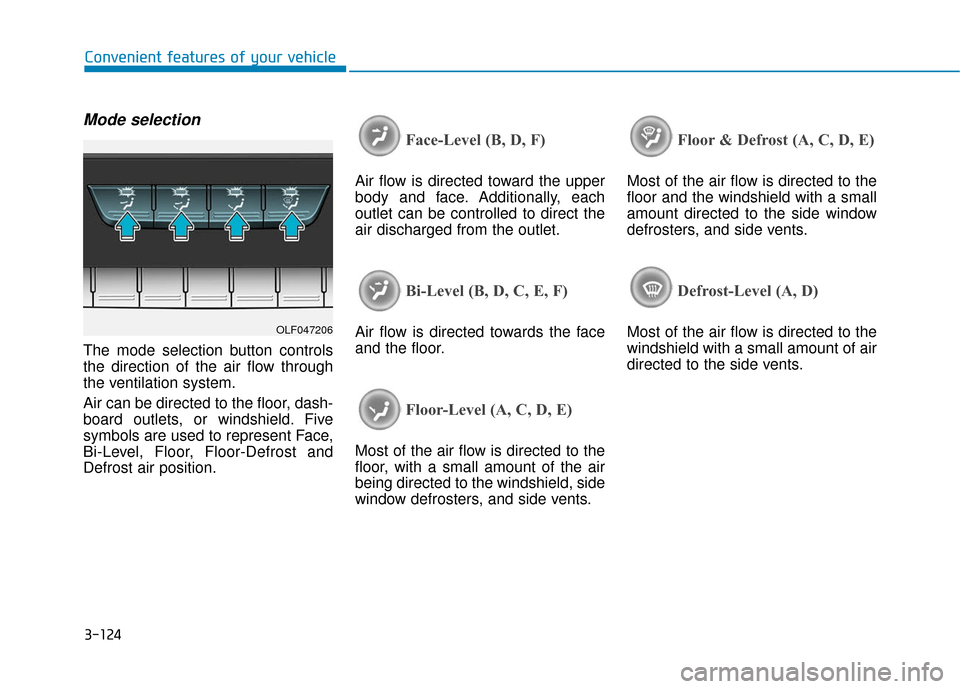
Mode selection
The mode selection button controls
the direction of the air flow through
the ventilation system.
Air can be directed to the floor, dash-
board outlets, or windshield. Five
symbols are used to represent Face,
Bi-Level, Floor, Floor-Defrost and
Defrost air position.
Face-Level (B, D, F)
Air flow is directed toward the upper
body and face. Additionally, each
outlet can be controlled to direct the
air discharged from the outlet.
Bi-Level (B, D, C, E, F)
Air flow is directed towards the face
and the floor.
Floor-Level (A, C, D, E)
Most of the air flow is directed to the
floor, with a small amount of the air
being directed to the windshield, side
window defrosters, and side vents.
Floor & Defrost (A, C, D, E)
Most of the air flow is directed to the
floor and the windshield with a small
amount directed to the side window
defrosters, and side vents.
Defrost-Level (A, D)
Most of the air flow is directed to the
windshield with a small amount of air
directed to the side vents.OLF047206