Page 66 of 546
1-6
Your vehicle at a glanceE
E NN GGIINN EE CC OO MM PPAA RRTTMM EENN TT
OLFH017005
1. Engine oil filler cap ...........................7-19
2. Engine oil dipstick .............................7-18
3. Radiator cap .....................................7-20
4. Engine coolant reservoir ...................7-21
5. Brake fluid reservoir ..........................7-24
6. Air cleaner.........................................7-26
7. Inverter coolant reservoir ..................7-20
8. Windshield washer fluid reservoir .....7-25
9. Fuse box ...........................................7-52
The actual engine room in the vehicle may differ from the illustration.
Page 183 of 546
3-47
Convenient features of your vehicle
3
3. Pull the fuel filler door (1) outwardto access the fuel tank cap.
4. To remove the fuel tank cap (2), turn it counterclockwise. You may hear a hissing noise as the pres-
sure inside the tank equalizes.
5. Place the cap on the fuel filler door. Information
If the fuel filler door does not open
because ice has formed around it, tap
lightly or push on the door to break
the ice and release the door. Do not
pry on the door. If necessary, spray
around the door with an approved de-
icer fluid (do not use radiator anti-
freeze) or move the vehicle to a warm
place and allow the ice to melt.
Closing the fuel filler door
1. To install the fuel tank cap, turn it clockwise until it "clicks" one time.
2. Close the fuel filler door until it is latched securely.i
OLF047052
Page 409 of 546

6-7
What to do in an emergency
6
If your engine coolant temperature
gauge indicates overheating, you
experience a loss of power, or hear
loud pinging or knocking, the engine
may be overheating. If this happens,
you should:
1. Turn ON the hazard warning flash-er, pull off the road and stop as
soon as it is safe to do so.
2. Place the shift lever in P (Park) and set the parking brake.
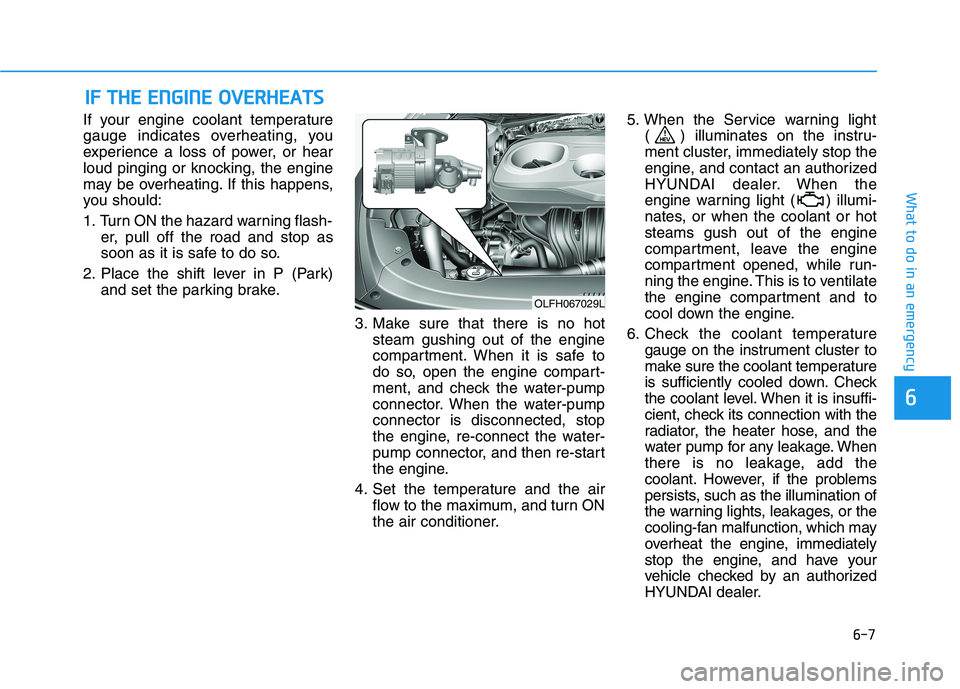
3. Make sure that there is no hotsteam gushing out of the engine
compartment. When it is safe to
do so, open the engine compart-
ment, and check the water-pump
connector. When the water-pumpconnector is disconnected, stop
the engine, re-connect the water-
pump connector, and then re-start
the engine.
4. Set the temperature and the air flow to the maximum, and turn ON
the air conditioner. 5. When the Service warning light
( ) illuminates on the instru-
ment cluster, immediately stop the
engine, and contact an authorized
HYUNDAI dealer. When the
engine warning light ( ) illumi-
nates, or when the coolant or hotsteams gush out of the engine
compartment, leave the engine
compartment opened, while run-
ning the engine. This is to ventilate
the engine compartment and to
cool down the engine.
6. Check the coolant temperature gauge on the instrument cluster to
make sure the coolant temperature
is sufficiently cooled down. Check
the coolant level. When it is insuffi-
cient, check its connection with the
radiator, the heater hose, and the
water pump for any leakage. When
there is no leakage, add the
coolant. However, if the problems
persists, such as the illumination of
the warning lights, leakages, or the
cooling-fan malfunction, which may
overheat the engine, immediately
stop the engine, and have your
vehicle checked by an authorized
HYUNDAI dealer.
IIFF TT HH EE EE NN GGIINN EE OO VVEERR HH EEAA TTSS
OLFH067029L
Page 410 of 546

6-8
What to do in an emergency
7. If you cannot find the cause of theoverheating, wait until the engine
temperature has returned to nor-
mal. Then, if coolant has beenlost, carefully add coolant to the
reservoir to bring the fluid level in
the reservoir up to the halfway
mark.
8. Proceed with caution, keeping alert for further signs of overheat-
ing. If overheating happens again,
call an authorized HYUNDAI deal-
er for assistance.
Serious loss of coolant indi-cates a leak in the cooling sys-
tem and should be checked as
soon as possible by an author-
ized HYUNDAI dealer.
CAUTION
The electric motor for
the cooling fan may
continue to operate
or start up when theengine is not running
and can cause serious injury.
Keep hands, clothing and tools
away from the rotating fan
blades of the cooling fan.
WARNING
Your vehicle is equipped with a pres-
surized coolant
reserve tank. NEVER
remove the coolant
reserve tank cap or the radiatordrain plug while the engine and
radiator are HOT. Hot coolant
and steam may blow out under
pressure, causing serious
injury.
Turn the engine off and wait
until the engine cools down.
Use extreme care when remov-
ing the coolant reserve tank
cap. Wrap a towel or thick rag
around it, and turn it counter-
clockwise slowly to release
some of the pressure from the
system. Step back while thepressure is released.
When you are sure all the pres-
sure has been released, contin-ue turning the cap counter-
clockwise to remove it.
WARNING
Page 441 of 546
7-3
7
Maintenance
EENN GGIINN EE CC OO MM PPAA RRTTMM EENN TT
1. Engine oil filler cap
2. Engine oil dipstick
3. Radiator cap
4. Engine coolant reservoir
5. Brake fluid reservoir
6. Air cleaner
7. Inverter coolant reservoir
8. Windshield washer fluid reservoir
9. Fuse box
The actual engine compartment the vehicle
may differ from the illustration.
OLFH017005
Page 445 of 546
7-7
7
Maintenance
At least twice a year:(i.e., every Spring and Fall)
Check radiator, heater and air condi- tioning hoses for leaks or damage.
Check windshield washer spray and wiper operation. Clean wiper
blades with clean cloth dampened
with washer fluid.
Check headlamp alignment.
Check muffler, exhaust pipes, shields and clamps.
Check the seat belts for wear and function.
At least once a year:
Clean body and door drain holes.
Lubricate door hinges and hoodhinges.
Lubricate door and hood locks and latches.
Lubricate door rubber weather strips.
Check the air conditioning system.
Inspect and lubricate automatic transmission linkage and controls.
Clean the battery and terminals.
Check the brake fluid level.
Page 454 of 546

7-16
Maintenance
Cooling system
Check cooling system components,
such as radiator, coolant reservoir,
hoses and connections for leakage
and damage. Replace any damaged
parts.
Engine coolant/Inverter coolant
The coolant should be changed at
the intervals specified in the mainte-
nance schedule.
Automatic transmission fluid
Automatic transmission fluid should
not be checked under normal usage
conditions. But in severe conditions,the fluid should be changed at an
authorized HYUNDAI dealer inaccordance to the scheduled mainte-nance at the beginning of this chap-
ter.
Automatic transmission fluid
color is basically red.
As the vehicle is driven, the auto- matic transmission fluid will begin
to look darker. This is a normal
condition and you should not
judge the need to replace the fluid
based upon the changed color.
Brake hoses and lines
Visually check for proper installation,
chafing, cracks, deterioration and
any leakage. Replace any deteriorat-
ed or damaged parts immediately.
Brake fluid
Check brake fluid level in the brake
fluid reservoir. The level should be
between the MIN and the MAX
marks on the side of the reservoir.
Use only hydraulic brake fluid con-
forming to DOT 3 or DOT 4 specifi-cation.
Parking brake
Inspect the parking brake system
including the parking brake pedal
and cables.
NOTICE
The use of a non-specified fluid could result in transmission
malfunction and failure. Use
only the specified automatic
transmission fluid (refer to"Recommended Lubricants and
Capacities" in chapter 8).
CAUTION
Page 458 of 546

7-20
MaintenanceE
E NN GGIINN EE CC OO OO LLAA NN TT//IINN VVEERR TTEERR CC OO OO LLAA NN TT
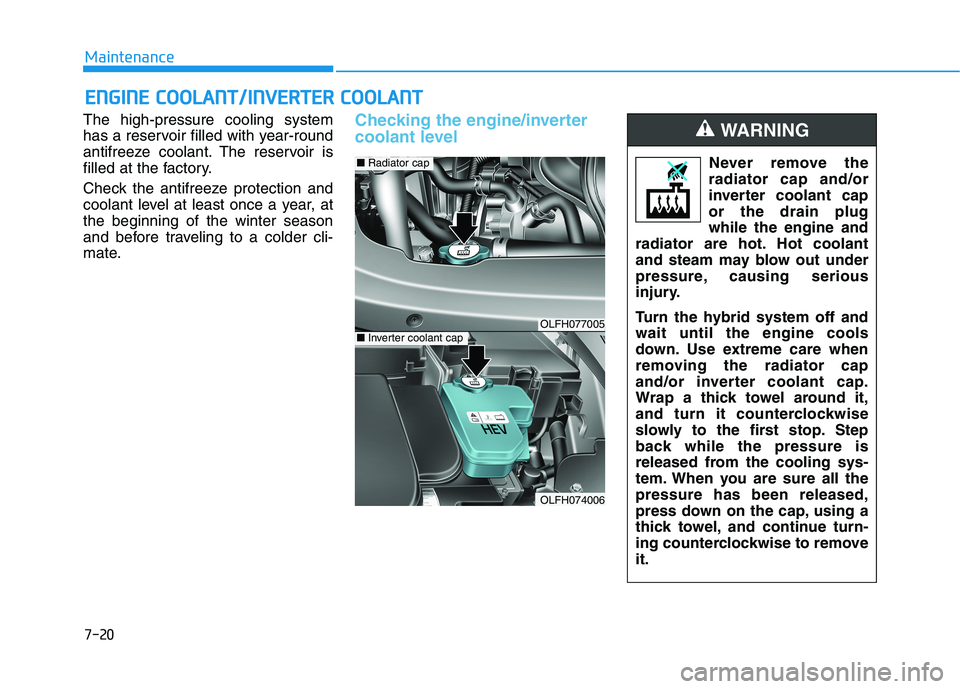
The high-pressure cooling system
has a reservoir filled with year-round
antifreeze coolant. The reservoir is
filled at the factory.
Check the antifreeze protection and
coolant level at least once a year, atthe beginning of the winter season
and before traveling to a colder cli-
mate.Checking the engine/inverter
coolant level
OLFH077005
OLFH074006
■Radiator cap
■Inverter coolant cap
Never remove the
radiator cap and/or
inverter coolant capor the drain plugwhile the engine and
radiator are hot. Hot coolant
and steam may blow out under
pressure, causing serious
injury.
Turn the hybrid system off and wait until the engine cools
down. Use extreme care when
removing the radiator cap
and/or inverter coolant cap.
Wrap a thick towel around it,
and turn it counterclockwise
slowly to the first stop. Step
back while the pressure is
released from the cooling sys-
tem. When you are sure all thepressure has been released,
press down on the cap, using a
thick towel, and continue turn-
ing counterclockwise to removeit.
WARNING