Page 410 of 546

6-8
What to do in an emergency
7. If you cannot find the cause of theoverheating, wait until the engine
temperature has returned to nor-
mal. Then, if coolant has beenlost, carefully add coolant to the
reservoir to bring the fluid level in
the reservoir up to the halfway
mark.
8. Proceed with caution, keeping alert for further signs of overheat-
ing. If overheating happens again,
call an authorized HYUNDAI deal-
er for assistance.
Serious loss of coolant indi-cates a leak in the cooling sys-
tem and should be checked as
soon as possible by an author-
ized HYUNDAI dealer.
CAUTION
The electric motor for
the cooling fan may
continue to operate
or start up when theengine is not running
and can cause serious injury.
Keep hands, clothing and tools
away from the rotating fan
blades of the cooling fan.
WARNING
Your vehicle is equipped with a pres-
surized coolant
reserve tank. NEVER
remove the coolant
reserve tank cap or the radiatordrain plug while the engine and
radiator are HOT. Hot coolant
and steam may blow out under
pressure, causing serious
injury.
Turn the engine off and wait
until the engine cools down.
Use extreme care when remov-
ing the coolant reserve tank
cap. Wrap a towel or thick rag
around it, and turn it counter-
clockwise slowly to release
some of the pressure from the
system. Step back while thepressure is released.
When you are sure all the pres-
sure has been released, contin-ue turning the cap counter-
clockwise to remove it.
WARNING
Page 433 of 546
6-31
What to do in an emergency
6
When towing your vehicle in an emergency without wheel dollies :
1. Place the Engine Start/Stop but-ton in the ACC position.
2. Place the shift lever in N (Neutral).
3. Release the parking brake.Removable towing hook
1. Open the trunk, and take the tow- ing hooks out from the tool case. 2. Open the cover by pressing the
lower part on the front bumper.
3. Install the towing hook by rotating it in a clock-wise direction until it is securely installed.
4. After use, remove the towing hook and close the cover.
Failure to place the transmis-
sion shift lever in N (Neutral)
may cause internal damage tothe transmission.
CAUTION
OLFH064024
OLFP065024
■
Hybrid
■Plug-in hybrid
OLF067025
Page 458 of 546

7-20
MaintenanceE
E NN GGIINN EE CC OO OO LLAA NN TT//IINN VVEERR TTEERR CC OO OO LLAA NN TT
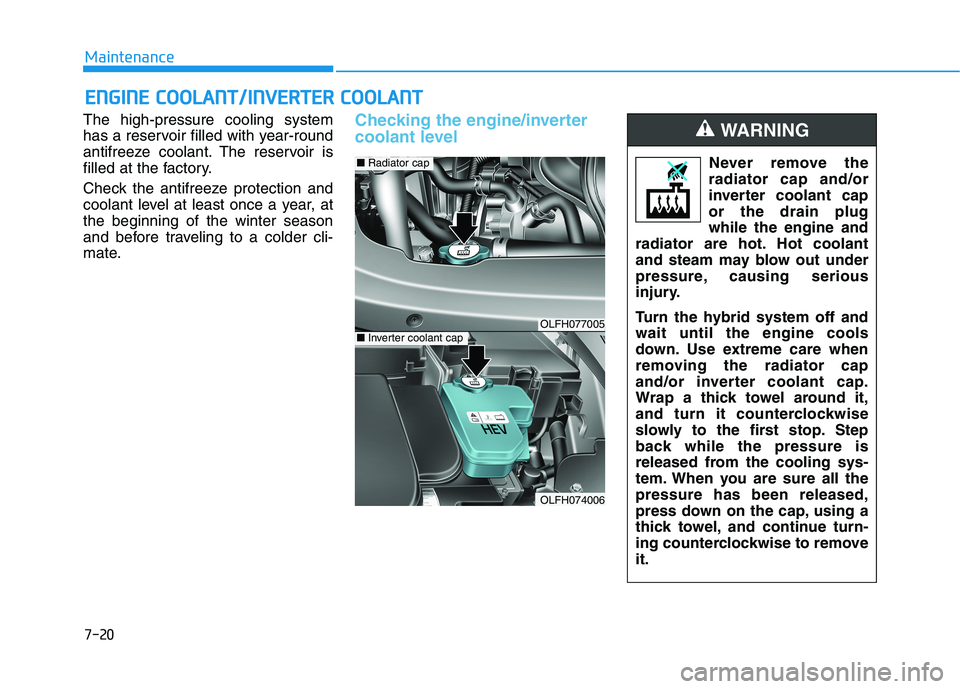
The high-pressure cooling system
has a reservoir filled with year-round
antifreeze coolant. The reservoir is
filled at the factory.
Check the antifreeze protection and
coolant level at least once a year, atthe beginning of the winter season
and before traveling to a colder cli-
mate.Checking the engine/inverter
coolant level
OLFH077005
OLFH074006
■Radiator cap
■Inverter coolant cap
Never remove the
radiator cap and/or
inverter coolant capor the drain plugwhile the engine and
radiator are hot. Hot coolant
and steam may blow out under
pressure, causing serious
injury.
Turn the hybrid system off and wait until the engine cools
down. Use extreme care when
removing the radiator cap
and/or inverter coolant cap.
Wrap a thick towel around it,
and turn it counterclockwise
slowly to the first stop. Step
back while the pressure is
released from the cooling sys-
tem. When you are sure all thepressure has been released,
press down on the cap, using a
thick towel, and continue turn-
ing counterclockwise to removeit.
WARNING
Page 472 of 546

7-34
Maintenance
By jump starting
After a jump start from a good bat-
tery, drive the vehicle for 20-30 min-
utes before it is shutoff. The vehicle
may not restart if you shut it off
before the battery had a chance to
adequately recharge. See "Jump
Starting" in chapter 6 for more infor-
mation on jump starting procedures.Information An inappropriately disposedbattery can be harmful to
the environment and human
health.
Dispose the battery according to your
local law(s) or regulation.
Reset features
Some items need to be reset after
the battery has been discharged or
the battery has been disconnected.
See chapter 3 for:
Power Windows
Trip Computer
Climate Control System
Clock
Audio System
Sunroof
i
(Continued)
Watch the battery during
charging, and stop or reduce
the charging rate if the battery
cells begin boiling violently.
The negative battery cable
must be removed first and
installed last when the battery
is disconnected. Disconnect
the battery charger in the fol-
lowing order:
(1) Turn off the battery charger main switch.
(2) Unhook the negative
clamp from the negative
battery terminal.
(3) Unhook the positive clamp from the positive batteryterminal.
Always use a genuine HYUNDAI
approved battery when you
replace the battery.
Page 491 of 546
7-53
7
Maintenance
In an emergency, if you do not have
a spare fuse, use a fuse of the same
rating from a circuit you may not
need for operating the vehicle, such
as the cigarette lighter fuse.
If the headlamps or other electrical
components do not work and the
fuses are OK, check the fuse panel
in the engine compartment. If a fuse
is blown, it must be replaced with the
same rating.Fuse switch
Always, place the fuse switch to theON position.
If you move the switch to the OFF position, some items such as the
audio system and digital clock must
be reset and the smart key may not
work properly.Information
If the fuse switch is OFF, the above
message will appear.
Always place the fuse switch in the ON position while driving the
vehicle.
Do not move the fuse switch repeatedly. The fuse switch may
be damaged.
NOTICE
i
OLF077023OLFH044149L
Page 496 of 546

7-58
Maintenance
Fuse NameFuse ratingCircuit Protected
MODULE 7 10ADriver/Passenger Door Module, Electric Parking Brake Module, AMP, Digital Clock, Blind Spot
Detection Rader LH/RH, Rear Parking Assist Sensor LH/RH/(Center),
Rear Parking Assist Sensor LH/RH
INTERIOR LAMP10AGlove Box Lamp, Driver/Passenger Door Lamp, Front Vanity Lamp Switch LH/RH,
Overhead Console Lamp, Room Lamp, Rear Personal Lamp LH/RH, Tru nk Room Lamp
MEMORY 27.5AElectro Chromic Mirror
P/SEAT
DRV 30ADriver Seat Manual Switch, Driver IMS Module
CURTAIN 10ARear Curtain Module
CLUSTER 10AInstrument Cluster
MODULE 4 10ASmart Key Control Module
MULTI
MEDIA15AAudio, A/V & Navigation Head Unit
MEMORY 1 10A
Driver/passenger Door Module, Instrument Cluster, Digital Clock,
Driver IMS Module, Auto Light & Photo Sensor, A/C Control Module,
Rear Curtain Module, Data Link Connector, BCM,
Tire Pressure Monitoring Module, Wireless Charger
S/HEATER RR 25ARear Seat Warmer Module
SUN ROOF 2 20APanorama Sunroof Motor
Driver's side fuse panel
Page 497 of 546

7-59
7
Maintenance
Fuse NameFuse ratingCircuit Protected
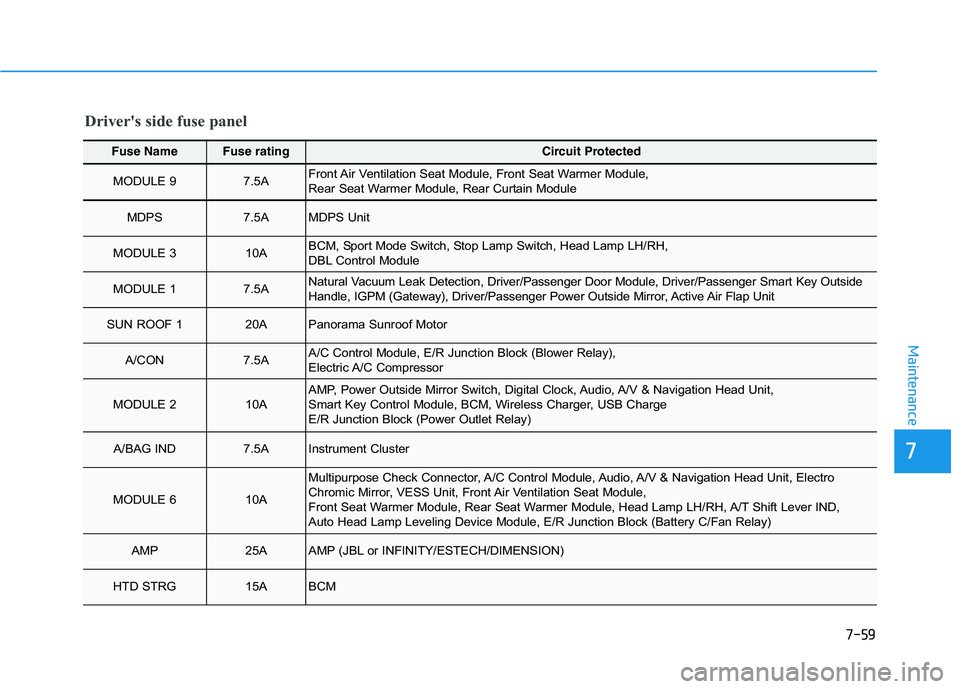
MODULE 9 7.5AFront Air Ventilation Seat Module, Front Seat Warmer Module,
Rear Seat Warmer Module, Rear Curtain Module
MDPS 7.5AMDPS Unit
MODULE 3 10ABCM, Sport Mode Switch, Stop Lamp Switch, Head Lamp LH/RH,
DBL Control Module
MODULE 1 7.5ANatural Vacuum Leak Detection, Driver/Passenger Door Module, Driver/Passenger Smart Key Outside
Handle, IGPM (Gateway), Driver/Passenger Power Outside Mirror, Active Air Flap Unit
SUN ROOF 1 20APanorama Sunroof Motor
A/CON 7.5AA/C Control Module, E/R Junction Block (Blower Relay),
Electric A/C Compressor
MODULE 2 10AAMP, Power Outside Mirror Switch, Digital Clock, Audio, A/V & Navigation Head Unit,
Smart Key Control Module, BCM, Wireless Charger, USB Charge
E/R Junction Block (Power Outlet Relay)
A/BAG IND 7.5AInstrument Cluster
MODULE 610A
Multipurpose Check Connector, A/C Control Module, Audio, A/V & N avigation Head Unit, Electro
Chromic Mirror, VESS Unit, Front Air Ventilation Seat Module,
Front Seat Warmer Module, Rear Seat Warmer Module, Head Lamp LH/ RH, A/T Shift Lever IND,
Auto Head Lamp Leveling Device Module, E/R Junction Block (Battery C/Fan Relay)
AMP25AAMP (JBL or INFINITY/ESTECH/DIMENSION)
HTD STRG 15ABCM
Driver's side fuse panel
Page 509 of 546

7-71
7
Maintenance
Always handle them carefully, andavoid scratches and abrasions. If
the bulbs are lit, avoid contact with
liquids.
Never touch the glass with bare hands. Residual oil may cause the
bulb to overheat and burst when lit.
A bulb should be operated only when installed in a headlamp.
If a bulb becomes damaged or cracked, replace it immediatelyand carefully dispose of it.
1. Open the hood.
2. Disconnect the negative batterycable.
3. Remove the headlamp bulb cover by turning it counterclockwise.
4. Disconnect the headlamp bulb socket-connector. 5. Unsnap the headlamp bulb retain-
ing wire by pressing the end and
pushing it upward.
6. Remove the bulb from the head- lamp assembly.
7. Install a new headlamp bulb and snap the headlamp bulb retaining
wire into position by aligning the
wire with the groove on the bulb.
8. Connect the headlamp bulb sock- et-connector.
9. Install the headlamp bulb cover by turning it clockwise.
Information
The headlamp aiming should be
adjusted after an accident or after the
headlamp assembly is reinstalled at an
authorized HYUNDAI dealer.
i
OLF077070
OLF077069
■ High beam
■Low beam