2019 Hyundai Santa Fe will not start
[x] Cancel search: will not startPage 41 of 557
2-23
Safety system of your vehicle
2
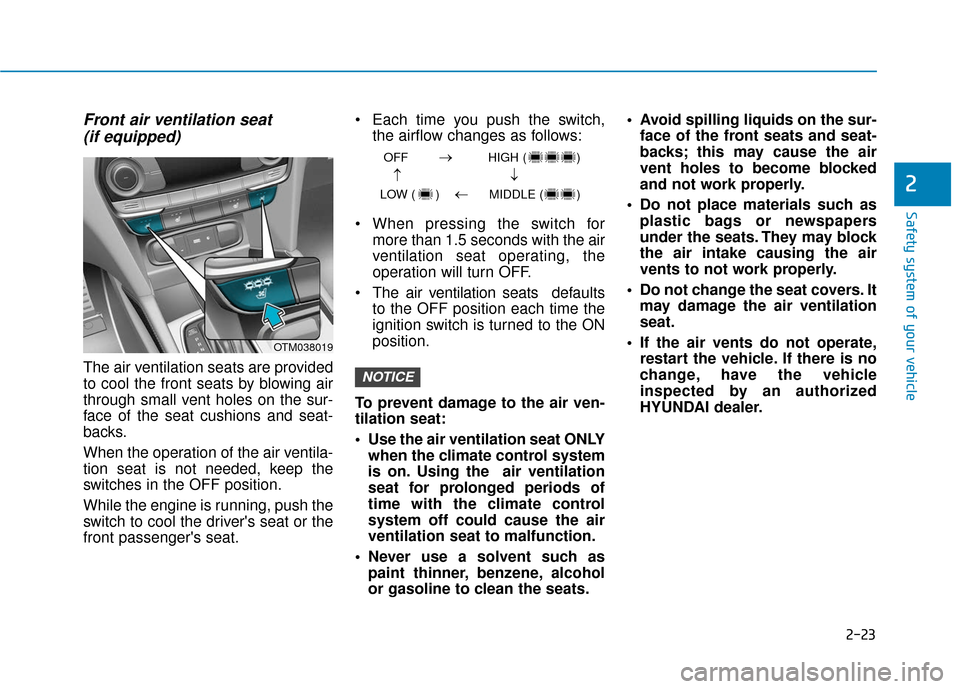
Front air ventilation seat(if equipped)
The air ventilation seats are provided
to cool the front seats by blowing air
through small vent holes on the sur-
face of the seat cushions and seat-
backs.
When the operation of the air ventila-
tion seat is not needed, keep the
switches in the OFF position.
While the engine is running, push the
switch to cool the driver's seat or the
front passenger's seat. Each time you push the switch,
the airflow changes as follows:
When pressing the switch for more than 1.5 seconds with the air
ventilation seat operating, the
operation will turn OFF.
The air ventilation seats def aults
to the OFF position each time the
ignition switch is turned to the ON
position.
To prevent damage to the air ven-
tilation seat:
Use the air ventilation seat ONLY when the climate control system
is on. Using the air ventilation
seat for prolonged periods of
time with the climate control
system off could cause the air
ventilation seat to malfunction.
Never use a solvent such as paint thinner, benzene, alcohol
or gasoline to clean the seats. Avoid spilling liquids on the sur-
face of the front seats and seat-
backs; this may cause the air
vent holes to become blocked
and not work properly.
Do not place materials such as plastic bags or newspapers
under the seats. They may block
the air intake causing the air
vents to not work properly.
Do not change the seat covers. It may damage the air ventilation
seat.
If the air vents do not operate, restart the vehicle. If there is no
change, have the vehicle
inspected by an authorized
HYUNDAI dealer.NOTICE
OFF HIGH ( )
LOW ( ) MIDDLE ( )
→→
→
→
OTM038019
Page 43 of 557
2-25
Safety system of your vehicle
2
This section describes how to use the
seat belts properly. It also describes
some of the things to avoid when
using seat belts.
Seat Belt Safety Precautions
Always fasten your seat belt and
make sure all passengers have fas-
tened their seat belts before starting
any trip. Air bags are designed to
supplement the seat belt as an addi-
tional safety device, but they are not a
substitute. Most states require all
occupants of a vehicle to wear seat
belts.
S SE
E A
A T
T
B
B E
EL
LT
T S
S
Seat belts must be used by ALL
passengers whenever the vehi-
cle is moving. Take the following
precautions when adjusting and
wearing seat belts:
ALWAYS properly restrain
children under age 13 in the
rear seats.
WARNING
NEVER allow children to ride
in the front passenger seat. If
a child age 13 or older must be
seated in the front seat, move
the seat as far back as possi-
ble and properly restrain them
in the seat.
NEVER allow an infant or child
to be carried on an occupant’s
lap.
NEVER ride with the seatback
reclined when the vehicle is
moving.
Do not allow children to share
a seat or seat belt.
Do not wear the shoulder belt
under your arm or behind your
back.
Always wear both the shoul-
der portion and lap portion of
the lap/shoulder belt.
Do not use the seat belt if it is
twisted. A twisted seat belt
will not protect you properly
in an accident.
Do not use a seat belt if the
webbing or hardware is dam-
aged.
Do not latch the seat belt into
the buckles of other seats.
NEVER unfasten the seat belt
while driving. This may cause
loss of vehicle control result-
ing in an accident.
Make sure there is nothing in
the buckle interfering with the
seat belt latch mechanism.
This may prevent the seat belt
from fastening securely.
No modifications or additions
should be made by the user
which will either prevent the
seat belt adjusting devices
from operating to remove
slack, or prevent the seat belt
assembly from being adjusted
to remove slack.
Page 76 of 557
2-58
Safety system of your vehicle
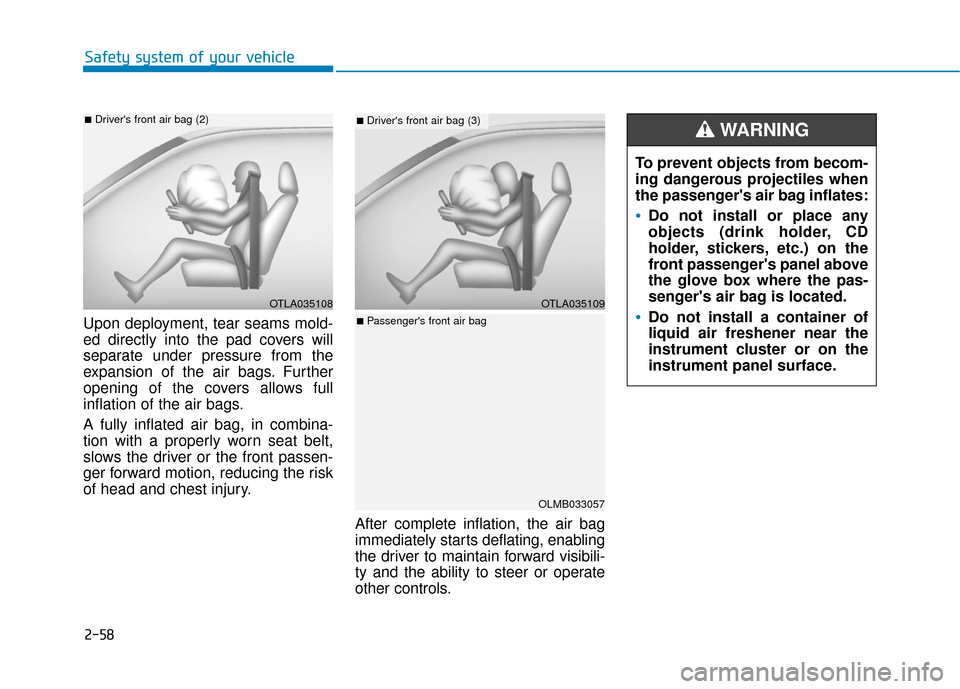
Upon deployment, tear seams mold-
ed directly into the pad covers will
separate under pressure from the
expansion of the air bags. Further
opening of the covers allows full
inflation of the air bags.
A fully inflated air bag, in combina-
tion with a properly worn seat belt,
slows the driver or the front passen-
ger forward motion, reducing the risk
of head and chest injury. After complete inflation, the air bag
immediately starts deflating, enabling
the driver to maintain forward visibili-
ty and the ability to steer or operate
other controls.
OTLA035108
■Driver's front air bag (2)
To prevent objects from becom-
ing dangerous projectiles when
the passenger's air bag inflates:
Do not install or place any
objects (drink holder, CD
holder, stickers, etc.) on the
front passenger's panel above
the glove box where the pas-
senger's air bag is located.
Do not install a container of
liquid air freshener near the
instrument cluster or on the
instrument panel surface.
WARNING
OTLA035109
■Driver's front air bag (3)
OLMB033057
■Passenger's front air bag
Page 82 of 557
2-64
Safety system of your vehicle
Proper seated position for OCS
If the "PASSENGER AIR BAG OFF"
indicator is on when an adult is seat-
ed in the front passenger seat, place
the Engine Start/Stop button in the
OFF position and ask the passenger
to sit properly (sitting upright with the
seat back in an upright position, cen-
tered on the seat cushion with their
seat belt on, legs comfortably
extended and their feet on the floor).
Restart the engine and have the per-
son remain in that position. This will
allow the system to detect the person
and to enable the passenger air bag.
If the "PASSENGER AIR BAG OFF"
indicator is still on, ask the passen-
ger to move to the rear seat.The "PASSENGER AIR BAG OFF"
indicator illuminates for approxi-
mately 4 seconds after the Engine
Start/Stop button is in the ON
position or after the engine is
started. If the front passenger seat
is occupied, the OCS will then
classify the front passenger after
several more seconds.
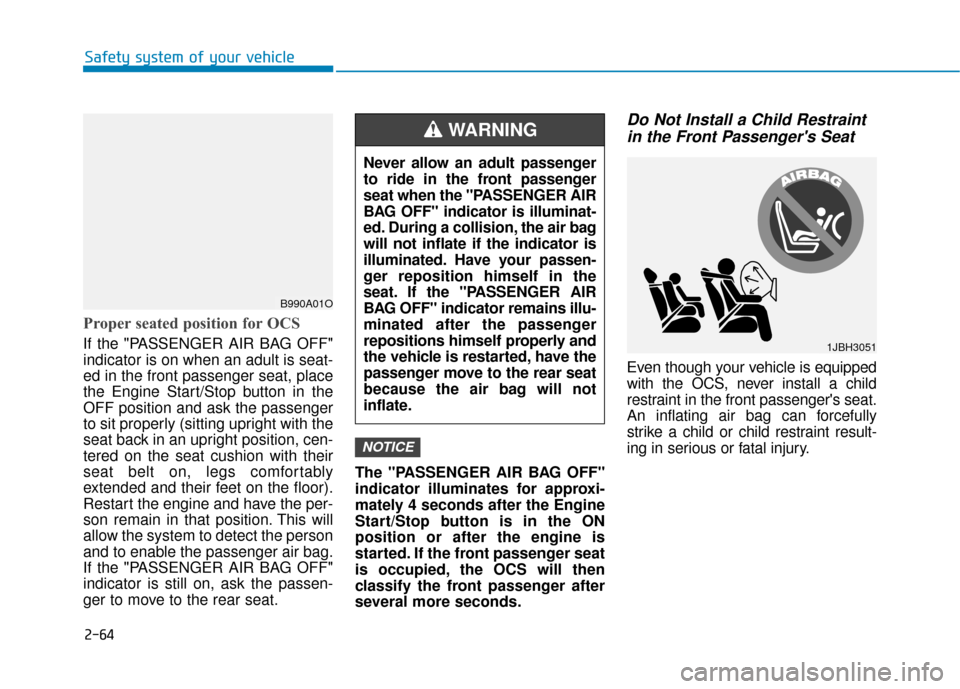
Do Not Install a Child Restraint
in the Front Passenger's Seat
Even though your vehicle is equipped
with the OCS, never install a child
restraint in the front passenger's seat.
An inflating air bag can forcefully
strike a child or child restraint result-
ing in serious or fatal injury.
NOTICE
B990A01O
Never allow an adult passenger
to ride in the front passenger
seat when the "PASSENGER AIR
BAG OFF" indicator is illuminat-
ed. During a collision, the air bag
will not inflate if the indicator is
illuminated. Have your passen-
ger reposition himself in the
seat. If the "PASSENGER AIR
BAG OFF" indicator remains illu-
minated after the passenger
repositions himself properly and
the vehicle is restarted, have the
passenger move to the rear seat
because the air bag will not
inflate.
WARNING
1JBH3051
Page 94 of 557
3-5
Convenient features of your vehicle
3
The Two Press Unlock feature can
also be enabled or disabled by press-
ing the door lock and unlock buttons
simultaneously on the Key FOB:
Press and hold both the Door Lock
button and the Door Unlock button
simultaneously until the hazard
warning lights blink.
This will enable or disable the Two
Press Unlock feature. Repeat this
procedure to enable/disable the
mode again.
Information
After unlocking the doors, the doors
will automatically relock after 30 sec-
onds unless a door is opened.
Liftgate unlocking
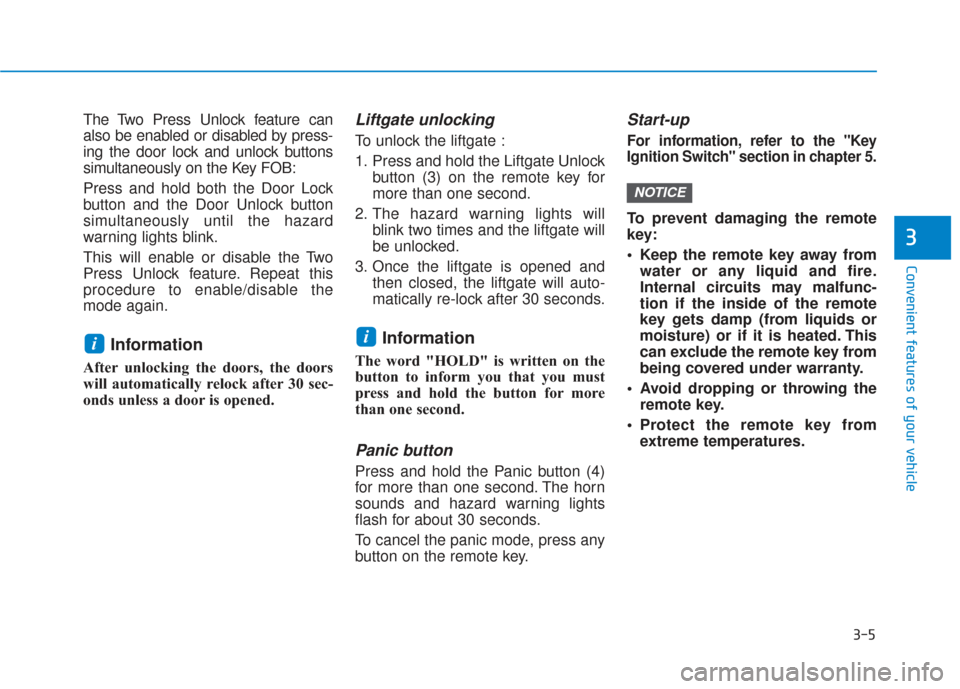
To unlock the liftgate :
1. Press and hold the Liftgate Unlockbutton (3) on the remote key for
more than one second.
2. The hazard warning lights will blink two times and the liftgate will
be unlocked.
3. Once the liftgate is opened and then closed, the liftgate will auto-
matically re-lock after 30 seconds.
Information
The word "HOLD" is written on the
button to inform you that you must
press and hold the button for more
than one second.
Panic button
Press and hold the Panic button (4)
for more than one second. The horn
sounds and hazard warning lights
flash for about 30 seconds.
To cancel the panic mode, press any
button on the remote key.
Start-up
For information, refer to the "Key
Ignition Switch" section in chapter 5.
To prevent damaging the remote
key:
• Keep the remote key away fromwater or any liquid and fire.
Internal circuits may malfunc-
tion if the inside of the remote
key gets damp (from liquids or
moisture) or if it is heated. This
can exclude the remote key from
being covered under warranty.
Avoid dropping or throwing the remote key.
Protect the remote key from extreme temperatures.
NOTICE
ii
Page 97 of 557

3-8
Convenient features of your vehicle
Locking your vehicle
To lock your vehicle using the door
handle button or the Smart Key:
1. Make sure all doors, the hood andthe liftgate are closed.
2. Make sure you have the smart key in your possession.
3. Press either the button on the door handle or the Door Lock but-
ton (1) on the smart key. The
chime will sound once and the
hazard warning lights will blink.
4. Make sure the doors are locked by checking the position of the door
lock button inside the vehicle.
Information
The door handle button will only
operate when the smart key is within
28~40 inches (0.7~1 m) from the out-
side door handle.
Note that you cannot lock your vehi-
cle using the door handle button if
any of the following occur:
The Smart Key is in the vehicle.
The Engine Start/Stop button is inACC or ON position.
Any of the doors are open except for the liftgate.
Unlocking your vehicle
To unlock your vehicle:
1. Make sure you have the smart keyin your possession.
2. Press either the button on the door handle or the Door Unock button
(2) on the smart key. The driver's
door will unlock and the hazard
warning lights will blink two times.
i
Do not leave the Smart Key in
your vehicle with unsupervised
children. Unattended children
could press the Engine Start/
Stop button and may operate
power windows or other con-
trols, or even make the vehicle
move, which could result in
serious injury or death.
WARNING
OTM048000OTM048000
Page 99 of 557
3-10
Convenient features of your vehicle
Power liftgate
To unlock and open the liftgate:
1. Make sure you have the smart keyin your possession.
2. Press either the liftgate handle release switch on the vehicle or
press and hold the Liftgate Unlock
button on the smart key for more
than one second. The hazard
warning lights will blink two times
and the liftgate latch will open.
3. Once the liftgate is opened and then closed, the liftgate will auto-
matically re-lock after 30 seconds.
Information
The liftgate handle switch will only
operate when the smart key is within
28 inches (0.7 m) from the liftgate
handle.
Panic button
Press and hold the Panic button (4)
for more than one second. The horn
sounds and hazard warning lights
blink for about 30 seconds. To cancel
the panic mode, press any button on
the Smart Key.
Start-up
You can start the vehicle without
inserting the key.
For information, refer to the
"Engine Start/Stop Button" sec-
tion in chapter 5.
To prevent damaging the smart key:
Keep the smart key in a cool, dryplace to avoid damage or mal-
function. Exposure to moisture
or high temperature may cause
the internal circuit of the smart
key to malfunction which may
not be covered under warranty.
Avoid dropping or throwing the smart key.
Protect the smart key from extreme temperatures.
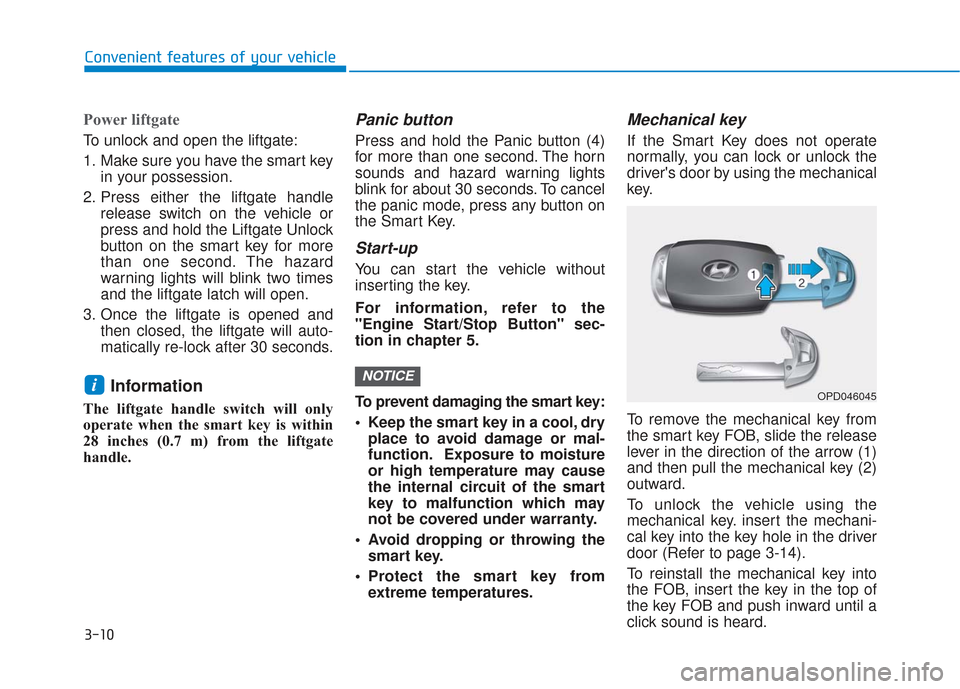
Mechanical key
If the Smart Key does not operate
normally, you can lock or unlock the
driver's door by using the mechanical
key.
To remove the mechanical key from
the smart key FOB, slide the release
lever in the direction of the arrow (1)
and then pull the mechanical key (2)
outward.
To unlock the vehicle using the
mechanical key. insert the mechani-
cal key into the key hole in the driver
door (Refer to page 3-14).
To reinstall the mechanical key into
the FOB, insert the key in the top of
the key FOB and push inward until a
click sound is heard.
NOTICEiOPD046045
Page 105 of 557
3-16
Convenient features of your vehicle
If the inner door handle of either the driver door or passenger door
is pulled when the door lock button
is in the lock position, the button is
unlocked and the door will open.
For Key Start Vehicles (with Remote Key)
The front doors cannot be locked if
the remote key is in the ignition
switch and either of the front doors
are open.
For Push Button Start Vehicles (with Smart Key)
The doors cannot be locked if the
smart key is inside the vehicle and
any of the doors are open.
Information
If a power door lock ever fails to func-
tion while you are in the vehicle try
one or more of the following tech-
niques to exit:
• Operate the door unlock featurerepeatedly (both electronic and
manual) while simultaneously
pulling on the door handle.
• Operate the other door locks and handles, front and rear.
• Lower a front window and use the mechanical key to unlock the door
from outside.
Information
When the vehicle’s battery run out
and you leave the vehicle, make sure
all the doors are locked. You can lock
the driver’s door with a key and the
rest of the doors with the lock button
above the door inside handle.
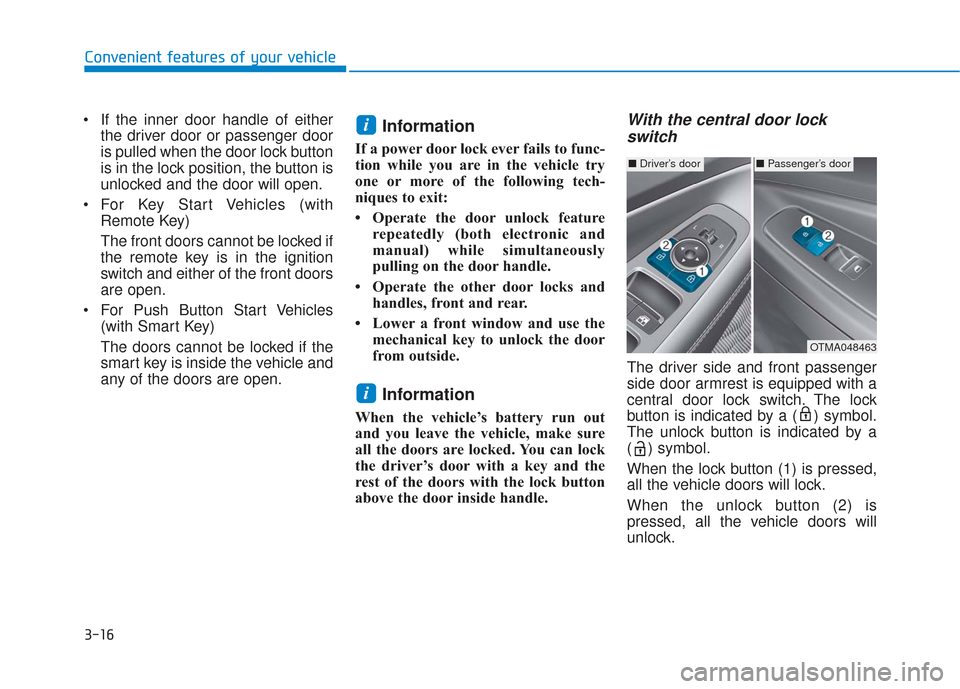
With the central door lockswitch
The driver side and front passenger
side door armrest is equipped with a
central door lock switch. The lock
button is indicated by a ( ) symbol.
The unlock button is indicated by a
( ) symbol.
When the lock button (1) is pressed,
all the vehicle doors will lock.
When the unlock button (2) is
pressed, all the vehicle doors will
unlock.
i
i
■ Driver’s door■Passenger’s door
OTMA048463