2019 Hyundai Santa Fe clock
[x] Cancel search: clockPage 23 of 557

Safety system of your vehicle
2
Safety Precautions
Adjusting the seats so that you are
sitting in a safe, comfortable position
plays an important role in driver and
passenger safety together with the
seat belts and air bags in an acci-
dent.
Air bags
You can take steps to reduce the risk
of being injured by an inflating air
bag. Sitting too close to an air bag
greatly increases the risk of injury in
the event the air bag inflates.
The National Highway Traffic Safety
Administration (NHTSA) recom-
mends that drivers allow at least 10
inches (25 cm) between the center of
the steering wheel and their chest.
Seat belts
Always fasten your seat belt before
starting any trip.
At all times, passengers should sit
upright and be properly restrained.
Infants and small children must be
restrained in appropriate child
restraint systems. Adults and chil-
dren who have outgrown a booster
seat must be restrained using the
seat belts.
Do not use a cushion that
reduces friction between the
seat and the passenger. The
passenger's hips may slide
under the lap portion of the seat
belt during an accident or a
sudden stop. Serious or fatal
internal injuries could result
because the seat belt cannot
operate properly.
WARNING
To reduce the risk of serious
injury or death from an inflating
air bag, take the following pre-
cautions:
•Adjust the driver's seat as far
to the rear as possible while
maintaining the ability to
maintain full control of the
vehicle.
Adjust the front passenger
seat as far to the rear as pos-
sible.
Hold the steering wheel by the
rim with hands at the 9 o'clock
and 3 o'clock positions to
minimize the risk of injuries to
your hands and arms.
NEVER place anything or any-
one between the steering
wheel and the air bag.
Do not allow the front passen-
ger to place feet or legs on the
dashboard to minimize the
risk of leg injuries.
WARNING
2-5
Page 71 of 557
2-53
Safety system of your vehicle
2
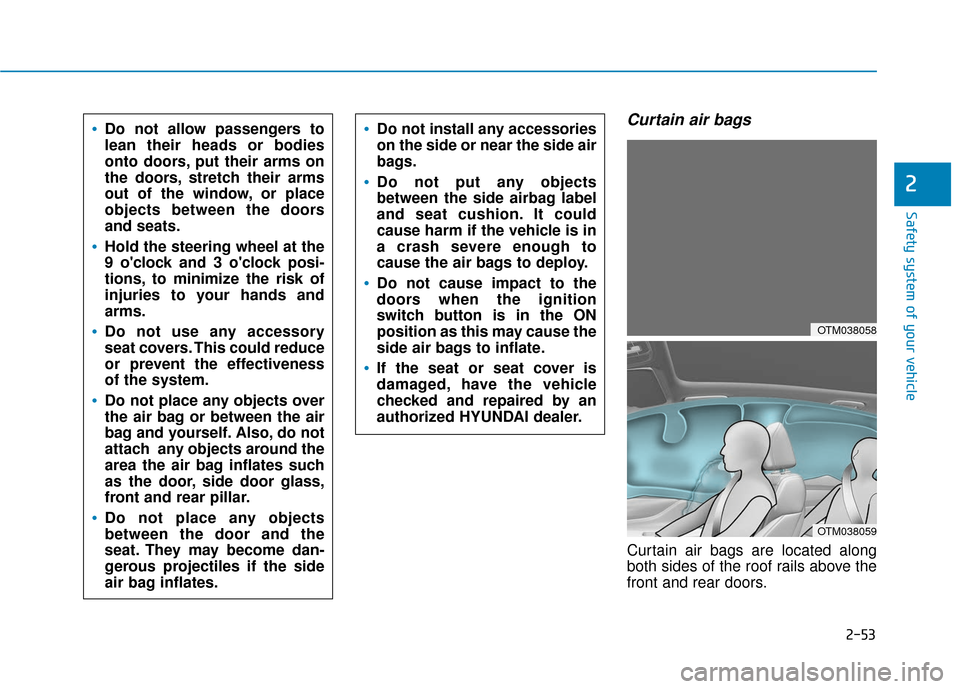
Curtain air bags
Curtain air bags are located along
both sides of the roof rails above the
front and rear doors.
Do not allow passengers to
lean their heads or bodies
onto doors, put their arms on
the doors, stretch their arms
out of the window, or place
objects between the doors
and seats.
Hold the steering wheel at the
9 o'clock and 3 o'clock posi-
tions, to minimize the risk of
injuries to your hands and
arms.
Do not use any accessory
seat covers. This could reduce
or prevent the effectiveness
of the system.
Do not place any objects over
the air bag or between the air
bag and yourself. Also, do not
attach any objects around the
area the air bag inflates such
as the door, side door glass,
front and rear pillar.
Do not place any objects
between the door and the
seat. They may become dan-
gerous projectiles if the side
air bag inflates.
Do not install any accessories
on the side or near the side air
bags.
Do not put any objects
between the side airbag label
and seat cushion. It could
cause harm if the vehicle is in
a crash severe enough to
cause the air bags to deploy.
Do not cause impact to the
doors when the ignition
switch button is in the ON
position as this may cause the
side air bags to inflate.
If the seat or seat cover is
damaged, have the vehicle
checked and repaired by an
authorized HYUNDAI dealer.
OTM038058
OTM038059
Page 75 of 557
2-57
Safety system of your vehicle
2
You can take steps to help reduce
the risk of being injured by an inflat-
ing air bag. The greatest risk is sitting
too close to the air bag. An air bag
needs about 10 inches (25 cm) of
space to inflate. NHTSA recom-
mends that drivers allow at least 10
inches (25 cm) between the center of
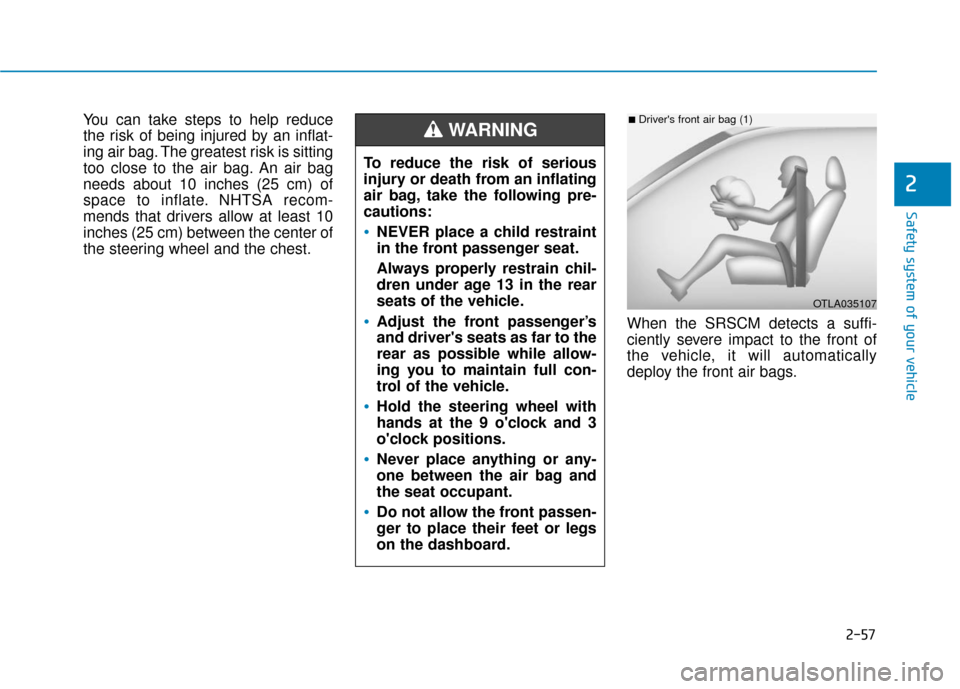
the steering wheel and the chest.When the SRSCM detects a suffi-
ciently severe impact to the front of
the vehicle, it will automatically
deploy the front air bags.
OTLA035107
■Driver's front air bag (1)
To reduce the risk of serious
injury or death from an inflating
air bag, take the following pre-
cautions:
NEVER place a child restraint
in the front passenger seat.
Always properly restrain chil-
dren under age 13 in the rear
seats of the vehicle.
Adjust the front passenger’s
and driver's seats as far to the
rear as possible while allow-
ing you to maintain full con-
trol of the vehicle.
Hold the steering wheel with
hands at the 9 o'clock and 3
o'clock positions.
Never place anything or any-
one between the air bag and
the seat occupant.
Do not allow the front passen-
ger to place their feet or legs
on the dashboard.
WARNING
Page 91 of 557
LCD Display ...........................................................3-93
LCD Display Control ........................................................3-93
LCD Display Modes .........................................................3-94
Trip Computer .....................................................3-108
Head Up Display (HUD).....................................3-112
Lighting................................................................3-114
Exterior Lights ...............................................................3-114
Interior Lights ................................................................3-122
Welcome System ...........................................................3-125
Wipers And Washers .........................................3-126
Front Windshield Wipers .............................................3-126
Front Windshield Washers ..........................................3-128
Rear Window Wiper and Washer..............................3-129
Driver Assist System .........................................3-130
Rear View Monitor .......................................................3-130
Surround View Monitoring .........................................3-131
Parking Distance Warning (Reverse) System ........3-133
Manual Climate Control System.......................3-138
Heating and Air Conditioning .....................................3-139
System Operation .........................................................3-143
System Maintenance....................................................3-145
Automatic Climate Control System ..................3-147
Automatic Temperature Control Mode ....................3-148
Manual Temperature Control Mode .........................3-149System Operation .........................................................3-156
System Maintenance....................................................3-157
Windshield Defrosting and Defogging ............3-159
Auto Defogging System ..............................................3-161
Rear Window Defroster ..............................................3-163
Climate Control Additional Features ...............3-164
Cluster ionizer ................................................................3-164
Automatic Ventilation ...................................................3-164
Sunroof Inside Air Recirculation ...............................3-164
Storage Compartment .......................................3-165
Center Console Storage ..............................................3-165
Glove Box ........................................................................\
3-165
Sunglass Holder.............................................................3-166
Tray......................................................................\
.............3-166
Luggage Tray .................................................................3-167
Interior Features ................................................3-168
Ashtray ........................................................................\
....3-168
Cup Holder ......................................................................3-\
168
Sunvisor ........................................................................\
...3-169
Power Outlet ..................................................................3-170
AC Inverter......................................................................3-\
171
USB Charger ...................................................................3-173\
Wireless Cellular Phone Charging System..............3-173
Clock ........................................................................\
.........3-175
Coat Hook .......................................................................3\
-176
3
Page 153 of 557
3-64
Convenient features of your vehicle
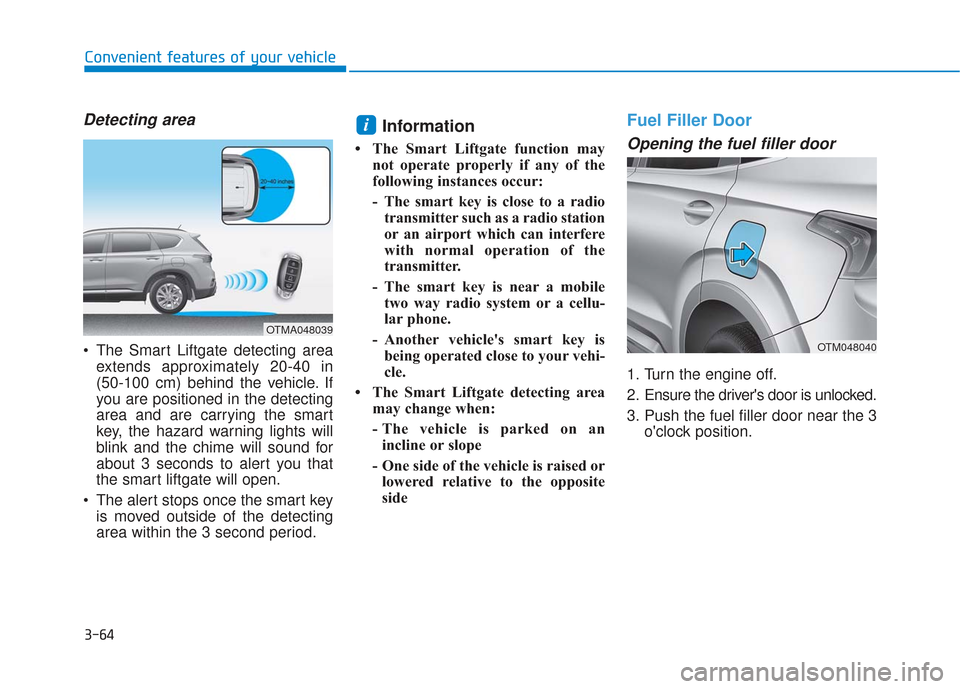
Detecting area
The Smart Liftgate detecting areaextends approximately 20-40 in
(50-100 cm) behind the vehicle. If
you are positioned in the detecting
area and are carrying the smart
key, the hazard warning lights will
blink and the chime will sound for
about 3 seconds to alert you that
the smart liftgate will open.
The alert stops once the smart key is moved outside of the detecting
area within the 3 second period.
Information
• The Smart Liftgate function may not operate properly if any of the
following instances occur:
- The smart key is close to a radiotransmitter such as a radio station
or an airport which can interfere
with normal operation of the
transmitter.
- The smart key is near a mobile two way radio system or a cellu-
lar phone.
- Another vehicle's smart key is being operated close to your vehi-
cle.
• The Smart Liftgate detecting area may change when:
- The vehicle is parked on anincline or slope
- One side of the vehicle is raised or lowered relative to the opposite
side
Fuel Filler Door
Opening the fuel filler door
1. Turn the engine off.
2. Ensure the driver's door is unlocked.
3. Push the fuel filler door near the 3 o'clock position.
i
OTMA048039
OTM048040
Page 154 of 557
3-65
Convenient features of your vehicle
3
Gasoline is highly flammable
and explosive. Failure to follow
these guidelines may result in
SERIOUS INJURY or DEATH:
Read and follow all warnings
posted at the gas station.
Before refueling, note the
location of the Emergency
Gasoline Shut-Off, if available,
at the gas station.
Before touching the fuel noz-
zle, you should eliminate the
potential build-up of static
electricity by touching a metal
part of the vehicle, a safe dis-
tance away from the fuel filler
neck, nozzle, or other gas
source, with your bare hand.
Do not use cellular phones
while refueling. Electric cur-
rent and/or electronic interfer-
ence from cellular phones can
potentially ignite fuel vapors
and cause a fire.
WARNING
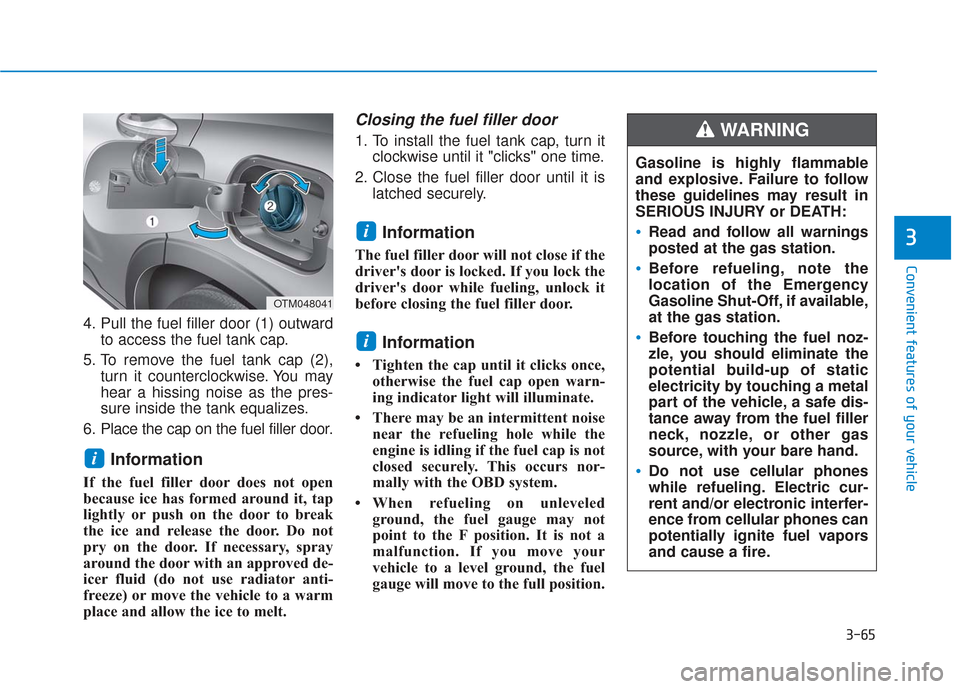
4. Pull the fuel filler door (1) outwardto access the fuel tank cap.
5. To remove the fuel tank cap (2), turn it counterclockwise. You may
hear a hissing noise as the pres-
sure inside the tank equalizes.
6. Place the cap on the fuel filler door.
Information
If the fuel filler door does not open
because ice has formed around it, tap
lightly or push on the door to break
the ice and release the door. Do not
pry on the door. If necessary, spray
around the door with an approved de-
icer fluid (do not use radiator anti-
freeze) or move the vehicle to a warm
place and allow the ice to melt.
Closing the fuel filler door
1. To install the fuel tank cap, turn it clockwise until it "clicks" one time.
2. Close the fuel filler door until it is latched securely.
Information
The fuel filler door will not close if the
driver's door is locked. If you lock the
driver's door while fueling, unlock it
before closing the fuel filler door.
Information
• Tighten the cap until it clicks once,otherwise the fuel cap open warn-
ing indicator light will illuminate.
• There may be an intermittent noise near the refueling hole while the
engine is idling if the fuel cap is not
closed securely. This occurs nor-
mally with the OBD system.
• When refueling on unleveled ground, the fuel gauge may not
point to the F position. It is not a
malfunction. If you move your
vehicle to a level ground, the fuel
gauge will move to the full position.
i
i
i
OTM048041
Page 257 of 557
3-168
Convenient features of your vehicle
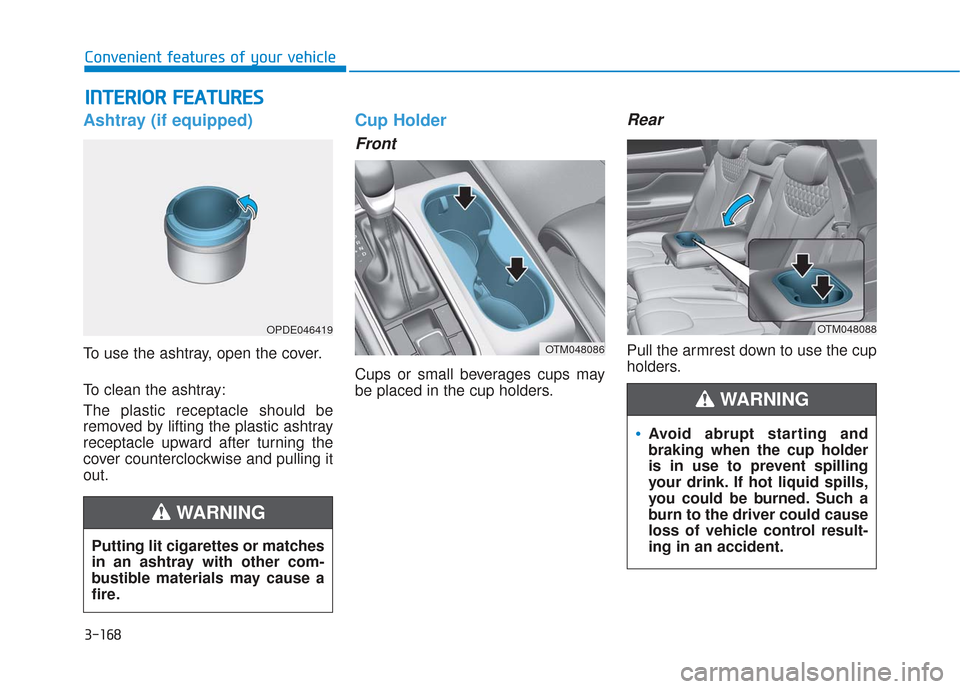
Ashtray (if equipped)
To use the ashtray, open the cover.
To clean the ashtray:
The plastic receptacle should be
removed by lifting the plastic ashtray
receptacle upward after turning the
cover counterclockwise and pulling it
out.
Cup Holder
Front
Cups or small beverages cups may
be placed in the cup holders.
Rear
Pull the armrest down to use the cup
holders.
I IN
N T
TE
ER
R I
IO
O R
R
F
F E
E A
A T
TU
U R
RE
ES
S
Avoid abrupt starting and
braking when the cup holder
is in use to prevent spilling
your drink. If hot liquid spills,
you could be burned. Such a
burn to the driver could cause
loss of vehicle control result-
ing in an accident.
WARNING
OTM048086
OTM048088OPDE046419
Putting lit cigarettes or matches
in an ashtray with other com-
bustible materials may cause a
fire.
WARNING
Page 264 of 557
3-175
Convenient features of your vehicle
3
The wireless charging processmay temporarily stop, when tem-
perature abnormally increases
inside the wireless cellular phone
charging system. Stop the charg-
ing cellular phone and wait until
temperature falls to a certain level.
The wireless charging process may temporarily stop when there
is any metallic item, such as a
coin, between the wireless cellular
phone charging system and the
cellular phone.
When charging some cellular phones with a self-protection fea-
ture, the wireless charging speed
may decrease and the wireless
charging may stop.
If the cellular phone has a thick cover, the wireless charging may
not be possible.
If the cell phone is not completely contacting the charging pad, wire-
less charging may not operate
properly.
Some magnetic items like credit cards, phone cards or rail tickets
may be damaged if left with the
cellular phone during the charging
process. When any cellular phone without a
wireless charging function or a
metallic object is placed on the
charging pad, a small noise may
sound. This small sound is due to
the vehicle discerning compatibil-
ity of the object placed on the
charging pad. It does not affect
your vehicle or the cellular phone
in any way.
Information
If the ignition switch is in the OFF
position, the charging also stops.
Information
This device complies with part 15 of
the FCC Rules.
Operation is subject to the following
two conditions:
1. This device may not cause harmful interference, and
2. This device must accept any inter- ference received, including inter-
ference that may cause undesired
operation.
Clock
Vehicles with Audio system
Select the [SETUP] button on the
audio system ➟ Select [Date/Time].
Set time: Set the time displayed on the audio screen.
Time format: Choose between 12- hour and 24-hour time formats.
Vehicles with Navigation system
Select the Settings menu on the
Navigation system ➟Select
[Date/Time].
GPS time: Displays time accord- ing to the received GNSS time.
24-hour: Switches to 12 hour or 24 hour.
i
i
Do not attempt to adjust the
clock while driving. Doing so
may result in distracted driving
which may lead to an accident
involving personal injury or
death.
WARNING