Page 272 of 557
4-2
Multimedia System
• If you install an aftermarket HID head lamp, your vehicle's audio
and electronic devices may not
function properly.
Prevent chemicals such as per- fume, cosmetic oil, sun cream,
hand cleaner, and air freshener
from contacting the interior
parts because they may cause
damage or discoloration.
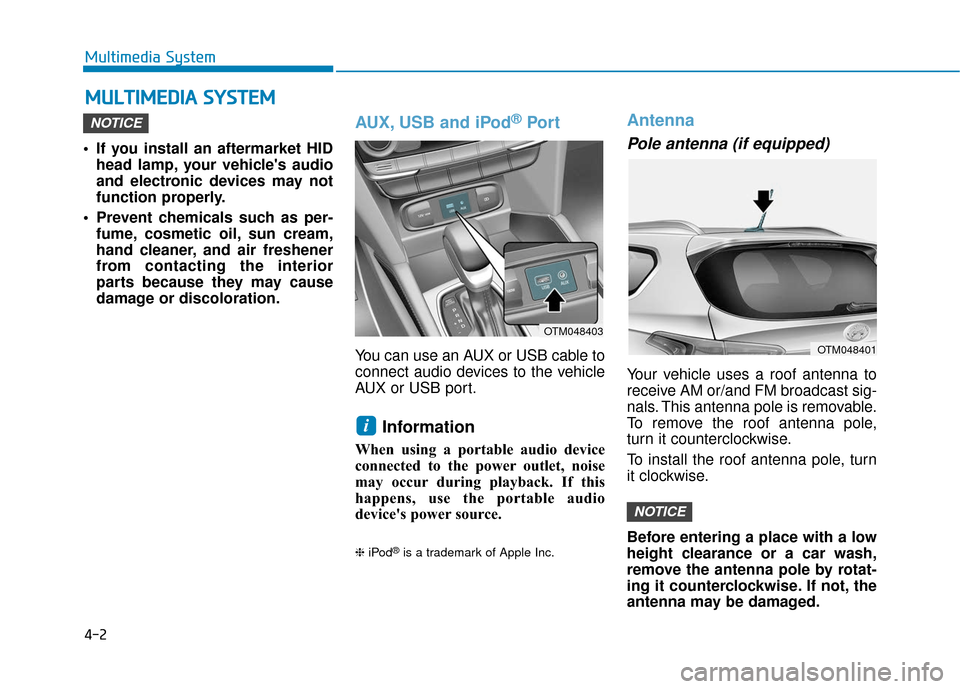
AUX, USB and iPod®Por t
You can use an AUX or USB cable to
connect audio devices to the vehicle
AUX or USB port.
Information
When using a portable audio device
connected to the power outlet, noise
may occur during playback. If this
happens, use the portable audio
device's power source.
❈ iPod®is a trademark of Apple Inc.
Antenna
Pole antenna (if equipped)
Your vehicle uses a roof antenna to
receive AM or/and FM broadcast sig-
nals. This antenna pole is removable.
To remove the roof antenna pole,
turn it counterclockwise.
To install the roof antenna pole, turn
it clockwise.
Before entering a place with a low
height clearance or a car wash,
remove the antenna pole by rotat-
ing it counterclockwise. If not, the
antenna may be damaged.
NOTICE
i
NOTICE
M MU
UL
LT
T I
IM
M E
ED
D I
IA
A
S
S Y
Y S
ST
T E
EM
M
OTM048401
OTM048403
Page 427 of 557
6-7
What to do in an emergency
6
4. Check for coolant leaking from theradiator, hoses or under the vehi-
cle. (If the air conditioning had
been in use, it is normal for cold
water to be draining from it when
you stop.)
5. If engine coolant is leaking out, stop the engine immediately and
call the nearest authorized
HYUNDAI dealer for assistance. 6. If you cannot find the cause of the
overheating, wait until the engine
temperature has returned to nor-
mal. Then, if coolant has been lost,
carefully add coolant to the reser-
voir to bring the fluid level in the
reservoir up to the halfway mark.
7. Proceed with caution, keeping alert for further signs of overheat-
ing. If overheating happens again,
call an authorized HYUNDAI deal-
er for assistance.
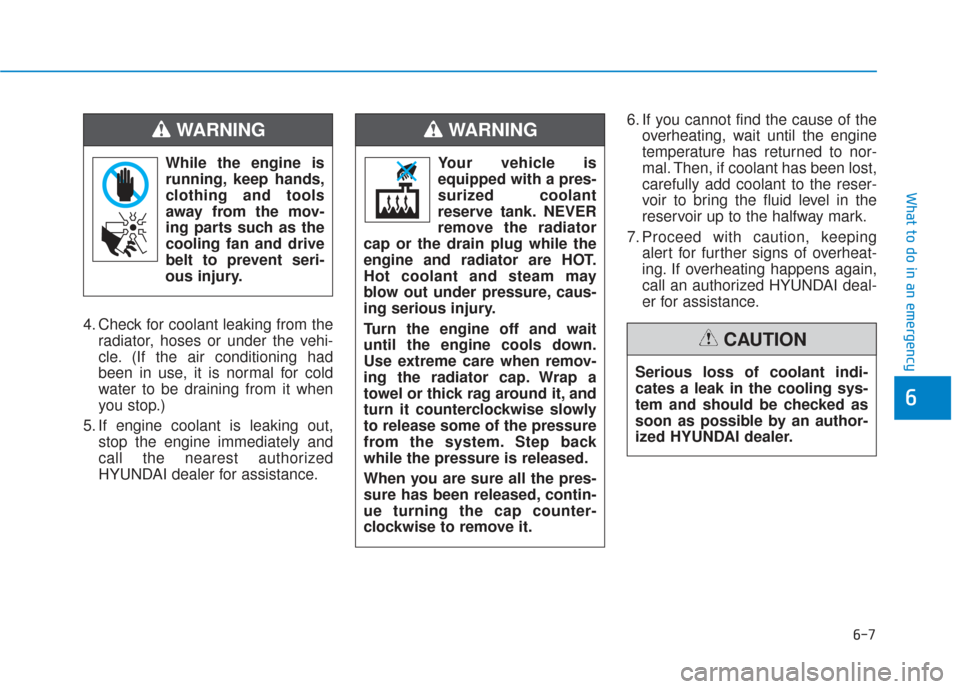
While the engine is
running, keep hands,
clothing and tools
away from the mov-
ing parts such as the
cooling fan and drive
belt to prevent seri-
ous injury.
WARNING
Serious loss of coolant indi-
cates a leak in the cooling sys-
tem and should be checked as
soon as possible by an author-
ized HYUNDAI dealer.
CAUTION
Your vehicle is
equipped with a pres-
surized coolant
reserve tank. NEVER
remove the radiator
cap or the drain plug while the
engine and radiator are HOT.
Hot coolant and steam may
blow out under pressure, caus-
ing serious injury.
Turn the engine off and wait
until the engine cools down.
Use extreme care when remov-
ing the radiator cap. Wrap a
towel or thick rag around it, and
turn it counterclockwise slowly
to release some of the pressure
from the system. Step back
while the pressure is released.
When you are sure all the pres-
sure has been released, contin-
ue turning the cap counter-
clockwise to remove it.
WARNING
Page 435 of 557
6-15
What to do in an emergency
3. Connect the socket (A) and wheellug nut wrench (B).
4. Loosen the bolt enough to lower the spare tire.
Turn the wrench counterclockwise until the spare tire reaches the
ground.
5. After the spare tire reaches the ground, continue to turn the
wrench counterclockwise, and
draw the spare tire outside. Never
rotate the wrench excessively, oth-
erwise the spare tire carrier may
be damaged. 6. Draw out the retainer guide (1)
through the center hole of the
spare tire. To store the spare tire:
1. Lay the tire on the ground with the
valve stem facing up.
2. Place the wheel under the vehicle and install the retainer guide and
chain through the wheel center.
3. Turn the wrench clockwise until it clicks.
6
OTMA068023OTM068024L
Page 437 of 557
6-17
What to do in an emergency
6
6. Loosen the wheel lug nuts coun-terclockwise one turn each in the
order shown above, but do not
remove any lug nuts until the tire
has been raised off of the ground. 7. Place the jack at the designated
jacking position under the frame
closest to the tire you are chang-
ing. The jacking positions are
plates welded to the frame with
two notches. Never jack at any
other position or part of the vehi-
cle. Doing so may damage the
side seal molding or other parts of
the vehicle. 8. Insert the jack handle into the jack
and turn it clockwise, raising the
vehicle until the tire clears the
ground. Make sure the vehicle is
stable on the jack.
OTM068029LOTMA068027OTMA068028
■Front
■Rear
Page 438 of 557
6-18
What to do in an emergency
9. Loosen the lug nuts with the wheel lug nut wrench and remove them
with your fingers. Remove the
wheel from the studs and lay it flat
on the ground out of the way.
Remove any dirt or debris from the
studs, mounting surfaces, and
wheel.
10.Install the spare tire onto the studs of the hub.
11.Tighten the lug nuts with your fin- gers onto the studs with the
smaller end of the lug nuts clos-
est to the wheel.
12.Lower the vehicle to the ground by turning the jack handle coun-
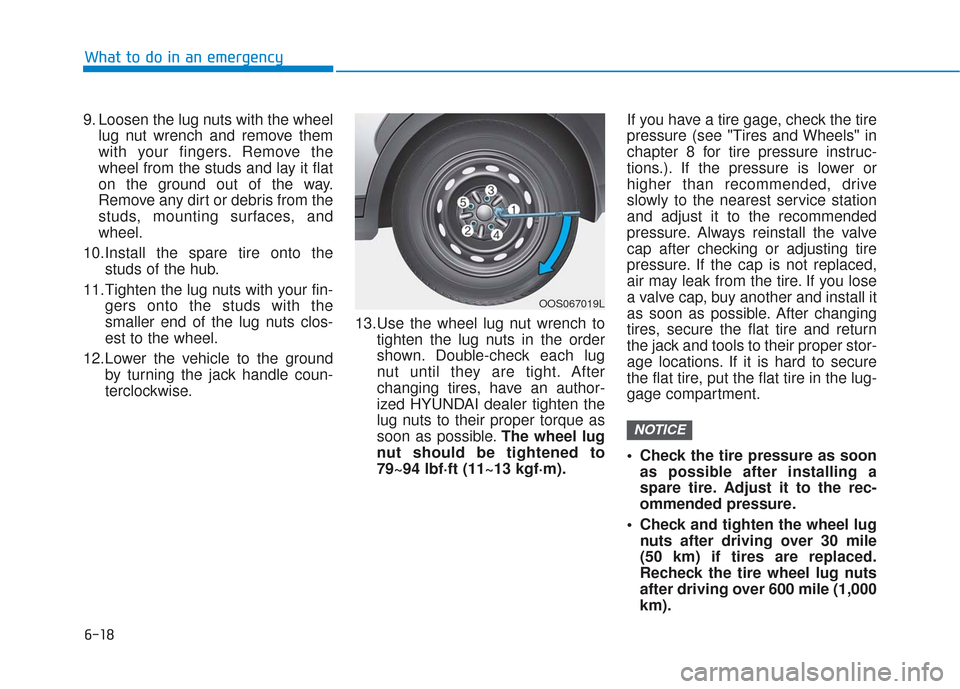
terclockwise. 13.Use the wheel lug nut wrench to
tighten the lug nuts in the order
shown. Double-check each lug
nut until they are tight. After
changing tires, have an author-
ized HYUNDAI dealer tighten the
lug nuts to their proper torque as
soon as possible. The wheel lug
nut should be tightened to
79~94 lbf·ft (11~13 kgf·m). If you have a tire gage, check the tire
pressure (see "Tires and Wheels" in
chapter 8 for tire pressure instruc-
tions.). If the pressure is lower or
higher than recommended, drive
slowly to the nearest service station
and adjust it to the recommended
pressure. Always reinstall the valve
cap after checking or adjusting tire
pressure. If the cap is not replaced,
air may leak from the tire. If you lose
a valve cap, buy another and install it
as soon as possible. After changing
tires, secure the flat tire and return
the jack and tools to their proper stor-
age locations. If it is hard to secure
the flat tire, put the flat tire in the lug-
gage compartment.
Check the tire pressure as soon
as possible after installing a
spare tire. Adjust it to the rec-
ommended pressure.
Check and tighten the wheel lug nuts after driving over 30 mile
(50 km) if tires are replaced.
Recheck the tire wheel lug nuts
after driving over 600 mile (1,000
km).
NOTICE
OOS067019L
Page 466 of 557
Do not use a solution that containsmore than 60% antifreeze or less
than 35% antifreeze, which would
reduce the effectiveness of the
solution.
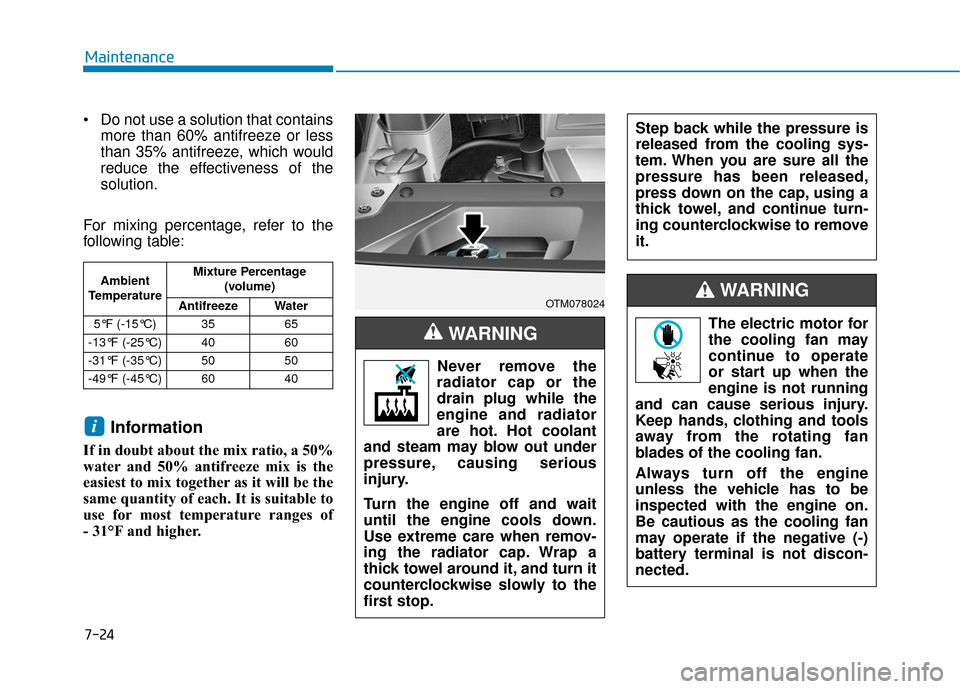
For mixing percentage, refer to the
following table:
Information
If in doubt about the mix ratio, a 50%
water and 50% antifreeze mix is the
easiest to mix together as it will be the
same quantity of each. It is suitable to
use for most temperature ranges of
- 31°F and higher.
i
7-24
Maintenance
The electric motor for
the cooling fan may
continue to operate
or start up when the
engine is not running
and can cause serious injury.
Keep hands, clothing and tools
away from the rotating fan
blades of the cooling fan.
Always turn off the engine
unless the vehicle has to be
inspected with the engine on.
Be cautious as the cooling fan
may operate if the negative (-)
battery terminal is not discon-
nected.
WARNING Ambient
Temperature Mixture Percentage
(volume)
Antifreeze Water
5°F (-15°C) 35 65
-13°F (-25°C) 40 60
-31°F (-35°C) 50 50
-49°F (-45°C) 60 40
Never remove the
radiator cap or the
drain plug while the
engine and radiator
are hot. Hot coolant
and steam may blow out under
pressure, causing serious
injury.
Turn the engine off and wait
until the engine cools down.
Use extreme care when remov-
ing the radiator cap. Wrap a
thick towel around it, and turn it
counterclockwise slowly to the
first stop.
WARNING
OTM078024
Step back while the pressure is
released from the cooling sys-
tem. When you are sure all the
pressure has been released,
press down on the cap, using a
thick towel, and continue turn-
ing counterclockwise to remove
it.
Page 478 of 557
By jump starting
After a jump start from a good bat-
tery, drive the vehicle for at least 30
minutes or operate at idle for at least
60 minutes before it is shutoff.
Alternatively you may visit a dealer
for charge and battery test.
The vehicle may not restart if you
shut it off before the battery had a
chance to adequately recharge. See
"Jump Starting" in chapter 6 for more
information on jump starting proce-
dures.
Information
An inappropriately disposedbattery can be harmful to
the environment and human
health. Dispose of the bat-
tery according to your local
law(s) or regulations.
Reset Features
The following items may need to be
reset after the battery has been dis-
charged or the battery has been dis-
connected. See chapter 3 or 4 for:
• Power Windows
Driver Position Memory System
Trip Computer
Climate Control System
Clock
Audio System
Sunroof
i
Maintenance
7-36
Page 508 of 557
Daytime running light (DRL),
parking lamp and side marker
lamp
If the LED lamp does not operate,
have the system checked by an
authorized HYUNDAI dealer.
The LED lamps cannot be replaced
as a single unit because it is an inte-
grated unit. The LED lamps has to be
replaced with the unit.
A skilled technician should check or
repair the LED lamp, for it may dam-
age related parts of the vehicle.
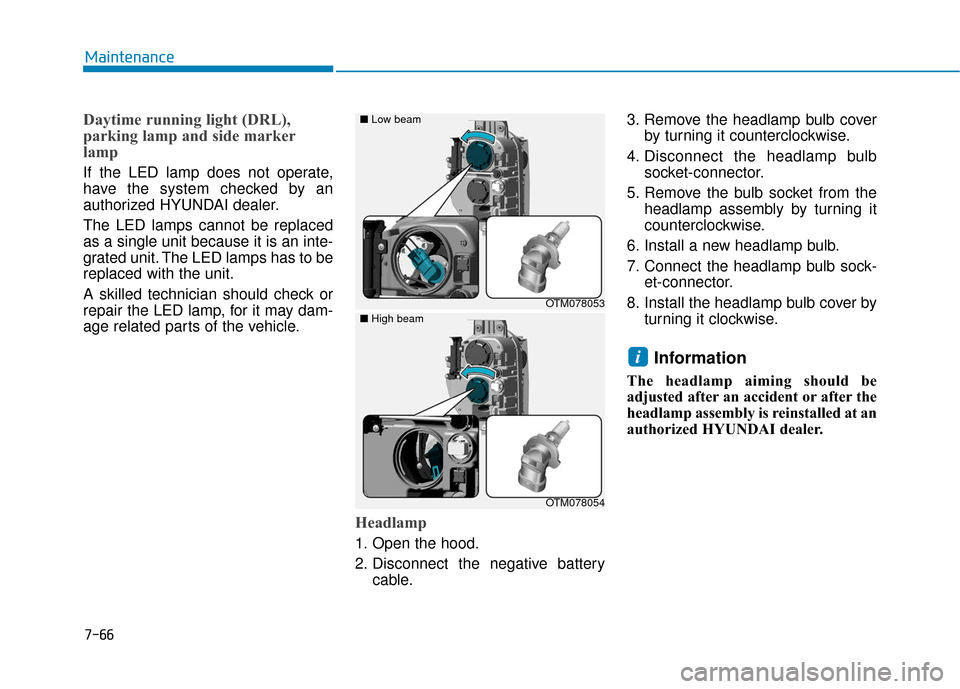
Headlamp
1. Open the hood.
2. Disconnect the negative batterycable. 3. Remove the headlamp bulb cover
by turning it counterclockwise.
4. Disconnect the headlamp bulb socket-connector.
5. Remove the bulb socket from the headlamp assembly by turning it
counterclockwise.
6. Install a new headlamp bulb.
7. Connect the headlamp bulb sock- et-connector.
8. Install the headlamp bulb cover by turning it clockwise.
Information
The headlamp aiming should be
adjusted after an accident or after the
headlamp assembly is reinstalled at an
authorized HYUNDAI dealer.
i
OTM078053
■
Low beam
OTM078054
■
High beam
Maintenance
7-66