2019 Hyundai Santa Fe push button start
[x] Cancel search: push button startPage 99 of 557
3-10
Convenient features of your vehicle
Power liftgate
To unlock and open the liftgate:
1. Make sure you have the smart keyin your possession.
2. Press either the liftgate handle release switch on the vehicle or
press and hold the Liftgate Unlock
button on the smart key for more
than one second. The hazard
warning lights will blink two times
and the liftgate latch will open.
3. Once the liftgate is opened and then closed, the liftgate will auto-
matically re-lock after 30 seconds.
Information
The liftgate handle switch will only
operate when the smart key is within
28 inches (0.7 m) from the liftgate
handle.
Panic button
Press and hold the Panic button (4)
for more than one second. The horn
sounds and hazard warning lights
blink for about 30 seconds. To cancel
the panic mode, press any button on
the Smart Key.
Start-up
You can start the vehicle without
inserting the key.
For information, refer to the
"Engine Start/Stop Button" sec-
tion in chapter 5.
To prevent damaging the smart key:
Keep the smart key in a cool, dryplace to avoid damage or mal-
function. Exposure to moisture
or high temperature may cause
the internal circuit of the smart
key to malfunction which may
not be covered under warranty.
Avoid dropping or throwing the smart key.
Protect the smart key from extreme temperatures.
Mechanical key
If the Smart Key does not operate
normally, you can lock or unlock the
driver's door by using the mechanical
key.
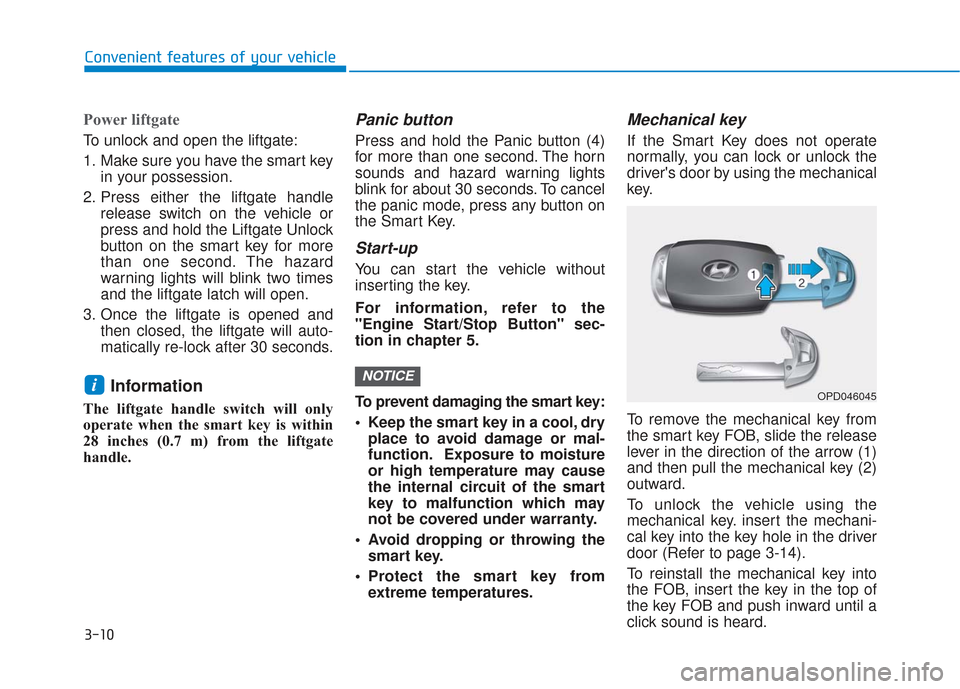
To remove the mechanical key from
the smart key FOB, slide the release
lever in the direction of the arrow (1)
and then pull the mechanical key (2)
outward.
To unlock the vehicle using the
mechanical key. insert the mechani-
cal key into the key hole in the driver
door (Refer to page 3-14).
To reinstall the mechanical key into
the FOB, insert the key in the top of
the key FOB and push inward until a
click sound is heard.
NOTICEiOPD046045
Page 105 of 557
3-16
Convenient features of your vehicle
If the inner door handle of either the driver door or passenger door
is pulled when the door lock button
is in the lock position, the button is
unlocked and the door will open.
For Key Start Vehicles (with Remote Key)
The front doors cannot be locked if
the remote key is in the ignition
switch and either of the front doors
are open.
For Push Button Start Vehicles (with Smart Key)
The doors cannot be locked if the
smart key is inside the vehicle and
any of the doors are open.
Information
If a power door lock ever fails to func-
tion while you are in the vehicle try
one or more of the following tech-
niques to exit:
• Operate the door unlock featurerepeatedly (both electronic and
manual) while simultaneously
pulling on the door handle.
• Operate the other door locks and handles, front and rear.
• Lower a front window and use the mechanical key to unlock the door
from outside.
Information
When the vehicle’s battery run out
and you leave the vehicle, make sure
all the doors are locked. You can lock
the driver’s door with a key and the
rest of the doors with the lock button
above the door inside handle.
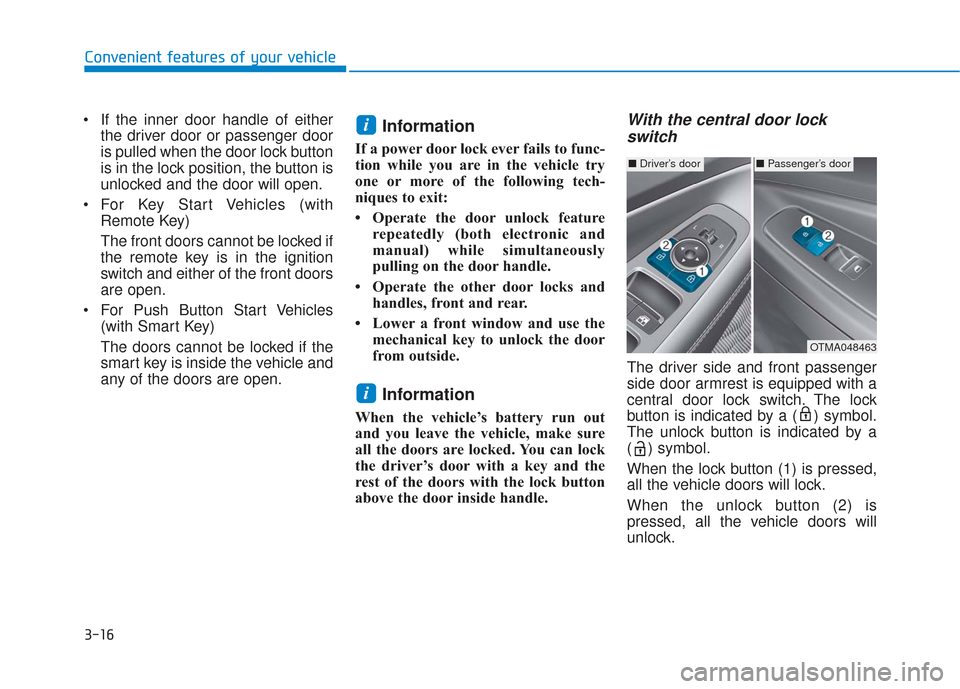
With the central door lockswitch
The driver side and front passenger
side door armrest is equipped with a
central door lock switch. The lock
button is indicated by a ( ) symbol.
The unlock button is indicated by a
( ) symbol.
When the lock button (1) is pressed,
all the vehicle doors will lock.
When the unlock button (2) is
pressed, all the vehicle doors will
unlock.
i
i
■ Driver’s door■Passenger’s door
OTMA048463
Page 106 of 557
3-17
Convenient features of your vehicle
3
For Key Start Vehicles (withRemote Key)
If the key is in the ignition switch
and any door is opened, the doors
will not lock even though the lock
button (2) is pressed.
For Push Button Start Vehicles (with Smart Key)
If the smart key is in the vehicle
and any door is open, the doors
will not lock even though the lock
button (2) is pressed.
The doors should always be
fully closed and locked while
the vehicle is in motion. If the
doors are unlocked, the risk of
being thrown from the vehicle
in a crash is increased.
Do not pull the inner door
handle of the driver's or pas-
senger's door while the vehi-
cle is moving.
WARNING
Do not leave children or animals
unattended in your vehicle. An
enclosed vehicle can become
extremely hot, causing death or
serious injury to unattended
children or animals who cannot
escape the vehicle. Children
might operate features of the
vehicle that could injure them,
or they could encounter other
harm, possibly from someone
gaining entry to the vehicle.
WARNING
Always secure your vehicle.
Leaving your vehicle unlocked
increases the potential risk to
you or others from someone
hiding in your vehicle.
To secure your vehicle, while
depressing the brake, move the
shift lever to the P (Park) posi-
tion, engage the parking brake,
and place the ignition switch in
the LOCK/OFF position, close
all windows, lock all doors, and
always take the key with you.
WARNING
Page 115 of 557
3-26
Convenient features of your vehicle
Recalling Positions from
Memory
1. Shift to P (Park) while the ignitionswitch is in the ON position.
2. Press the desired memory button (1 or 2). The system will beep
once, and then the driver's seat
position, side view mirror position,
instrument panel illumination
intensity and head-up display
height/brightness will automatical-
ly adjust to the stored positions.
3. "Driver 1 (or 2) settings applied" will appear on the cluster LCD dis-
play.
Information
• While recalling the "1" memoryposition, pressing the SET or 1 but-
ton temporarily stops the adjust-
ment of the recalled memory posi-
tion. Pressing the 2 button recalls
the "2" memory position. • While recalling the "2" memory
position, pressing the SET or 2 but-
ton temporarily stops the adjust-
ment of the recalled memory posi-
tion. Pressing the 1 button recalls
the "1" memory position.
• While recalling the stored positions, pressing one of the control buttons
for the driver's seat, side view mir-
ror, instrument panel illumination
or head-up display will cause the
movement of that component to stop
and move in the direction that the
control button is pressed.
Resetting the Driver's Seat
Memory System
Take the following procedures to reset
the driver's seat memory system,
when it does not operate properly.
To reset the driver's seat memo-ry system
1. Place the ignition switch to the ON
position, shift to P (Park), and
open the driver's door. 2. Operate the control switch to set
the driver's seat and seatback to
the foremost position.
3. Simultaneously press the SET button and push forward the seat
movement switch over 2 seconds.
While resetting the driver's seatmemory system
1. It starts with the notification sound.
2. The driver's seat and seatback is
adjusted to the rearward position
with the notification sound.
3. The driver's seat and seatback is re-adjusted to the default position
(central position) with the notifica-
tion sound.
However, in the following cases, the
resetting procedure and the notifica-
tion sound may stop.
- The memory button is pressed.
- The control switch is operated.
- The gear is shifted out of P (Park).
- The driving speed exceeds 2 mph (3 km/h).
- The driver's door is closed.
i
Page 238 of 557

3-149
Convenient features of your vehicle
3
To turn the automatic operation off,
select any button of the following:
- Mode selection button
- Front windshield defroster button(Press the button one more time
to deselect the front windshield
defroster function. The 'AUTO'
sign will illuminate on the informa-
tion display once again.)
- Fan speed control button
The selected function will be con-
trolled manually while other functions
operate automatically.
For your convenience and to improve
the efficiency of the climate control,
use the AUTO button and set the
temperature to 72°F (22°C).
Never place anything near the
ambient light/solar sensor to
ensure better control of the heat-
ing and cooling system.Manual Temperature Control
Mode
The heating and cooling system can
be controlled manually by pushing
buttons other than the AUTO button.
In this case, the system works
sequentially according to the order of
buttons selected.
When pressing any button except the
AUTO button while using automatic
operation, the functions not selected
will be controlled automatically.
1. Start the engine.
2. Set the mode to the desired posi-tion.
To improve the effectiveness of heating and cooling, select the
mode according to the following:
- Heating:
- Cooling:
3. Set the temperature control to the desired position.
4. Set the air intake control to Fresh mode.
5. Set the fan speed control to the desired speed.
NOTICE
OTMA048315
OTMA048478
■Type A
■Type B
Page 287 of 557
5-13
Driving your vehicle
5
To prevent damage to the vehicle:
If the engine stalls while you arein motion, do not attempt to
move the shift lever to the P
(Park) position.
If traffic and road conditions
permit, you may put the shift
lever in the N (Neutral) position
while the vehicle is still moving
and press the Engine Start/Stop
button in an attempt to restart
the engine.
Do not push or tow your vehicle to start the engine. To prevent damage to the vehicle:
When the stop lamp switch fuse is
blown, you can't start the engine
normally. Replace the fuse with a
new one. If you are not able to
replace the fuse, you can start the
engine by pressing and holding
the Engine Start/Stop button for
10 seconds with the Engine Start/
Stop button in the ACC position.
Do not press the Engine Start/Stop
button for more than 10 seconds
except when the stop
lamp switch
fuse is blown.
For your safety always depress
the brake pedal before starting the
engine.
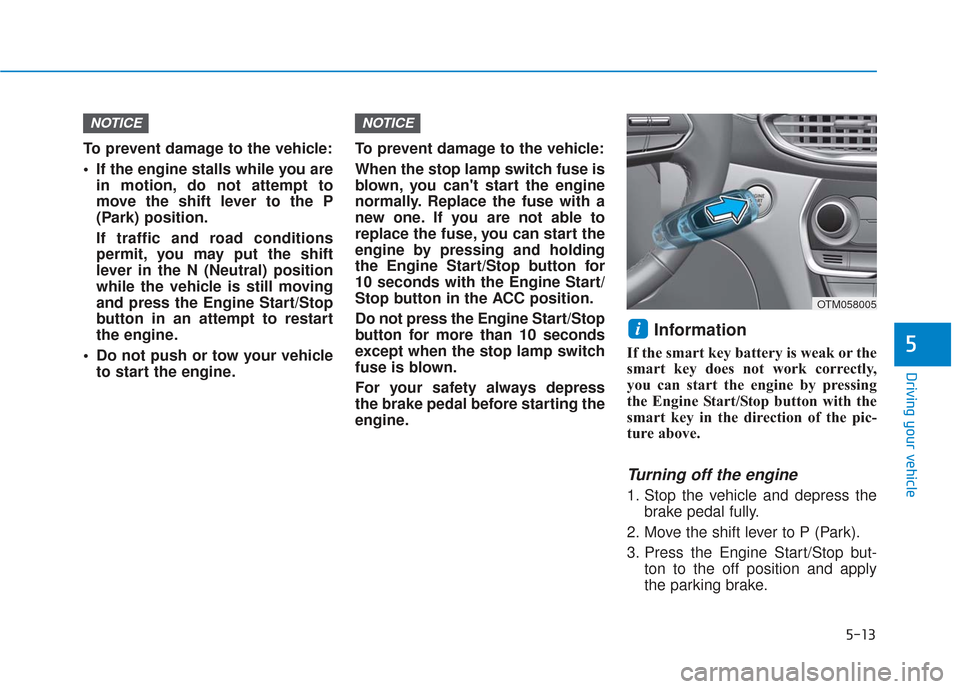
Information
If the smart key battery is weak or the
smart key does not work correctly,
you can start the engine by pressing
the Engine Start/Stop button with the
smart key in the direction of the pic-
ture above.
Turning off the engine
1. Stop the vehicle and depress the brake pedal fully.
2. Move the shift lever to P (Park).
3. Press the Engine Start/Stop but- ton to the off position and apply
the parking brake.
i
NOTICENOTICE
OTM058005
Page 316 of 557
5-42
Driving your vehicle
When driving on normal roads,
deactivate the AWD LOCK mode
by pushing the AWD LOCK button
(AWD LOCK indicator light goes
off). Driving on normal roads with
the AWD LOCK mode, especially,
when cornering may cause
mechanical noise or vibration. The
noise and vibration will disappear
when the AWD LOCK mode is
deactivated. Prolong driving with
the noise and vibration may dam-
age some parts of the power train.
Information
When the AWD LOCK mode is deac-
tivated, a sensation may be felt as the
driving power is delivered entirely to
the front wheels.
For safe AWD operation
Before driving
Make sure all passengers are wearing seat belts.
Sit upright and closer to the steer- ing wheel than usual. Adjust the
steering wheel to a position com-
fortable for you to drive.
Driving on snow-covered or icy
roads
Start off slowly by applying theaccelerator pedal gently.
Use snow tires or tire chains.
Keep sufficient distance between your vehicle and the vehicle in
front of you.
Apply engine braking during decel- eration by switching the gear shift
lever to Manual Shift Mode and
manually selecting a lower gear.
Avoid speeding, rapid accelera- tion, sudden brake applications,
and sharp turns to prevent skids.
Driving in sand or mud
Maintain slow and constant speed.
Use tire chains driving in mud ifnecessary.
Keep sufficient distance between your vehicle and the vehicle in
front of you.
Reduce vehicle speed and always check the road condition.
Avoid speeding, rapid accelera- tion, sudden brake applications,
and sharp turns to prevent getting
stuck.
i
NOTICE
When the vehicle is stuck in
snow, sand or mud, place a non-
slip material under the drive
wheels to provide traction OR
Slowly spin the wheels in for-
ward and reverse directions
which causes a rocking motion
that may free the vehicle.
However, avoid running the
engine continuously at high
rpm, doing so may damage the
AWD system.
CAUTION
Page 385 of 557
5-111
Driving your vehicle
5
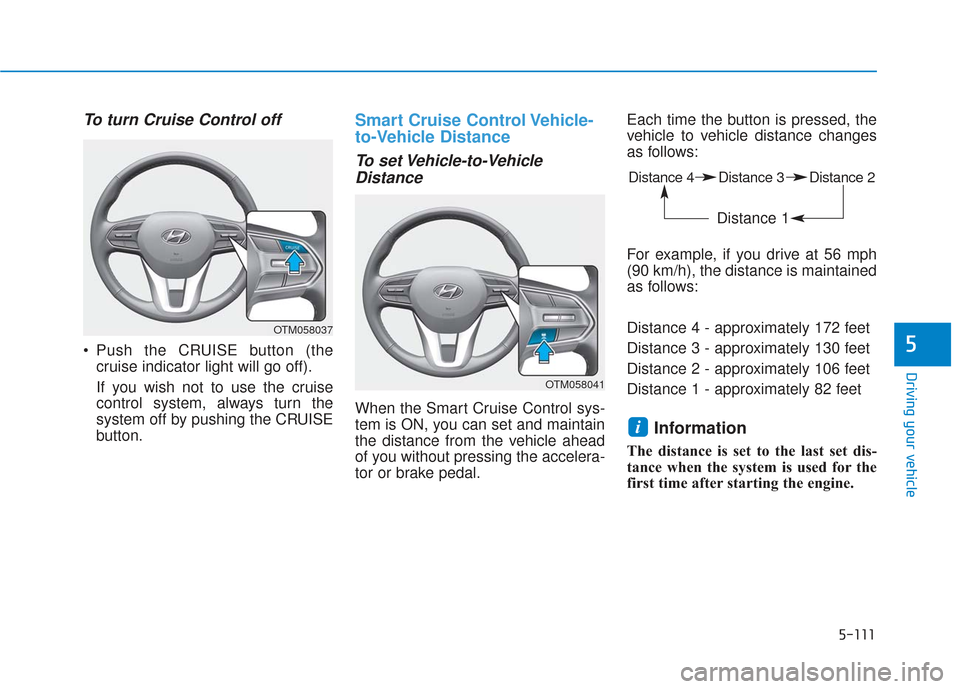
To turn Cruise Control off
Push the CRUISE button (thecruise indicator light will go off).
If you wish not to use the cruise
control system, always turn the
system off by pushing the CRUISE
button.
Smart Cruise Control Vehicle-
to-Vehicle Distance
To set Vehicle-to-VehicleDistance
When the Smart Cruise Control sys-
tem is ON, you can set and maintain
the distance from the vehicle ahead
of you without pressing the accelera-
tor or brake pedal. Each time the button is pressed, the
vehicle to vehicle distance changes
as follows:
For example, if you drive at 56 mph
(90 km/h), the distance is maintained
as follows:
Distance 4 - approximately 172 feet
Distance 3 - approximately 130 feet
Distance 2 - approximately 106 feet
Distance 1 - approximately 82 feet
Information
The distance is set to the last set dis-
tance when the system is used for the
first time after starting the engine.
i
OTM058037
Distance 4 Distance 3 Distance 2
Distance 1
OTM058041