2019 Hyundai Santa Fe mph
[x] Cancel search: mphPage 44 of 557
2-26
Safety system of your vehicle
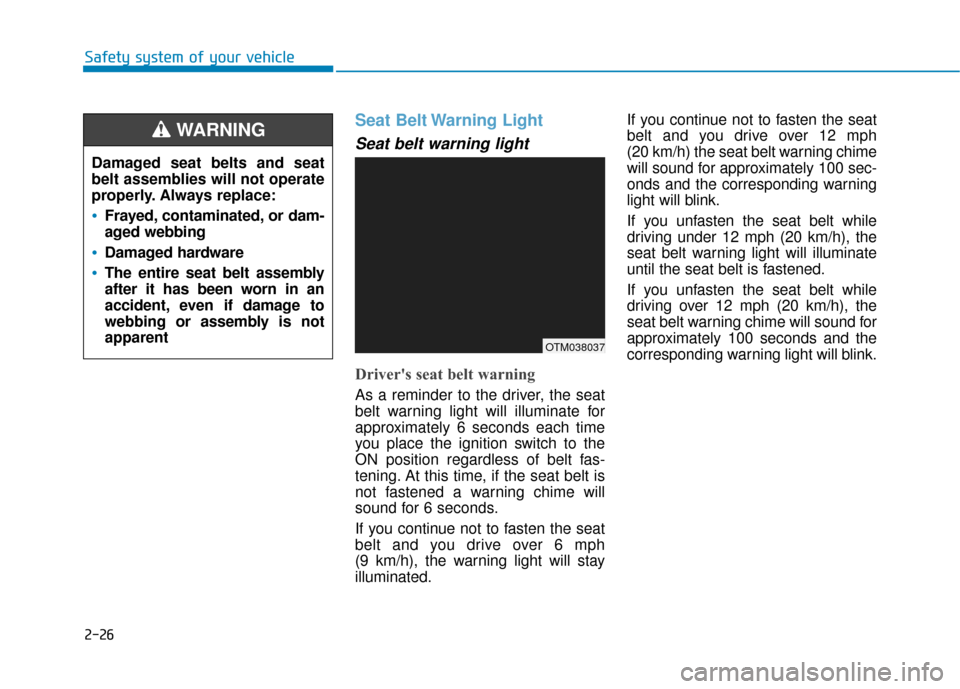
Seat Belt Warning Light
Seat belt warning light
Driver's seat belt warning
As a reminder to the driver, the seat
belt warning light will illuminate for
approximately 6 seconds each time
you place the ignition switch to the
ON position regardless of belt fas-
tening. At this time, if the seat belt is
not fastened a warning chime will
sound for 6 seconds.
If you continue not to fasten the seat
belt and you drive over 6 mph
(9 km/h), the warning light will stay
illuminated.If you continue not to fasten the seat
belt and you drive over 12 mph
(20 km/h) the seat belt warning chime
will sound for approximately 100 sec-
onds and the corresponding warning
light will blink.
If you unfasten the seat belt while
driving under 12 mph (20 km/h), the
seat belt warning light will illuminate
until the seat belt is fastened.
If you unfasten the seat belt while
driving over 12 mph (20 km/h), the
seat belt warning chime will sound for
approximately 100 seconds and the
corresponding warning light will blink.
Damaged seat belts and seat
belt assemblies will not operate
properly. Always replace:
Frayed, contaminated, or dam-
aged webbing
Damaged hardware
The entire seat belt assembly
after it has been worn in an
accident, even if damage to
webbing or assembly is not
apparent
WARNING
OTM038037
Page 45 of 557
2-27
Safety system of your vehicle
2
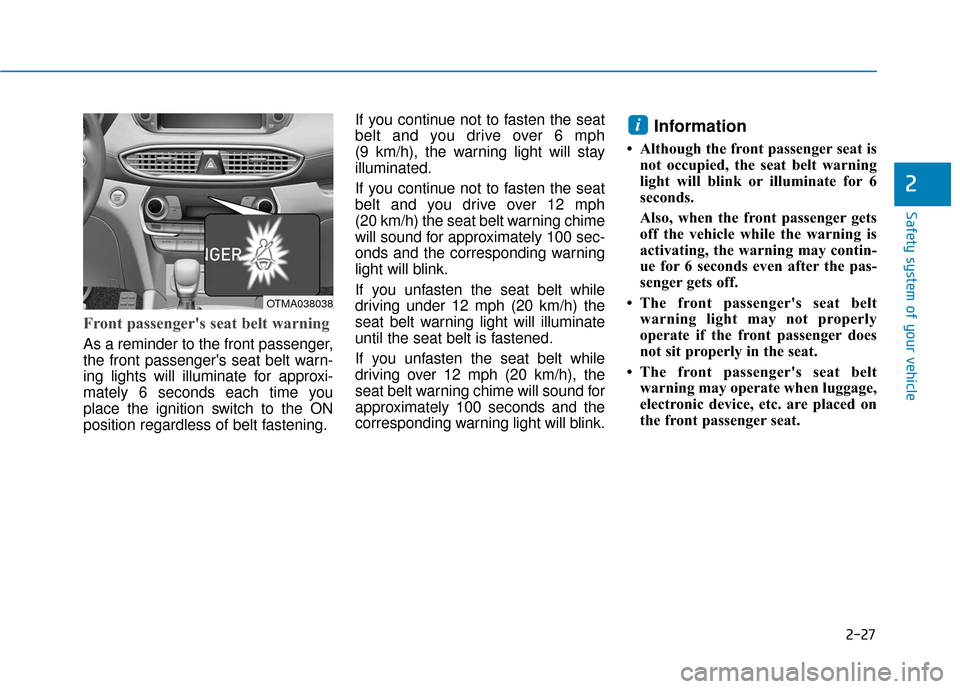
Front passenger's seat belt warning
As a reminder to the front passenger,
the front passenger's seat belt warn-
ing lights will illuminate for approxi-
mately 6 seconds each time you
place the ignition switch to the ON
position regardless of belt fastening.If you continue not to fasten the seat
belt and you drive over 6 mph
(9 km/h), the warning light will stay
illuminated.
If you continue not to fasten the seat
belt and you drive over 12 mph
(20 km/h) the seat belt warning chime
will sound for approximately 100 sec-
onds and the corresponding warning
light will blink.
If you unfasten the seat belt while
driving under 12 mph (20 km/h) the
seat belt warning light will illuminate
until the seat belt is fastened.
If you unfasten the seat belt while
driving over 12 mph (20 km/h), the
seat belt warning chime will sound for
approximately 100 seconds and the
corresponding warning light will blink.
Information
• Although the front passenger seat is
not occupied, the seat belt warning
light will blink or illuminate for 6
seconds.
Also, when the front passenger gets
off the vehicle while the warning is
activating, the warning may contin-
ue for 6 seconds even after the pas-
senger gets off.
• The front passenger's seat belt warning light may not properly
operate if the front passenger does
not sit properly in the seat.
• The front passenger's seat belt warning may operate when luggage,
electronic device, etc. are placed on
the front passenger seat.
i
OTMA038038
Page 107 of 557
3-18
Convenient features of your vehicle
Automatic Door Lock and
Unlock Features
Your vehicle is equipped with fea-
tures that will automatically lock or
unlock your vehicle based on set-
tings you select in the cluster LCD
display.
Auto LOCK - Enable on Speed
When this feature is set in the cluster
LCD display, all the doors will be
locked automatically when the vehi-
cle exceeds 9 mph (15 kph).
Auto LOCK - Enable on Shift
When this feature is set in the cluster
LCD display, all the doors will be
locked automatically when the vehi-
cle is shifted out of P (Park) while the
engine is running.
Auto UNLOCK - Enable on Shift
When this feature is set in the LCD
cluster display, all the doors will be
unlocked automatically when the
vehicle is shifted back into P (Park).
For more information on these
features, refer to the LCD Display
section later in this chapter.
Additional Unlock SafetyFeature - Air Bag Deployment
As an additional safety feature, all
doors will be automatically unlocked
when an impact causes the air bags
to deploy.
Opening a door when something
is approaching may cause dam-
age or injury. Be careful when
opening doors and watch for
vehicles, motorcycles, bicycles
or pedestrians approaching the
vehicle in the path of the door.
CAUTION
If you stay in the vehicle for a
long time while the weather is
very hot or cold, there are risks
of injuries or danger to life. Do
not lock the vehicle from the
outside when someone is in the
vehicle.
WARNING
Page 115 of 557
3-26
Convenient features of your vehicle
Recalling Positions from
Memory
1. Shift to P (Park) while the ignitionswitch is in the ON position.
2. Press the desired memory button (1 or 2). The system will beep
once, and then the driver's seat
position, side view mirror position,
instrument panel illumination
intensity and head-up display
height/brightness will automatical-
ly adjust to the stored positions.
3. "Driver 1 (or 2) settings applied" will appear on the cluster LCD dis-
play.
Information
• While recalling the "1" memoryposition, pressing the SET or 1 but-
ton temporarily stops the adjust-
ment of the recalled memory posi-
tion. Pressing the 2 button recalls
the "2" memory position. • While recalling the "2" memory
position, pressing the SET or 2 but-
ton temporarily stops the adjust-
ment of the recalled memory posi-
tion. Pressing the 1 button recalls
the "1" memory position.
• While recalling the stored positions, pressing one of the control buttons
for the driver's seat, side view mir-
ror, instrument panel illumination
or head-up display will cause the
movement of that component to stop
and move in the direction that the
control button is pressed.
Resetting the Driver's Seat
Memory System
Take the following procedures to reset
the driver's seat memory system,
when it does not operate properly.
To reset the driver's seat memo-ry system
1. Place the ignition switch to the ON
position, shift to P (Park), and
open the driver's door. 2. Operate the control switch to set
the driver's seat and seatback to
the foremost position.
3. Simultaneously press the SET button and push forward the seat
movement switch over 2 seconds.
While resetting the driver's seatmemory system
1. It starts with the notification sound.
2. The driver's seat and seatback is
adjusted to the rearward position
with the notification sound.
3. The driver's seat and seatback is re-adjusted to the default position
(central position) with the notifica-
tion sound.
However, in the following cases, the
resetting procedure and the notifica-
tion sound may stop.
- The memory button is pressed.
- The control switch is operated.
- The gear is shifted out of P (Park).
- The driving speed exceeds 2 mph (3 km/h).
- The driver's door is closed.
i
Page 124 of 557
3-35
Convenient features of your vehicle
3
To adjust the Zone setting:
1. Determine the desired ZoneNumber based upon your current
location on the Zone Map.
2. Press and hold the Control Button for up to 6 seconds, the current
Zone Number will appear on the
display.
3. Release and press the Control Button and then hold the Control
Button again will cause the num-
bers to increment (Note: they will
repeat …13, 14, 15, 1, 2, …).
Releasing the button when the
desired Zone Number appears on
the display will set the new Zone.
4. Within about 5 seconds the com- pass will start displaying a com-
pass heading again.
There are some conditions that can
cause changes to the vehicle mag-
nets, such as installing a ski rack or
a CB antenna. Body repair work on
the vehicle can also cause changes
to the vehicle's magnetic field. In
these situations, the compass will
need to be re-calibrated to correct
these changes. If you need to recalibrate the com-
pass:
1. Press and hold the Control Button
for more than 6 seconds. When
the compass memory is cleared, a
"C" will appear in the display.
2. Drive the vehicle in 2 complete cir- cles at less than 5 mph (8 km/h).
Integrated HomeLink®Wireless
Control System
The HomeLink®Wireless Control
System can replace up to three
hand-held radio-frequency (RF)
transmitters with a single built-in
device. This innovative feature will
learn the radio frequency codes of
most current transmitters to operate
devices such as gate operators,
garage door openers, entry door
locks, security systems, even home
lighting. Both standard and rolling
code-equipped transmitters can be
programmed by following the out-
lined procedures.
Additional HomeLink
®information
can be found at: www.homelink.com,
www.youtube.com/HomeLinkGentex
or by calling 1-800-355-3515. Retain the original transmitter of the RF
device you are programming for use in
other vehicles as well as for future
HomeLink
®programming. It is also sug-
gested that upon the sale of the vehicle,
the programmed HomeLink
®buttons be
erased for security purposes.
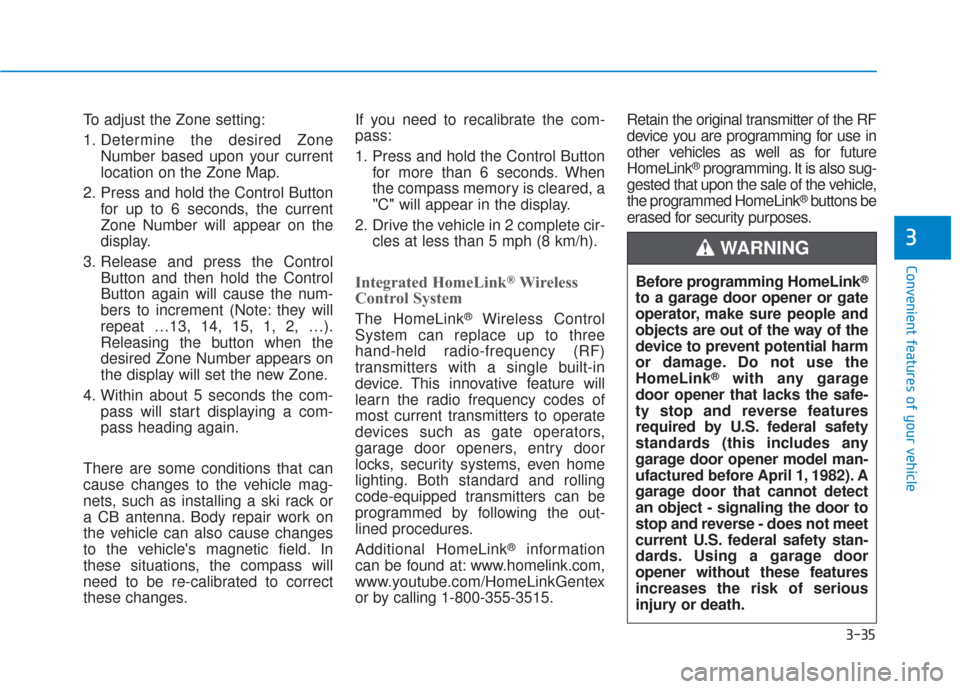
Before programming HomeLink
®
to a garage door opener or gate
operator, make sure people and
objects are out of the way of the
device to prevent potential harm
or damage. Do not use the
HomeLink
®with any garage
door opener that lacks the safe-
ty stop and reverse features
required by U.S. federal safety
standards (this includes any
garage door opener model man-
ufactured before April 1, 1982). A
garage door that cannot detect
an object - signaling the door to
stop and reverse - does not meet
current U.S. federal safety stan-
dards. Using a garage door
opener without these features
increases the risk of serious
injury or death.
WARNING
Page 159 of 557

3-70
Convenient features of your vehicle
Gauges and Meters
Speedometer
The speedometer indicates the
speed of the vehicle and is calibrated
in miles per hour (MPH) and/or kilo-
meters per hour (km/h).
Tachometer
The tachometer indicates the
approximate number of engine revo-
lutions per minute (rpm).
Use the tachometer to select the cor-
rect shift points and to prevent lug-
ging and/or over-revving the engine.
Do not operate the engine within
the tachometer's RED ZONE. This
may cause severe engine damage.
Engine coolant temperaturegauge
This gauge indicates the tempera-
ture of the engine coolant when the
ignition switch is in the ON position.
If the gauge pointer moves
beyond the normal range area
toward the "H" position, it indi-
cates overheating that may dam-
age the engine.
Do not continue driving with an
overheated engine. If your vehicle
overheats, refer to "If the Engine
Overheats" in chapter 6.
NOTICE
NOTICE
OTM048102L
OTMA048103
OTM048105/OTM048106
■
Type A
■Type B
OTM048108/OTM048109
■
Type A
■Type B
■
Type A
■ Type B
Page 191 of 557
3-102
Convenient features of your vehicle
ItemsExplanation
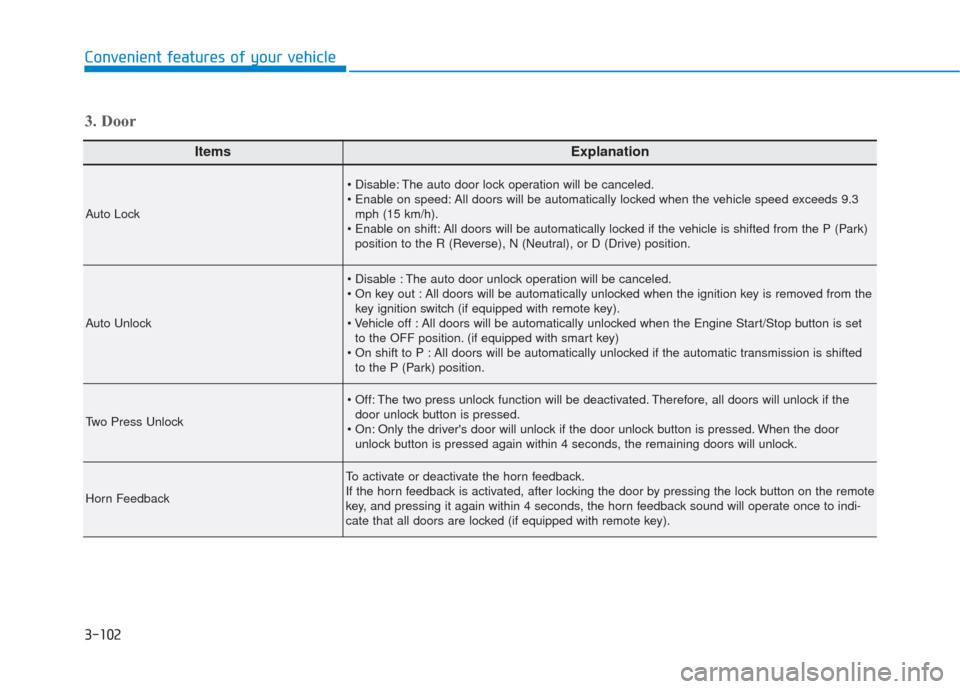
Auto Lock
The auto door lock operation will be canceled.
All doors will be automatically locked when the vehicle speed exceeds 9.3mph (15 km/h).
All doors will be automatically locked if the vehicle is shifted from the P (Park) position to the R (Reverse), N (Neutral), or D (Drive) position.
Auto Unlock
The auto door unlock operation will be canceled.
All doors will be automatically unlocked when the ignition key is removed from thekey ignition switch (if equipped with remote key).
All doors will be automatically unlocked when the Engine Start/Stop button is set to the OFF position. (if equipped with smart key)
All doors will be automatically unlocked if the automatic transmission is shifted to the P (Park) position.
Two Press Unlock
The two press unlock function will be deactivated. Therefore, all doors will unlock if thedoor unlock button is pressed.
Only the driver's door will unlock if the door unlock button is pressed. When the door unlock button is pressed again within 4 seconds, the remaining doors will unlock.
Horn Feedback
To activate or deactivate the horn feedback.
If the horn feedback is activated, after locking the door by pressing the lock button on the remote
key, and pressing it again within 4 seconds, the horn feedback sound will operate once to indi-
cate that all doors are locked (if equipped with remote key).
3. Door
Page 196 of 557
3-107
Convenient features of your vehicle
3
ItemsExplanation
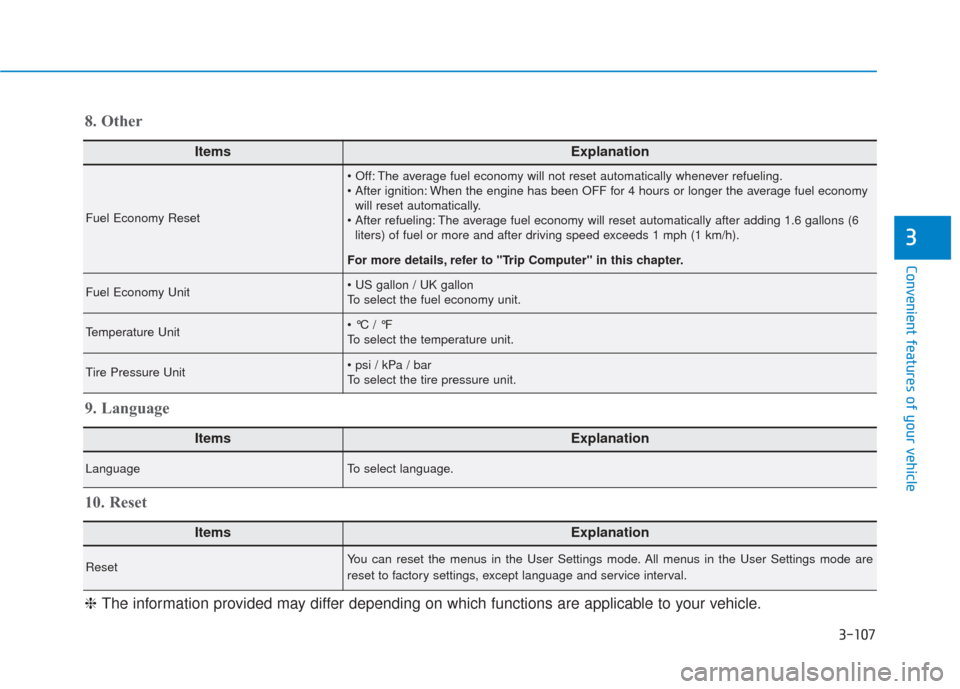
Fuel Economy Reset
The average fuel economy will not reset automatically whenever refueling.
When the engine has been OFF for 4 hours or longer the average fuel economywill reset automatically.
The average fuel economy will reset automatically after adding 1.6 gallons (6 liters) of fuel or more and after driving speed exceeds 1 mph (1 km/h).
For more details, refer to "Trip Computer" in this chapter.
Fuel Economy Unit
To select the fuel economy unit.
Temperature Unit
To select the temperature unit.
Tire Pressure Unit
To select the tire pressure unit.
8. Other
ItemsExplanation
LanguageTo select language.
9. Language
ItemsExplanation
ResetYou can reset the menus in the User Settings mode. All menus in the User Settings mode are
reset to factory settings, except language and service interval.
10. Reset
❈ The information provided may differ depending on which functions are applicable to your vehicle.