2019 Hyundai Santa Fe options
[x] Cancel search: optionsPage 122 of 557

3-33
Convenient features of your vehicle
3
Automatic-Dimming Night Vision
Safety™ (NVS®) Mirror
(if equipped)
The NVS®Mirror automatically
reduces glare by monitoring light lev-
els in the front and the rear of the
vehicle. Any object that obstructs
either light sensor will degrade the
automatic dimming control feature.
For more information regarding
NVS
®mirrors and other applica-
tions, please refer to the Gentex
website:
www.gentex.com
Your mirror will automatically dim
upon detecting glare from the vehi-
cles traveling behind you.
The mirror defaults to the ON posi-
tion each time the vehicle is started.
Z-Nav™ Compass Display
The NVS™ Mirror in your vehicle is
also equipped with a Z-Nav™
Compass that shows the vehicle
Compass heading in the Display
Window using the 8 basic cardinal
headings (N, NE, E, SE, etc.).
Compass function
The Compass can be turned ON and
OFF, but it returns to ON after the
ignition is cycled.
1. Press and release the Control Button within 1 second to turn the
display feature OFF.
2. Press and release the Control Button again within 1 second to
turn the display back ON.
Additional options can be set with
press and hold sequences of the
Control Button and are detailed
below.
OTMA048467
Page 183 of 557
3-94
Convenient features of your vehicle
Modes SymbolExplanation
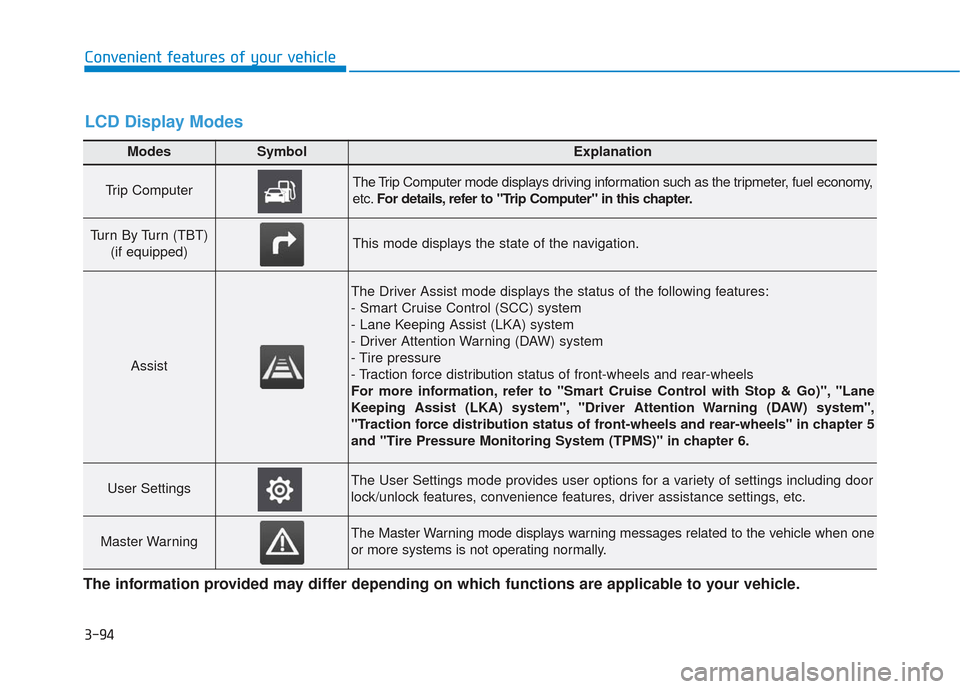
Trip Computer The Trip Computer mode displays driving information such as the tripmeter, fuel economy,
etc.For details, refer to "Trip Computer" in this chapter.
Turn By Turn (TBT)
(if equipped)This mode displays the state of the navigation.
Assist
The Driver Assist mode displays the status of the following features:
- Smart Cruise Control (SCC) system
- Lane Keeping Assist (LKA) system
- Driver Attention Warning (DAW) system
- Tire pressure
- Traction force distribution status of front-wheels and rear-wheels
For more information, refer to "Smart Cruise Control with Stop & Go)", "Lane
Keeping Assist (LKA) system", "Driver Attention Warning (DAW) system",
"Traction force distribution status of front-wheels and rear-wheels" in chapter 5
and "Tire Pressure Monitoring System (TPMS)" in chapter 6.
User SettingsThe User Settings mode provides user options for a variety of settings including door
lock/unlock features, convenience features, driver assistance settings, etc.
Master WarningThe Master Warning mode displays warning messages related to the vehicle when one
or more systems is not operating normally.
The information provided may differ depending on which functions are applicable to your vehicle.
LCD Display Modes
Page 329 of 557
5-55
Driving your vehicle
5
- If you select "Warning Only", theFCA system activates and pro-
duces only warning alarms in
accordance with the collision risk
levels. You should control the
brake directly because the FCA
system do not control the brake.
- If you select "Off", the FCA sys- tem deactivates,
The warning light illu-
minates on the LCD
display, when you can-
cel the FCA system.
The driver can monitor the FCA
ON/OFF status on the LCD dis-
play. Also, the warning light illumi-
nates when the ESC (Electronic
Stability Control) is turned off. If
the warning light remains ON
when the FCA is activated, have
the system checked by an author-
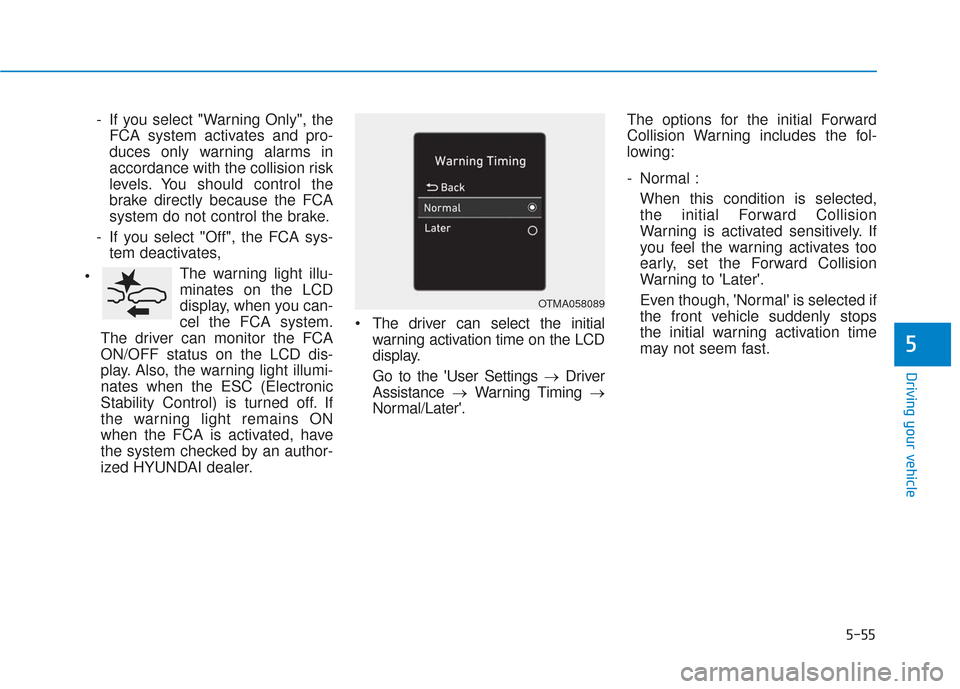
ized HYUNDAI dealer. The driver can select the initial
warning activation time on the LCD
display.
Go to the 'User Settings → Driver
Assistance →Warning Timing →
Normal/Later'. The options for the initial Forward
Collision Warning includes the fol-
lowing:
- Normal :
When this condition is selected,
the initial Forward Collision
Warning is activated sensitively. If
you feel the warning activates too
early, set the Forward Collision
Warning to 'Later'.
Even though, 'Normal' is selected if
the front vehicle suddenly stops
the initial warning activation time
may not seem fast.
OTMA058089
Page 331 of 557
5-57
Driving your vehicle
5
FCA Warning Message and
System Control
The FCA produces warning mes-
sages and warning alarms in accor-
dance with the collision risk levels,
such as abrupt stopping of the vehi-
cle in front, insufficient braking dis-
tance, or pedestrian detection. Also,
it controls the brakes in accordance
with the collision risk levels.
The driver can select the initial warn-
ing activation time in the User
Settings in the LCD display. The
options for the initial Forward Collision
Warning include Early or Later initial
warning time.
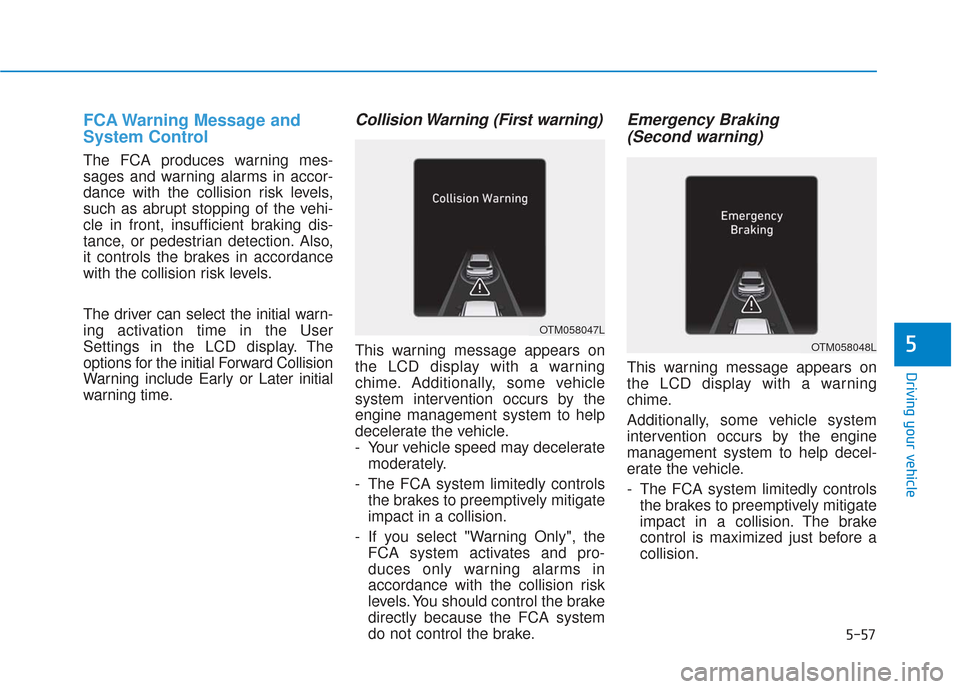
Collision Warning (First warning)
This warning message appears on
the LCD display with a warning
chime. Additionally, some vehicle
system intervention occurs by the
engine management system to help
decelerate the vehicle.
- Your vehicle speed may deceleratemoderately.
- The FCA system limitedly controls the brakes to preemptively mitigate
impact in a collision.
- If you select "Warning Only", the FCA system activates and pro-
duces only warning alarms in
accordance with the collision risk
levels. You should control the brake
directly because the FCA system
do not control the brake.
Emergency Braking(Second warning)
This warning message appears on
the LCD display with a warning
chime.
Additionally, some vehicle system
intervention occurs by the engine
management system to help decel-
erate the vehicle.
- The FCA system limitedly controls
the brakes to preemptively mitigate
impact in a collision. The brake
control is maximized just before a
collision.
OTM058047L
OTM058048L
Page 345 of 557
5-71
Driving your vehicle
5
The options for the initial Blind-Spot Collision Warning includes
the following:
- Normal:
When this condition is selected,
the initial Blind-Spot Collision
Warning is activated normally. If
this setting feels sensitive,
change the option to 'Later'.
The warning activation time may
feel late if a vehicle at the side or
rear abruptly accelerates.
- Later: Select this warning activation
time when the traffic is light and
you are driving in a low speed.
Information
If you change the warning timing, the
warning time of other systems may
change. Always be aware before
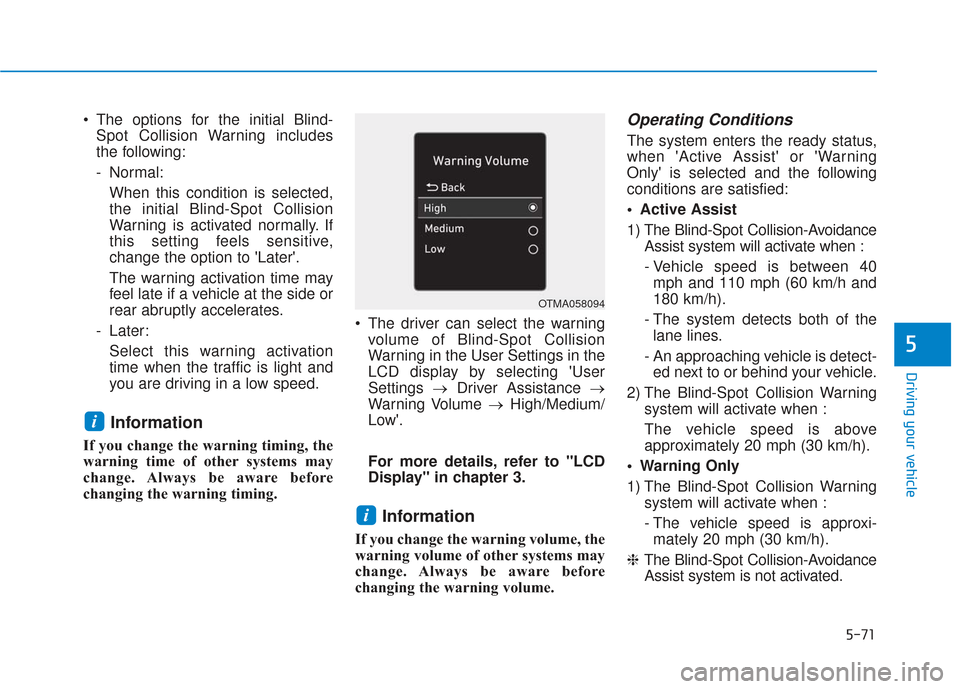
changing the warning timing. The driver can select the warning
volume of Blind-Spot Collision
Warning in the User Settings in the
LCD display by selecting 'User
Settings →Driver Assistance →
Warning Volume →High/Medium/
Low'.
For more details, refer to "LCD
Display" in chapter 3.
Information
If you change the warning volume, the
warning volume of other systems may
change. Always be aware before
changing the warning volume.
Operating Conditions
The system enters the ready status,
when 'Active Assist' or 'Warning
Only' is selected and the following
conditions are satisfied:
Active Assist
1) The Blind-Spot Collision-Avoidance Assist system will activate when :
- Vehicle speed is between 40mph and 110 mph (60 km/h and
180 km/h).
- The system detects both of the lane lines.
- An approaching vehicle is detect- ed next to or behind your vehicle.
2) The Blind-Spot Collision Warning system will activate when :
The vehicle speed is above
approximately 20 mph (30 km/h).
Warning Only
1) The Blind-Spot Collision Warning system will activate when :
- The vehicle speed is approxi-mately 20 mph (30 km/h).
❈ The Blind-Spot Collision-Avoidance
Assist system is not activated.
i
i
OTMA058094
Page 357 of 557
5-83
Driving your vehicle
5
System Setting and Activation
System setting
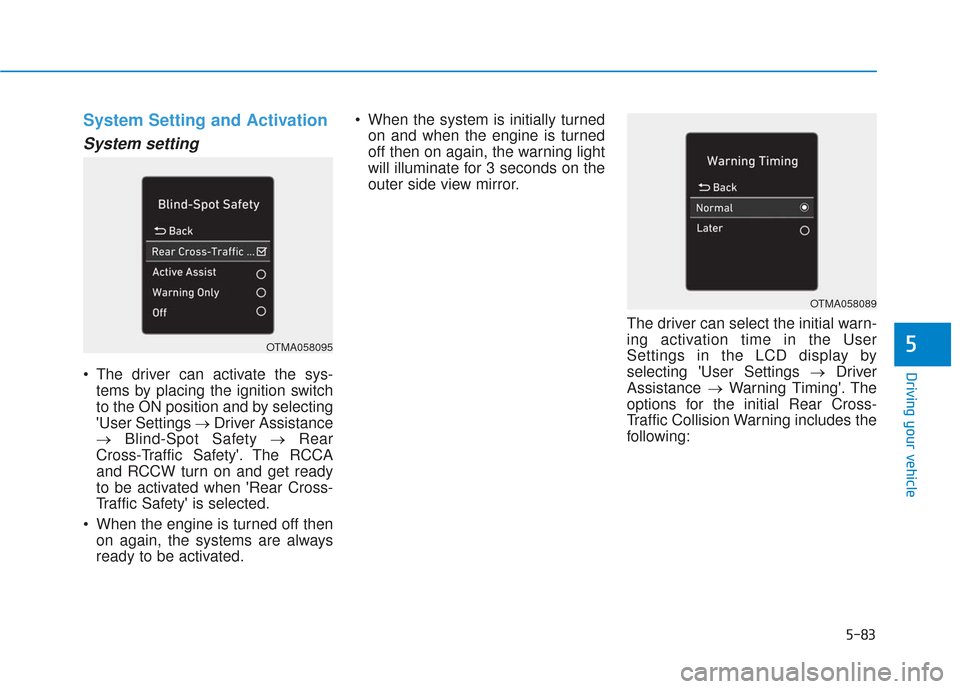
The driver can activate the sys-tems by placing the ignition switch
to the ON position and by selecting
'User Settings → Driver Assistance
→ Blind-Spot Safety → Rear
Cross-Traffic Safety'. The RCCA
and RCCW turn on and get ready
to be activated when 'Rear Cross-
Traffic Safety' is selected.
When the engine is turned off then on again, the systems are always
ready to be activated. When the system is initially turned
on and when the engine is turned
off then on again, the warning light
will illuminate for 3 seconds on the
outer side view mirror.
The driver can select the initial warn-
ing activation time in the User
Settings in the LCD display by
selecting 'User Settings →Driver
Assistance →Warning Timing'. The
options for the initial Rear Cross-
Traffic Collision Warning includes the
following:
OTMA058095
OTMA058089
Page 415 of 557
5-141
Driving your vehicle
5
Two labels on your driver's door sill
show how much weight your vehicle
was designed to carry: the Tire and
Loading Information Label and the
Certification Label.
Before loading your vehicle, familiar-
ize yourself with the following terms
for determining your vehicle’s weight
ratings, from the vehicle's specifica-
tions and the Certification Label:
Base Curb Weight
This is the weight of the vehicle
including a full tank of fuel and all
standard equipment. It does not
include passengers, cargo, or option-
al equipment.
Vehicle Curb Weight
This is the weight of your new vehicle
when you picked it up from your deal-
er plus any aftermarket equipment.Cargo Weight
This figure includes all weight added
to the Base Curb Weight, including
cargo and optional equipment.
GAW (Gross Axle Weight)
This is the total weight placed on
each axle (front and rear) - including
vehicle curb weight and all payload.
GAWR (Gross Axle Weight Rating)
This is the maximum allowable
weight that can be carried by a single
axle (front or rear). These numbers
are shown on the Certification Label.
The total load on each axle must
never exceed its GAWR.
GVW (Gross Vehicle Weight)
This is the Base Curb Weight plus
actual Cargo Weight plus passen-
gers.
GVWR (Gross Vehicle Weight
Rating)
This is the maximum allowable
weight of the fully loaded vehicle
(including all options, equipment,
passengers and cargo). The GVWR
is shown on the Certification Label
located on the driver’s door sill.
V V
E
EH
H I
IC
C L
LE
E
L
L O
O A
AD
D
L
L I
IM
M I
IT
T
Page 490 of 557
Kilopascal (kPa)
The metric unit for air pressure.
Light truck(LT) tire
A tire designated by its manufacturer
as primarily intended for use on light-
weight trucks or multipurpose pas-
senger vehicles.
Load ratings
The maximum load that a tire is rated
to carry for a given inflation pressure.
Load Index
An assigned number ranging from 1
to 279 that corresponds to the load
carrying capacity of a tire.
Maximum Inflation Pressure
The maximum air pressure to which
a cold tire may be inflated. The max-
imum air pressure is molded onto the
sidewall.
Maximum Load Rating
The load rating for a tire at the maxi-
mum permissible inflation pressure
for that tire.
Maximum Loaded VehicleWeight
The sum of curb weight; accessory
weight; vehicle capacity weight; and
production options weight.
Normal Occupant Weight
The number of occupants a vehicle
is designed to seat multiplied by 150
pounds (68 kg).
Occupant Distribution
Designated seating positions.
Outward Facing Sidewall
An asymmetrical tire has a particular
side that faces outward when mount-
ed on a vehicle. The outward facing
sidewall bears white lettering or
bears manufacturer, brand, and/or
model name molding that is higher or
deeper than the same moldings on
the inner facing sidewall.
Passenger (P-Metric) tire
A tire used on passenger cars and
some light duty trucks and multipur-
pose vehicles.
Ply
A layer of rubber-coated parallel
cords.
Pneumatic tire
A mechanical device made of rubber,
chemicals, fabric and steel or other
materials, that, when mounted on an
automotive wheel provides the trac-
tion and contains the gas or fluid that
sustains the load.
Pneumatic options weight
The combined weight of installed
regular production options weighing
over 5 lb. (2.3 kg) in excess of the
standard items which they replace,
not previously considered in curb
weight or accessory weight, includ-
ing heavy duty breaks, ride levelers,
roof rack, heavy duty battery, and
special trim.
Maintenance
7-48