2019 Hyundai Santa Fe auto engine stop start
[x] Cancel search: auto engine stop startPage 16 of 557

I
IN
N S
ST
T R
R U
U M
M E
EN
N T
T
P
P A
A N
N E
EL
L
O
O V
VE
ER
R V
V I
IE
E W
W
(
( I
I)
)
The actual shape may differ from the illustration.
1-5
Your vehicle at a glance
11. Instrument cluster ....................................3-68
2. Horn ........................................................3-29
3. Driver’s front air bag ................................2-51
4. Key ignition switch/ ....................................5-6
Engine Start/Stop button ............................5-9
5. Hazard warning flasher switch ..................6-2
6. Audio system/Navigation system ..............4-4
7. Manual climate control system/ ............3-138 Automatic climate control system ..........3-147
8. Heated steering wheel ............................3-30
9. Seat warmer ............................................2-21
10. Air ventilation seat ................................2-22
11. Power outlet ........................................3-170
12. Aux, USB and iPod
®................................4-2
13. USB charger ........................................3-173
14. Wireless cellular phone charging system ..................................3-173
15. Passenger’s front air bag ......................2-51
16. Glove box ............................................3-165
17. Automatic transmission shift lever ........5-14
18. Drive mode button ................................5-51
19. Idle Stop and Go(ISG) OFF button ......5-46
20. Downhill Brake Control (DBC) ..............5-36
21. Parking Distance Warning (Reverse) OFF button ..........................................3-133
22. Surround view monitor button ............3-131
23. Electronic Parking Brake (EPB) ............5-21
24. Auto Hold switch ....................................5-27
25. AC inverter ..........................................3-171
OTMA018004
Page 99 of 557
3-10
Convenient features of your vehicle
Power liftgate
To unlock and open the liftgate:
1. Make sure you have the smart keyin your possession.
2. Press either the liftgate handle release switch on the vehicle or
press and hold the Liftgate Unlock
button on the smart key for more
than one second. The hazard
warning lights will blink two times
and the liftgate latch will open.
3. Once the liftgate is opened and then closed, the liftgate will auto-
matically re-lock after 30 seconds.
Information
The liftgate handle switch will only
operate when the smart key is within
28 inches (0.7 m) from the liftgate
handle.
Panic button
Press and hold the Panic button (4)
for more than one second. The horn
sounds and hazard warning lights
blink for about 30 seconds. To cancel
the panic mode, press any button on
the Smart Key.
Start-up
You can start the vehicle without
inserting the key.
For information, refer to the
"Engine Start/Stop Button" sec-
tion in chapter 5.
To prevent damaging the smart key:
Keep the smart key in a cool, dryplace to avoid damage or mal-
function. Exposure to moisture
or high temperature may cause
the internal circuit of the smart
key to malfunction which may
not be covered under warranty.
Avoid dropping or throwing the smart key.
Protect the smart key from extreme temperatures.
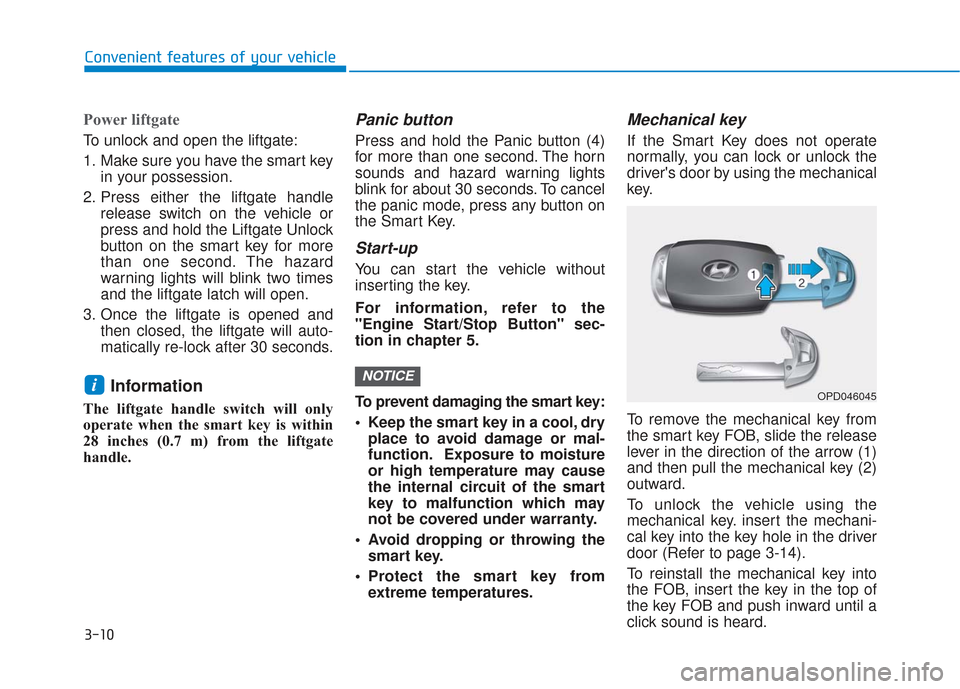
Mechanical key
If the Smart Key does not operate
normally, you can lock or unlock the
driver's door by using the mechanical
key.
To remove the mechanical key from
the smart key FOB, slide the release
lever in the direction of the arrow (1)
and then pull the mechanical key (2)
outward.
To unlock the vehicle using the
mechanical key. insert the mechani-
cal key into the key hole in the driver
door (Refer to page 3-14).
To reinstall the mechanical key into
the FOB, insert the key in the top of
the key FOB and push inward until a
click sound is heard.
NOTICEiOPD046045
Page 116 of 557
3-27
Convenient features of your vehicle
3
Reattempt to do the resettingprocedure again, when the reset-
ting procedure incompletely
stops or the notification sound
do not stop.
Make sure that there is no obsta- cle around the driver's seat in
advance of resetting the driver's
seat memory system.
Easy Access Function
The system will move the driver's
seat automatically as follows:
- It will move the driver’s seat rear- ward when the ignition key is
removed.
- It will move the driver’s seat for- ward when the ignition key is
inserted.
- It will move the driver’s seat rear- ward when the Engine Start/Stop
button is pressed to the OFF posi-
tion. - It will move the driver’s seat for-
ward when the Engine Start/Stop
button is pressed to the ACC or
START position.
You can activate or deactivate the
Easy Access Function from the User
Settings mode in the cluster LCD dis-
play.
'Convenience →Seat Easy Access →
Off/Normal/Extended'.
For more details, refer to "LCD
Display" in this chapter.
NOTICE
Driver should be cautious when
using this function to assure no
injury to passenger or child on
the back seat. In case of emer-
gency the driver has to stop
movement of front seat (when
easy access feature is activat-
ed) by pressing SET button or
any of the driver seat control
switches.
CAUTION
Page 171 of 557
3-82
Convenient features of your vehicle
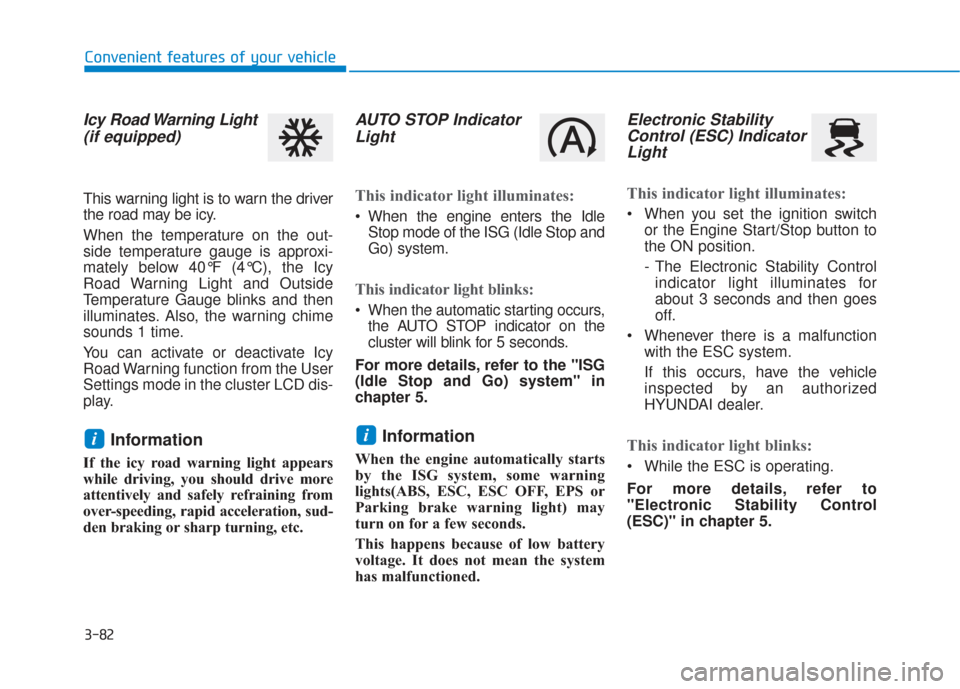
Icy Road Warning Light(if equipped)
This warning light is to warn the driver
the road may be icy.
When the temperature on the out-
side temperature gauge is approxi-
mately below 40°F (4°C), the Icy
Road Warning Light and Outside
Temperature Gauge blinks and then
illuminates. Also, the warning chime
sounds 1 time.
You can activate or deactivate Icy
Road Warning function from the User
Settings mode in the cluster LCD dis-
play.
Information
If the icy road warning light appears
while driving, you should drive more
attentively and safely refraining from
over-speeding, rapid acceleration, sud-
den braking or sharp turning, etc.
AUTO STOP IndicatorLight
This indicator light illuminates:
When the engine enters the Idle
Stop mode of the ISG (Idle Stop and
Go) system.
This indicator light blinks:
When the automatic starting occurs,the AUTO STOP indicator on the
cluster will blink for 5 seconds.
For more details, refer to the "ISG
(Idle Stop and Go) system" in
chapter 5.
Information
When the engine automatically starts
by the ISG system, some warning
lights(ABS, ESC, ESC OFF, EPS or
Parking brake warning light) may
turn on for a few seconds.
This happens because of low battery
voltage. It does not mean the system
has malfunctioned.
Electronic Stability Control (ESC) IndicatorLight
This indicator light illuminates:
When you set the ignition switch
or the Engine Start/Stop button to
the ON position.
- The Electronic Stability Controlindicator light illuminates for
about 3 seconds and then goes
off.
Whenever there is a malfunction with the ESC system.
If this occurs, have the vehicle
inspected by an authorized
HYUNDAI dealer.
This indicator light blinks:
While the ESC is operating.
For more details, refer to
"Electronic Stability Control
(ESC)" in chapter 5.
ii
Page 191 of 557
3-102
Convenient features of your vehicle
ItemsExplanation
Auto Lock
The auto door lock operation will be canceled.
All doors will be automatically locked when the vehicle speed exceeds 9.3mph (15 km/h).
All doors will be automatically locked if the vehicle is shifted from the P (Park) position to the R (Reverse), N (Neutral), or D (Drive) position.
Auto Unlock
The auto door unlock operation will be canceled.
All doors will be automatically unlocked when the ignition key is removed from thekey ignition switch (if equipped with remote key).
All doors will be automatically unlocked when the Engine Start/Stop button is set to the OFF position. (if equipped with smart key)
All doors will be automatically unlocked if the automatic transmission is shifted to the P (Park) position.
Two Press Unlock
The two press unlock function will be deactivated. Therefore, all doors will unlock if thedoor unlock button is pressed.
Only the driver's door will unlock if the door unlock button is pressed. When the door unlock button is pressed again within 4 seconds, the remaining doors will unlock.
Horn Feedback
To activate or deactivate the horn feedback.
If the horn feedback is activated, after locking the door by pressing the lock button on the remote
key, and pressing it again within 4 seconds, the horn feedback sound will operate once to indi-
cate that all doors are locked (if equipped with remote key).
3. Door
Page 275 of 557

Driving your vehicle
5
Before Driving ........................................................5-4
Before Entering the Vehicle ...........................................5-4
Before Starting ..................................................................5-4
Ignition Switch ........................................................5-6
Key Ignition Switch ...........................................................5-6
Engine Start/Stop Button................................................5-9
Automatic Transmission ......................................5-14
Automatic Transmission Operation .............................5-14
Good Driving Practices ..................................................5-18
Braking System ....................................................5-20
Power Brakes ...................................................................5-20
Disc Brakes Wear Indicator ..........................................5-21
Electronic Parking Brake (EPB)...................................5-21
Auto Hold ........................................................................\
..5-27
Anti-lock Brake System (ABS) ....................................5-30
Electronic Stability Control (ESC)................................5-32
Vehicle Stability Management (VSM).........................5-35
Hill-Start Assist Control (HAC) ....................................5-36
Downhill Brake Control (DBC) ......................................5-36
Good Braking Practices .................................................5-39
All Wheel Drive (AWD) ........................................5-40
AWD operation.................................................................5-41
Emergency precautions .................................................5-44
ISG (Idle Stop and Go) System ..........................5-46
To Activate the ISG System ..........................................5-46
To Deactivate the ISG System......................................5-49
ISG System Malfunction ................................................5-49
Battery Sensor Deactivation ........................................5-50
Drive Mode Integrated Control System ............5-51
Drive Mode .......................................................................5\
-51
Smart shift on trip computer .......................................5-53
Forward Collision-Avoidance
Assist (FCA) System ............................................5-54
System Setting and Activation.....................................5-54
FCA Warning Message and System Control ............5-57
FCA Sensor .......................................................................5\
-59
System Malfunction .......................................................5-61
Limitations of the System .............................................5-62
Blind-Spot Collision Warning/Blind-Spot
Collision-Avoidance Assist .................................5-68
System Description .........................................................5-68
System Setting and Activation.....................................5-69
Warning and System Control .......................................5-72
Detecting Sensor (Camera and Radar) ......................5-74
Limitations of the System .............................................5-77
Page 284 of 557
5-10
Driving your vehicle
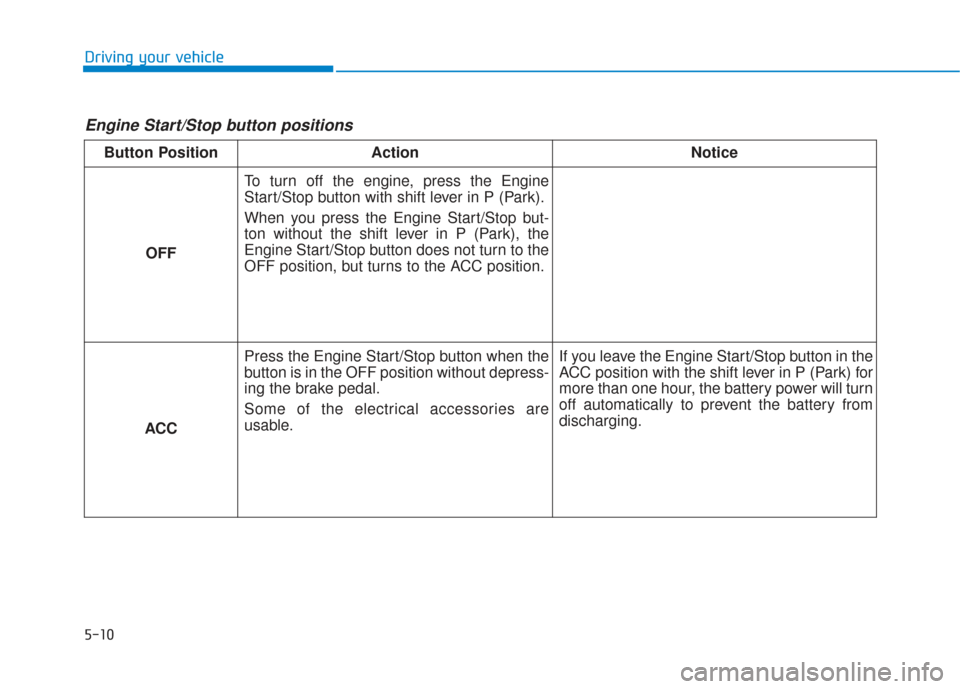
Engine Start/Stop button positions
Button PositionAction Notice
OFF To turn off the engine, press the Engine
Start/Stop button with shift lever in P (Park).
When you press the Engine Start/Stop but-
ton without the shift lever in P (Park), the
Engine Start/Stop button does not turn to the
OFF position, but turns to the ACC position.
ACC Press the Engine Start/Stop button when the
button is in the OFF position without depress-
ing the brake pedal.
Some of the electrical accessories are
usable.
If you leave the Engine Start/Stop button in the
ACC position with the shift lever in P (Park) for
more than one hour, the battery power will turn
off automatically to prevent the battery from
discharging.
Page 291 of 557
5-17
Driving your vehicle
5
• If the driver presses the lever to + (Up) or - (Down) position, the
transmission may not make the
requested gear change if the next
gear is outside of the allowable
engine rpm range. The driver must
execute upshifts in accordance with
road conditions, taking care to keep
the engine rpms below the red zone.
• When accelerating from a stop on a slippery road, push the shift lever
forward into the + (Up) position.
This allows the transmission to
shift into the 2
ndgear which is bet-
ter for smooth driving on a slippery
road. Push the shift lever to the -
(Down) side to shift back to the 1
st
gear.
• When driving in Manual Shift Mode, slow down before shifting to
a lower gear. Otherwise, the lower
gear may not be engaged if the
engine rpms are outside of the
allowable range.
Shift-lock system
For your safety, the automatic trans-
mission has a shift-lock system
which prevents shifting the transmis-
sion from P (Park) into R (Reverse)
unless the brake pedal is depressed.
To shift the transmission from P
(Park) into R (Reverse):
1. Depress and hold the brake pedal.
2. Start the engine or place the igni-tion switch in the ON position.
3. Move the shift lever.
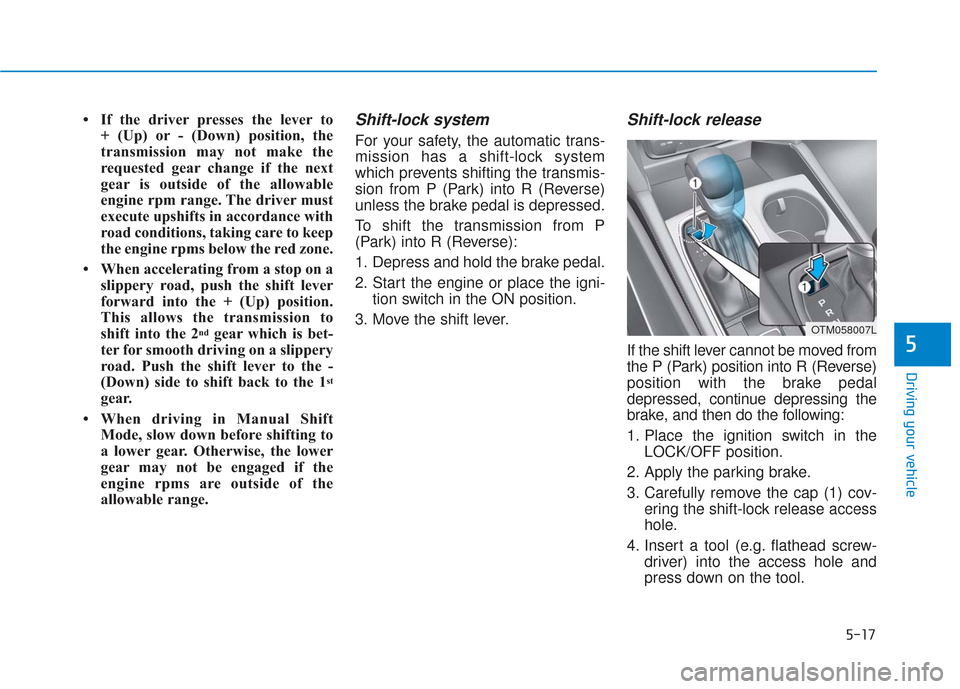
Shift-lock release
If the shift lever cannot be moved from
the P (Park) position into R (Reverse)
position with the brake pedal
depressed, continue depressing the
brake, and then do the following:
1. Place the ignition switch in the LOCK/OFF position.
2. Apply the parking brake.
3. Carefully remove the cap (1) cov- ering the shift-lock release access
hole.
4. Insert a tool (e.g. flathead screw- driver) into the access hole and
press down on the tool.
OTM058007L