2019 Hyundai Santa Fe sound
[x] Cancel search: soundPage 151 of 557
3-62
Convenient features of your vehicle
Information
The Smart Liftgate will NOT operate
when:
• Any door is open, or all doors areclosed but not locked
• The smart key is detected within 15 seconds from when the doors were
closed and locked
• For vehicles equipped with illumi- nated exterior front door handles, if
the smart key is detected within 15
seconds from when the doors were
closed and locked or if the smart
key is within 60 inches (1.5m) from
the front door handles
• The smart key is in the vehicle. 1.Setting
To activate the Smart Liftgate, go to
User Settings mode and select
Smart Liftgate in the cluster LCD dis-
play.
For more details, refer to "LCD
Display" in this chapter.
2.Detect and Alert
The Smart Liftgate detecting area
extends approximately 20-40 in (50-
100 cm) behind the vehicle. If you
are positioned in the detecting area
and are carrying the smart key, the
hazard warning lights will blink and
the chime will sound to alert you that
the smart liftgate will open.
Information
Do not approach the detecting area if
you do not want the liftgate to open. If
you have unintentionally entered the
detecting area and the hazard warn-
ing lights and chime starts to operate,
move away from the area behind the
vehicle with the smart key. The lift-
gate will remain closed.3. Automatic opening
After the hazard warning lights blink
and the chime sounds 6 times, the
power liftgate will open.
i
i
Make certain that you close
the liftgate before driving your
vehicle.
Make sure there are no people
or objects around the liftgate
before opening or closing the
liftgate.
Make sure objects in the rear
cargo area do not come out
when opening the liftgate,
especially if the vehicle is
parked on a grade or incline.
If you keep your vehicle
parked and locked on your
driveway, you may want to
temporarily deactivate the
Smart Liftgate system.
Otherwise, standing at the
rear of the vehicle with the
smart key may cause the lift-
gate to open unintentionally.
WARNING
Page 153 of 557
3-64
Convenient features of your vehicle
Detecting area
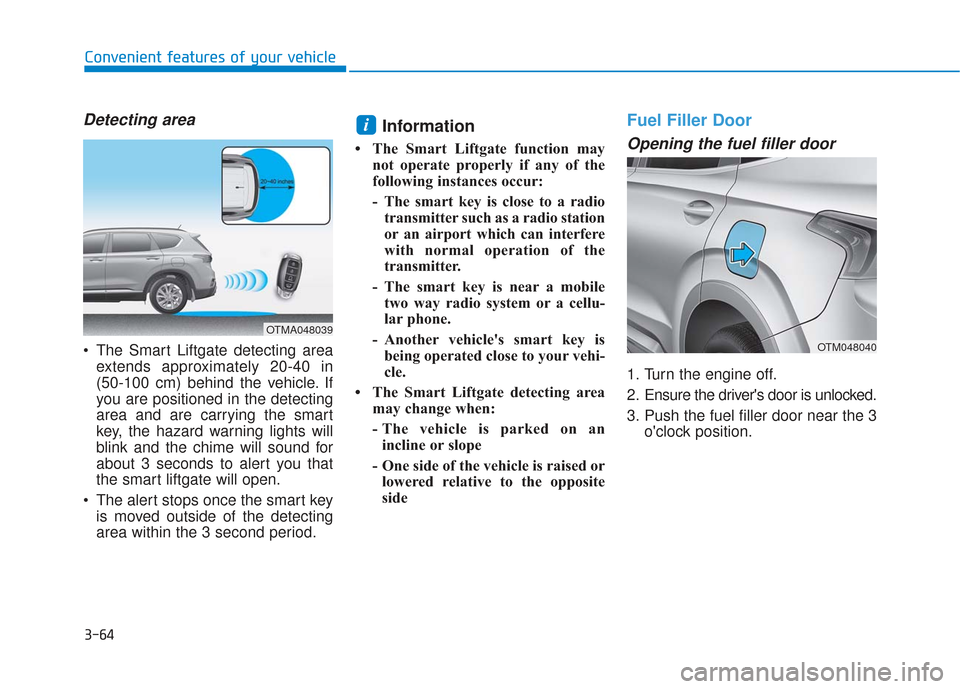
The Smart Liftgate detecting areaextends approximately 20-40 in
(50-100 cm) behind the vehicle. If
you are positioned in the detecting
area and are carrying the smart
key, the hazard warning lights will
blink and the chime will sound for
about 3 seconds to alert you that
the smart liftgate will open.
The alert stops once the smart key is moved outside of the detecting
area within the 3 second period.
Information
• The Smart Liftgate function may not operate properly if any of the
following instances occur:
- The smart key is close to a radiotransmitter such as a radio station
or an airport which can interfere
with normal operation of the
transmitter.
- The smart key is near a mobile two way radio system or a cellu-
lar phone.
- Another vehicle's smart key is being operated close to your vehi-
cle.
• The Smart Liftgate detecting area may change when:
- The vehicle is parked on anincline or slope
- One side of the vehicle is raised or lowered relative to the opposite
side
Fuel Filler Door
Opening the fuel filler door
1. Turn the engine off.
2. Ensure the driver's door is unlocked.
3. Push the fuel filler door near the 3 o'clock position.
i
OTMA048039
OTM048040
Page 155 of 557

3-66
Convenient features of your vehicle
Do not get back into a vehicle
once you have begun refuel-
ing. You can generate a build-
up of static electricity by
touching, rubbing or sliding
against any item or fabric
capable of producing static
electricity. Static electricity
discharge can ignite fuel
vapors causing a fire. If you
must re-enter the vehicle, you
should once again eliminate
potentially dangerous static
electricity discharge by touch-
ing a metal part of the vehicle,
away from the fuel filler neck,
nozzle or other gasoline
source, with your bare hand.
When using an approved
portable fuel container, be
sure to place the container on
the ground prior to refueling.
Static electricity discharge
from the container can ignite
fuel vapors causing a fire.
Do not over-fill or top-off your
vehicle tank, which can cause
gasoline spillage.
If a fire breaks out during refu-
eling, leave the vicinity of the
vehicle, and immediately con-
tact the manager of the gas
station and then contact the
local fire department. Follow
any safety instructions they
provide.
If pressurized fuel sprays out,
it can cover your clothes or
skin and thus subject you to
the risk of fire and burns.
Always remove the fuel cap
carefully and slowly. If the cap
is venting fuel or if you hear a
hissing sound, wait until the
condition stops before com-
pletely removing the cap.
Always check that the fuel cap
is installed securely to pre-
vent fuel spillage in the event
of an accident.
Once refueling has begun,
contact between your bare
hand and the vehicle should
be maintained until the filling
is complete.
Use only approved portable
plastic fuel containers designed
to carry and store gasoline.
When refueling, always move
the shift lever to the P (Park)
position (for automatic trans-
mission/dual clutch transmis-
sion), set the parking brake,
and place the ignition switch
to the LOCK/OFF position.
Sparks produced by electrical
components related to the
engine can ignite fuel vapors
causing a fire.
Do not use matches or a
lighter and do not smoke or
leave a lit cigarette in your
vehicle while at a gas station,
especially during refueling.
Page 158 of 557
3-69
Convenient features of your vehicle
3
Instrument Cluster Control
Adjusting instrument clusterillumination
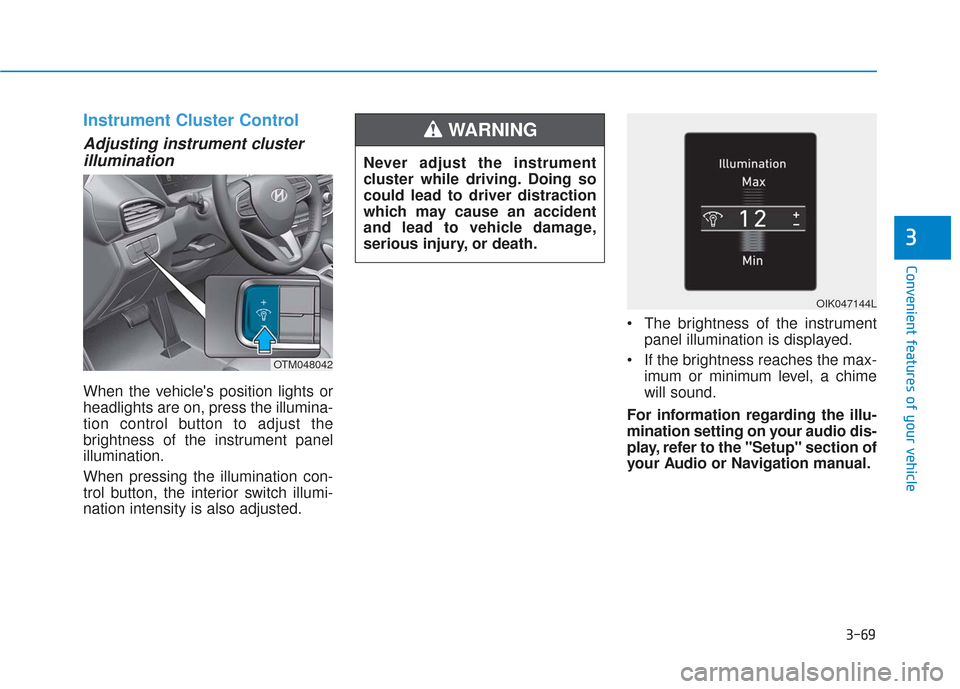
When the vehicle's position lights or
headlights are on, press the illumina-
tion control button to adjust the
brightness of the instrument panel
illumination.
When pressing the illumination con-
trol button, the interior switch illumi-
nation intensity is also adjusted. The brightness of the instrument
panel illumination is displayed.
If the brightness reaches the max- imum or minimum level, a chime
will sound.
For information regarding the illu-
mination setting on your audio dis-
play, refer to the "Setup" section of
your Audio or Navigation manual.
Never adjust the instrument
cluster while driving. Doing so
could lead to driver distraction
which may cause an accident
and lead to vehicle damage,
serious injury, or death.
WARNING
OTM048042
OIK047144L
Page 171 of 557
3-82
Convenient features of your vehicle
Icy Road Warning Light(if equipped)
This warning light is to warn the driver
the road may be icy.
When the temperature on the out-
side temperature gauge is approxi-
mately below 40°F (4°C), the Icy
Road Warning Light and Outside
Temperature Gauge blinks and then
illuminates. Also, the warning chime
sounds 1 time.
You can activate or deactivate Icy
Road Warning function from the User
Settings mode in the cluster LCD dis-
play.
Information
If the icy road warning light appears
while driving, you should drive more
attentively and safely refraining from
over-speeding, rapid acceleration, sud-
den braking or sharp turning, etc.
AUTO STOP IndicatorLight
This indicator light illuminates:
When the engine enters the Idle
Stop mode of the ISG (Idle Stop and
Go) system.
This indicator light blinks:
When the automatic starting occurs,the AUTO STOP indicator on the
cluster will blink for 5 seconds.
For more details, refer to the "ISG
(Idle Stop and Go) system" in
chapter 5.
Information
When the engine automatically starts
by the ISG system, some warning
lights(ABS, ESC, ESC OFF, EPS or
Parking brake warning light) may
turn on for a few seconds.
This happens because of low battery
voltage. It does not mean the system
has malfunctioned.
Electronic Stability Control (ESC) IndicatorLight
This indicator light illuminates:
When you set the ignition switch
or the Engine Start/Stop button to
the ON position.
- The Electronic Stability Controlindicator light illuminates for
about 3 seconds and then goes
off.
Whenever there is a malfunction with the ESC system.
If this occurs, have the vehicle
inspected by an authorized
HYUNDAI dealer.
This indicator light blinks:
While the ESC is operating.
For more details, refer to
"Electronic Stability Control
(ESC)" in chapter 5.
ii
Page 186 of 557
3-97
Convenient features of your vehicle
3
- Smart Cruise Control with Stop &Go radar blocked (if equipped)
- Lamp malfunction
- High Beam Assist malfunction (if equipped)
- Tire Pressure Monitoring System (TPMS) malfunction
The Master Warning Light illumi-
nates if one or more of the above
warning situations occur. At this time,
the LCD Modes Icon will change
from ( ) to ( ).
If the warning situation is solved, the
master warning light will be turned
off and the LCD Modes Icon will be
changed back to its previous icon
().User settings mode
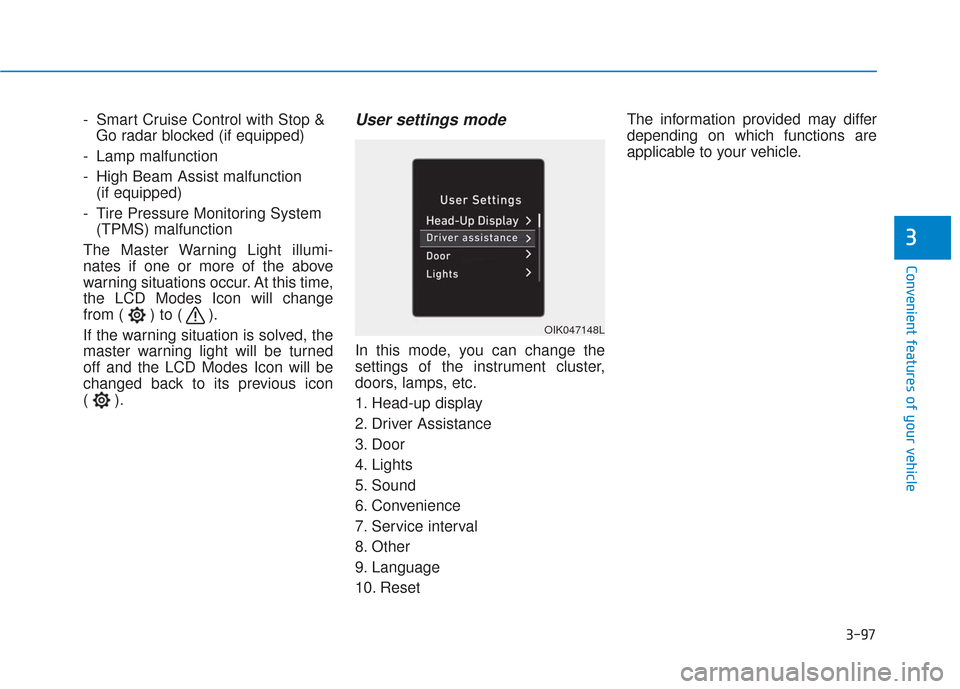
In this mode, you can change the
settings of the instrument cluster,
doors, lamps, etc.
1. Head-up display
2. Driver Assistance
3. Door
4. Lights
5. Sound
6. Convenience
7. Service interval
8. Other
9. Language
10. Reset The information provided may differ
depending on which functions are
applicable to your vehicle.
OIK047148L
Page 189 of 557
3-100
Convenient features of your vehicle
ItemsExplanation
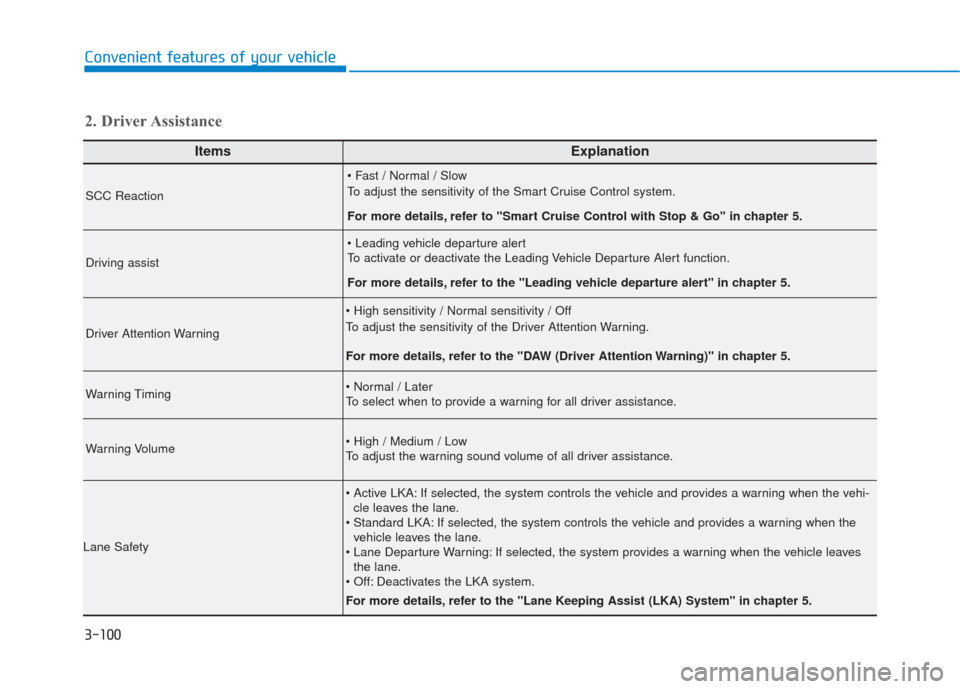
SCC Reaction
To adjust the sensitivity of the Smart Cruise Control system.
For more details, refer to ''Smart Cruise Control with Stop & Go'' in chapter 5.
Driving assist
To activate or deactivate the Leading Vehicle Departure Alert function.
For more details, refer to the "Leading vehicle departure alert" in chapter 5.
Driver Attention Warning
To adjust the sensitivity of the Driver Attention Warning.
For more details, refer to the "DAW (Driver Attention Warning)" in chapter 5.
Warning Timing
To select when to provide a warning for all driver assistance.
Warning Volume
To adjust the warning sound volume of all driver assistance.
Lane Safety
If selected, the system controls the vehicle and provides a warning when the vehi-cle leaves the lane.
If selected, the system controls the vehicle and provides a warning when the vehicle leaves the lane.
If selected, the system provides a warning when the vehicle leaves the lane.
Deactivates the LKA system.
For more details, refer to the "Lane Keeping Assist (LKA) System" in chapter 5.
2. Driver Assistance
Page 191 of 557
3-102
Convenient features of your vehicle
ItemsExplanation
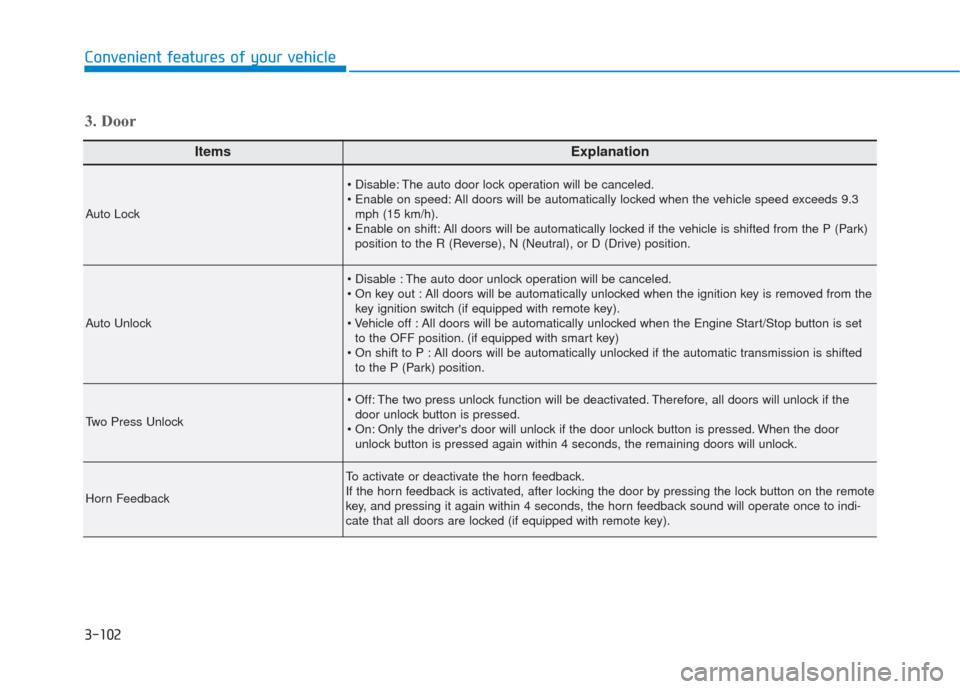
Auto Lock
The auto door lock operation will be canceled.
All doors will be automatically locked when the vehicle speed exceeds 9.3mph (15 km/h).
All doors will be automatically locked if the vehicle is shifted from the P (Park) position to the R (Reverse), N (Neutral), or D (Drive) position.
Auto Unlock
The auto door unlock operation will be canceled.
All doors will be automatically unlocked when the ignition key is removed from thekey ignition switch (if equipped with remote key).
All doors will be automatically unlocked when the Engine Start/Stop button is set to the OFF position. (if equipped with smart key)
All doors will be automatically unlocked if the automatic transmission is shifted to the P (Park) position.
Two Press Unlock
The two press unlock function will be deactivated. Therefore, all doors will unlock if thedoor unlock button is pressed.
Only the driver's door will unlock if the door unlock button is pressed. When the door unlock button is pressed again within 4 seconds, the remaining doors will unlock.
Horn Feedback
To activate or deactivate the horn feedback.
If the horn feedback is activated, after locking the door by pressing the lock button on the remote
key, and pressing it again within 4 seconds, the horn feedback sound will operate once to indi-
cate that all doors are locked (if equipped with remote key).
3. Door