2019 Hyundai Santa Fe sound
[x] Cancel search: soundPage 113 of 557

3-24
Convenient features of your vehicleThis system helps to protect your vehi-
cle and valuables. The horn will sound
and the hazard warning lights will blink
continuously if any of the following
occur:
- A door is opened without using theremote key or smart key.
- The liftgate is opened without using the remote key or smart key.
- The engine hood is opened.
The alarm continues for 30 seconds
(repeats 2 times unless the system is
disarmed), then the system resets. To
turn off the alarm, unlock the doors
with the remote key or smart key.
The Theft Alarm System automatically
sets 30 seconds after you lock the
doors and the liftgate. For the system
to activate, you must lock the doors
and the liftgate from outside the vehi-
cle with the remote key or smart key or
by pressing the button on the outside
of the door handle with the smart key
in your possession.
The hazard warning lights will blink
and the chime will sound once to indi-
cate the system is armed.
Once the security system is set, open-
ing any door, the liftgate, or the hood
without using the remote key or smart
key will cause the alarm to activate. The Theft Alarm System will not set if
the hood, the liftgate, or any door is
not fully closed. If the system will not
set, check the hood, the liftgate, or the
doors are fully closed.
Do not attempt to alter this system or
add other devices to it.
Information
• Do not lock the doors until all pas-
sengers have left the vehicle. If the
remaining passenger leaves the
vehicle when the system is armed,
the alarm will be activated.
• If the vehicle is not disarmed with the remote key or smart key, open
the doors by using the mechanical
key and place the ignition switch in
the ON position (for remote key) or
start the engine (for smart key) by
directly pressing the ignition switch
with the smart key.
• If the system is disarmed by unlock- ing the vehicle, but neither a door or
the liftgate is opened within 30 sec-
onds, the doors will relock and the
system will rearm automatically.
i
T TH
H E
EF
FT
T -
-A
A L
LA
A R
RM
M
S
S Y
Y S
ST
T E
EM
M
Even if your vehicle is
equipped with the Rear
Occupant Alert (ROA) system,
always make sure you check
the rear seat before you get
off the vehicle.
The alert may not operate if:
- The movement does not
continue for a certain period
of time or the movement is
small.
- The rear passenger is cov- ered with an obstacle such
as a blanket.
- Also, always be cautious of the passenger’s safety as
the detection function and
2nd alert may not operate
according to the surround-
ing environment and certain
conditions.
WARNING
Page 115 of 557
3-26
Convenient features of your vehicle
Recalling Positions from
Memory
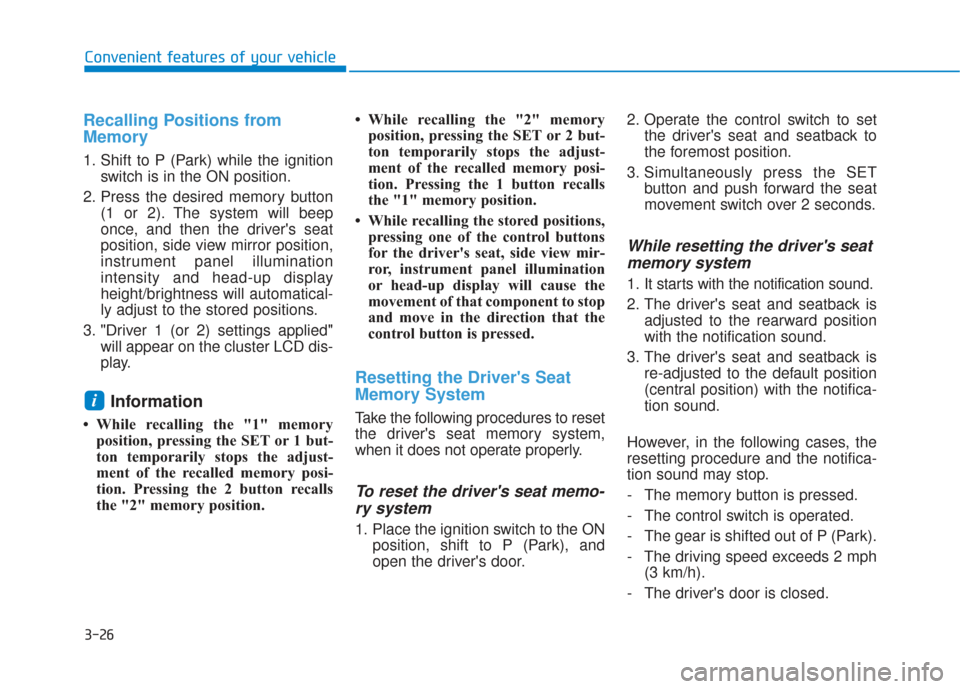
1. Shift to P (Park) while the ignitionswitch is in the ON position.
2. Press the desired memory button (1 or 2). The system will beep
once, and then the driver's seat
position, side view mirror position,
instrument panel illumination
intensity and head-up display
height/brightness will automatical-
ly adjust to the stored positions.
3. "Driver 1 (or 2) settings applied" will appear on the cluster LCD dis-
play.
Information
• While recalling the "1" memoryposition, pressing the SET or 1 but-
ton temporarily stops the adjust-
ment of the recalled memory posi-
tion. Pressing the 2 button recalls
the "2" memory position. • While recalling the "2" memory
position, pressing the SET or 2 but-
ton temporarily stops the adjust-
ment of the recalled memory posi-
tion. Pressing the 1 button recalls
the "1" memory position.
• While recalling the stored positions, pressing one of the control buttons
for the driver's seat, side view mir-
ror, instrument panel illumination
or head-up display will cause the
movement of that component to stop
and move in the direction that the
control button is pressed.
Resetting the Driver's Seat
Memory System
Take the following procedures to reset
the driver's seat memory system,
when it does not operate properly.
To reset the driver's seat memo-ry system
1. Place the ignition switch to the ON
position, shift to P (Park), and
open the driver's door. 2. Operate the control switch to set
the driver's seat and seatback to
the foremost position.
3. Simultaneously press the SET button and push forward the seat
movement switch over 2 seconds.
While resetting the driver's seatmemory system
1. It starts with the notification sound.
2. The driver's seat and seatback is
adjusted to the rearward position
with the notification sound.
3. The driver's seat and seatback is re-adjusted to the default position
(central position) with the notifica-
tion sound.
However, in the following cases, the
resetting procedure and the notifica-
tion sound may stop.
- The memory button is pressed.
- The control switch is operated.
- The gear is shifted out of P (Park).
- The driving speed exceeds 2 mph (3 km/h).
- The driver's door is closed.
i
Page 116 of 557
3-27
Convenient features of your vehicle
3
Reattempt to do the resettingprocedure again, when the reset-
ting procedure incompletely
stops or the notification sound
do not stop.
Make sure that there is no obsta- cle around the driver's seat in
advance of resetting the driver's
seat memory system.
Easy Access Function
The system will move the driver's
seat automatically as follows:
- It will move the driver’s seat rear- ward when the ignition key is
removed.
- It will move the driver’s seat for- ward when the ignition key is
inserted.
- It will move the driver’s seat rear- ward when the Engine Start/Stop
button is pressed to the OFF posi-
tion. - It will move the driver’s seat for-
ward when the Engine Start/Stop
button is pressed to the ACC or
START position.
You can activate or deactivate the
Easy Access Function from the User
Settings mode in the cluster LCD dis-
play.
'Convenience →Seat Easy Access →
Off/Normal/Extended'.
For more details, refer to "LCD
Display" in this chapter.
NOTICE
Driver should be cautious when
using this function to assure no
injury to passenger or child on
the back seat. In case of emer-
gency the driver has to stop
movement of front seat (when
easy access feature is activat-
ed) by pressing SET button or
any of the driver seat control
switches.
CAUTION
Page 118 of 557
3-29
Convenient features of your vehicle
3
Tilt Steering / Telescopic
Steering
When adjusting the steering wheel to
a comfortable position, adjust the
steering wheel so that it points
toward your chest, not toward your
face. Make sure you can see the
instrument cluster warning lights and
gauges. After adjusting, push the
steering wheel both up and down to
be certain it is locked in position.
Always adjust the position of the
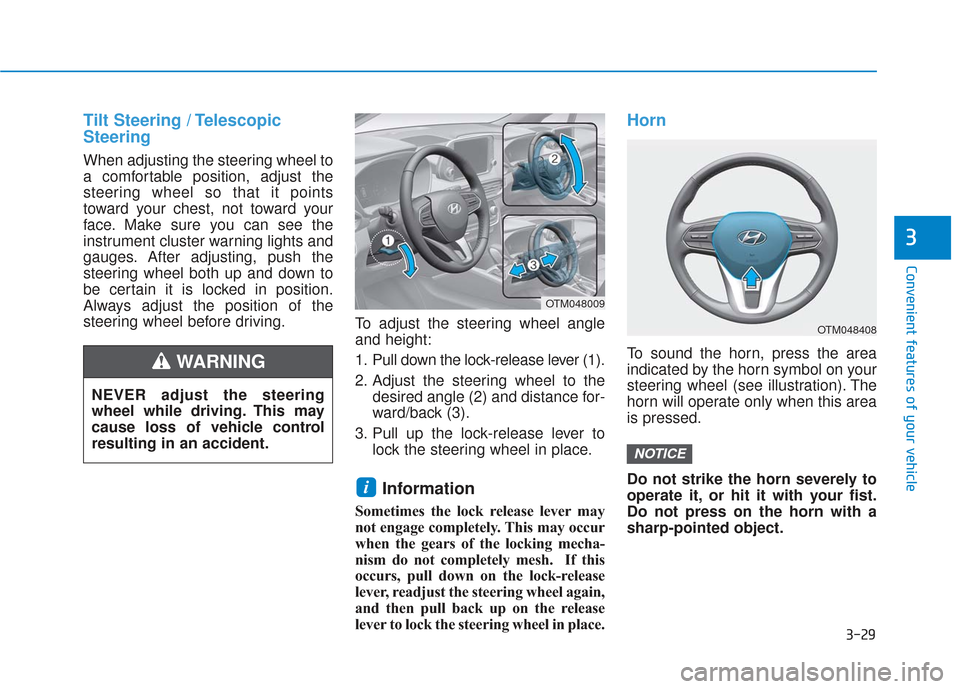
steering wheel before driving.To adjust the steering wheel angle
and height:
1. Pull down the lock-release lever (1).
2. Adjust the steering wheel to the
desired angle (2) and distance for-
ward/back (3).
3. Pull up the lock-release lever to lock the steering wheel in place.
Information
Sometimes the lock release lever may
not engage completely. This may occur
when the gears of the locking mecha-
nism do not completely mesh. If this
occurs, pull down on the lock-release
lever, readjust the steering wheel again,
and then pull back up on the release
lever to lock the steering wheel in place.
Horn
To sound the horn, press the area
indicated by the horn symbol on your
steering wheel (see illustration). The
horn will operate only when this area
is pressed.
Do not strike the horn severely to
operate it, or hit it with your fist.
Do not press on the horn with a
sharp-pointed object.
NOTICE
i
OTM048408
OTM048009
NEVER adjust the steering
wheel while driving. This may
cause loss of vehicle control
resulting in an accident.
WARNING
Page 139 of 557
3-50
Convenient features of your vehicle
Periodically remove any dirt that may accumulate on the sunroof
guide rail or between the sun-
roof and roof panel which can
make a noise.
Do not try to open the sunroof when the temperature is below
freezing or when the sunroof is
covered with snow or ice, other-
wise the motor could be dam-
aged. In cold and wet climates, the
sunroof may not work properly.
Resetting the Sunroof
The sunroof may need to be reset if
the following conditions occur:
The battery is discharged or dis-connected or the sunroof fuse has
been replaced or disconnected
The sunroof control lever is not operating correctly
To reset the sunroof, perform the fol-
lowing steps:
1. Turn the engine on and close the sunroof glass and sunshade com-
pletely. 2. Release the control lever.
3. Push and hold the sunroof control
lever forward (to close the sun-
shade) for about 10 seconds until
the sunroof moves slightly, then
release the control lever.
4. Push and hold the sunroof control lever forward until the sunroof
operates as follows:
Sunshade Open → Glass Tilt Open
→ Glass Slide Open → Glass Slide
Close → Sunshade Close
Then, release the control lever.
When this is complete, the sunroof
system is reset.
For more information, contact an
authorized HYUNDAI dealer.
Information
If you do not reset the sunroof, it may
not work properly.
Sunroof Open Warning
(if equipped)
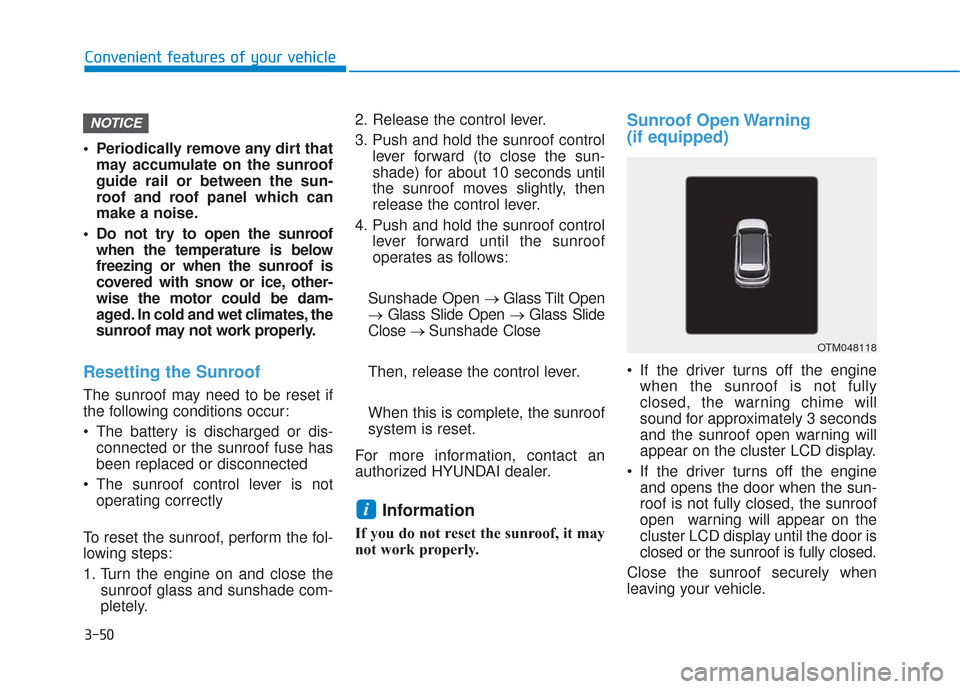
If the driver turns off the engine when the sunroof is not fully
closed, the warning chime will
sound for approximately 3 seconds
and the sunroof open warning will
appear on the cluster LCD display.
If the driver turns off the engine and opens the door when the sun-
roof is not fully closed, the sunroof
open warning will appear on the
cluster LCD display until the door is
closed or the sunroof is fully closed.
Close the sunroof securely when
leaving your vehicle.
i
NOTICE
OTM048118
Page 146 of 557
3-57
Convenient features of your vehicle
3
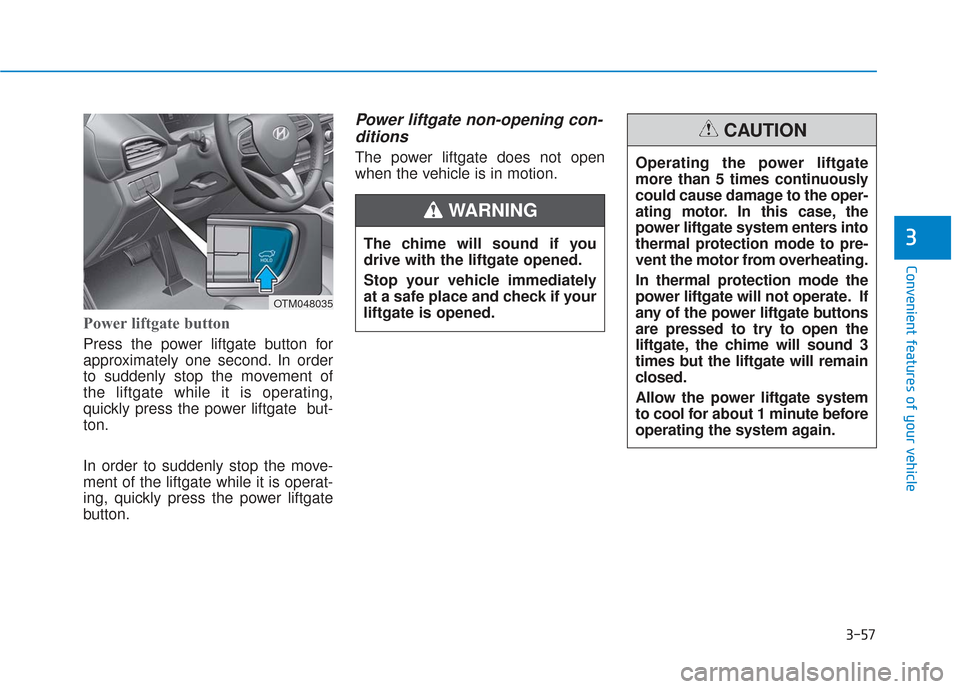
Power liftgate button
Press the power liftgate button for
approximately one second. In order
to suddenly stop the movement of
the liftgate while it is operating,
quickly press the power liftgate but-
ton.
In order to suddenly stop the move-
ment of the liftgate while it is operat-
ing, quickly press the power liftgate
button.
Power liftgate non-opening con-ditions
The power liftgate does not open
when the vehicle is in motion.
The chime will sound if you
drive with the liftgate opened.
Stop your vehicle immediately
at a safe place and check if your
liftgate is opened.
WARNING
OTM048035
Operating the power liftgate
more than 5 times continuously
could cause damage to the oper-
ating motor. In this case, the
power liftgate system enters into
thermal protection mode to pre-
vent the motor from overheating.
In thermal protection mode the
power liftgate will not operate. If
any of the power liftgate buttons
are pressed to try to open the
liftgate, the chime will sound 3
times but the liftgate will remain
closed.
Allow the power liftgate system
to cool for about 1 minute before
operating the system again.
CAUTION
Page 148 of 557
3-59
Convenient features of your vehicle
3
However, in some instances the
automatic reversal system may not
detect the object if it is too soft or is
very thin, or if the liftgate is almost
fully closed near the latched position.
Caution should be taken to prevent
any objects from obstructing the lift-
gate opeining.
If the automatic reversal feature
operates more than 2 times while
attempting to open or close the lift-
gate, the power liftgate may stop at
that position. If this occurs, carefully
close the liftgate manually, and then
try to operate the power liftgate auto-
matically again.How to reset the power liftgate
If the battery has been discharged or
disconnected, or if the power liftgate
fuse has been replaced or removed,
reset the power liftgate by performing
the following procedure:
1. Put the shift lever in P (Park).
2. Press the power liftgate inner but-ton and the power liftgate outer
handle button simultaneously for
more than 3 seconds. The chime
will sound.
3. Close the liftgate manually.
If the power liftgate does not work
properly after the above procedure,
have the system checked by an
authorized HYUNDAI dealer.
When operating the power liftgate,
the gear shift lever must be in the
(P) park position in order to oper-
ate normally.
NOTICE
Never intentionally place any
object or part of your body in
the path of the power liftgate to
make sure the automatic rever-
sal operates.
WARNING
Do not put heavy objects on the
power liftgate before you oper-
ate the power liftgate feature.
Additional weight may damage
the operation of the system.
CAUTION
Page 149 of 557
3-60
Convenient features of your vehicle
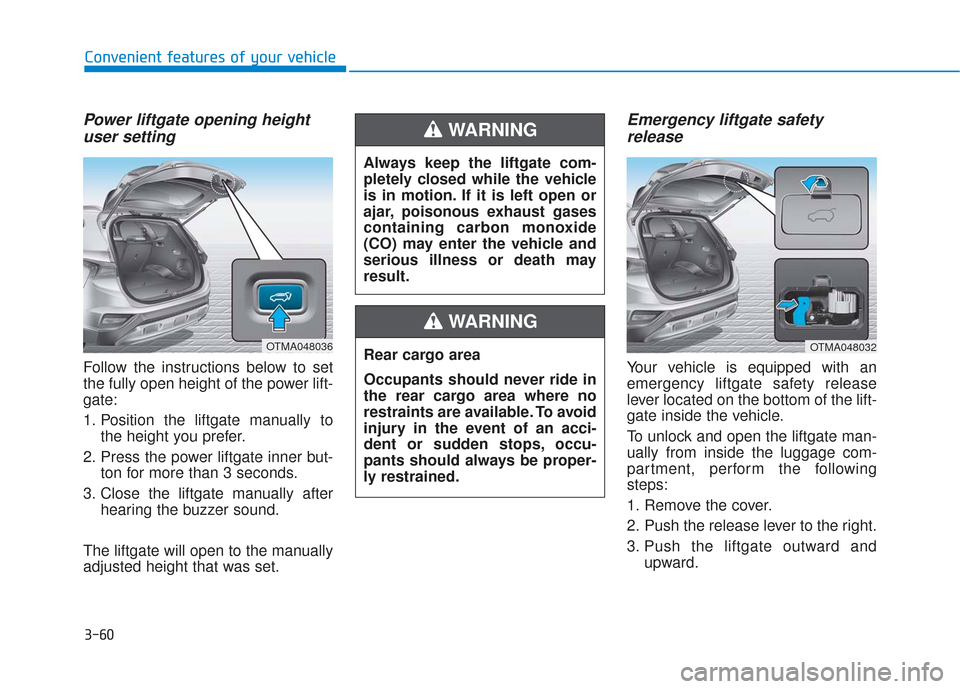
Power liftgate opening heightuser setting
Follow the instructions below to set
the fully open height of the power lift-
gate:
1. Position the liftgate manually to
the height you prefer.
2. Press the power liftgate inner but- ton for more than 3 seconds.
3. Close the liftgate manually after hearing the buzzer sound.
The liftgate will open to the manually
adjusted height that was set.
Emergency liftgate safety release
Your vehicle is equipped with an
emergency liftgate safety release
lever located on the bottom of the lift-
gate inside the vehicle.
To unlock and open the liftgate man-
ually from inside the luggage com-
partment, perform the following
steps:
1. Remove the cover.
2. Push the release lever to the right.
3. Push the liftgate outward and
upward.
OTMA048036
Always keep the liftgate com-
pletely closed while the vehicle
is in motion. If it is left open or
ajar, poisonous exhaust gases
containing carbon monoxide
(CO) may enter the vehicle and
serious illness or death may
result.
WARNING
Rear cargo area
Occupants should never ride in
the rear cargo area where no
restraints are available. To avoid
injury in the event of an acci-
dent or sudden stops, occu-
pants should always be proper-
ly restrained.
WARNING
OTMA048032