2019 Hyundai Santa Fe replacement
[x] Cancel search: replacementPage 469 of 557
W
WA
AS
SH
H E
ER
R
F
F L
LU
U I
ID
D
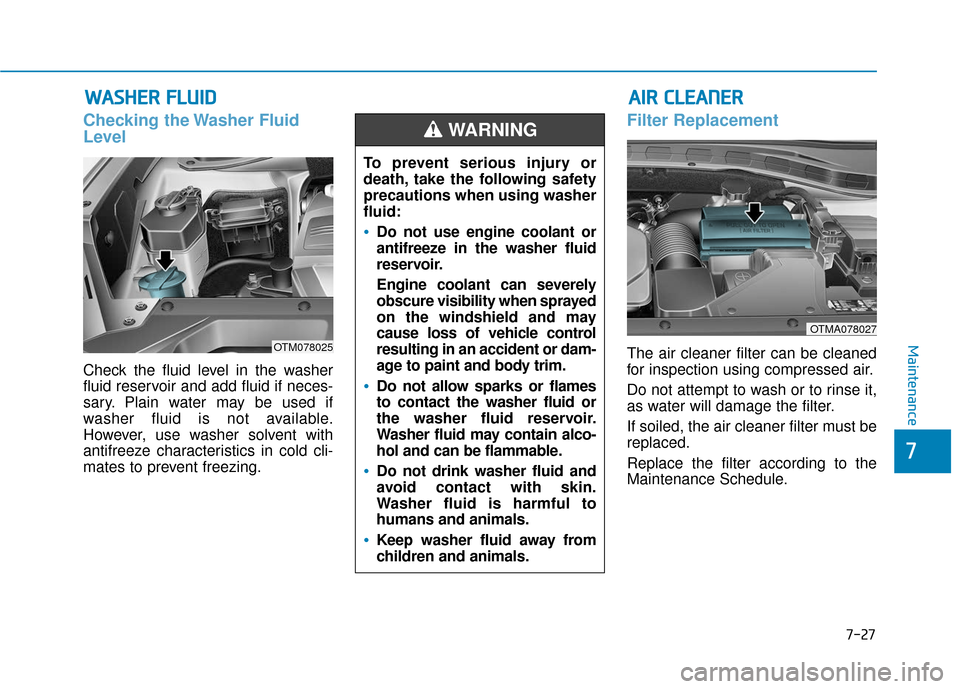
Checking the Washer Fluid
Level
Check the fluid level in the washer
fluid reservoir and add fluid if neces-
sary. Plain water may be used if
washer fluid is not available.
However, use washer solvent with
antifreeze characteristics in cold cli-
mates to prevent freezing.
Filter Replacement
The air cleaner filter can be cleaned
for inspection using compressed air.
Do not attempt to wash or to rinse it,
as water will damage the filter.
If soiled, the air cleaner filter must be
replaced.
Replace the filter according to the
Maintenance Schedule.OTM078025
OTMA078027
A
A I
IR
R
C
C L
LE
E A
A N
N E
ER
R
To prevent serious injury or
death, take the following safety
precautions when using washer
fluid:
Do not use engine coolant or
antifreeze in the washer fluid
reservoir.
Engine coolant can severely
obscure visibility when sprayed
on the windshield and may
cause loss of vehicle control
resulting in an accident or dam-
age to paint and body trim.
Do not allow sparks or flames
to contact the washer fluid or
the washer fluid reservoir.
Washer fluid may contain alco-
hol and can be flammable.
Do not drink washer fluid and
avoid contact with skin.
Washer fluid is harmful to
humans and animals.
Keep washer fluid away from
children and animals.
WARNING
Maintenance
7
7-27
Page 473 of 557
W
WI
IP
P E
ER
R
B
B L
LA
A D
DE
ES
S
Blade Inspection
Contamination of either the windshield
or the wiper blades with foreign matter
can reduce the effectiveness of the
windshield wiper functionality.
Common sources of contamination
are insects, tree sap, and hot wax
treatments used by some commercial
car washes. If the blades are not wip-
ing properly, clean both the window
and the blades with a clean cloth
dampened with washer fluid.
To prevent damage to the wiper
blades, arms or other compo-
nents, do not:
Use gasoline, kerosene, paint
thinner, or other solvents on or
near them.
Attempt to move the wipers manually.
Use non-specified wiper blades.
Information
Commercial hot waxes applied by auto-
matic car washes have been known to
make the windshield difficult to clean.
Blade Replacement
When the wipers no longer clean
adequately, the blades may be worn
or cracked, and require replacement.
To prevent damage to the wiper
arms or other components, do not
attempt to move the wipers manu-
ally.
The use of a non-specified wiper
blade could result in wiper mal-
function and failure.
In order to prevent damage to the hood and the wiper arms, the
wiper arms should only be lifted
when in the top wiping position.
Always return the wiper arms to the windshield before driving.
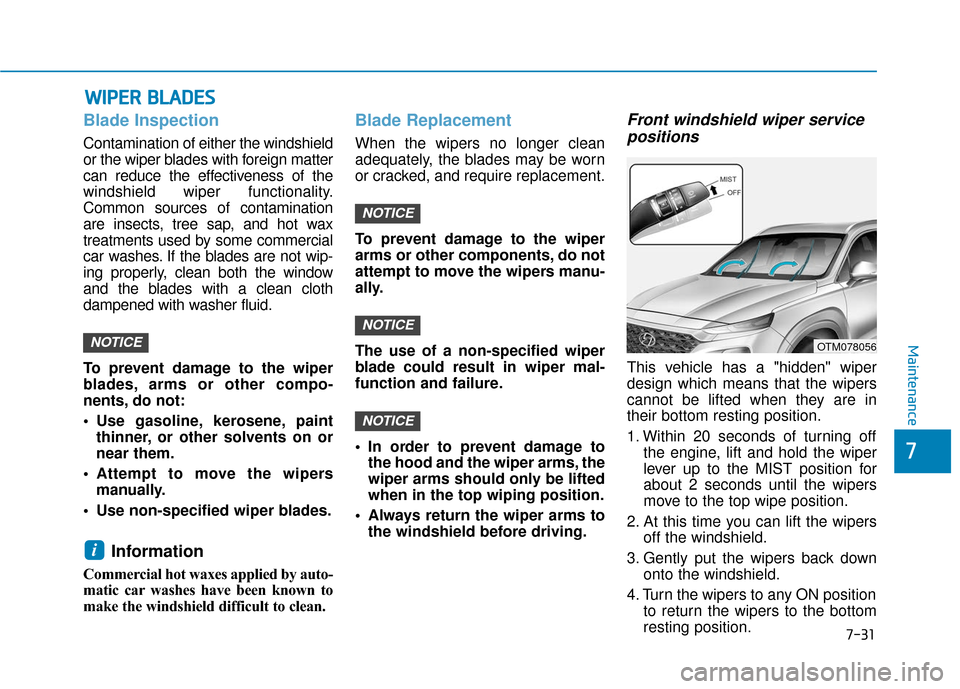
Front windshield wiper servicepositions
This vehicle has a "hidden" wiper
design which means that the wipers
cannot be lifted when they are in
their bottom resting position.
1. Within 20 seconds of turning off
the engine, lift and hold the wiper
lever up to the MIST position for
about 2 seconds until the wipers
move to the top wipe position.
2. At this time you can lift the wipers off the windshield.
3. Gently put the wipers back down onto the windshield.
4. Turn the wipers to any ON position to return the wipers to the bottom
resting position.
NOTICE
NOTICE
NOTICE
i
NOTICEOTM078056Maintenance
7
7-31
Page 474 of 557
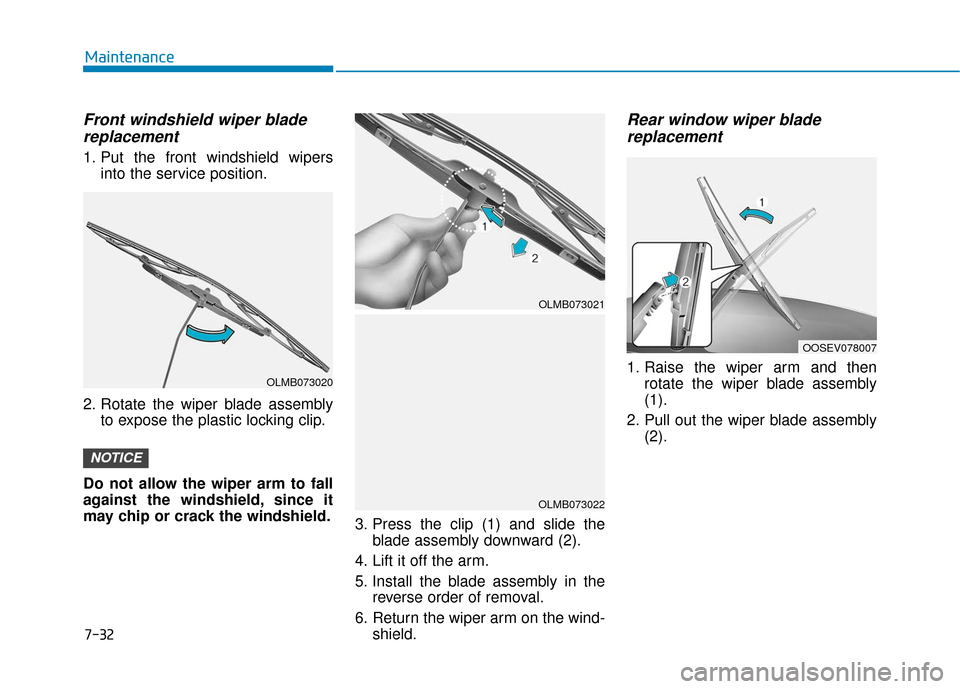
Front windshield wiper bladereplacement
1. Put the front windshield wipers
into the service position.
2. Rotate the wiper blade assembly to expose the plastic locking clip.
Do not allow the wiper arm to fall
against the windshield, since it
may chip or crack the windshield. 3. Press the clip (1) and slide the
blade assembly downward (2).
4. Lift it off the arm.
5. Install the blade assembly in the reverse order of removal.
6. Return the wiper arm on the wind- shield.
Rear window wiper bladereplacement
1. Raise the wiper arm and then
rotate the wiper blade assembly
(1).
2. Pull out the wiper blade assembly (2).
NOTICE
OLMB073021
OLMB073022
OLMB073020
OOSEV078007
Maintenance
7-32
Page 477 of 557
Battery Recharging
AGM battery
Absorbent Glass Matt (AGM)batteries are maintenance-free
and we recommend that the
AGM battery be serviced by an
authorized retailer of Genesis
Branded products. For charging
your AGM battery, use only fully
automatic battery chargers that
are specially developed for AGM
batteries.
When replacing the AGM bat- tery, we recommend that you
use parts for replacement from
an authorized retailer of Genesis
Branded products.
Do not open or remove the cap on top of the battery. This may
cause leaks of internal elec-
trolyte that could result in
severe injury.
NOTICE
Always follow these instruc-
tions when recharging your
vehicle's battery to avoid the
risk of SERIOUS INJURY or
DEATH from explosions or acid
burns:
Before performing mainte-
nance or recharging the bat-
tery, turn off all accessories
and place the ignition switch
to the LOCK/OFF position.
Keep all flames, sparks, or
smoking materials away from
the battery.
Always work outdoors or in an
area with plenty of ventilation.
Wear eye protection when
checking the battery during
charging.
The battery must be removed
from the vehicle and placed in
a well ventilated area.
WARNING
Watch the battery during
charging, and stop or reduce
the charging rate if the battery
cells begin boiling violently.
The negative battery cable
must be removed first and
installed last when the battery
is disconnected. Disconnect
the battery charger in the fol-
lowing order:
(1) Turn off the battery charger main switch.
(2) Unhook the negative clamp from the negative battery
terminal.
(3) Unhook the positive clamp from the positive battery
terminal.
Always use a genuine
HYUNDAI approved battery
when you replace the battery.
Maintenance
7
7-35
Page 483 of 557
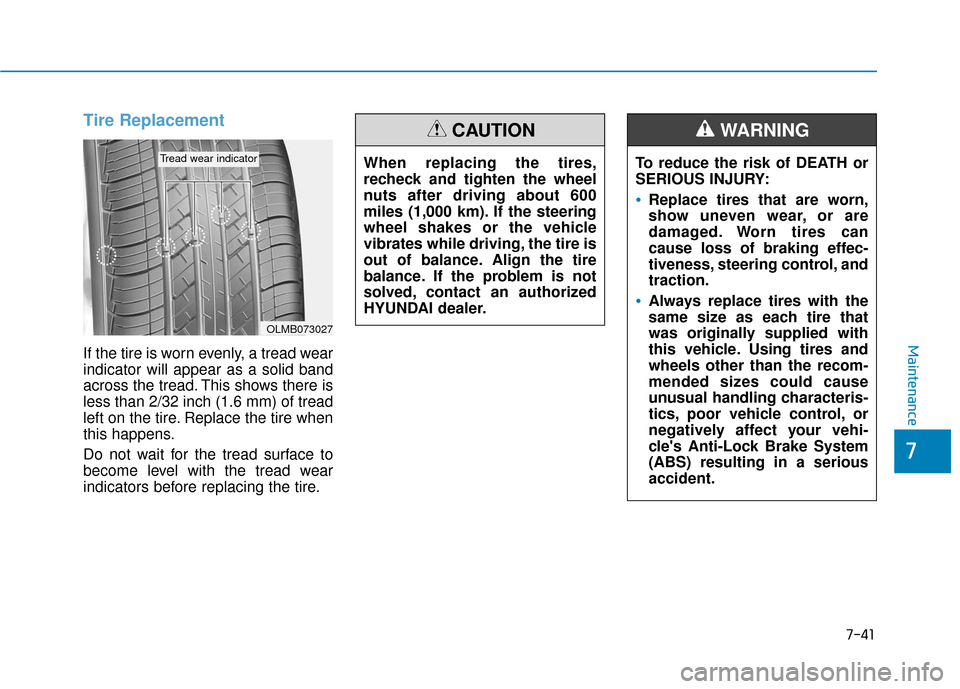
Tire Replacement
If the tire is worn evenly, a tread wear
indicator will appear as a solid band
across the tread. This shows there is
less than 2/32 inch (1.6 mm) of tread
left on the tire. Replace the tire when
this happens.
Do not wait for the tread surface to
become level with the tread wear
indicators before replacing the tire.
OLMB073027
Tread wear indicatorTo reduce the risk of DEATH or
SERIOUS INJURY:
Replace tires that are worn,
show uneven wear, or are
damaged. Worn tires can
cause loss of braking effec-
tiveness, steering control, and
traction.
Always replace tires with the
same size as each tire that
was originally supplied with
this vehicle. Using tires and
wheels other than the recom-
mended sizes could cause
unusual handling characteris-
tics, poor vehicle control, or
negatively affect your vehi-
cle's Anti-Lock Brake System
(ABS) resulting in a serious
accident.
WARNING
When replacing the tires,
recheck and tighten the wheel
nuts after driving about 600
miles (1,000 km). If the steering
wheel shakes or the vehicle
vibrates while driving, the tire is
out of balance. Align the tire
balance. If the problem is not
solved, contact an authorized
HYUNDAI dealer.
CAUTION
Maintenance
7
7-41
Page 484 of 557

Compact spare tire replacement
A compact spare tire has a shorter
tread life than a regular size tire.
Replace it when you can see the
tread wear indicator bars on the tire.
The replacement compact spare tire
should be the same size and design
tire as the one provided with your
new vehicle and should be mounted
on the same compact spare tire
wheel. The compact spare tire is not
designed to be mounted on a regular
size wheel, and the compact spare
tire wheel is not designed for mount-
ing a regular size tire.
Wheel Replacement
When replacing the metal wheels for
any reason, make sure the new
wheels are equivalent to the original
factory units in diameter, rim width
and offset.
Tire Traction
Tire traction can be reduced if you
drive on worn tires, tires that are
improperly inflated or on slippery
road surfaces. Tires should be
replaced when the tread depth is at
least 2/32 inch (1.6 mm). To reduce
the possibility of losing control, slow
down whenever there is rain, snow or
ice on the road.
The original tire should be
repaired or replaced as soon as
possible to avoid failure of the
spare and loss of vehicle con-
trol resulting in an accident. The
compact spare tire is for emer-
gency use only. Do not operate
your vehicle over 50 mph (80
km/h) when using the compact
spare tire.
WARNING
Tires degrade over time, even
when they are not being used.
Regardless of the remaining
tread, HYUNDAI recommends
that tires be replaced after six
(6) years of normal service.
When replacing tires (or
wheels), it is recommended to
replace the two front or two
rear tires (or wheels) as a pair.
Replacing just one tire can
seriously affect your vehicle's
handling. If only replacing one
pair of tires, it is recommend-
ed to install the pair of new
tires on the rear axle.
Heat caused by hot climates
or frequent high loading con-
ditions can accelerate the
aging process. Failure to fol-
low this warning may cause
sudden tire failure, which
could lead to a loss of vehicle
control resulting in an acci-
dent.
Maintenance
7-42
Page 494 of 557
F
FU
U S
SE
E S
S
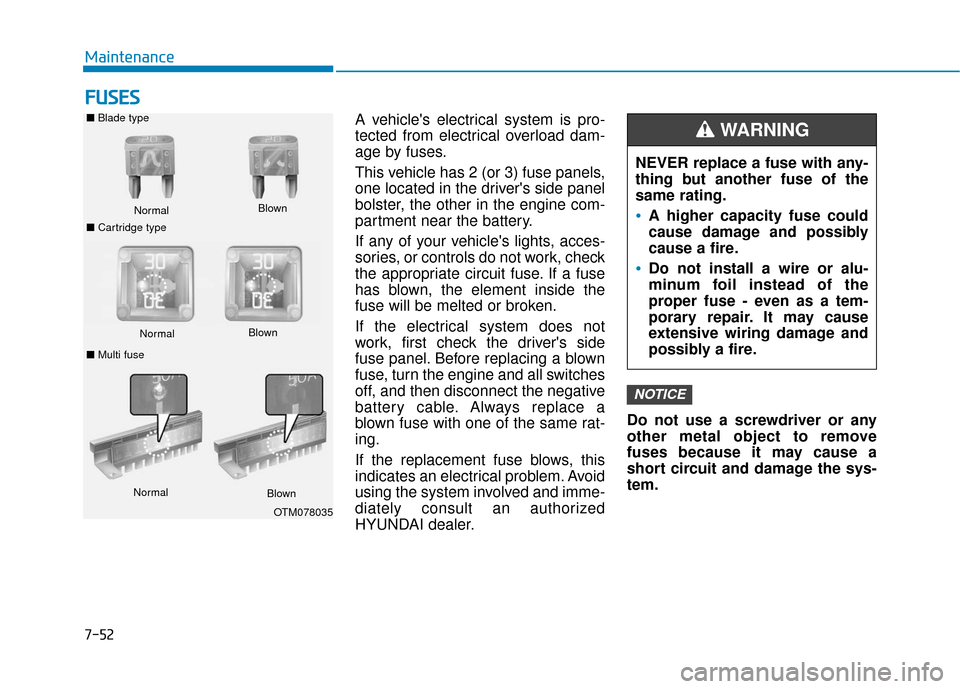
A vehicle's electrical system is pro-
tected from electrical overload dam-
age by fuses.
This vehicle has 2 (or 3) fuse panels,
one located in the driver's side panel
bolster, the other in the engine com-
partment near the battery.
If any of your vehicle's lights, acces-
sories, or controls do not work, check
the appropriate circuit fuse. If a fuse
has blown, the element inside the
fuse will be melted or broken.
If the electrical system does not
work, first check the driver's side
fuse panel. Before replacing a blown
fuse, turn the engine and all switches
off, and then disconnect the negative
battery cable. Always replace a
blown fuse with one of the same rat-
ing.
If the replacement fuse blows, this
indicates an electrical problem. Avoid
using the system involved and imme-
diately consult an authorized
HYUNDAI dealer. Do not use a screwdriver or any
other metal object to remove
fuses because it may cause a
short circuit and damage the sys-
tem.
NOTICE
NEVER replace a fuse with any-
thing but another fuse of the
same rating.
A higher capacity fuse could
cause damage and possibly
cause a fire.
Do not install a wire or alu-
minum foil instead of the
proper fuse - even as a tem-
porary repair. It may cause
extensive wiring damage and
possibly a fire.
WARNING ■
Blade type
Normal
■ Cartridge type Blown
Normal
Blown
■ Multi fuse
Normal Blown
OTM078035
Maintenance
7-52
Page 495 of 557
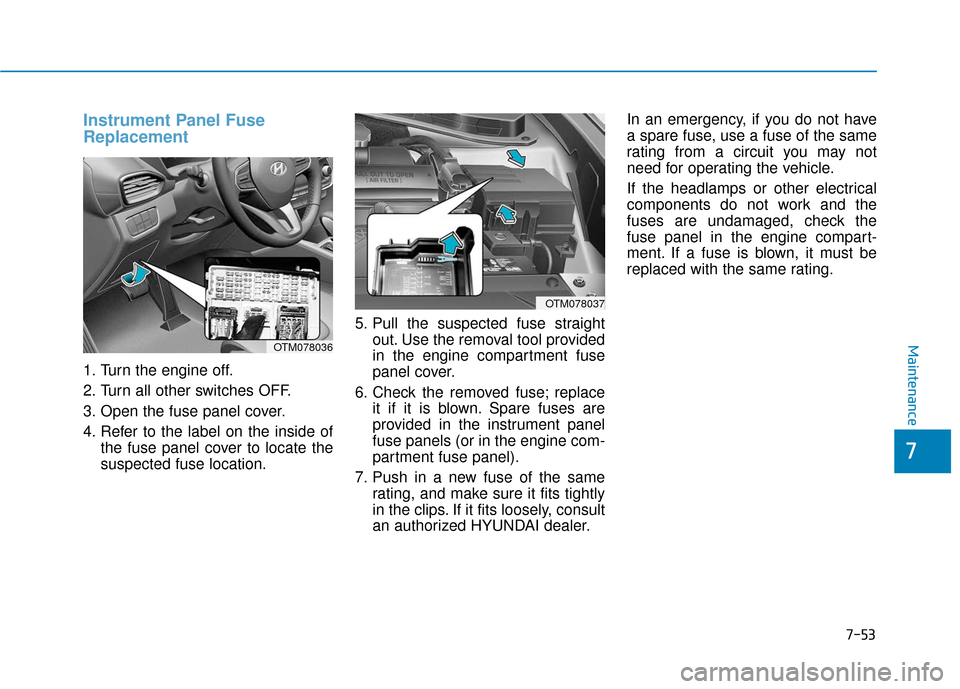
Instrument Panel Fuse
Replacement
1. Turn the engine off.
2. Turn all other switches OFF.
3. Open the fuse panel cover.
4. Refer to the label on the inside ofthe fuse panel cover to locate the
suspected fuse location. 5. Pull the suspected fuse straight
out. Use the removal tool provided
in the engine compartment fuse
panel cover.
6. Check the removed fuse; replace it if it is blown. Spare fuses are
provided in the instrument panel
fuse panels (or in the engine com-
partment fuse panel).
7. Push in a new fuse of the same rating, and make sure it fits tightly
in the clips. If it fits loosely, consult
an authorized HYUNDAI dealer. In an emergency, if you do not have
a spare fuse, use a fuse of the same
rating from a circuit you may not
need for operating the vehicle.
If the headlamps or other electrical
components do not work and the
fuses are undamaged, check the
fuse panel in the engine compart-
ment. If a fuse is blown, it must be
replaced with the same rating.
OTM078037
OTM078036Maintenance
7
7-53