2019 Hyundai Nexo Air Compressor
[x] Cancel search: Air CompressorPage 243 of 560
3-156
Convenient features of your vehicle
If the vehicle is being driven in
severe conditions such as dusty or
rough roads and/or if transporting
pets or occupants smoke inside the
vehicle, then more frequent cabin air
filter inspections and changes are
required.
If the air flow rate suddenly decreas-
es, the system should be checked at
an authorized HYUNDAI dealer.
Checking the amount of air conditioner refrigerant andcompressor lubricant
When the amount of refrigerant is
low, the performance of the air con-
ditioning is reduced. Overfilling also
reduces the performance of the air
conditioning system.
Therefore, if abnormal operation is
found, have the system inspected by
an authorized HYUNDAI dealer.
It is important that the correct
type and amount of oil and refrig-
erant is used. Otherwise, damage
to the compressor and abnormal
system operation may occur. The air conditioning system should
be serviced by an authorized
HYUNDAI dealer.
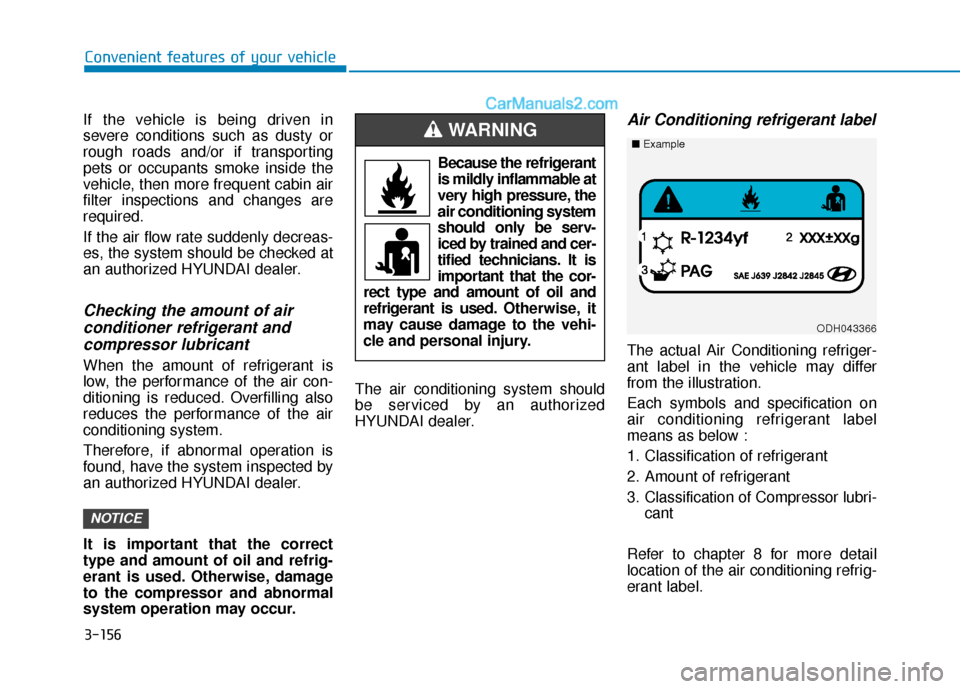
Air Conditioning refrigerant label
The actual Air Conditioning refriger-
ant label in the vehicle may differ
from the illustration.
Each symbols and specification on
air conditioning refrigerant label
means as below :
1. Classification of refrigerant
2. Amount of refrigerant
3. Classification of Compressor lubri-
cant
Refer to chapter 8 for more detail
location of the air conditioning refrig-
erant label.
NOTICE
ODH043366
■ Example
Because the refrigerant
is mildly inflammable at
very high pressure, the
air conditioning system
should only be serv-
iced by trained and cer-
tified technicians. It is
important that the cor-
rect type and amount of oil and
refrigerant is used. Otherwise, it
may cause damage to the vehi-
cle and personal injury.
WARNING
Page 414 of 560
6-17
What to do in an emergency
6
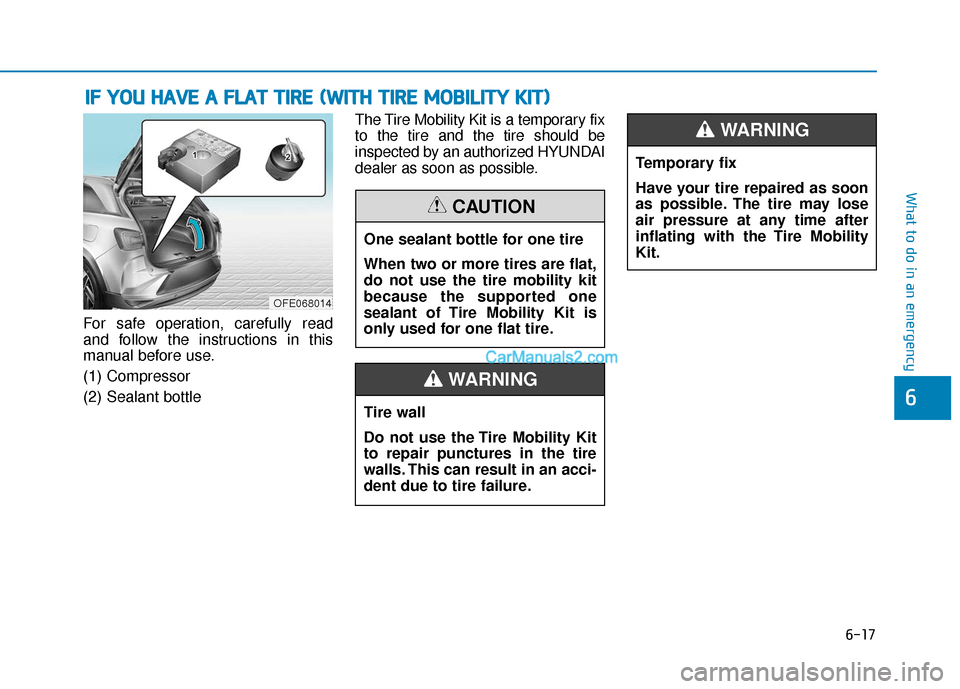
For safe operation, carefully read
and follow the instructions in this
manual before use.
(1) Compressor
(2) Sealant bottleThe Tire Mobility Kit is a temporary fix
to the tire and the tire should be
inspected by an authorized HYUNDAI
dealer as soon as possible.
I I
F
F
Y
Y O
O U
U
H
H A
AV
VE
E
A
A
F
F L
LA
A T
T
T
T I
IR
R E
E
(
( W
W I
IT
T H
H
T
T I
IR
R E
E
M
M O
OB
BI
IL
L I
IT
T Y
Y
K
K I
IT
T )
)
OFE068014
One sealant bottle for one tire
When two or more tires are flat,
do not use the tire mobility kit
because the supported one
sealant of Tire Mobility Kit is
only used for one flat tire.
CAUTION
Tire wall
Do not use the Tire Mobility Kit
to repair punctures in the tire
walls. This can result in an acci-
dent due to tire failure.
WARNING
Temporary fix
Have your tire repaired as soon
as possible. The tire may lose
air pressure at any time after
inflating with the Tire Mobility
Kit.
WARNING
Page 415 of 560
6-18
What to do in an emergency
Introduction
With the Tire Mobility Kit you stay
mobile even after experiencing a tire
puncture.
The compressor and sealing com-
pound system effectively and com-
fortably seals most punctures in a
passenger car tire caused by nails
or similar objects and reinflates the
tire.
After you ensure that the tire is prop-
erly sealed you can drive cautiously
on the tire (distance up to 120 miles
(200 km)) at a max. speed of (50
mph (80 km/h)) in order to reach a
service station or tire dealer for the
tire replacement.
It is possible that some tires, espe-
cially with larger punctures or dam-
age to the sidewall, cannot be sealed
completely.
Air pressure loss in the tire may
adversely affect tire performance.
For this reason, you should avoid
abrupt steering or other driving
maneuvers, especially if the vehicle
is heavily loaded or if a trailer is in
use.The Tire Mobility Kit is not designed
or intended as a permanent tire
repair method and is to be used for
one tire only.
This instruction shows you step by
step how to temporarily seal the
puncture simply and reliably.
Read the section "Notes on the safe
use of the Tire Mobility Kit".
Notes on the safe use of the
Tire Mobility Kit
Park your car at the side of the
road so that you can work with the
Tire Mobility Kit away from moving
traffic.
To be sure your vehicle will not move, even when you're on fairly
level ground, always set your park-
ing brake.
Only use the Tire Mobility Kit for sealing/inflation passenger car
tires. Only punctured areas located
within the tread region of the tire
can be sealed using the tire mobil-
ity kit.
Do not use on motorcycles, bicy- cles or any other type of tires. When the tire and wheel are dam-
aged, do not use Tire Mobility Kit
for your safety.
Use of the Tire Mobility Kit may not be effective for tire damage larger
than approximately 0.16 in. (4
mm).
Please contact the nearest
HYUNDAI dealership if the tire
cannot be made roadworthy with
the Tire Mobility Kit.
Do not use the Tire Mobility Kit if a tire is severely damaged by driving
run flat or with insufficient air pres-
sure.
Do not remove any foreign objects such as nails or screws that have
penetrated the tire.
Provided the car is outdoors, leave the vehicle ON ( indicator ON).
Otherwise operating the compres-
sor may eventually drain the car
battery.
Never leave the Tire Mobility Kit unattended while it is being used.
Do not leave the compressor run- ning for more than 10 minutes at a
time or it may overheat.
Page 416 of 560
6-19
What to do in an emergency
6
Do not use the Tire Mobility Kit ifthe ambient temperature is below
-22°F (-30°C).
In case of skin contact with the- sealant, wash the area thoroughly-
with plenty of water. If the irritation-
persists, seek medical attention.
In case of eye contact with the sealant,flush your eyes for at least
15 minutes. If the irritation persists,
seek medical attention.
In case of swallowing the sealant,rinse the mouth and drink
plenty ofwater. However, never give
anythingto an unconscious person
and seek medical attention imme-
diately.
Long time exposure to the sealant- may cause damage to bodily tissue
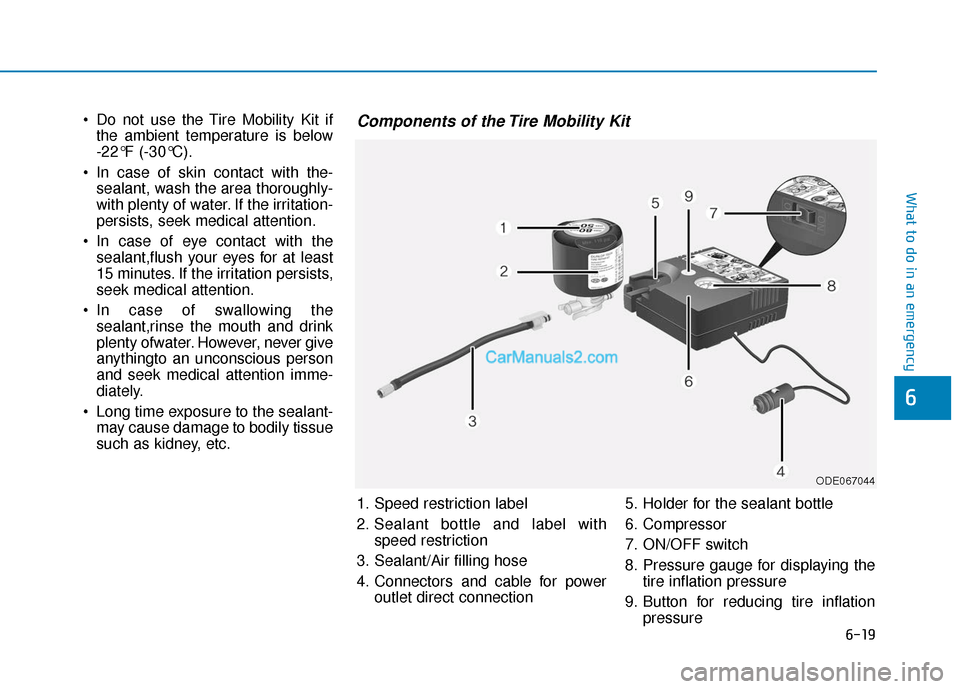
such as kidney, etc.Components of the Tire Mobility Kit
ODE067044
1. Speed restriction label
2. Sealant bottle and label with speed restriction
3. Sealant/Air filling hose
4. Connectors and cable for power outlet direct connection 5. Holder for the sealant bottle
6. Compressor
7. ON/OFF switch
8. Pressure gauge for displaying the
tire inflation pressure
9. Button for reducing tire inflation pressure
Page 420 of 560
6-23
What to do in an emergency
6
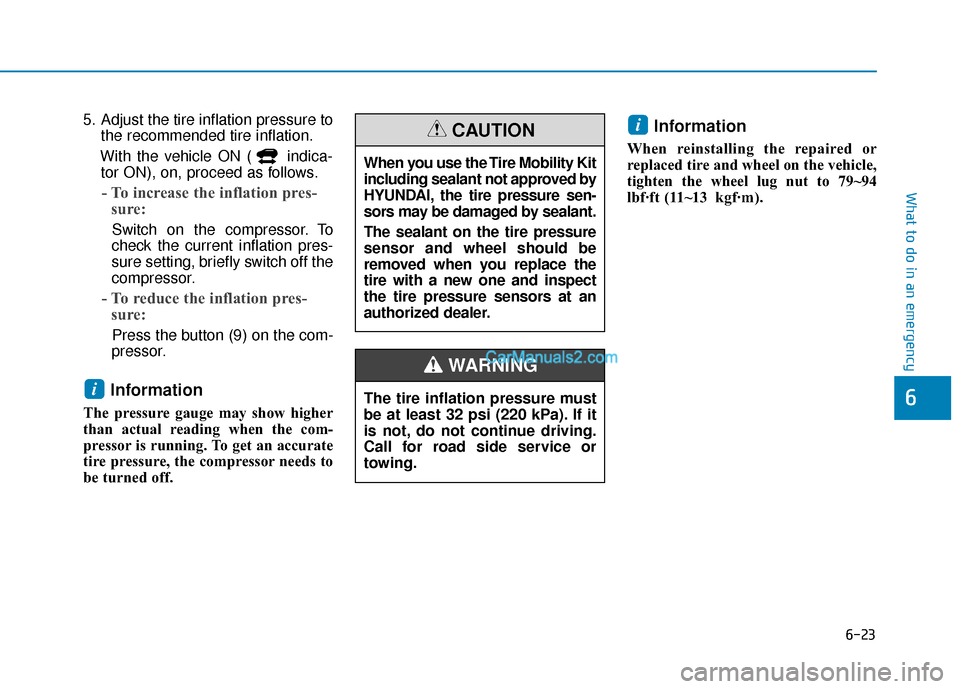
5. Adjust the tire inflation pressure tothe recommended tire inflation.
With the vehicle ON ( indica- tor ON), on, proceed as follows.
- To increase the inflation pres- sure:
Switch on the compressor. To
check the current inflation pres-
sure setting, briefly switch off the
compressor.
- To reduce the inflation pres- sure:
Press the button (9) on the com-
pressor.
Information
The pressure gauge may show higher
than actual reading when the com-
pressor is running. To get an accurate
tire pressure, the compressor needs to
be turned off.
Information
When reinstalling the repaired or
replaced tire and wheel on the vehicle,
tighten the wheel lug nut to 79~94
lbf·ft (1 1~13kgf·m).
i
i
When you use the Tire Mobility Kit
including sealant not approved by
HYUNDAI, the tire pressure sen-
sors may be damaged by sealant.
The sealant on the tire pressure
sensor and wheel should be
removed when you replace the
tire with a new one and inspect
the tire pressure sensors at an
authorized dealer.
CAUTION
The tire inflation pressure must
be at least 32 psi (220 kPa). If it
is not, do not continue driving.
Call for road side service or
towing.
WARNING
Page 432 of 560
7-8
Maintenance
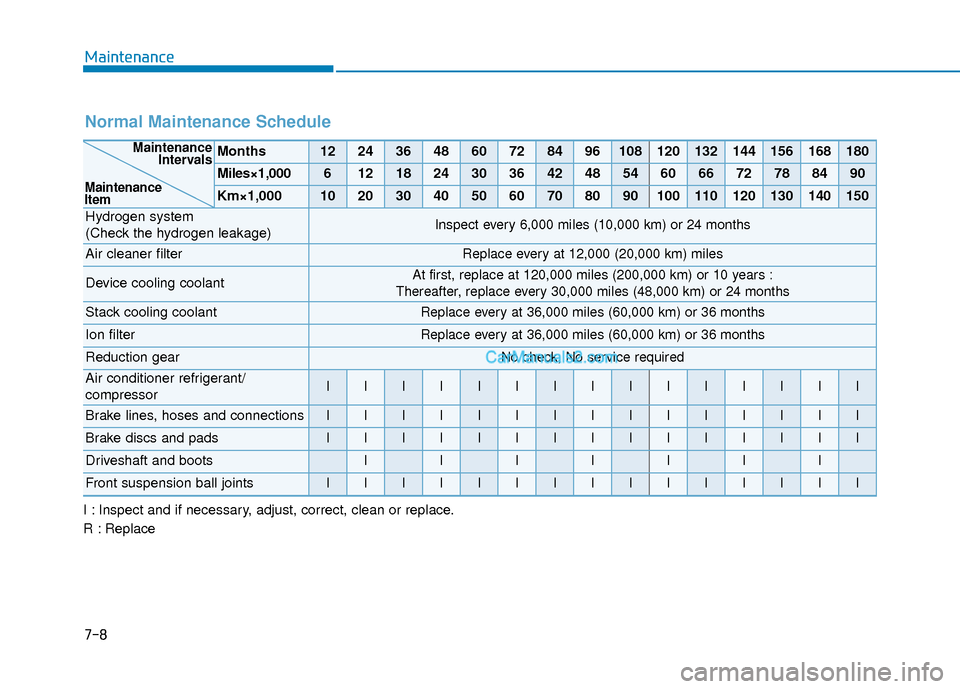
Normal Maintenance Schedule
Months1224364860728496108120132144156168180
Miles×1,00061218243036424854606672788490
Km×1,000102030405060708090100110120130140150
Hydrogen system
(Check the hydrogen leakage)Inspect every 6,000 miles (10,000 km) or 24 months
Air cleaner filterReplace every at 12,000 (20,000 km) miles
Device cooling coolantAt first, replace at 120,000 miles (200,000 km) or 10 years :
Thereafter, replace every 30,000 miles (48,000 km) or 24 months
Stack cooling coolantReplace every at 36,000 miles (60,000 km) or 36 months
Ion filterReplace every at 36,000 miles (60,000 km) or 36 months
Reduction gearNo check, No service required
Air conditioner refrigerant/
compressorIIIIIIIIIIIIIII
Brake lines, hoses and connectionsIIIIIIIIIIIIIII
Brake discs and padsIIIIIIIIIIIIIII
Driveshaft and bootsIIIIIII
Front suspension ball jointsIIIIIIIIIIIIIII
Maintenance Intervals
Maintenance
Item
I : Inspect and if necessary, adjust, correct, clean or replace.
R : Replace
Page 434 of 560
7-10
Maintenance
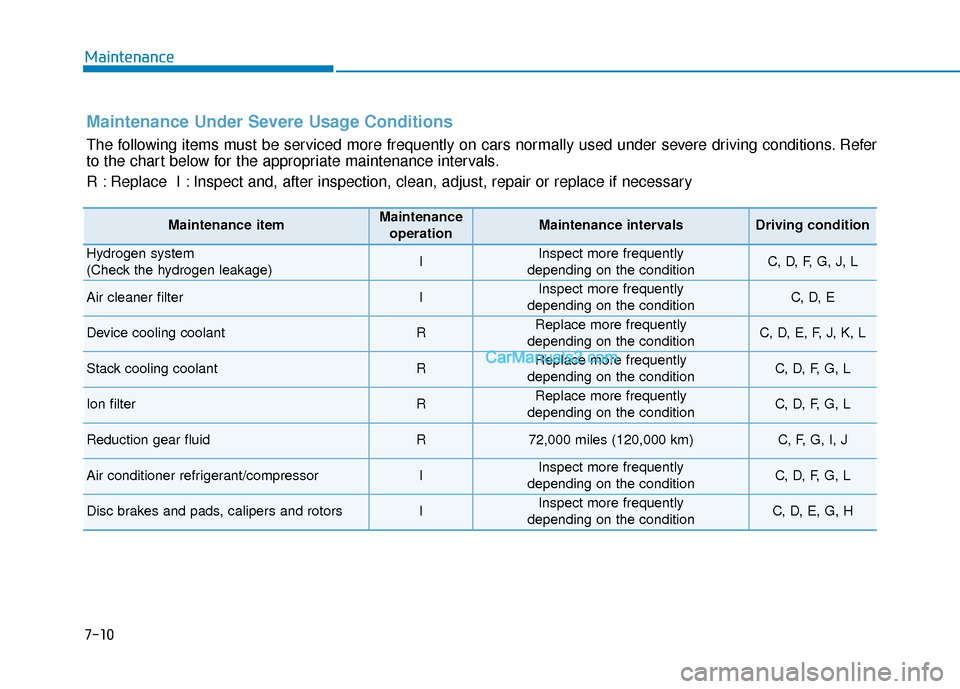
Maintenance Under Severe Usage Conditions
The following items must be serviced more frequently on cars normally used under severe driving conditions. Refer
to the chart below for the appropriate maintenance intervals.
R : Replace I : Inspect and, after inspection, clean, adjust, repair or replace if neces\
sary
Maintenance itemMaintenanceoperationMaintenance intervalsDriving condition
Hydrogen system
(Check the hydrogen leakage)IInspect more frequently
depending on the conditionC, D, F, G, J, L
Air cleaner filterIInspect more frequently
depending on the conditionC, D, E
Device cooling coolantRReplace more frequently
depending on the conditionC, D, E, F, J, K, L
Stack cooling coolantRReplace more frequently
depending on the conditionC, D, F, G, L
Ion filterRReplace more frequently
depending on the conditionC, D, F, G, L
Reduction gear fluidR72,000 miles (120,000 km)C, F, G, I, J
Air conditioner refrigerant/compressorIInspect more frequently
depending on the conditionC, D, F, G, L
Disc brakes and pads, calipers and rotorsIInspect more frequently
depending on the conditionC, D, E, G, H
Page 475 of 560
7-51
7
Maintenance
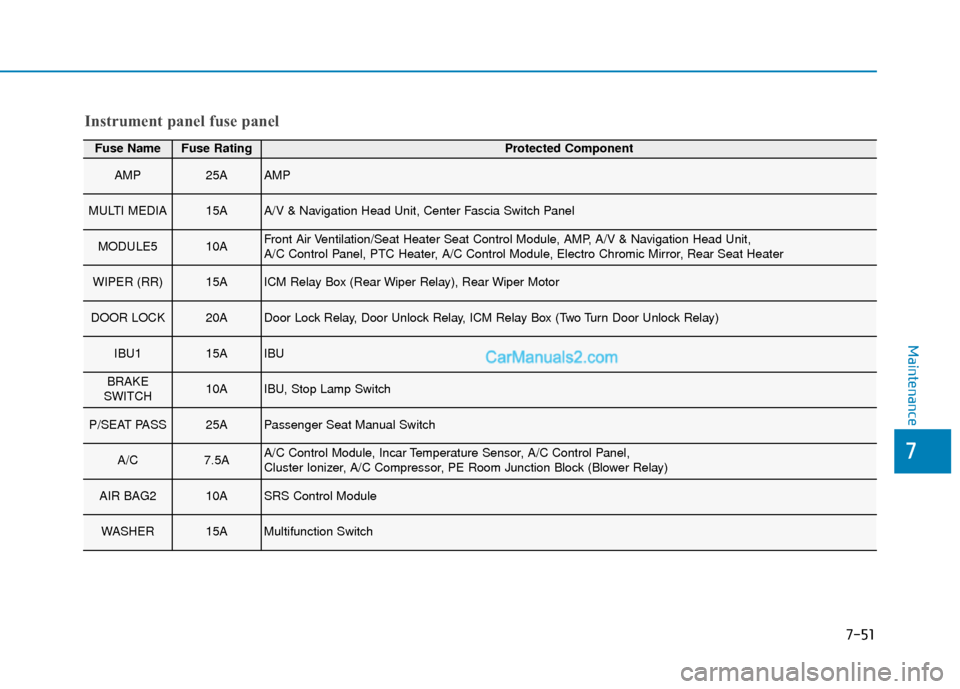
Fuse NameFuse RatingProtected Component
AMP25AAMP
MULTI MEDIA15AA/V & Navigation Head Unit, Center Fascia Switch Panel
MODULE510AFront Air Ventilation/Seat Heater Seat Control Module, AMP, A/V & Navigation Head Unit,
A/C Control Panel, PTC Heater, A/C Control Module, Electro Chromic Mirror, Rear Seat Heater
WIPER (RR)15AICM Relay Box (Rear Wiper Relay), Rear Wiper Motor
DOOR LOCK20ADoor Lock Relay, Door Unlock Relay, ICM Relay Box (Two Turn Door Unlock Relay)
IBU115AIBU
BRAKE
SWITCH10AIBU, Stop Lamp Switch
P/SEAT PASS25APassenger Seat Manual Switch
A/C7.5AA/C Control Module, Incar Temperature Sensor, A/C Control Panel,
Cluster Ionizer, A/C Compressor, PE Room Junction Block (Blower Relay)
AIR BAG210ASRS Control Module
WASHER15AMultifunction Switch
Instrument panel fuse panel