Page 412 of 560
6-15
What to do in an emergency
6
The TPMS Malfunction Indicator
may illuminate after blinking for
one minute if the vehicle is near
electric power supply cables or
radio transmitters such as police
stations, government and public
offices, broadcasting stations,
military installations, airports,
transmitting towers, etc.
Additionally, the TPMS Malfunction
Indicator may illuminate if snow
chains are used or electronic
devices such as computers, charg-
ers, remote starters, navigation,
etc. This may interfere with normal
operation of the TPMS.
Changing a Tire with TPMS
If you have a flat tire, the Low Tire
Pressure and LCD position indicator
will come on. Have the flat tire
repaired by an authorized HYUNDAI
dealer as soon as possible.
Once the original tire equipped with
a tire pressure monitoring sensor is
reinflated to the recommended pres-
sure and reinstalled on the vehicle,
the Low Tire Pressure LCD position
indicator and TPMS Malfunction
Indicator will go off within a few min-
utes of driving.If the indicators do not disappear
after a few minutes, please visit an
authorized HYUNDAI dealer.
Each wheel is equipped with a tire
pressure sensor mounted inside the
tire behind the valve stem. You must
use TPMS specific wheels. It is rec-
ommended that you always have
your tires serviced by an authorized
HYUNDAI dealer.
NOTICE
Never use a puncture-repairing
agent not approved by HYUNDAI
dealer to repair and/or inflate a
low pressure tire. Tire sealant
not approved by HYUNDAI deal-
er may damage the tire pressure
sensor.
CAUTION
Page 420 of 560
6-23
What to do in an emergency
6
5. Adjust the tire inflation pressure tothe recommended tire inflation.
With the vehicle ON ( indica- tor ON), on, proceed as follows.
- To increase the inflation pres- sure:
Switch on the compressor. To
check the current inflation pres-
sure setting, briefly switch off the
compressor.
- To reduce the inflation pres- sure:
Press the button (9) on the com-
pressor.
Information
The pressure gauge may show higher
than actual reading when the com-
pressor is running. To get an accurate
tire pressure, the compressor needs to
be turned off.
Information
When reinstalling the repaired or
replaced tire and wheel on the vehicle,
tighten the wheel lug nut to 79~94
lbf·ft (1 1~13kgf·m).
i
i
When you use the Tire Mobility Kit
including sealant not approved by
HYUNDAI, the tire pressure sen-
sors may be damaged by sealant.
The sealant on the tire pressure
sensor and wheel should be
removed when you replace the
tire with a new one and inspect
the tire pressure sensors at an
authorized dealer.
CAUTION
The tire inflation pressure must
be at least 32 psi (220 kPa). If it
is not, do not continue driving.
Call for road side service or
towing.
WARNING
Page 422 of 560
6-25
What to do in an emergency
6
When towing your vehicle in an
emergency without wheel dollies:
1. Place the POWER button in theACC position.
2. Place the shift button in N (Neutral).
3. Release the parking brake.
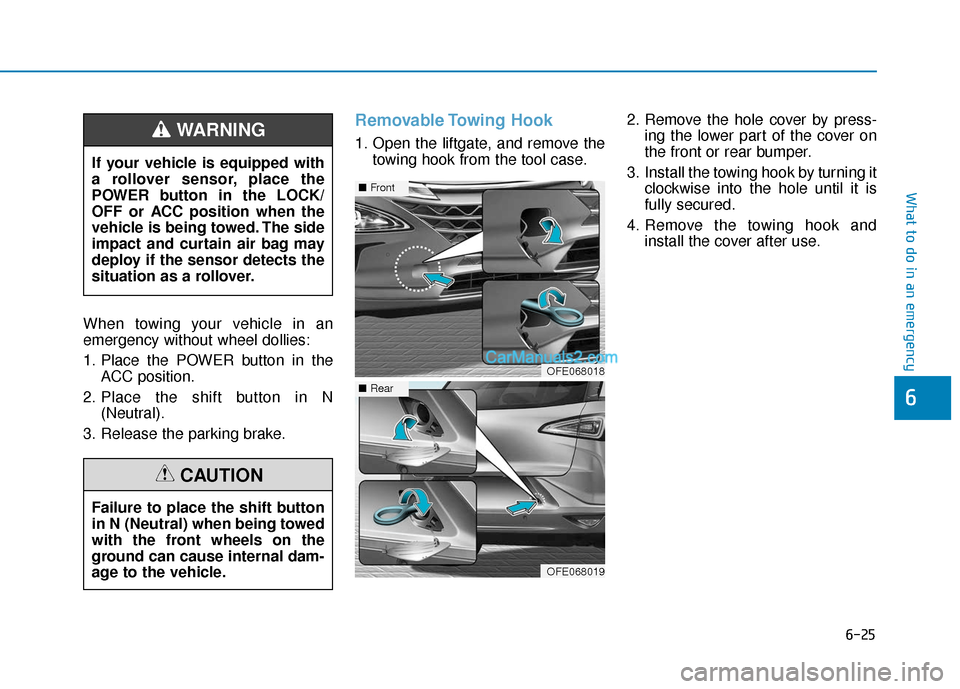
Removable Towing Hook
1. Open the liftgate, and remove the towing hook from the tool case. 2. Remove the hole cover by press-
ing the lower part of the cover on
the front or rear bumper.
3. Install the towing hook by turning it clockwise into the hole until it is
fully secured.
4. Remove the towing hook and install the cover after use.
If your vehicle is equipped with
a rollover sensor, place the
POWER button in the LOCK/
OFF or ACC position when the
vehicle is being towed. The side
impact and curtain air bag may
deploy if the sensor detects the
situation as a rollover.WARNING
Failure to place the shift button
in N (Neutral) when being towed
with the front wheels on the
ground can cause internal dam-
age to the vehicle.
CAUTION
OFE068018
■
Front
OFE068019
■Rear
Page 445 of 560
1. Loosen the air cleaner coverattaching clips and open the
cover. 2. Wipe the inside of the air cleaner.
3. Replace the air cleaner filter.
4. Lock the cover with the cover
attaching clips.
5. Check that the cover is firmly installed.
Information
If the vehicle is operated in extremely
dusty or sandy areas, replace the air
cleaner filter more often than the
usual recommended intervals (refer to
"Maintenance Under Severe Usage
Conditions" in this chapter).
i
7-21
7
Maintenance
OFE078010OFE078009Do not drive with the air clean-
er filter removed. This will
result in excessive wear.
When removing the air clean-
er filter, be careful that dust or
dirt does not enter the air
intake, or damage may result.
Use HYUNDAI genuine parts,
use of non-genuine parts
could damage the air flow
sensor.
CAUTION
Page 474 of 560
7-50
Maintenance
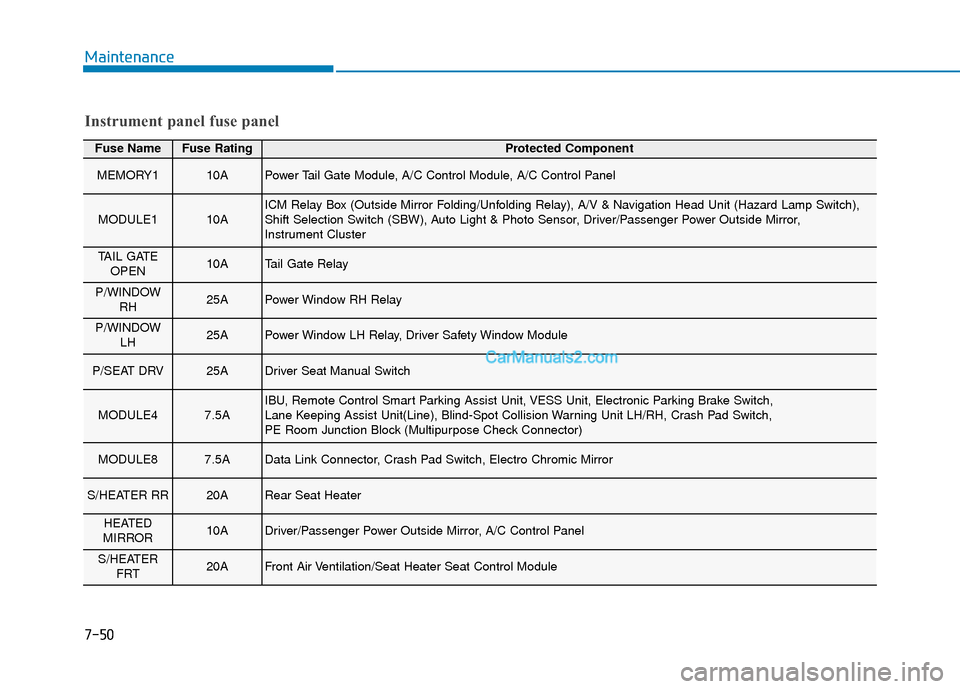
Fuse NameFuse RatingProtected Component
MEMORY110APower Tail Gate Module, A/C Control Module, A/C Control Panel
MODULE110AICM Relay Box (Outside Mirror Folding/Unfolding Relay), A/V & Navigation Head Unit (Hazard Lamp Switch),
Shift Selection Switch (SBW), Auto Light & Photo Sensor, Driver/Passenger Power Outside Mirror,
Instrument Cluster
TAIL GATEOPEN10ATail Gate Relay
P/WINDOW RH25APower Window RH Relay
P/WINDOW LH25APower Window LH Relay, Driver Safety Window Module
P/SEAT DRV25ADriver Seat Manual Switch
MODULE47.5AIBU, Remote Control Smart Parking Assist Unit, VESS Unit, Electronic Parking Brake Switch,
Lane Keeping Assist Unit(Line), Blind-Spot Collision Warning Unit LH/RH, Crash Pad Switch,
PE Room Junction Block (Multipurpose Check Connector)
MODULE87.5AData Link Connector, Crash Pad Switch, Electro Chromic Mirror
S/HEATER RR20ARear Seat Heater
HEATED
MIRROR10ADriver/Passenger Power Outside Mirror, A/C Control Panel
S/HEATER FRT20AFront Air Ventilation/Seat Heater Seat Control Module
Instrument panel fuse panel
Page 475 of 560
7-51
7
Maintenance
Fuse NameFuse RatingProtected Component
AMP25AAMP
MULTI MEDIA15AA/V & Navigation Head Unit, Center Fascia Switch Panel
MODULE510AFront Air Ventilation/Seat Heater Seat Control Module, AMP, A/V & Navigation Head Unit,
A/C Control Panel, PTC Heater, A/C Control Module, Electro Chromic Mirror, Rear Seat Heater
WIPER (RR)15AICM Relay Box (Rear Wiper Relay), Rear Wiper Motor
DOOR LOCK20ADoor Lock Relay, Door Unlock Relay, ICM Relay Box (Two Turn Door Unlock Relay)
IBU115AIBU
BRAKE
SWITCH10AIBU, Stop Lamp Switch
P/SEAT PASS25APassenger Seat Manual Switch
A/C7.5AA/C Control Module, Incar Temperature Sensor, A/C Control Panel,
Cluster Ionizer, A/C Compressor, PE Room Junction Block (Blower Relay)
AIR BAG210ASRS Control Module
WASHER15AMultifunction Switch
Instrument panel fuse panel
Page 476 of 560
7-52
Maintenance
Fuse NameFuse RatingProtected Component
MDPS7.5AMDPS Unit
MODULE77.5AFront Air Ventilation/Seat Heater Seat Control Module, AC Inverter,
Rear Seat Heater, Surround View Monitor Unit, Rear Power Outlet
SUNROOF220ASunroof Unit
SUNROOF120ASunroof Unit
CLUSTER7.5AInstrument Cluster
MODULE37.5ASCU, Shift Selection Switch (SBW), IDC, VPD Sensor, Stop Lamp Switch, HMU, BMS Control Module
START7.5AFCU, IBU
IBU27.5AIBU
A/BAG IND7.5AInstrument Cluster, A/C Control Panel
MODULE67.5AIBU
MODULE210ABMS Control Module, Wireless Charger, USB Charger LH/RH, A/V & Navigation Head Unit,
Center Fascia Switch Panel, AMP, Surround View Monitor Unit, Power Outside Mirror Switch, IBU
AIR BAG115ASRS Control Module, Passenger Occupant Detection Sensor
Instrument panel fuse panel
Page 486 of 560
7-62
Maintenance
A
AP
PP
PE
EA
A R
RA
A N
N C
CE
E
C
C A
A R
RE
E
Exterior Care
Exterior general caution
It is very important to follow the label
directions when using any chemical
cleaner or polish. Read all warning
and caution statements that appear
on the label.
High-pressure washing
When using high-pressure wash-
ers, make sure to maintain suffi-
cient distance from the vehicle.
Insufficient clearance or excessive
pressure can lead to component
damage or water penetration.
Do not spray the camera, sensors or its surrounding area directly with
a high pressure washer. Shock
applied from high pressure water
may cause the device to not oper-
ate normally.
Do not bring the nozzle tip close to boots (rubber or plastic covers)or
connectors as they may be dam-
aged if they come into contact with
high pressure water.
Do not use any high-pressure noz- zles, which induce either one-
direct water stream or water
swirling.
Protecting your vehicle’s finish
Washing
To help protect your vehicle’s finish
from rust and deterioration, wash it
thoroughly and frequently at least
once a month with lukewarm or cold
water.
If you use your vehicle for off-road
driving, you should wash it after each
off-road trip. Pay special attention to
the removal of any accumulation of
salt, dirt, mud, and other foreign
materials. Make sure the drain holes
in the lower edges of the doors and
rocker panels are kept clear and
clean.
Insects, tar, tree sap, bird droppings,
industrial pollution and similar
deposits can damage your vehicle’s
finish if not removed immediately.
Even prompt washing with plain
water may not completely remove all
these deposits. A mild soap, safe for
use on painted surfaces, should be
used.