2019 Hyundai Kona radiator
[x] Cancel search: radiatorPage 103 of 526
3-21
Convenient features of your vehicle
3
The mirror heads can be folded to
prevent damage during an automatic
car wash or when passing through a
narrow street. Do not scrape ice off the mirror
face; this may damage the sur-
face of the glass.
If the mirror is jammed with ice, do not adjust the mirror by
force. Use an approved spray
de-icer (not radiator antifreeze)
spray, or a sponge or soft cloth
with very warm water, or move
the vehicle to a warm place and
allow the ice to melt.Adjusting the rearview mirrors
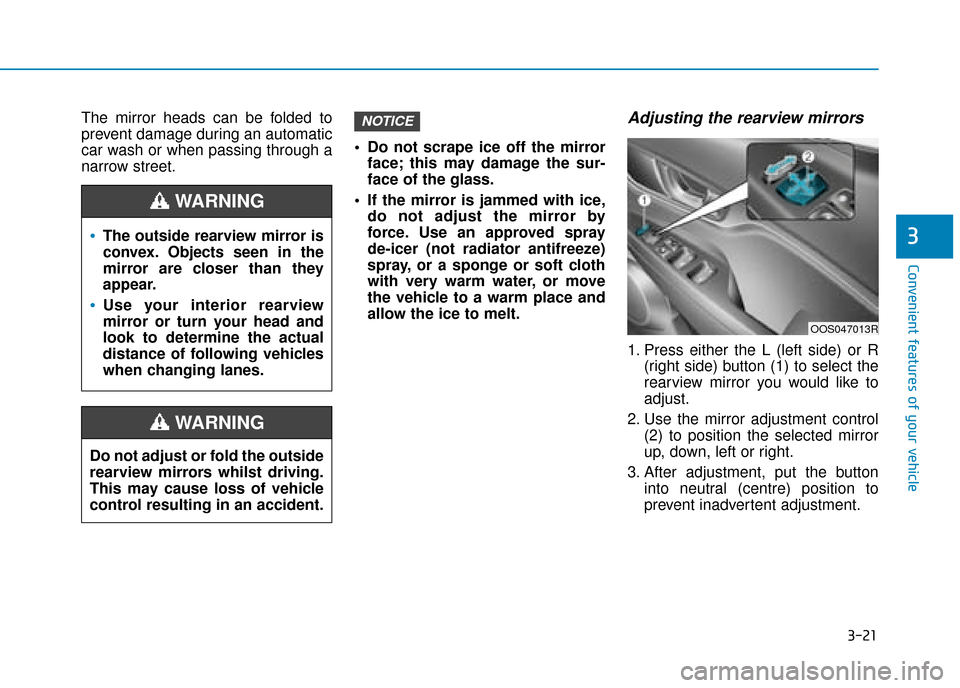
1. Press either the L (left side) or R (right side) button (1) to select the
rearview mirror you would like to
adjust.
2. Use the mirror adjustment control (2) to position the selected mirror
up, down, left or right.
3. After adjustment, put the button into neutral (centre) position to
prevent inadvertent adjustment.
NOTICE
The outside rearview mirror is
convex. Objects seen in the
mirror are closer than they
appear.
Use your interior rearview
mirror or turn your head and
look to determine the actual
distance of following vehicles
when changing lanes.
WARNING
Do not adjust or fold the outside
rearview mirrors whilst driving.
This may cause loss of vehicle
control resulting in an accident.
WARNING
OOS047013R
Page 117 of 526
3-35
Convenient features of your vehicle
3
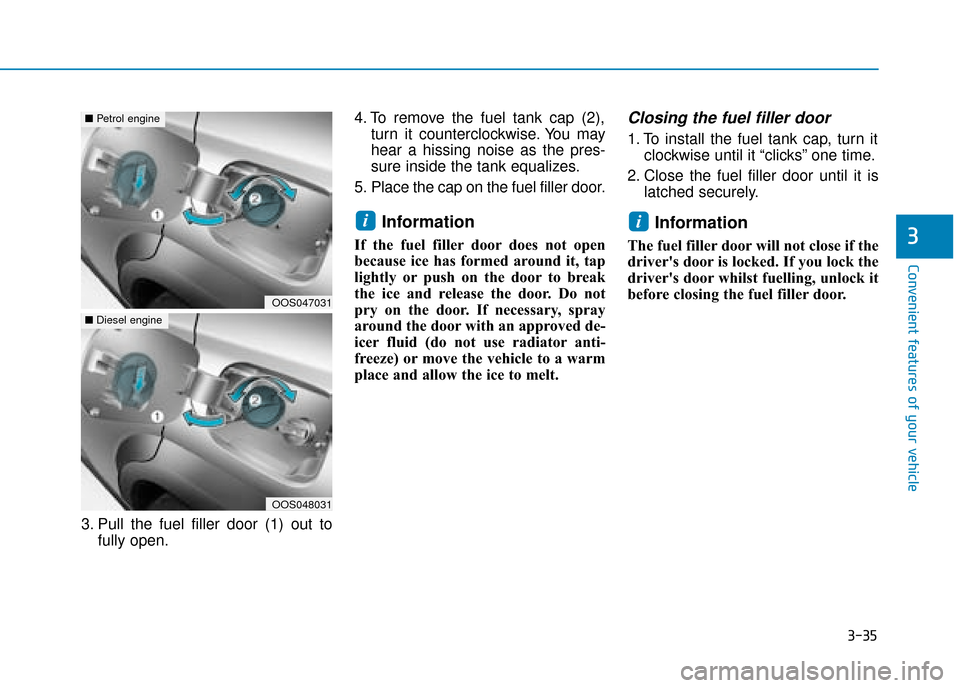
3. Pull the fuel filler door (1) out tofully open. 4. To remove the fuel tank cap (2),
turn it counterclockwise. You may
hear a hissing noise as the pres-
sure inside the tank equalizes.
5. Place the cap on the fuel filler door.
Information
If the fuel filler door does not open
because ice has formed around it, tap
lightly or push on the door to break
the ice and release the door. Do not
pry on the door. If necessary, spray
around the door with an approved de-
icer fluid (do not use radiator anti-
freeze) or move the vehicle to a warm
place and allow the ice to melt.
Closing the fuel filler door
1. To install the fuel tank cap, turn it clockwise until it “clicks” one time.
2. Close the fuel filler door until it is latched securely.
Information
The fuel filler door will not close if the
driver's door is locked. If you lock the
driver's door whilst fuelling, unlock it
before closing the fuel filler door.
ii
OOS047031
■Petrol engine
OOS048031
■Diesel engine
Page 122 of 526
3-40
Convenient features of your vehicle
Tachometer
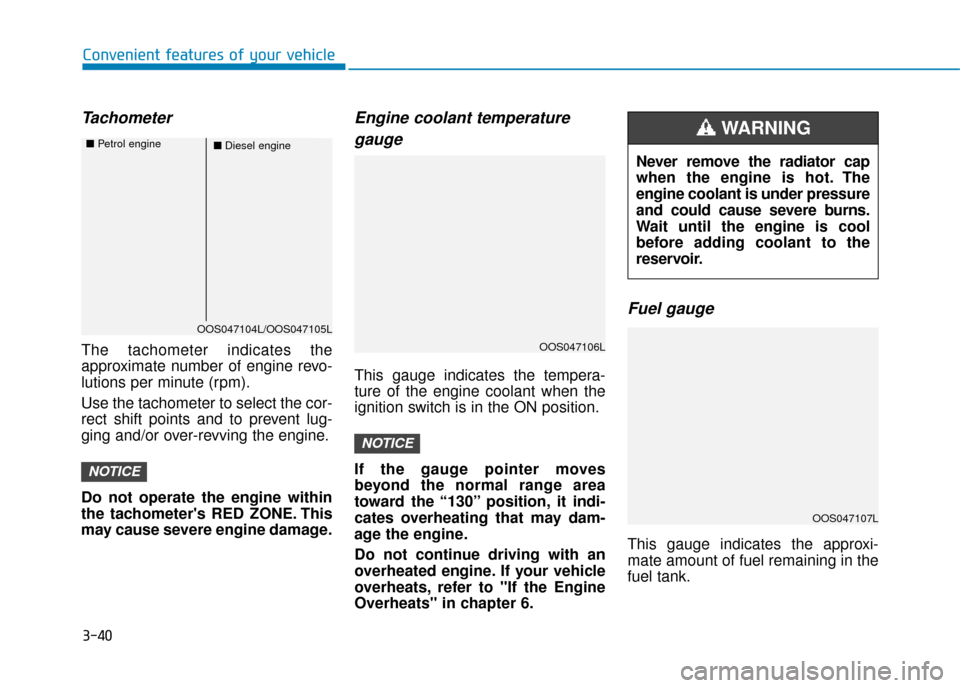
The tachometer indicates the
approximate number of engine revo-
lutions per minute (rpm).
Use the tachometer to select the cor-
rect shift points and to prevent lug-
ging and/or over-revving the engine.
Do not operate the engine within
the tachometer's RED ZONE. This
may cause severe engine damage.
Engine coolant temperaturegauge
This gauge indicates the tempera-
ture of the engine coolant when the
ignition switch is in the ON position.
If the gauge pointer moves
beyond the normal range area
toward the “130” position, it indi-
cates overheating that may dam-
age the engine.
Do not continue driving with an
overheated engine. If your vehicle
overheats, refer to "If the Engine
Overheats" in chapter 6.
Fuel gauge
This gauge indicates the approxi-
mate amount of fuel remaining in the
fuel tank.
NOTICE
NOTICE
OOS047106L
Never remove the radiator cap
when the engine is hot. The
engine coolant is under pressure
and could cause severe burns.
Wait until the engine is cool
before adding coolant to the
reservoir.
WARNING
OOS047107L
OOS047104L/OOS047105L
■ Diesel engine
■
Petrol engine
Page 380 of 526
6-8
What to do in an emergency
If your temperature gauge indicates
overheating, you experience a loss
of power, or hear loud pinging or
knocking, the engine may be over-
heating. If this happens, you should:
1. Pull off the road and stop as soon as it is safe to do so.
2. Place the shift lever in P (Park, for dual clutch transmission vehicle)
or neutral (for manual transmis-
sion/dual clutch transmission vehi-
cle) and set the parking brake. If
the air conditioning is ON, turn it
OFF.
3. If engine coolant is running out under the vehicle or steam is com-
ing out from the bonnet, stop the
engine. Do not open the bonnet
until the coolant has stopped run-
ning or the steaming has stopped.
If there is no visible loss of engine
coolant and no steam, leave the
engine running and check to be
sure the engine cooling fan is
operating. If the fan is not running,
turn the engine off. 4. Check for coolant leaking from the
radiator, hoses or under the vehi-
cle. (If the air conditioning had been
in use, it is normal for cold water to
be draining from it when you stop.)
5. If engine coolant is leaking out, stop the engine immediately and we rec-
ommend that you call a HYUNDAI
authorised repairer for assistance.
I IF
F
T
T H
H E
E
E
E N
N G
GI
IN
N E
E
O
O V
VE
ER
R H
H E
EA
A T
TS
S
Whilst the engine is
running, keep hands,
clothing and tools
away from the mov-
ing parts such as the
cooling fan and drive
belt to prevent seri-
ous injury.
WARNING
NEVER remove the
radiator cap or the
drain plug whilst the
engine and radiator
are hot. Hot coolant
and steam may blow out under
pressure, causing serious injury.
Turn the engine off and wait
until the engine cools down.
Use extreme care when remov-
ing the radiator cap. Wrap a
thick towel around it, and turn it
counterclockwise slowly to the
first stop. Step back whilst the
pressure is released from the
cooling system. When you are
sure all the pressure has been
released, press down on the
cap, using a thick towel, and
continue turning counterclock-
wise to remove it.
WARNING
Page 424 of 526
7-7
7
Maintenance
Owner maintenance schedule
When you stop for fuel:
Check the engine oil level.
Check the coolant level in theengine coolant reservoir.
Check the windscreen washer fluid level.
Check for low or under-inflated tyres.
Whilst operating your vehicle:
Note any changes in the sound ofthe exhaust or any smell of
exhaust fumes in the vehicle.
Check for vibrations in the steering wheel. Notice if there is any
increased steering effort or loose-
ness in the steering wheel, or
change in its straight-ahead posi-
tion.
Notice if your vehicle constantly turns slightly or “pulls” to one side
when travelling on smooth, level
road.
When stopping, listen and check for unusual sounds, pulling to one
side, increased brake pedal travel
or “hard-to-push” brake pedal.
If any slipping or changes in the operation of your transmission
occurs, check the transmission
fluid level.
Check the dual clutch transmission P (Park) function.
Check the parking brake.
Check for fluid leaks under your vehicle (water dripping from the air
conditioning system during or after
use is normal).
At least monthly:
Check coolant level in the enginecoolant reservoir.
Check the operation of all exterior lights, including the stoplights, turn
signals and hazard warning flash-
ers.
Check the inflation pressures of all tyres including the spare for tyres
that are worn, show uneven wear,
or are damaged.
Check for loose wheel lug nuts.
At least twice a year: (i.e., every Spring and Autumn)
Check radiator, heater and air con-
ditioning hoses for leaks or dam-
age.
Check windscreen washer spray and wiper operation. Clean wiper
blades with a clean cloth damp-
ened with washer fluid.
Check headlamp alignment.
Check muffler, exhaust pipes, shields and clamps.
Check the seat belts for wear and function.
Be careful when checking your
engine coolant level when the
engine is hot. This may result in
coolant being blown out of the
opening and cause serious
burns and other injuries.
WARNING
Page 427 of 526
7-10
Maintenance
Vacuum crankcase ventilation
hoses (if equipped)
Inspect the surface of hoses for evi-
dence of heat and/or mechanical
damage. Hard and brittle rubber,
cracking, tears, cuts, abrasions, and
excessive swelling indicate deterio-
ration. Particular attention should be
paid to examine those hose surfaces
nearest to high heat sources, such
as the exhaust manifold.
Inspect the hose routing to ensure
that the hoses do not come in con-
tact with any heat source, sharp
edges or moving component which
might cause heat damage or
mechanical wear. Inspect all hose
connections, such as clamps and
couplings, to make sure they are
secure, and that no leaks are pres-
ent. Hoses should be replaced
immediately if there is any evidence
of deterioration or damage.
Air cleaner filter
We recommend that the air cleaner
filter be replaced by a HYUNDAI
authorised repairer.
Spark plugs
(for Petrol Engine)
Make sure to install new spark plugs
of the correct heat range.
Valve clearance
(for Petrol Engine)
Inspect excessive valve noise and/or
engine vibration and adjust if neces-
sary. We recommend that the system
be serviced by a HYUNDAI authorised
repairer.
Cooling system
Check the cooling system parts,
such as radiator, coolant reservoir,
hoses and connections for leakage
and damage. Replace any damaged
parts.
Engine coolant
The coolant should be changed at
the intervals specified in the mainte-
nance schedule.
Manual transmission fluid
(if equipped)
Inspect the manual transmission
fluid according to the maintenance
schedule.
Do not disconnect and inspect
spark plugs when the engine is
hot. You may burn yourself.
WARNING
Page 429 of 526
7-12
Maintenance
E
EN
N G
GI
IN
N E
E
O
O I
IL
L
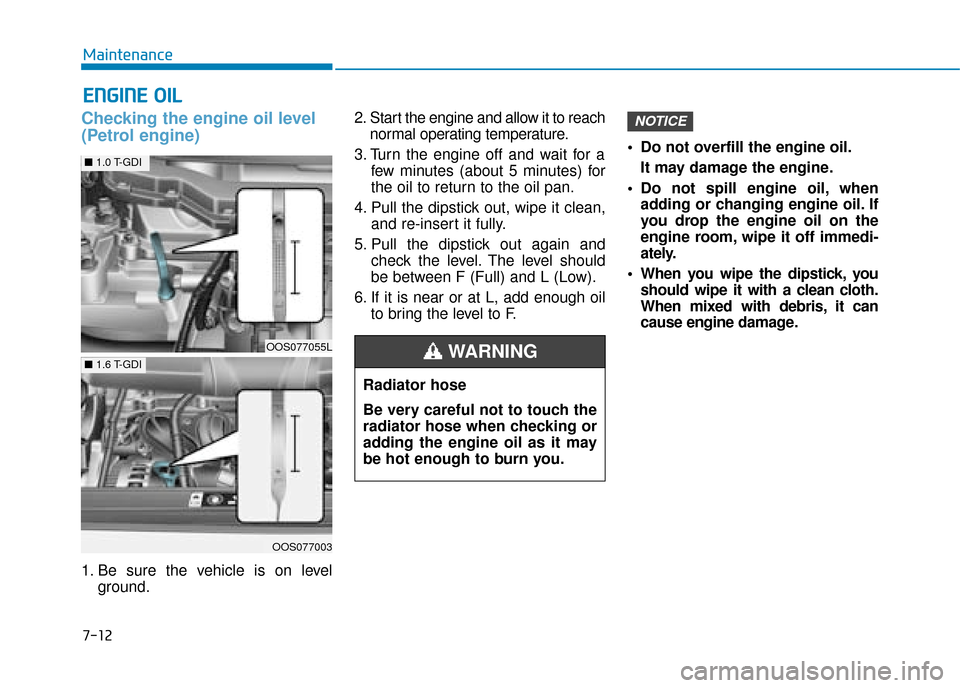
Checking the engine oil level
(Petrol engine)
1. Be sure the vehicle is on level
ground. 2. Start the engine and allow it to reach
normal operating temperature.
3. Turn the engine off and wait for a few minutes (about 5 minutes) for
the oil to return to the oil pan.
4. Pull the dipstick out, wipe it clean, and re-insert it fully.
5. Pull the dipstick out again and check the level. The level should
be between F (Full) and L (Low).
6. If it is near or at L, add enough oil to bring the level to F. Do not overfill the engine oil.
It may damage the engine.
Do not spill engine oil, when adding or changing engine oil. If
you drop the engine oil on the
engine room, wipe it off immedi-
ately.
When you wipe the dipstick, you should wipe it with a clean cloth.
When mixed with debris, it can
cause engine damage.
NOTICE
Radiator hose
Be very careful not to touch the
radiator hose when checking or
adding the engine oil as it may
be hot enough to burn you.
WARNING OOS077055L
OOS077003
■ 1.6 T-GDI
■1.0 T-GDI
Page 430 of 526
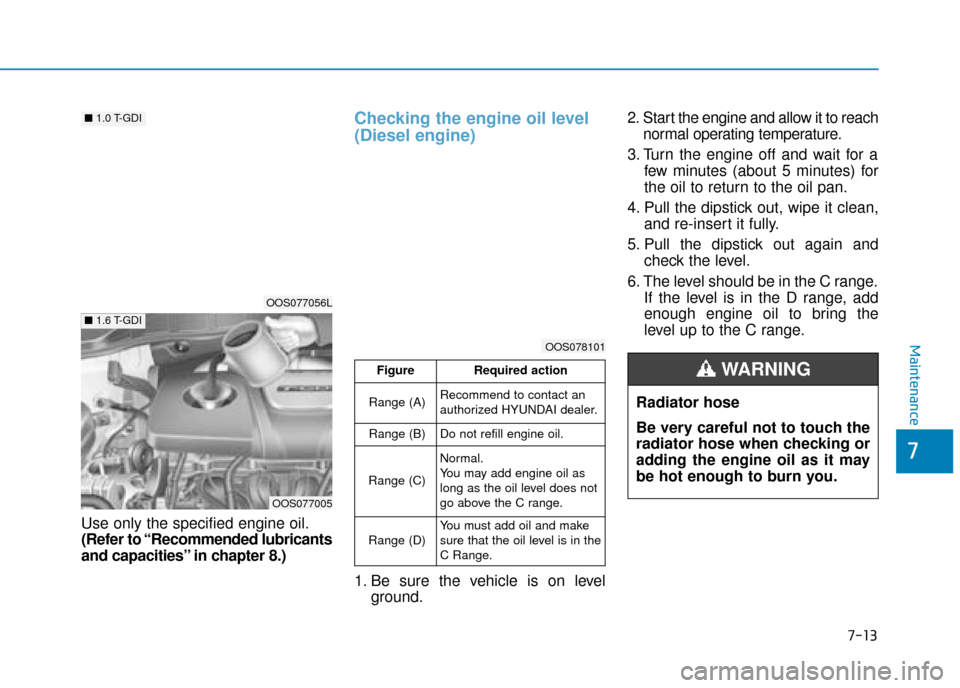
Use only the specified engine oil.
(Refer to “Recommended lubricants
and capacities” in chapter 8.)
Checking the engine oil level
(Diesel engine)
1. Be sure the vehicle is on levelground. 2. Start the engine and allow it to reach
normal operating temperature.
3. Turn the engine off and wait for a few minutes (about 5 minutes) for
the oil to return to the oil pan.
4. Pull the dipstick out, wipe it clean, and re-insert it fully.
5. Pull the dipstick out again and check the level.
6. The level should be in the C range. If the level is in the D range, add
enough engine oil to bring the
level up to the C range.
7-13
7
MaintenanceOOS078101
Radiator hose
Be very careful not to touch the
radiator hose when checking or
adding the engine oil as it may
be hot enough to burn you.
WARNING FigureRequired action
Range (A)Recommend to contact an
authorized HYUNDAI dealer.
Range (B)Do not refill engine oil.
Range (C)
Normal.
You may add engine oil as
long as the oil level does not
go above the C range.
Range (D)You must add oil and make
sure that the oil level is in the
C Range.
OOS077056L
OOS077005
■1.6 T-GDI
■1.0 T-GDI