Page 225 of 526

4-3
Multimedia System
4
Steering wheel audio controls
(if equipped)
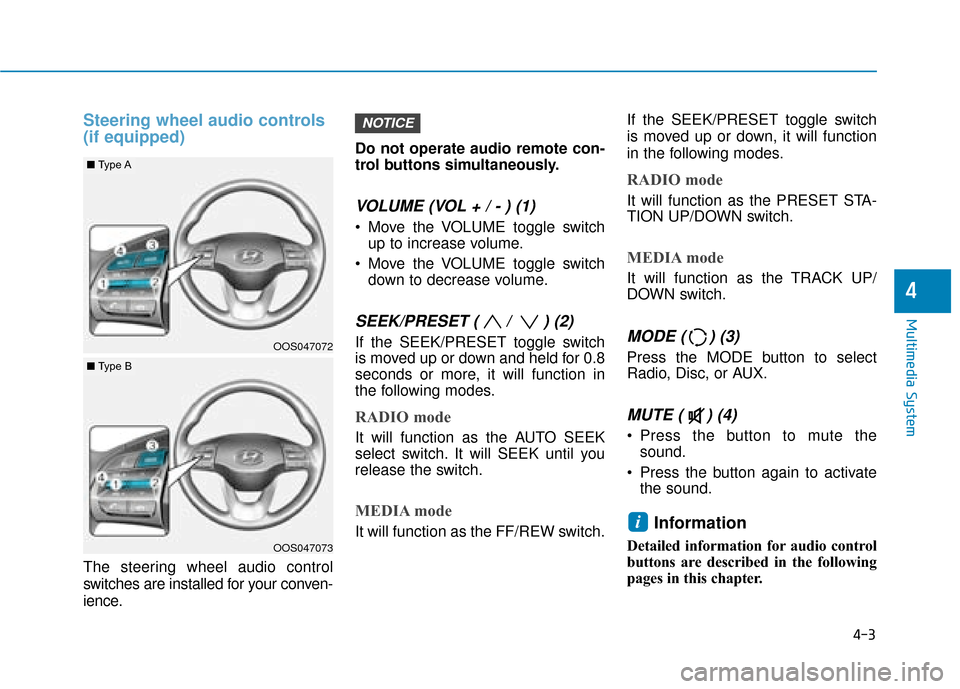
The steering wheel audio control
switches are installed for your conven-
ience.Do not operate audio remote con-
trol buttons simultaneously.
VOLUME (VOL + / - ) (1)
Move the VOLUME toggle switch
up to increase volume.
Move the VOLUME toggle switch down to decrease volume.
SEEK/PRESET ( / ) (2)
If the SEEK/PRESET toggle switch
is moved up or down and held for 0.8
seconds or more, it will function in
the following modes.
RADIO mode
It will function as the AUTO SEEK
select switch. It will SEEK until you
release the switch.
MEDIA mode
It will function as the FF/REW switch. If the SEEK/PRESET toggle switch
is moved up or down, it will function
in the following modes.
RADIO mode
It will function as the PRESET STA-
TION UP/DOWN switch.
MEDIA mode
It will function as the TRACK UP/
DOWN switch.
MODE ( ) (3)
Press the MODE button to select
Radio, Disc, or AUX.
MUTE ( ) (4)
Press the button to mute the
sound.
Press the button again to activate the sound.
Information
Detailed information for audio control
buttons are described in the following
pages in this chapter.
i
NOTICE
OOS047072
OOS047073
■ Type A
■Type B
Page 230 of 526
4-8
Multimedia System
Feature of Your Audio
Head unit
❈The actual features in the vehicle
may differ from the illustration. (1)
SEEK/TRACK
Search for next station in DAB/FM* and AM radio mode.
Change the current song in media mode.
* with DAB
(2) RADIO (if equipped)
Start DAB/FM* and AM radio.
* with DAB
(3) MEDIA (if equipped)
Select USB(iPod
®), Bluetooth®(BT)
Audio or AUX.
Display the media menu when two or more media are connected or
when the [MEDIA] button is pressed
in media mode.
(4) PHONE
Start Bluetooth
®Phone mode. (5)
POWER/VOLUME knob
Turn to adjust the volume.
Press to turn the device on or off.
(6) RESET
Shutdown and restart the system.
Page 231 of 526
4-9
Multimedia System
4
(7) PRESET
Move to the previous/next preset page in radio mode.
(8) SETUP/CLOCK
Access Display, Sound, Date/Time, Bluetooth, System and Display Off
settings.
Press and hold to set the date/time.
(9) MENU
Display additional menus available on the current screen.
(10) BACK
Return to the previous screen.
(11) TUNE knob
Turn to navigate through the sta- tions/songs list.
Press to select an item. (12)
[1]~ [6] (Preset)
Save/play presets in radio mode.
Select/launch the numeric menus displayed on the screen.
Page 232 of 526

4-10
Multimedia System
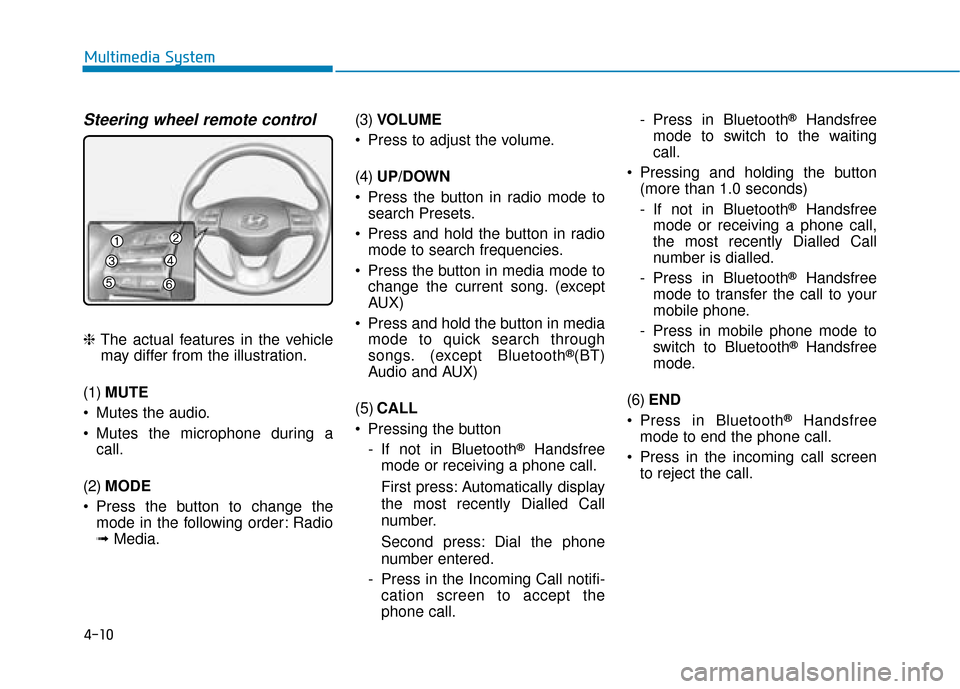
Steering wheel remote control
❈The actual features in the vehicle
may differ from the illustration.
(1) MUTE
Mutes the audio.
Mutes the microphone during a call.
(2) MODE
Press the button to change the mode in the following order: Radio
➟ Media. (3)
VOLUME
Press to adjust the volume.
(4) UP/DOWN
Press the button in radio mode to search Presets.
Press and hold the button in radio mode to search frequencies.
Press the button in media mode to change the current song. (except
AUX)
Press and hold the button in media mode to quick search through
songs. (except Bluetooth®(BT)
Audio and AUX)
(5) CALL
Pressing the button - If not in Bluetooth
®Handsfree
mode or receiving a phone call.
First press: Automatically display
the most recently Dialled Call
number.
Second press: Dial the phone
number entered.
- Press in the Incoming Call notifi- cation screen to accept the
phone call. - Press in Bluetooth
®Handsfree
mode to switch to the waiting
call.
Pressing and holding the button (more than 1.0 seconds)
- If not in Bluetooth
®Handsfree
mode or receiving a phone call,
the most recently Dialled Call
number is dialled.
- Press in Bluetooth
®Handsfree
mode to transfer the call to your
mobile phone.
- Press in mobile phone mode to switch to Bluetooth
®Handsfree
mode.
(6) END
Press in Bluetooth
®Handsfree
mode to end the phone call.
Press in the incoming call screen to reject the call.
Page 235 of 526
![Hyundai Kona 2019 Owners Manual - RHD (UK, Australia) 4-13
Multimedia System
4
Radio
FM/AM (with RDS, if equipped)
Switching between FM and AM
Press the [RADIO]button on the
audio system to switch between
FM and AM.
Searching stations
Press the [SEEK/TR Hyundai Kona 2019 Owners Manual - RHD (UK, Australia) 4-13
Multimedia System
4
Radio
FM/AM (with RDS, if equipped)
Switching between FM and AM
Press the [RADIO]button on the
audio system to switch between
FM and AM.
Searching stations
Press the [SEEK/TR](/manual-img/35/16225/w960_16225-234.png)
4-13
Multimedia System
4
Radio
FM/AM (with RDS, if equipped)
Switching between FM and AM
Press the [RADIO]button on the
audio system to switch between
FM and AM.
Searching stations
Press the [SEEK/TRACK] button to
search stations.
Presets
Save up to 36 frequently used sta-
tions.
1. Press and hold the desired slot from 1 through 36. This saves the
current station in the selected slot.
If the slot is empty, simply press-
ing saves the station to the slot.
2. To save in slots numbered 7 or higher, press the [PRESET]but-
ton to move to the previous/next
page and save.
To listen to a preset station, press
the desired station in the list.
Menu
Press the [MENU] button, and select
the desired function.
List: A list of all available stations in the current location of the vehicle is
displayed. Press the desired sta-
tion.
Traffic Announcement (TA): Enable or disable Traffic Announcements.
Scan: All available stations are played for five seconds each.
Sound Settings: Audio sound set- tings can be changed.
DAB/FM (with DAB)
Switching between DAB/FM and AM
Press the [RADIO] button on the
audio system to switch between
DAB/FM and AM.
Searching stations
Press the [SEEK/TRACK] button to
search stations.
Page 236 of 526

4-14
Multimedia System
Presets
Save up to 36 frequently used sta-
tions.
1. Press and hold the desired slotfrom 1 through 36. This saves the
current station in the selected slot.
If the slot is empty, simply press-
ing saves the station to the slot.
2. To save in slots numbered 7 or higher, press the [PRESET]but-
ton to move to the previous/next
page and save.
To listen to a preset station, press
the desired station in the list.
Menu
Press the [MENU] button, and select
the desired function.
List: A list of all available stations in the current location of the vehicle is
displayed. Press the desired sta-
tion.
Traffic Announcement (TA): Enable or disable Traffic Announcements.
Region : Enable or disable auto- matic switching between regional
stations.
Sound Settings: Audio sound set- tings can be changed.
Scan: All available stations are played for five seconds each.
Manual tune FM : Search for fre- quencies manually.
Media
Information
- Using MP3
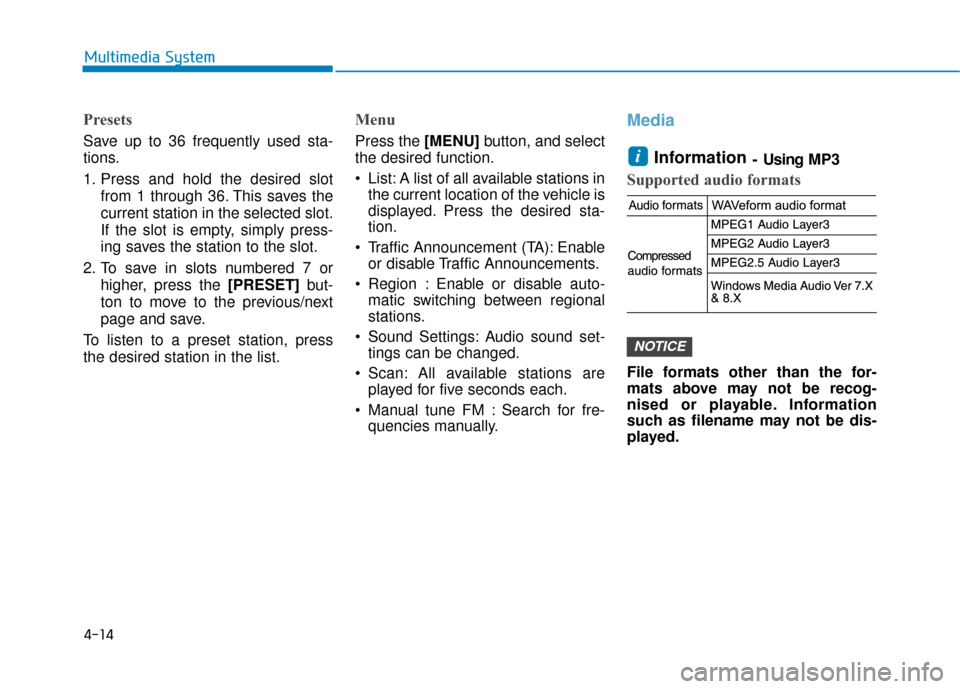
Supported audio formats
File formats other than the for-
mats above may not be recog-
nised or playable. Information
such as filename may not be dis-
played.
NOTICE
i
Page 241 of 526

4-19
Multimedia System
4
• There may be noise if the audio sys-tem is used with an iPod®or AUX
external device connected to the
power jack. In these cases, discon-
nect the iPod
®or external device
from the power jack.
• Play may be interrupted, or device malfunctions may occur depending
on the characteristics of your
iPod
®/iPhone®.
• Play may fail if your iPhone
®is con-
nected through both Bluetooth®and
USB. In this case, select Dock con-
nector or Bluetooth
®on your
iPhone®to change the sound output
settings.
• If your software version does not support the communication proto-
col or your iPod
®is not recognised
due to device failure, anomalies or
defects, iPod
®mode cannot be used.
• iPod
®nano (5th generation) devices
may not be recognised if the battery
is low. Charge sufficiently before
use.
• The search and song play order in the iPod
®device may be different
from the search order in the audio
system. • If the iPod
®has failed due to an
internal defect, please reset the
iPod
®(consult your iPod®manual).
• Depending on the software version, the iPod
®may fail to sync with the
system. If the media is removed or
disconnected before recognition, the
previous mode may not be restored
(iPad
®cannot be charged).
• Cables other than the 1-meter cable provided with iPod
®/iPhone®prod-
ucts may not be recognised.
• When other music apps are used on your iPod
®, the system sync func-
tion may fail due to malfunction of
the iPod
®application.
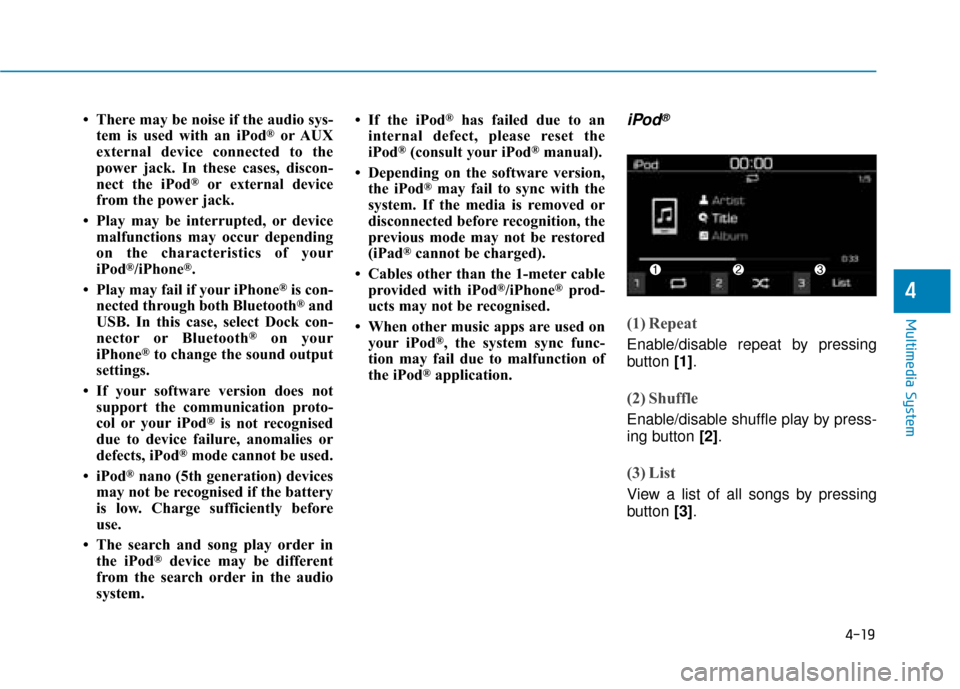
iPod®
(1) Repeat
Enable/disable repeat by pressing
button [1].
(2) Shuffle
Enable/disable shuffle play by press-
ing button [2].
(3) List
View a list of all songs by pressing
button [3].
Page 254 of 526
![Hyundai Kona 2019 Owners Manual - RHD (UK, Australia) 4-32
Multimedia System
Bluetooth
Press the [SETUP/CLOCK]button
➟ Select [Bluetooth].
Connections: Control pairing, dele- tion, connection and disconnection
of Bluetooth
®devices.
Auto connection Hyundai Kona 2019 Owners Manual - RHD (UK, Australia) 4-32
Multimedia System
Bluetooth
Press the [SETUP/CLOCK]button
➟ Select [Bluetooth].
Connections: Control pairing, dele- tion, connection and disconnection
of Bluetooth
®devices.
Auto connection](/manual-img/35/16225/w960_16225-253.png)
4-32
Multimedia System
Bluetooth
Press the [SETUP/CLOCK]button
➟ Select [Bluetooth].
Connections: Control pairing, dele- tion, connection and disconnection
of Bluetooth
®devices.
Auto connection priority: Set the connection priority of Bluetooth
®
devices when the vehicle is started.
Update contacts: Contacts can be
downloaded from connected
Bluetooth
®devices.
Bluetooth voice guidance: Play or mute voice prompts for Bluetooth
®
device pairing, connection and
errors.
Information
• When paired devices are deleted,the call history and contacts of the
device saved to the audio system are
deleted.
• For Bluetooth
®connections with
low connection priority, some time
may be required for the connection
to be established.
• Contacts can be downloaded only from the currently connected
Bluetooth
®device.
• If no Bluetooth
®device is connected,
the Download Contacts button is
disabled.
• If the language setting is Slovakian or Hungarian, Bluetooth voice guid-
ance is not supported.
System
Press the [SETUP/CLOCK] button
on the audio system ➟Select
[System].
Language: Change the user lan- guage.
Default: Reset the audio system.
Information
The system resets to the default val-
ues, and all saved data and settings
are lost.
Display Off
To prevent glare, the screen can be
turned off with the audio system in
operation.
Press the [SETUP/CLOCK] button
on the audio system ➟Select
[Display Off].
Information
Use ‘Screensaver’ to set the informa-
tion to be displayed when the screen is
turned off.
i
i
i