Page 273 of 526
5-18
Starting and stopping the engine
for turbocharger intercooler
1. Do not race or accelerate theengine immediately after starting
the engine.
If the engine is cold, idle for sever-
al seconds before sufficient lubri-
cation is ensured in the tur-
bocharger.
2. After high speed or extended driv- ing that requires heavy engine
load, idle the engine about 1
minute before turning the engine
off. This idle time will allow the tur-
bocharger to cool prior to shutting
the engine off.
Do not turn off the engine immedi-
ately after it has been subjected to
a heavy load. Doing so may cause
severe damage to the engine or
turbocharger. To prevent damage to the vehicle:
If the engine stalls whilst you are
in motion, do not attempt to
move the shift lever to the P
(Park) position.
If traffic and road conditions
permit, you may put the shift
lever in the N (Neutral) position
whilst the vehicle is still moving
and press the Engine Start/Stop
button in an attempt to restart
the engine.
Do not push or tow your vehicle to start the engine. To prevent damage to the vehicle:
Do not press the Engine Start/
Stop button for more than 10 sec-
onds except when the stop lamp
fuse is blown.
When the stop lamp fuse is blown,
you can't start the engine normal-
ly. Replace the fuse with a new
one. If you are not able to replace
the fuse, you can start the engine
by pressing and holding the
Engine Start/Stop button for 10
seconds with the Engine Start/
Stop button in the ACC position.
For your safety always depress
the brake and/or clutch pedal
before starting the engine.
NOTICENOTICE
NOTICE
Driving your vehicle
Page 419 of 526
7
Tyres and wheels .................................................7-32
Tyre care ........................................................................\
...7-32
Recommended cold tyre inflation pressures ...........7-33
Check tyre inflation pressure ......................................7-34
Tyre rotation ....................................................................7-34\
Wheel alignment and tyre balance.............................7-35
Tyre replacement ............................................................7-36
Wheel replacement .........................................................7-37
Tyre traction .....................................................................7-3\
7
Tyre maintenance ...........................................................7-37
Tyre sidewall labelling ....................................................7-37
Low aspect ratio tyres...................................................7-41
Fuses ......................................................................7-\
42
Instrument panel fuse replacement ...........................7-43
Engine compartment panel fuse replacement.........7-44
Fuse/Relay panel description ......................................7-46
Light bulbs.............................................................7-59
Headlamp, Low beam assist - Static,
position lamp, turn signal lamp and
daytime running light bulb replacement ...................7-60
Front fog lamp .................................................................7-64
Headlamp and front fog lamp aiming ........................7-64
Side repeater lamp replacement .................................7-69
Rear combination lamp bulb replacement ................7-69
High mounted stop lamp replacement .......................7-71
License plate light bulb replacement .........................7-71
Interior light bulb replacement ....................................7-72
Appearance care ..................................................7-73
Exterior care ....................................................................7-73\
Interior care......................................................................7-\
78
Emission control system .....................................7-80
Crankcase emission control system ...........................7-81
Evaporative emission control system.........................7-81
Exhaust emission control system ...............................7-81
Selective Catalytic Reduction .......................................7-86
Page 420 of 526
7-3
7
Maintenance
E
EN
N G
GI
IN
N E
E
C
C O
O M
M P
PA
A R
RT
TM
M E
EN
N T
T
1. Engine coolant reservoir/
Engine coolant cap
2. Fuse box
3. Battery
4. Brake/clutch fluid reservoir
5. Air cleaner
6. Engine oil dipstick
7. Engine oil filler cap
8. Windscreen washer fluid reservoir
The actual engine compartment in the
vehicle may differ from the illustration.
OOS077070E/OOS077001R
■
■Petrol Engine (Kappa 1.0 T-GDI)
■
■Petrol Engine (Gamma 1.6 T-GDI)
Page 421 of 526
7-4
Maintenance
1. Engine coolant reservoir/Engine coolant cap
2. Fuse box
3. Battery
4. Brake/clutch fluid reservoir
5. Air cleaner
6. Engine oil dipstick
7. Engine oil filler cap
8. Windscreen washer fluid reservoir
The actual engine compartment in the
vehicle may differ from the illustration.
OOS078100R
■ ■Diesel Engine (Smartstream D1.6)
Page 459 of 526
7-42
Maintenance
F
FU
U S
SE
E S
S
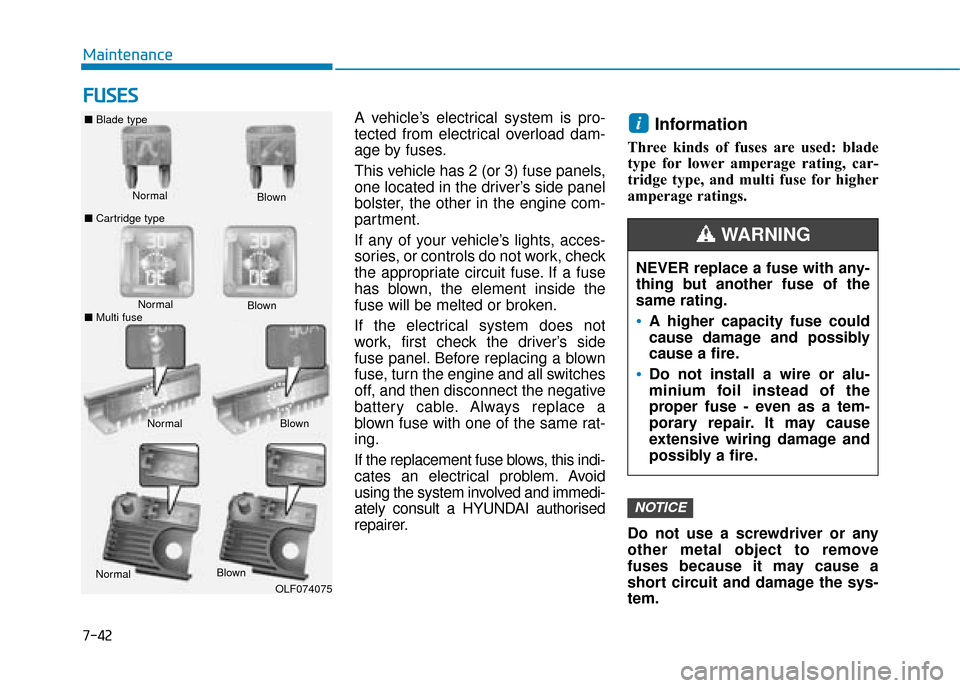
A vehicle’s electrical system is pro-
tected from electrical overload dam-
age by fuses.
This vehicle has 2 (or 3) fuse panels,
one located in the driver’s side panel
bolster, the other in the engine com-
partment.
If any of your vehicle’s lights, acces-
sories, or controls do not work, check
the appropriate circuit fuse. If a fuse
has blown, the element inside the
fuse will be melted or broken.
If the electrical system does not
work, first check the driver’s side
fuse panel. Before replacing a blown
fuse, turn the engine and all switches
off, and then disconnect the negative
battery cable. Always replace a
blown fuse with one of the same rat-
ing.
If the replacement fuse blows, this indi-
cates an electrical problem. Avoid
using the system involved and immedi-
ately consult a HYUNDAI authorised
repairer.Information
Three kinds of fuses are used: blade
type for lower amperage rating, car-
tridge type, and multi fuse for higher
amperage ratings.
Do not use a screwdriver or any
other metal object to remove
fuses because it may cause a
short circuit and damage the sys-
tem.
NOTICE
i
Normal
■
Blade type
■ Cartridge type Blown
Normal Blown
Normal Blown
OLF074075
NEVER replace a fuse with any-
thing but another fuse of the
same rating.
A higher capacity fuse could
cause damage and possibly
cause a fire.
Do not install a wire or alu-
minium foil instead of the
proper fuse - even as a tem-
porary repair. It may cause
extensive wiring damage and
possibly a fire.
WARNING
Normal Blown
■ Multi fuse
Page 460 of 526
7-43
7
Maintenance
Instrument panel fuse replace-
ment
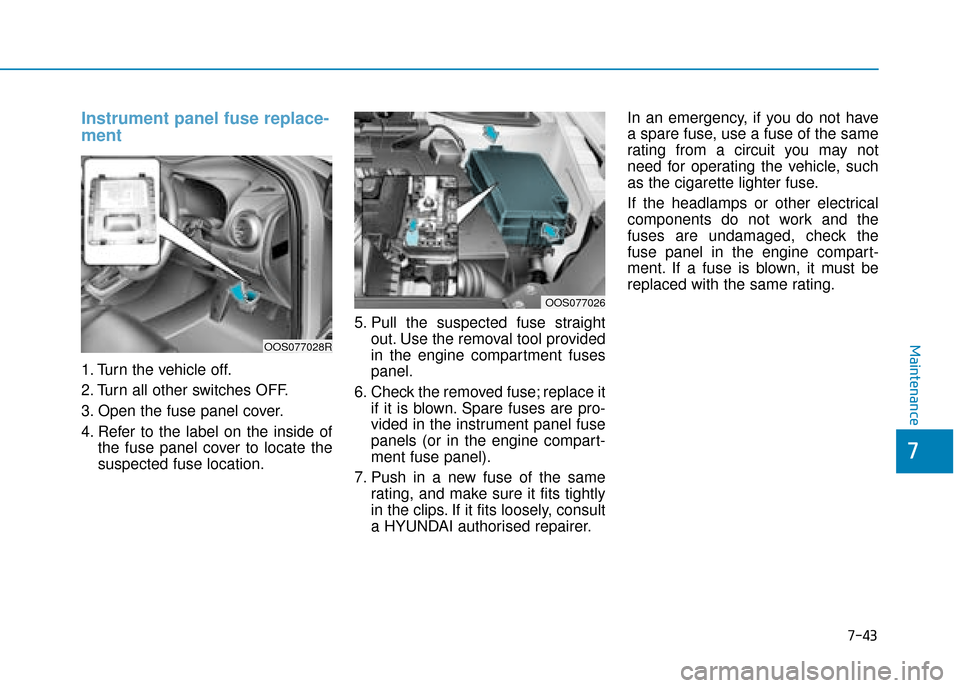
1. Turn the vehicle off.
2. Turn all other switches OFF.
3. Open the fuse panel cover.
4. Refer to the label on the inside ofthe fuse panel cover to locate the
suspected fuse location. 5. Pull the suspected fuse straight
out. Use the removal tool provided
in the engine compartment fuses
panel.
6. Check the removed fuse; replace it if it is blown. Spare fuses are pro-
vided in the instrument panel fuse
panels (or in the engine compart-
ment fuse panel).
7. Push in a new fuse of the same rating, and make sure it fits tightly
in the clips. If it fits loosely, consult
a HYUNDAI authorised repairer. In an emergency, if you do not have
a spare fuse, use a fuse of the same
rating from a circuit you may not
need for operating the vehicle, such
as the cigarette lighter fuse.
If the headlamps or other electrical
components do not work and the
fuses are undamaged, check the
fuse panel in the engine compart-
ment. If a fuse is blown, it must be
replaced with the same rating.
OOS077028R
OOS077026
Page 461 of 526
7-44
Maintenance
Fuse switch
Always, place the fuse switch to the
ON position.
If you move the switch to the OFF
position, some items such as the
audio system and digital clock must
be reset and the smart key may not
work properly.
Information
If the fuse switch is OFF, “Turn on
FUSE SWITCH” message will appear.
(if equipped)
Always place the fuse switch inthe ON position whilst driving
the vehicle.
Do not move the transportation fuse switch repeatedly. The fuse
switch may be damaged.
Engine compartment panel
fuse replacement
1. Turn the vehicle off.
2. Turn all other switches OFF.
NOTICE
i
OOS077027ROPDE046119
OOS077024
■ Blade type fuse
OOS077025
■Cartridge type fuse
Page 462 of 526
7-45
7
Maintenance
3. Remove the fuse panel cover bypressing the tab and pulling up.
4. Check the removed fuse; replace it if it is blown. To remove or insert
the fuse, use the fuse puller in the
engine compartment fuse panel.
5. Push in a new fuse of the same rating, and make sure it fits tightly
in the clips. If it fits loosely, consult
a HYUNDAI authorised repairer.
After checking the fuse panel in
the engine compartment, securely
install the fuse panel cover. You
may hear a clicking sound if the
cover is securely latched. If it is
not securely latched, electrical
failure may occur from water con-
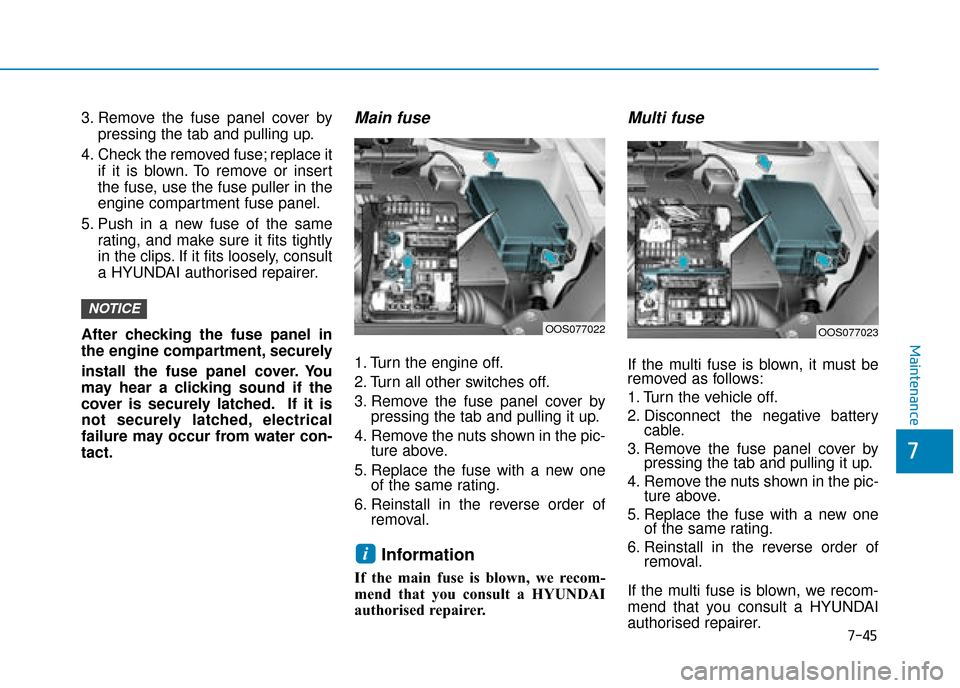
tact.Main fuse
1. Turn the engine off.
2. Turn all other switches off.
3. Remove the fuse panel cover by pressing the tab and pulling it up.
4. Remove the nuts shown in the pic- ture above.
5. Replace the fuse with a new one of the same rating.
6. Reinstall in the reverse order of removal.
Information
If the main fuse is blown, we recom-
mend that you consult a HYUNDAI
authorised repairer.
Multi fuse
If the multi fuse is blown, it must be
removed as follows:
1. Turn the vehicle off.
2. Disconnect the negative batterycable.
3. Remove the fuse panel cover by pressing the tab and pulling it up.
4. Remove the nuts shown in the pic- ture above.
5. Replace the fuse with a new one of the same rating.
6. Reinstall in the reverse order of removal.
If the multi fuse is blown, we recom-
mend that you consult a HYUNDAI
authorised repairer.
i
NOTICE
OOS077022OOS077023