Page 305 of 526

5-50
Driving your vehicle
Additional driving conditions
Become familiar with the off-roadconditions before driving.
Always pay attention when driving off-road and avoid dangerous
areas.
Drive slowly when driving in heavy wind.
Reduce vehicle speed when cor- nering. The centre of gravity of
4WD vehicles is higher than con-
ventional 2WD vehicles, making
them more likely to roll over when
you rapidly turn corners. Always hold the steering wheel
firmly when you are driving off-
road.
Emergency precautions
Tyres
Do not use tyres and wheels of dif-
ferent sizes and types from those
originally installed on your vehicle. It
can affect the safety and perform-
ance of your vehicle, which could
lead to steering failure or rollover
causing serious injury. When replac-
ing the tyres, be sure to equip all four
tyres and wheels with those of the
same size, type, tread, brand and
load-carrying capacity. If you equip
your vehicle with any tyre/wheel
combination not recommended by
HYUNDAI for off-road driving, you
should not use these tyres for high-
way driving.
OOS057075L
Do not grab the inside of the
steering wheel when you are
driving off-road. You may hurt
your arm by a sudden steering
manoeuvre or from steering
wheel rebound due to an impact
with objects on the ground. You
could lose control of the steer-
ing wheel which may lead to
serious injury or death.
WARNING
Never start or run the engine
whilst a full-time 4WD vehicle is
raised on a jack. The vehicle can
slip or roll off of a jack causing
serious injury or death to you or
those nearby.
WARNING
Page 306 of 526

5-51
Driving your vehicle
5
Towing
4WD vehicles must be towed with a
wheel lift and dollies or flatbed equip-
ment with all the wheels off the
ground. For more information, refer
to "Towing" in chapter 6.
Dynamometer testing
A full-time 4WD vehicle must be test-
ed on a special four wheel chassis
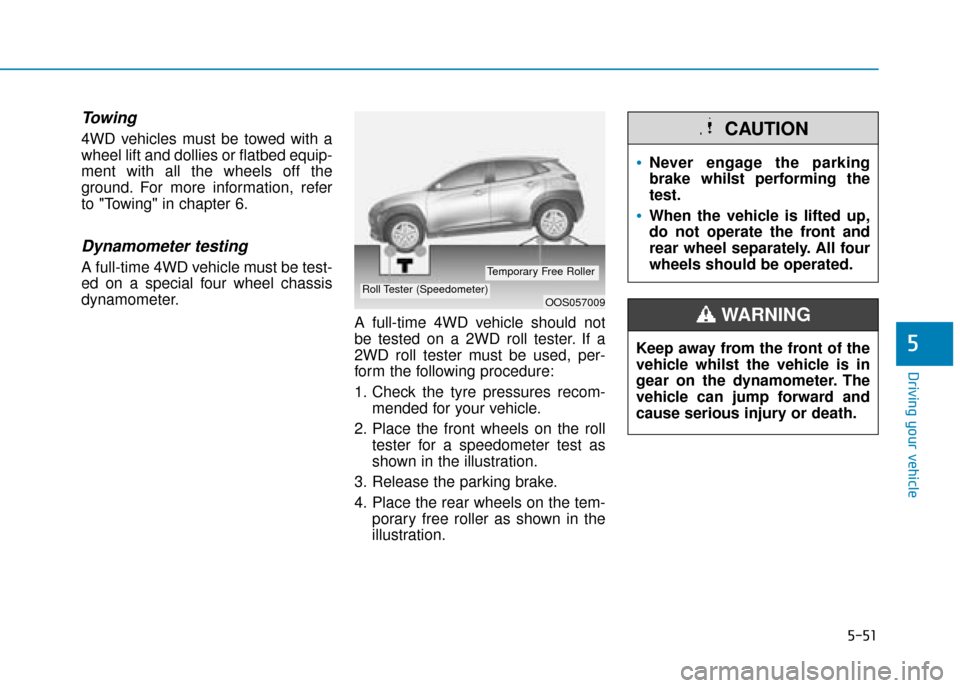
dynamometer.A full-time 4WD vehicle should not
be tested on a 2WD roll tester. If a
2WD roll tester must be used, per-
form the following procedure:
1. Check the tyre pressures recom-mended for your vehicle.
2. Place the front wheels on the roll tester for a speedometer test as
shown in the illustration.
3. Release the parking brake.
4. Place the rear wheels on the tem- porary free roller as shown in the
illustration.
OOS057009Roll Tester (Speedometer)
Temporary Free Roller
Never engage the parking
brake whilst performing the
test.
When the vehicle is lifted up,
do not operate the front and
rear wheel separately. All four
wheels should be operated.
CAUTION
Keep away from the front of the
vehicle whilst the vehicle is in
gear on the dynamometer. The
vehicle can jump forward and
cause serious injury or death.
WARNING
Page 360 of 526

5-105
Driving your vehicle
5
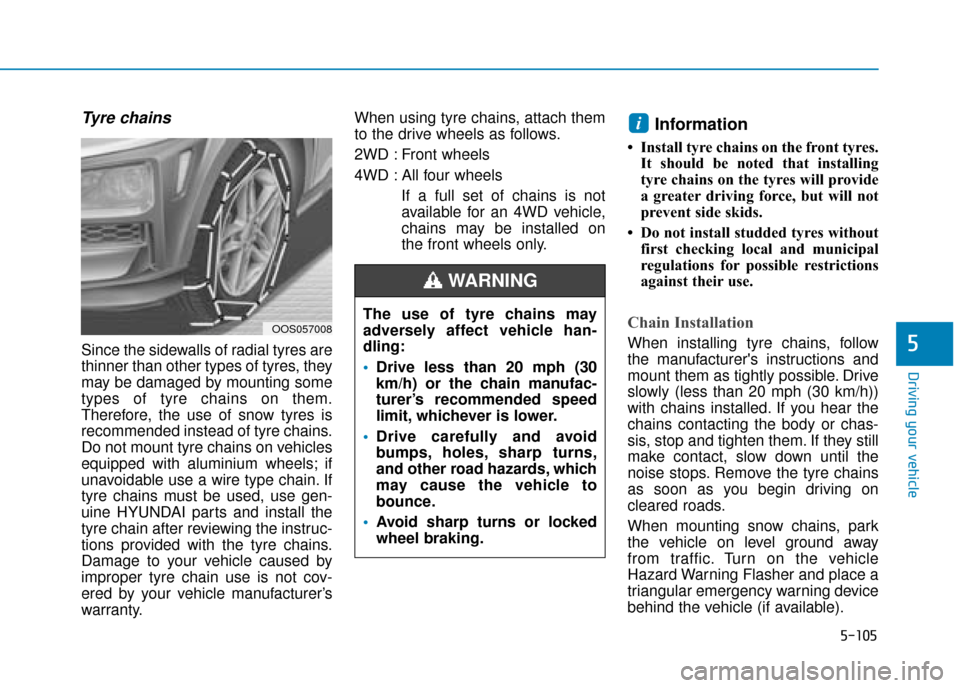
Tyre chains
Since the sidewalls of radial tyres are
thinner than other types of tyres, they
may be damaged by mounting some
types of tyre chains on them.
Therefore, the use of snow tyres is
recommended instead of tyre chains.
Do not mount tyre chains on vehicles
equipped with aluminium wheels; if
unavoidable use a wire type chain. If
tyre chains must be used, use gen-
uine HYUNDAI parts and install the
tyre chain after reviewing the instruc-
tions provided with the tyre chains.
Damage to your vehicle caused by
improper tyre chain use is not cov-
ered by your vehicle manufacturer’s
warranty.When using tyre chains, attach them
to the drive wheels as follows.
2WD : Front wheels
4WD : All four wheels
If a full set of chains is not
available for an 4WD vehicle,
chains may be installed on
the front wheels only.
Information
• Install tyre chains on the front tyres.It should be noted that installing
tyre chains on the tyres will provide
a greater driving force, but will not
prevent side skids.
• Do not install studded tyres without first checking local and municipal
regulations for possible restrictions
against their use.
Chain Installation
When installing tyre chains, follow
the manufacturer's instructions and
mount them as tightly possible. Drive
slowly (less than 20 mph (30 km/h))
with chains installed. If you hear the
chains contacting the body or chas-
sis, stop and tighten them. If they still
make contact, slow down until the
noise stops. Remove the tyre chains
as soon as you begin driving on
cleared roads.
When mounting snow chains, park
the vehicle on level ground away
from traffic. Turn on the vehicle
Hazard Warning Flasher and place a
triangular emergency warning device
behind the vehicle (if available).
i
OOS057008The use of tyre chains may
adversely affect vehicle han-
dling:
Drive less than 20 mph (30
km/h) or the chain manufac-
turer’s recommended speed
limit, whichever is lower.
Drive carefully and avoid
bumps, holes, sharp turns,
and other road hazards, which
may cause the vehicle to
bounce.
Avoid sharp turns or locked
wheel braking.
WARNING
Page 366 of 526
5-111
Driving your vehicle
5
M/T : Manual transmission DCT : Dual clutch transmissionItem
Petrol Engine
1.0 T-GDI1.6 T-GDI
M/T
DCT
Maximum trailer weight kg (Ibs.)
With brake system1200 (2645)1250 (2756)
Without brake system600 (1322)
Maximum permissible static vertical load on the coupling device kg (Ibs.)80 (176)
Recommended distance from rear wheel centre to coupling point mm (inch)820 (32.3)
Reference weight and distance when towing a trailer
Item Diesel EngineSmartstream D1.6
M/T 2WD (Low power)
DCT 2WD/4WD (High power)
Maximum trailer weight kg (Ibs.)
With brake systemStandard package : 700 (1543)Standard package : 700 (1543)
Trailer package : 1200 (2645)
Trailer package : 1250 (2756)
Without brake system600 (1322)
Maximum permissible static vertical load on the coupling device
kg (Ibs.)80 (176)
Recommended distance from rear wheel centre to coupling point mm (inch)820 (32.3)
Page 413 of 526
![Hyundai Kona 2019 Owners Manual - RHD (UK, Australia) 6-41
What to do in an emergency
6
Information
When reinstalling the repaired or
replaced tyre and wheel on the vehi-
cle, tighten the wheel lug nut to 11~13
kgf·m (79~94 lbf·ft).
Towing service
[A] Hyundai Kona 2019 Owners Manual - RHD (UK, Australia) 6-41
What to do in an emergency
6
Information
When reinstalling the repaired or
replaced tyre and wheel on the vehi-
cle, tighten the wheel lug nut to 11~13
kgf·m (79~94 lbf·ft).
Towing service
[A]](/manual-img/35/16225/w960_16225-412.png)
6-41
What to do in an emergency
6
Information
When reinstalling the repaired or
replaced tyre and wheel on the vehi-
cle, tighten the wheel lug nut to 11~13
kgf·m (79~94 lbf·ft).
Towing service
[A] : Dollies
If emergency towing is necessary,
we recommend having it done by a
HYUNDAI authorised repairer or a
commercial tow-truck service.
Proper lifting and towing procedures
are necessary to prevent damage to
the vehicle. The use of wheel dollies
or flatbed is recommended.On 2WD vehicles, it is acceptable to
tow the vehicle with the rear wheels
on the ground (without dollies) and
the front wheels off the ground.
If any of the loaded wheels or sus-
pension components are damaged
or the vehicle is being towed with the
front wheels on the ground, use a
towing dolly under the front wheels.
When being towed by a commercial
tow truck and wheel dollies are not
used, the front of the vehicle should
always be lifted, not the rear.
i
Tyre pressure sensor
(if equipped with TPMS)
The sealant on the tyre pres-
sure sensor and wheel should
be removed when you replace
the tyre with a new one and
inspect the tyre pressure sen-
sors at an authorised repairer.
CAUTION
The tyre inflation pressure must
be at least 220 kPa (32 psi). If it
is not, do not continue driving.
Call for road side service or
towing.
WARNING
T T
O
O W
W I
IN
N G
G
OOS067007L
The 4WD vehicle should never
be towed with the wheels on the
ground. This can cause serious
damage to the transaxle or the
4WD system.
CAUTION
Page 464 of 526

7-47
7
Maintenance
Driver's side fuse Panel
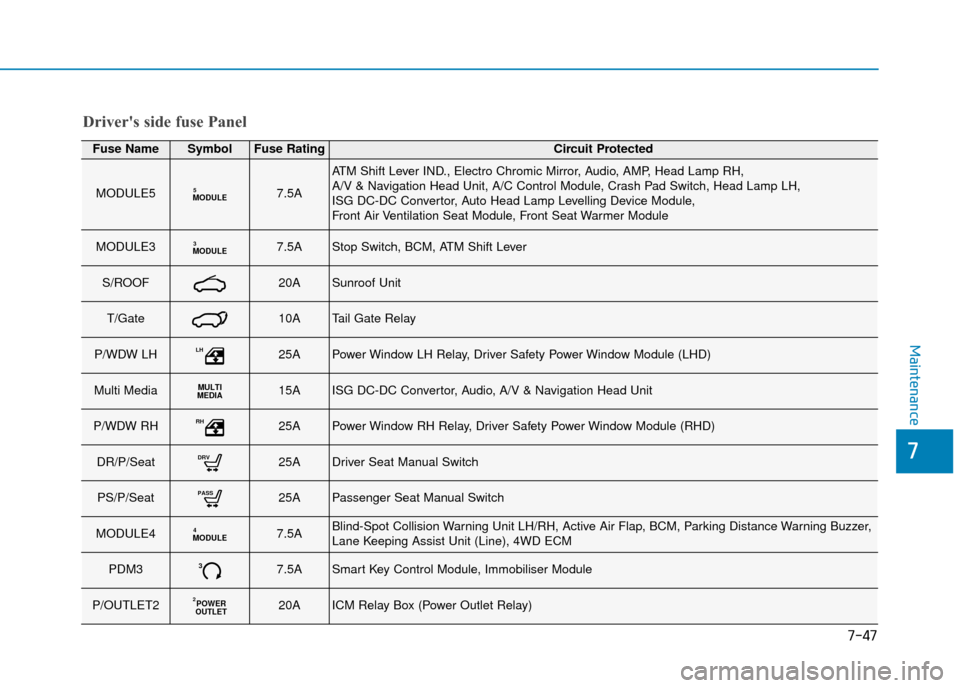
Fuse NameSymbolFuse RatingCircuit Protected
MODULE5MODULE57.5A
ATM Shift Lever IND., Electro Chromic Mirror, Audio, AMP, Head Lamp RH,
A/V & Navigation Head Unit, A/C Control Module, Crash Pad Switch, Head Lamp LH,
ISG DC-DC Convertor, Auto Head Lamp Levelling Device Module,
Front Air Ventilation Seat Module, Front Seat Warmer Module
MODULE3MODULE37.5AStop Switch, BCM, ATM Shift Lever
S/ROOF20ASunroof Unit
T/Gate10ATail Gate Relay
P/WDW LHLH25APower Window LH Relay, Driver Safety Power Window Module (LHD)
Multi MediaMULTI
MEDIA15AISG DC-DC Convertor, Audio, A/V & Navigation Head Unit
P/WDW RHRH25APower Window RH Relay, Driver Safety Power Window Module (RHD)
DR/P/SeatDRV25ADriver Seat Manual Switch
PS/P/SeatPASS25APassenger Seat Manual Switch
MODULE4MODULE47.5ABlind-Spot Collision Warning Unit LH/RH, Active Air Flap, BCM, Parking Distance Warning Buzzer,
Lane Keeping Assist Unit (Line), 4WD ECM
PDM337.5ASmart Key Control Module, Immobiliser Module
P/OUTLET2POWER
OUTLET220AICM Relay Box (Power Outlet Relay)
Page 471 of 526
7-54
Maintenance
Engine compartment fuse panel
TypeFuse NameSymbolFuse RatingCircuit Protected
FUSE
TCMT115ATCM
V/PUMPVACUUMPUMP20AVacuum Pump
F/PUMPFUEL
PUMP20AE/R Junction Block (RLY.7)
BATT1140AIGPM ((Fuse - F21, F24, F28, F33), Leak Current Autocut Device)
DCT1DCT140ATCM
DCT2DCT240ATCM
4WD20A4WD ECM
ABS1140AESC Control Module, Multifunction Switch
ABS2230AESC Control Module
DCUDCU40A-
Page 518 of 526
8-6
Specifications & Consumer information
ItemPetrol Engine Diesel Engine
1.0 T-GDI 1.6 T-GDI Smartstream D1.6
2WD 2WD 4WD 2WD4WD
M/T DCT DCT M/T DCT DCT
Gross vehicle weight kg (lbs.)1775 (3913) 1835 (4045) 1910 (4210) 1850 (4079) 1880 (4145) 1950 (4299)
Luggage volume (VDA) l(cu ft.) MIN : 361 (12.74)
MAX : 1143 (40.36)
V
V E
EH
H I
IC
C L
LE
E
W
W E
EI
IG
G H
H T
T
A
A N
N D
D
L
L U
U G
GG
GA
AG
G E
E
V
V O
O L
LU
U M
M E
E
M/T : Manual transmission
DCT : Dual clutch transmission
MIN : Behind rear seat to upper edge of the seat back.
MAX : Behind front seat to roof.