2019 Hyundai Kona EV light assembly
[x] Cancel search: light assemblyPage 39 of 540

2-24
Safety system of your vehicle
Seat Belt Warning Light
Driver's seat belt warning
As a reminder to the driver, the seat
belt warning light will illuminate for
approximately 6 seconds each time
you place the POWER button to the
ON position regardless of belt fas-
tening. At this time, if the seat belt is
not fastened a warning chime will
sound for 6 seconds.If you do not fasten the seat belt and
you drive over 6 mph (9 km/h), the
warning light will stay illuminated.
If you do not fasten the seat belt and
you drive over 12 mph (20 km/h) the
seat belt warning chime will sound
for approximately 100 seconds and
the corresponding warning light will
blink.
If you unfasten the seat belt while
driving under 12 mph (20 km/h), the
seat belt warning light will illuminate
until the seat belt is fastened.
If you unfasten the seat belt while
driving over 12 mph (20 km/h), the
seat belt warning chime will sound for
approximately 100 seconds and the
corresponding warning light will blink.
Damaged seat belts and seat
belt assemblies will not operate
properly. Always replace:
Frayed, contaminated, or dam-
aged webbing
Damaged hardware
The entire seat belt assembly
after it has been worn in an
accident, even if damage to
webbing or assembly is not
apparent
WARNING
OOSEV038009K
Page 287 of 540

5-54
Driving your vehicle
FCA Sensor
In order for the FCA system to oper-
ate properly, always make sure the
camera is clean and free of dirt,
snow, and debris. Dirt, snow, or for-
eign substances on the surface may
adversely affect the sensing perform-
ance of the sensor.The sensing performance of the
sensor may be affected if the fol-
lowing instructions are not fol-
lowed.
Always keep the camera sensor
clean and free of dirt and debris.
Use only genuine parts to repair or replace a damaged sensor.
Be careful not to apply unneces-
sary force on the camera sensor. If
the sensor is forcibly moved out
of proper alignment, the FCA sys-
tem may not operate correctly. In
this case, a warning message may
not be displayed. Have the vehicle
inspected by an authorized
HYUNDAI dealer. Do not tint the window or install
stickers, accessories around the
inside mirror where the camera
is installed.
NEVER locate any reflective objects (i.e. white paper, mirror)
over the dashboard. Any light
reflection may cause a malfunc-
tion of the system.
Pay extreme caution to keep the camera out of water.
NEVER arbitrarily disassemble the camera assembly, nor apply
any impact on the camera
assembly.
Playing the vehicle audio sys- tem at high volume may offset
the system warning sounds.
Information
Have the system checked by an
authorized HYUNDAI dealer when:
• The windshield glass is replaced.
• The camera or related parts arerepaired or removed.
i
NOTICE
NOTICE
NOTICE
OOSEV058117N
■ Front camera
Page 319 of 540

5-86
Driving your vehicleThe Driver Attention Warning sys-
tem utilizes the camera sensor on
the front windshield for its opera-
tion. To keep the camera sensor in
the best condition, you should
observe the followings:
Do not disassemble the cameratemporarily to tint the window or
to attach any types of coatings
and accessories. If you disas-
semble a camera and assemble
it again, take your vehicle to an
authorized HYUNDAI dealer and
have the system checked for cal-
ibration.
NEVER locate any reflective objects (i.e. white paper, mirror)
over the dashboard. Any light
reflection may cause a malfunc-
tion of the Driver Attention Alert
(DAW) system.
Pay extreme caution to keep the camera sensor out of water.
NEVER arbitrarily disassemble the camera assembly, nor apply
any impact on the camera
assembly.
NOTICE
The Driver Attention Warning
(DAW) system is not a substi-
tute for safe driving practices,
but a convenience function
only. It is the responsibility of
the driver to always drive cau-
tiously to prevent unexpected
and sudden situations from
occurring. Pay attention to the
road conditions at all times.
The system may suggest a
break according to the dri-
ver's driving pattern or habits
even if the driver doesn't feel
fatigue.
The driver, who feels fatigued,
should take a break, even
though there is no break sug-
gestion by the Driver Attention
Warning (DAW) system.
WARNING
The Driver Attention Warning
(DAW) system may not properly
operate with limited alerting in
the following situations:
The lane detection perform-
ance is limited. (For more infor-
mation, refer to "Lane Keeping
Assist (LKA) system" in this
chapter.)
The vehicle is driven erratical-
ly or is abruptly turned for
obstacle avoidance (e.g. con-
struction area, other vehicles,
fallen objects, bumpy road).
Forward drivability of the vehi-
cle is severely undermined
(possibly due to wide variation
in tire pressures, uneven tire
wear-out, toe-in/toe-out align-
ment).
The vehicle drives on a curvy
road.
The vehicle drives on a bumpy
road.
CAUTION
Page 400 of 540

7-20
Maintenance
Front windshield wiper bladereplacement
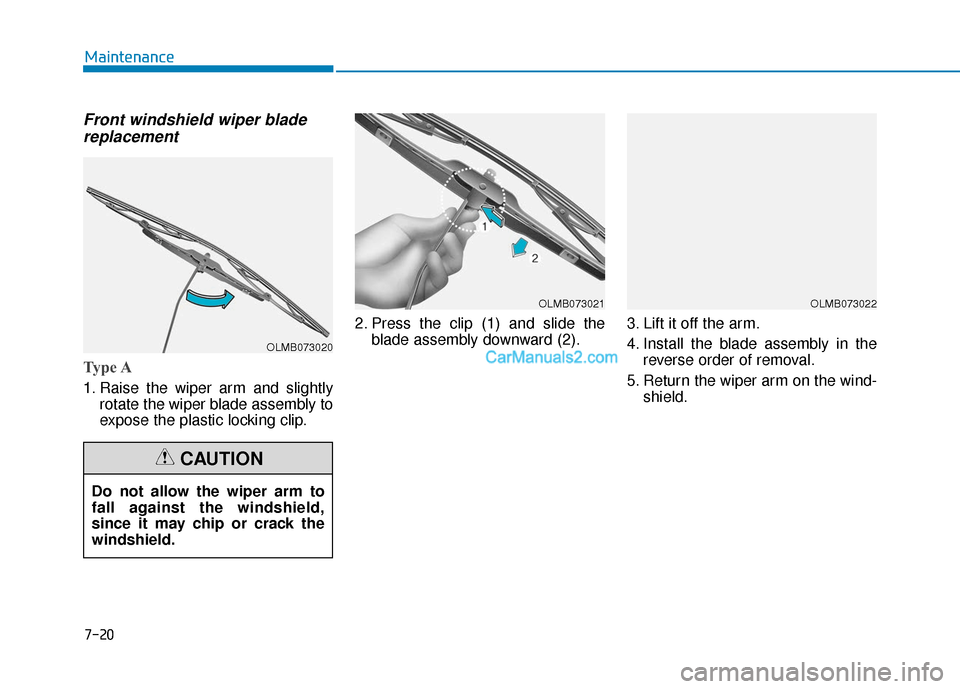
Type A
1. Raise the wiper arm and slightly
rotate the wiper blade assembly to
expose the plastic locking clip. 2. Press the clip (1) and slide the
blade assembly downward (2). 3. Lift it off the arm.
4. Install the blade assembly in the
reverse order of removal.
5. Return the wiper arm on the wind- shield.
OLMB073020
Do not allow the wiper arm to
fall against the windshield,
since it may chip or crack the
windshield.
CAUTION
OLMB073021OLMB073022
Page 402 of 540

Rear window wiper bladereplacement
1. Raise the wiper arm and then
rotate the wiper blade assembly
(1).
2. Pull out the wiper blade assembly (2). 3. Install the new blade assembly by
inserting the center part into the
slot in the wiper arm until it clicks
into place (3).
4. Make sure the blade assembly is installed firmly by trying to pull it
slightly.
5. Rotate back the blade assembly so that it aligns with the wiper arm.
To prevent damage to the wiper arms
or other components, have the wiper
blades replaced by an authorized
HYUNDAI dealer.
7-22
Maintenance
OOSEV078008
OOSEV078007
Page 435 of 540

7-55
7
Maintenance
L
LI
IG
G H
H T
T
B
B U
U L
LB
B S
S
Consult an authorized HYUNDAI
dealer to replace most vehicle light
bulbs. It is difficult to replace vehicle
light bulbs because other parts of the
vehicle must be removed before you
can get to the bulb. This is especially
true for removing the headlamp
assembly to get to the bulb(s).
Removing/installing the headlamp
assembly can result in damage to
the vehicle. Light replacement
Be sure to replace the burned out
bulb with one of the same wattage
rating. Otherwise, it may cause
damage to the fuse or electric
wiring system.
Headlamp lens
To prevent damage, do not clean
the headlamp lens with chemical
solvents or strong detergents.
Information
After heavy rain or washing, head-
lamp and trunk lenses could appear
frosty. This condition is caused by the
temperature difference between the
lamp inside and the outside tempera-
ture. This is similar to the condensa-
tion on your windows inside your
vehicle during the rain and doesn’t
indicate a problem with your vehicle.
If the water leaks into the lamp bulb
circuitry, have your vehicle checked
by an authorized retailer of Genesis
Branded products.
Information
• A normally functioning lamp may flicker momentarily to stabilize the
vehicle’s electrical control system.
However, if the lamp goes out after
flickering momentarily, or contin-
ues to flicker, we recommend the
system be checked by an authorized
HYUNDAI dealer.
• The position lamp may not turn on when the position lamp switch is
turned on, but the position lamp and
headlamp switch may turn on when
the headlamp switch is turned on.
This may be caused by network fail-
ure or vehicle electrical control sys-
tem malfunction. If this occurs, we
recommend the system be checked
by an authorized HYUNDAI dealer.
i
i
NOTICE
NOTICE
Prior to replacing a lamp,
depress the foot brake, shift
to P (Park), apply the parking
brake, place the POWER but-
ton in the OFF position and
take the key with you when
leaving the vehicle to avoid
sudden movement of the vehi-
cle and to prevent possible
electric shock.
Be aware the bulbs may be
hot and may burn your fin-
gers.
WARNING
Page 436 of 540

7-56
Maintenance
Headlamp, Daytime Running
Light (DRL), Cornering Lamp,
Parking Lamp, Turn Signal
Lamp and Side Marker
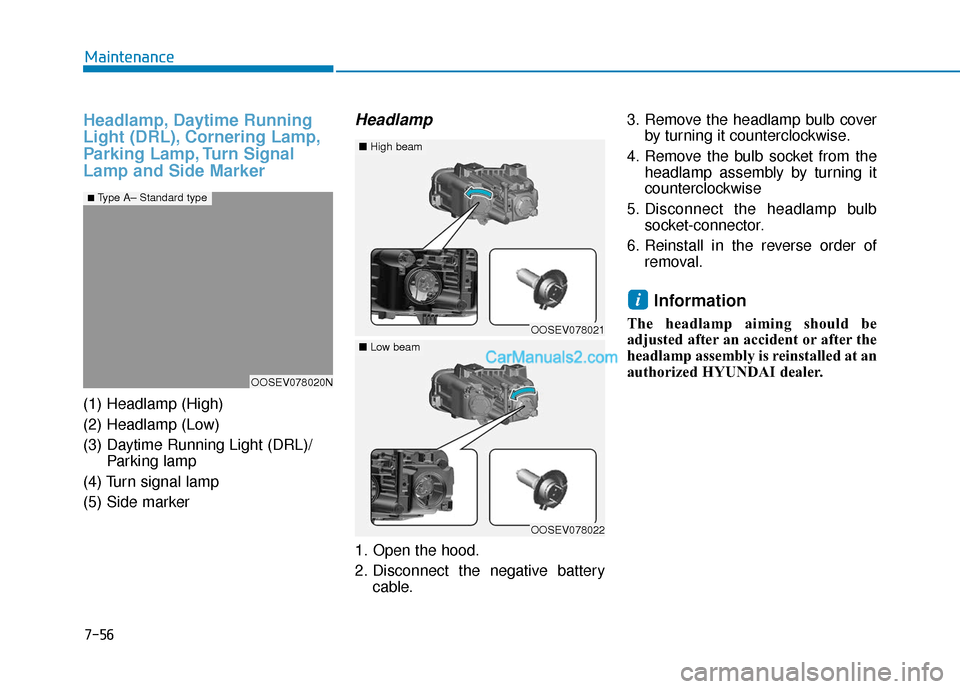
(1) Headlamp (High)
(2) Headlamp (Low)
(3) Daytime Running Light (DRL)/Parking lamp
(4) Turn signal lamp
(5) Side marker
Headlamp
1. Open the hood.
2. Disconnect the negative battery cable. 3. Remove the headlamp bulb cover
by turning it counterclockwise.
4. Remove the bulb socket from the headlamp assembly by turning it
counterclockwise
5. Disconnect the headlamp bulb socket-connector.
6. Reinstall in the reverse order of removal.
Information
The headlamp aiming should be
adjusted after an accident or after the
headlamp assembly is reinstalled at an
authorized HYUNDAI dealer.
i
OOSEV078020N
■ Type A– Standard type
OOSEV078021
■High beam
OOSEV078022
■Low beam
Page 437 of 540

7-57
7
Maintenance
Always handle them carefully, andavoid scratches and abrasions. If
the bulbs are lit, avoid contact with
liquids.
Never touch the glass with bare hands. Residual oil may cause the
bulb to overheat and burst when lit.
A bulb should be operated only when installed in a headlamp.
If a bulb becomes damaged or cracked, replace it immediately
and carefully dispose of it.
Daytime running light(DRL)/Position lamp
If the lamp (LED) does not operate,
have the system checked by an
authorized HYUNDAI dealer.
The LED lamps cannot be replaced
as a single unit because it is an inte-
grated unit. The LED lamps has to be
replaced with the unit.
A skilled technician should check or
repair the LED lamp, for it may dam-
age related parts of the vehicle.
Turn signal lamp
1. Open the hood.
2. Disconnect the negative battery
cable.
3. Remove the socket from the assembly by turning the socket
counterclockwise until the tabs on
the socket align with the slots on
the assembly.
4. Remove the bulb from the socket by pressing it in and rotating it
counterclockwise until the tabs on
the bulb align with the slots in the
socket. Pull the bulb out of the
socket.
OOSEV078023Halogen bulb
Handle halogen bulbs with
care. Halogen bulbs contain
pressurized gas that will pro-
duce flying pieces of glass
that could cause injuries if
broken.
Wear eye protection when
changing a bulb. Allow the
bulb to cool down before han-
dling it.
WARNING
OLMB073042L