2019 Hyundai Ioniq Plug-in Hybrid ignition
[x] Cancel search: ignitionPage 166 of 599

3-20
Electric power steering (EPS)
The system assists you with steering
the vehicle. If the engine is off or if
the power steering system becomes
inoperative, the vehicle may still be
steered, but it will require increased
steering effort.
Also, the steering effort becomes
heavier as the vehicle’s speed
increases and becomes lighter as
the vehicle’s speed decreases for
better control of the steering wheel.
Should you notice any change in the
effort required to steer during normal
vehicle operation, we recommend
that the system be checked by a
HYUNDAI authorised repairer.
If the electric Power SteeringSystem does not operate nor-
mally, the warning light ( ) will
illuminate or blink on the instru-
ment cluster. The steering wheel
may become difficult to control
or operate. Take your vehicle to a
HYUNDAI authorised repairer
and have the system checked as
soon as possible.
(Continued)(Continued)
When abnormality is detected in
the electric power steering sys-
tem, to prevent a deadly acci-
dent, the steering assist func-
tion will stop. At this time, the
warning light turns on or blinks
on the cluster. The steering
wheel may become difficult to
control or operate. Have your
vehicle checked immediately,
after moving the vehicle to a
safe zone.
Information
The following symptoms may occur
during normal vehicle operation:
• The steering effort may be highimmediately after placing the igni-
tion switch or the Engine Start/Stop
button in the ON position.
This happens as the system per-
forms the EPS system diagnostics.
When the diagnostics are complet-
ed, the steering wheel will return to
its normal condition.
(Continued)(Continued)
• A click noise may be heard from the
EPS relay after the ignition switch is
placed in the ON or LOCK/OFF
position.
• Motor noise may be heard when the vehicle is at a stop or at a low driv-
ing speed.
• When you operate the steering wheel in low temperatures, abnor-
mal noise may occur. If the temper-
ature rises, the noise will disappear.
This is a normal condition.
• When the vehicle is stationary, if you turn the steering wheel all the
way to the left or right continuously,
the steering wheel effort increases.
This is not a system malfunction. As
time passes, the steering wheel
effort will return to its normal con-
dition.
i
NOTICE
S
ST
T E
EE
ER
R I
IN
N G
G
W
W H
HE
EE
EL
L
Convenient features of your vehicle
Page 167 of 599

3-21
Convenient features of your vehicle
3
Tilt steering /
Telescopic steeringInformation
After adjustment, sometimes the lock-
release lever may not lock the steering
wheel.
It is not a malfunction. This occurs
when two gears are not engaged cor-
rectly. In this case, adjust the steering
wheel again and then lock the steering
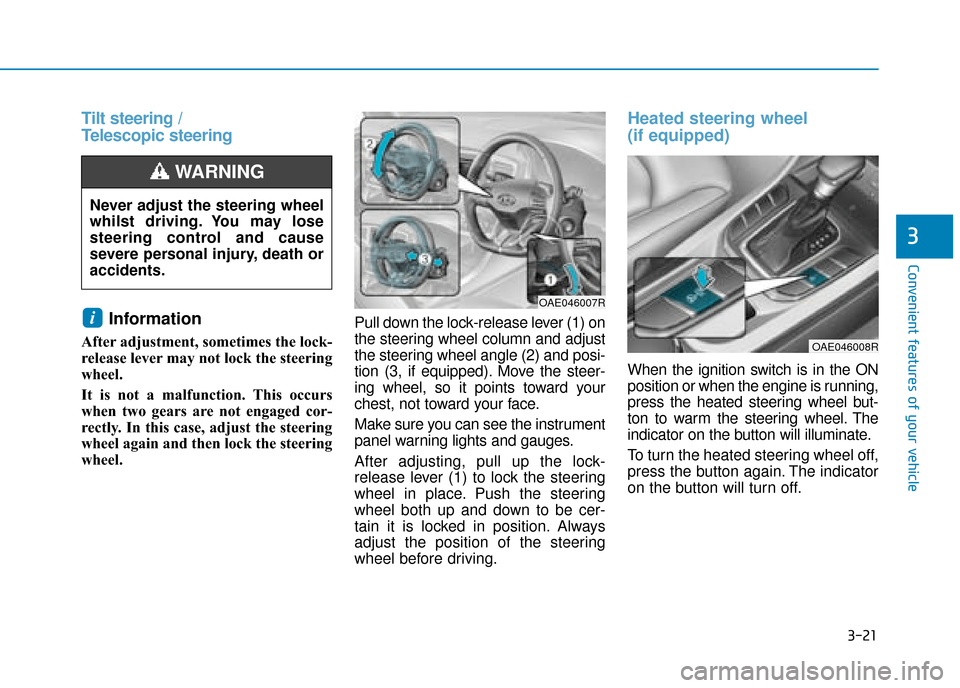
wheel. Pull down the lock-release lever (1) on
the steering wheel column and adjust
the steering wheel angle (2) and posi-
tion (3, if equipped). Move the steer-
ing wheel, so it points toward your
chest, not toward your face.
Make sure you can see the instrument
panel warning lights and gauges.
After adjusting, pull up the lock-
release lever (1) to lock the steering
wheel in place. Push the steering
wheel both up and down to be cer-
tain it is locked in position. Always
adjust the position of the steering
wheel before driving.
Heated steering wheel
(if equipped)
When the ignition switch is in the ON
position or when the engine is running,
press the heated steering wheel but-
ton to warm the steering wheel. The
indicator on the button will illuminate.
To turn the heated steering wheel off,
press the button again. The indicator
on the button will turn off.
i
Never adjust the steering wheel
whilst driving. You may lose
steering control and cause
severe personal injury, death or
accidents.
WARNING
OAE046007R
OAE046008R
Page 170 of 599

3-24
Convenient features of your vehicle
To operate the electric rearview
mirror:
Press the ON/OFF button (1) toturn the automatic dimming func-
tion off. The mirror indicator light
will turn off.
Press the ON/OFF button (1) to
turn the automatic dimming func-
tion on. The mirror indicator light
will illuminate.
The mirror defaults to the ON posi- tion whenever the ignition switch or
the Engine Start/Stop button is in
the ON position.
Outside rearview mirror
Be sure to adjust mirror angles
before driving.
Your vehicle is equipped with both
left-hand and right-hand outside
rearview mirrors.
The mirror can be adjusted remotely
with the remote switch.
The mirror heads can be folded to
prevent damage during an automatic
car wash or when passing through a
narrow street.
OAD045010
OAE046013
I
I
I
I
n
n
n
n
d
d
d
d
i
i
i
i
c
c
c
c
a
a
a
a
t
t
t
t
o
o
o
o
r
r
r
r
The outside rearview mirror is
convex. Objects seen in the
mirror are closer than they
appear.
Use your interior rearview
mirror or turn your head and
look to determine the actual
distance of following vehicles
when changing lanes.
WARNING
Do not adjust or fold the outside
rearview mirrors whilst driving.
This may cause loss of vehicle
control resulting in an accident.
WARNING
Page 172 of 599

3-26
Convenient features of your vehicle
Folding the outside rearviewmirror
Manual type
To fold the outside rearview mirror,
grasp the housing of the mirror and
then fold it toward the rear of the
vehicle.
Electric type (if equipped)
Left : The mirror will unfold.
Right : The mirror will fold.
Centre (AUTO) : The mirror will fold
or unfold automatically as follows:
Without smart key system
- The mirror will fold or unfold whenthe door is locked or unlocked by
the remote key. With smart key system
- The mirror will fold or unfold whenthe door is locked or unlocked by
the smart key.
- The mirror will fold or unfold when the door is locked or unlocked by
the button on the outside door
handle.
- The mirror will unfold when you approach the vehicle (all doors
closed and locked) with a smart
key in possession. (if equipped)
The electric type outside rearview
mirror operates even though the
ignition switch is in the OFF posi-
tion. However, to prevent unnec-
essary battery discharge, do not
adjust the mirrors longer than
necessary whilst the engine is not
running.
Do not fold the electric type out-
side rearview mirror by hand. It
could cause motor failure.
NOTICE
NOTICEOAE046015
OAE046016R
Page 174 of 599

3-28
Convenient features of your vehicle
The ignition switch must be in the ON
position to be able to raise or lower
the windows. Each door has a Power
Window switch to control that door's
window. The driver has a Power
Window Lock switch which can block
the operation of passenger windows.
The power windows will operate for
approximately 30 seconds after the
ignition switch is placed in the ACC
or OFF position. However, if the front
doors are opened, the Power
Windows will not operate even within
the 30 second period.
Information
• In cold and wet climates, power win- dows may not work properly due to
freezing conditions.
• Whilst driving with the rear win- dows down or with the sunroof (if
equipped) opened (or partially
opened), your vehicle may demon-
strate a wind buffeting or pulsation
noise. This noise is normal and can
be reduced or eliminated by taking
the following actions. If the noise
occurs with one or both of the rear
windows down, partially lower both
front windows approximately one
inch. If you experience the noise
with the sunroof open, slightly close
the sunroof.
Window opening and closing
To open:
Press the window switch down to the
first detent position (5). Release the
switch when you want the window to
stop.
To close:
Pull the window switch up to the first
detent position (5). Release the win-
dow switch when you want the win-
dow to stop.
i
To avoid serious injury or death,
do not extend your head, arms
or body outside the windows
whilst driving.
WARNING
OAE046020
Page 175 of 599

3-29
Convenient features of your vehicle
3
Auto down window (if equipped)
Pressing the power window switch
momentarily to the second detent
position (6) completely lowers the
window even when the switch is
released. To stop the window at the
desired position whilst the window is
in operation, pull up or press down
and release the switch.
Auto up/down window (if equipped)
Pressing or pulling up the power win-
dow switch momentarily to the sec-
ond detent position (6) completely
lowers or lifts the window even when
the switch is released. To stop the
window at the desired position whilst
the window is in operation, pull up or
press down and release the switch.
To reset the power windows
If the power windows do not operate
normally, the automatic power win-
dow system must be reset as follows:
1. Place the ignition switch to the ON
position.
2. Close the window and continue pulling up on the power window
switch for at least one second.
If the power windows do not operate
properly after resetting, it is recom-
mended that the system be checked
by a HYUNDAI authorised repairer.
Automatic reverse (if equipped)
If a window senses any obstacle
whilst it is closing automatically, it will
stop and lower approximately 30 cm
(12 inches) to allow the object to be
cleared.
If the window detects the resistance
whilst the power window switch is
pulled up continuously, the window
will stop upward movement then
lower approximately 2.5 cm (1 inch).
If the power window switch is pulled
up continuously again within 5 sec-
onds after the window is lowered by
the automatic window reverse fea-
ture, the automatic window reverse
will not operate.
OLF044032
The automatic reverse feature
doesn't activate whilst resetting
the power window system. Make
sure body parts or other objects
are safely out of the way before
closing the windows to avoid
injuries or vehicle damage.
WARNING
Page 177 of 599

3-31
Convenient features of your vehicle
3
If your vehicle is equipped with a
sunroof, you can slide or tilt your
sunroof with the sunroof control
switch located on the overhead con-
sole.
The sunroof can be opened, closed,
or tilted when the ignition switch is in
the ON position.
The sunroof can be operated for
approximately 30 seconds after the
ignition key is removed or turned to
the ACC or LOCK/OFF position.
However, if the front door is opened,
the sunroof cannot be operated even
within 30 seconds.Information
• In cold and wet climates, the sun-roof may not work properly due to
freezing conditions.
• After the vehicle is washed or in a rainstorm, be sure to wipe off any
water that is on the sunroof before
operating it.
i
NEVER leave the keys in your
vehicle with unsupervised
children, when the engine is
running.
NEVER leave any child unat-
tended in the vehicle. Even
very young children may inad-
vertently cause the vehicle to
move, entangle themselves in
the windows, or otherwise
injure themselves or others.
Always double check to make
sure all arms, hands, head
and other obstructions are
safely out of the way before
closing a window.
Do not allow children to play
with the power windows. Keep
the driver’s door power window
lock switch in the LOCK posi-
tion (pressed). Serious injury
can result from unintentional
window operation by the child.
Do not extend your head,
arms or body outside the win-
dows whilst driving.
WARNING
S SU
U N
NR
RO
O O
OF
F
(
( I
IF
F
E
E Q
Q U
UI
IP
P P
PE
ED
D )
)
OAD045022
Never adjust the sunroof or
sunshade whilst driving. This
could result in loss of control
and an accident that may
cause death, serious injury, or
property damage.
Make sure heads, other body
parts or objects are out of the
way before using the sunroof.
Do not extend your head, arms
or body outside the sunroof
whilst driving, to avoid serious
injury.
Do not leave the engine run-
ning and the key in your vehi-
cle with unsupervised children.
(Continued)
WARNING
Page 180 of 599

3-34
Convenient features of your vehicle
Periodically remove any dirt that may accumulate on the sunroof
guide rail or between the sun-
roof and roof panel, which can
make a noise.
Do not try to open the sunroof when the temperature is below
freezing or when the sunroof is
covered with snow or ice, other-
wise the motor could be dam-
aged. In cold and wet climates, the
sunroof may not work properly.
Sunshade
The sunshade will open automatical-
ly with the sunroof when the glass
panel moves. If you want it closed,
move the sunshade manually.
The sunroof is made to slide
together with the sunshade. Do
not leave the sunshade closed
whilst the sunroof is open.
Resetting the sunroof
The sunroof may need to be reset if
the following conditions occur:
- The battery is discharged or dis-connected or the sunroof fuse has
been replaced or disconnected
- The sunroof control lever is not operating correctly
To reset the sunroof, perform the fol-
lowing steps:
1. Place the ignition switch to the ON position or start the engine. It is rec-
ommended to reset the sunroof
whilst the engine is running.
2. Push the control lever forward. The sunroof will close completely or tilt
depending on the condition of the
sunroof.
3. Release the control lever until the sunroof does not move.
NOTICE
NOTICE
OAD045037