2019 Hyundai Ioniq Hybrid 12v battery reset
[x] Cancel search: 12v battery resetPage 15 of 603

1-4
Your vehicle at a glance
I
IN
N T
TE
ER
R I
IO
O R
R
O
O V
VE
ER
R V
V I
IE
E W
W
-
-
H
H Y
Y B
BR
RI
ID
D
V
V E
EH
H I
IC
C L
LE
E
1. Door lock/unlock button ........................3-10
2. Driver position memory system ............3-14
3. Side view mirror control switch ..............3-35
4. Central door lock switch ........................3-11
5. Power window switches ........................3-37
6. Power window lock switch......................3-40
7. Instrument panel illumination control
switch ....................................................3-56
8. Blind-spot Collision Warning (BCW) System ..................................................5-34
9. Lane Keeping Assist (LKA) System ......5-56
10. ESC (Electronic Stability Control) OFF button ..........................................5-28
11. Fuel filler door open switch ..................3-48
12. 12V battery reset switch ........................6-5
13. Fuse panel ..........................................7-50
14. Steering wheel ....................................3-16
15. Steering wheel tilt/telescope lever ......3-16
16. Seat........................................................2-4
17. Hood release lever ..............................3-45
OAE017003N
The actual shape may differ from the illustration.
Page 189 of 603

3-97
Convenient features of your vehicle
3
If the service interval is activated and
the time and distance is adjusted,
messages are displayed in the fol-
lowing situations each time the vehi-
cle is turned on.
- Service in: Displayed to inform the driver theremaining mileage and days to
service.
- Service required : Displayed when the mileage anddays to service has been reached
or passed.
Information
If any of the following conditions
occur, the mileage and number of days
to service may be incorrect.
- The battery cable is disconnected.
- The fuse switch is turned off.
- The battery is discharged. 6. Other (Features)
Battery Saver+
To activate or deactivate the Aux.
Battery Saver+ function.
When activated, the high voltage bat-
tery is used to keep the 12V battery
charged.
For more information, refer to
"Hybrid System Overview" provid-
ed in the front of the owner’s man-
ual.
- Off: The average fuel economy will
not reset automatically whenever
refueling.
- After Ignition: When the vehicle has been OFF for 4 hours or longer the
average fuel economy will reset
automatically.
- After Refueling: The average fuel economy will reset automatically
after adding 1.6 gallons (6 liters) of
fuel or more and after driving speed
exceeds 1 mph (1 km/h).
For more information, refer to
"Trip Computer" in this chapter.
To select the fuel economy unit.
(US gallon, UK gallon)
To select the temperature unit.
(°C,°F)
To select the tire pressure unit.
(psi, kPa, bar)
To select language.
7. Reset
You can reset the menus in the User
Settings Mode. All menus in the User
Settings Mode are reset to factory
settings, except language and serv-
ice interval.
i
Page 196 of 603

3-104
Convenient features of your vehicle
If the service interval is activated and
the time and distance is adjusted,
messages are displayed in the fol-
lowing situations each time the vehi-
cle is turned on.
- Service in : Displayed to inform the driver theremaining mileage and days to
service.
- Service required : Displayed when the mileage anddays to service has been reached
or passed.
Information
If any of the following conditions
occur, the mileage and number of days
to service may be incorrect.
- The battery cable is disconnected.
- The fuse switch is turned off.
- The battery is discharged. 6. Other (Features)
Battery Saver+
To activate or deactivate the Aux.
Battery Saver+ function.
When activated, the high voltage bat-
tery is used to keep the 12V battery
charged.
For more information, refer to
"Hybrid System Overview" provid-
ed in the front of the owner's man-
ual.
- Off: The average fuel economy will
not reset automatically whenever
refueling.
- After Ignition: When the engine has been OFF for 4 hours or longer the
average fuel economy will reset
automatically.
- After Refueling: The average fuel economy will reset automatically
after adding 1.6 gallons (6 liters) of
fuel or more and after driving speed
exceeds 1 mph (1 km/h).
For more information, refer to
"Trip Computer" in this chapter.
To select the fuel economy unit.
(US gallon, UK gallon)
To select the temperature unit.
(°C,°F)
To select the tire pressure unit.
(psi, kPa, bar)
To select language.
7. Reset
You can reset the menus in the User
Settings Mode. All menus in the User
Settings Mode are reset to factory
settings, except language and serv-
ice interval.
i
Page 404 of 603
6-3
What to do in an emergency
If You Have a Flat Tire While
Driving
If a tire goes flat while you are driving:
Take your foot off the acceleratorpedal and let the vehicle slow
down while driving straight ahead.
Do not apply the brakes immedi-
ately or attempt to pull off the road
as this may cause loss of vehicle
control resulting in an accident.
When the vehicle has slowed to
such a speed that it is safe to do
so, brake carefully and pull off the
road. Drive off the road as far as
possible and park on firm, level
ground. If you are on a divided
highway, do not park in the median
area between the two traffic lanes.
When the vehicle is stopped, press the hazard warning flasher button,
move the shift lever into P (Park),
and apply the parking brake, and
place the Engine Start/Stop button
in the OFF position.
Have all passengers get out of the vehicle. Be sure they all get out on
the side of the vehicle that is away
from traffic.
When changing a flat tire, follow the instructions provided later in
this chapter.
Hybrid vehicle
Be sure the shift lever is in P
(Park). The vehicle starts only
when the shift lever is in P (Park).
This vehicle does not have a regu- lar 12V battery that needs periodic
replacement. It is lithium ion poly-
mer type integrated into the HEV
high voltage battery. The vehicle
has a 12V battery protection sys-
tem that cuts 12V battery from
vehicle draw to prevent full dis-
charge. If vehicle will not start, first
try pressing the 12V Battery Reset
switch (left side of the steering
wheel near the fuel door open
switch) to reconnect the 12V bat-
tery, but you must start vehicle
within 15 seconds of pressing the
12V Battery Reset switch. After
starting vehicle, operate the vehi-
cle safely outdoors in ready mode
stopped and/or drive it for 30 min-
utes total to charge the 12V battery
fully. Check the fuel level and add fuel if
necessary.
If the vehicle still does not start, have
your vehicle checked by an author-
ized HYUNDAI dealer.
6
I I F
F
T
T H
H E
E
V
V E
EH
H I
IC
C L
LE
E
W
W I
IL
L L
L
N
N O
O T
T
S
S T
T A
A R
RT
T
Push or pull starting the vehicle
may cause the catalytic con-
verter to overload which can
lead to damage to the emission
control system.
CAUTION
Page 406 of 603
6-5
What to do in an emergency
6
Before Jump Starting
This vehicle does not have a regular
12V battery that needs periodic
replacement. It is lithium ion polymer
type integrated into the HEV high
voltage battery. The vehicle has a
12V battery protection system that
cuts 12V battery from vehicle draw to
prevent full discharge.
Using the 12V Battery ResetSwitch
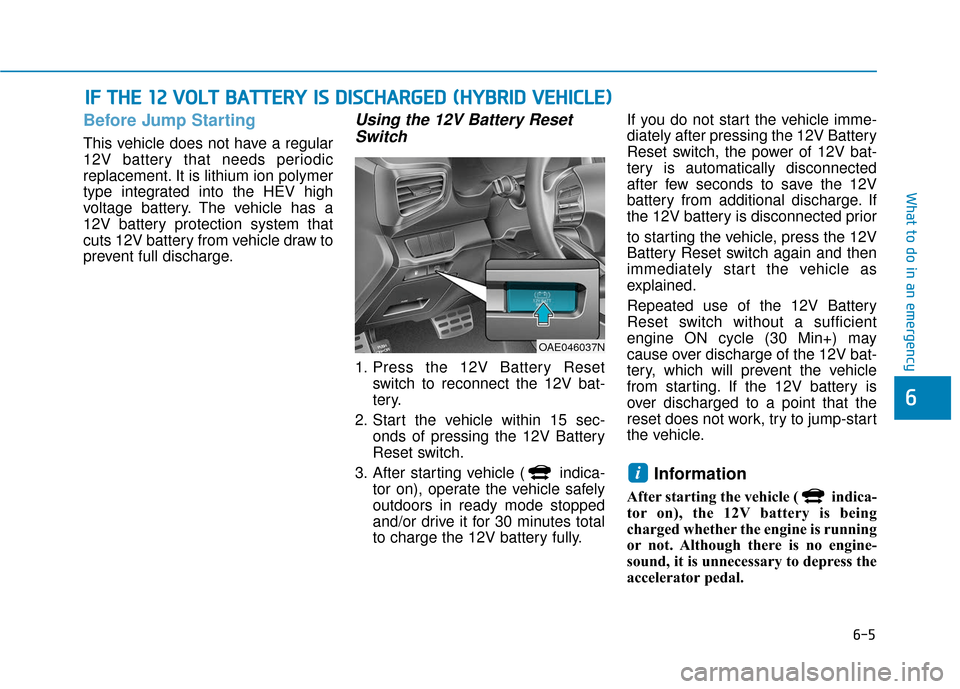
1. Press the 12V Battery Reset
switch to reconnect the 12V bat-
tery.
2. Start the vehicle within 15 sec- onds of pressing the 12V Battery
Reset switch.
3. After starting vehicle ( indica- tor on), operate the vehicle safely
outdoors in ready mode stopped
and/or drive it for 30 minutes total
to charge the 12V battery fully. If you do not start the vehicle imme-
diately after pressing the 12V Battery
Reset switch, the power of 12V bat-
tery is automatically disconnected
after few seconds to save the 12V
battery from additional discharge. If
the 12V battery is disconnected prior
to starting the vehicle, press the 12V
Battery Reset switch again and then
immediately start the vehicle as
explained.
Repeated use of the 12V Battery
Reset switch without a sufficient
engine ON cycle (30 Min+) may
cause over discharge of the 12V bat-
tery, which will prevent the vehicle
from starting. If the 12V battery is
over discharged to a point that the
reset does not work, try to jump-start
the vehicle.
Information
After starting the vehicle ( indica-
tor on), the 12V battery is being
charged whether the engine is running
or not. Although there is no engine-
sound, it is unnecessary to depress the
accelerator pedal.
i
I
I
F
F
T
T H
H E
E
1
1 2
2
V
V O
O L
LT
T
B
B A
A T
TT
TE
ER
R Y
Y
I
IS
S
D
D I
IS
S C
C H
H A
AR
RG
G E
ED
D
(
( H
H Y
Y B
BR
RI
ID
D
V
V E
EH
H I
IC
C L
LE
E )
)
OAE046037N
Page 407 of 603
6-6
What to do in an emergency
The following items may need to be
reset after the battery has been dis-
charged or the battery has been dis-
connected. See chapter 3 or 4 for:
Power Windows
Trip Computer
Climate Control System
Clock
Audio System
Sunroof
Driver Position Memory System
External power source using 12V
battery
The use of external power acces-
sories may reduce performance
and function of the vehicle.
Especially, the use of dash cam-
eras may shut off the power of the
vehicle prior to the dash camera's
automatic shut-down.
If the power of the vehicle is shut
off, start the vehicle as explained.
(refer to "Using the 12V Battery
Switch")
Jump Starting
In the event vehicle still does not
have a functional 12V battery (check
if interior lights will not turn on) then
you can try a jump start to the engine
compartment jumper terminals using
a 12V booster pack or jumper cables
from another vehicle's 12V battery
according to the following instruc-
tions. 1. Position the vehicles close enough
that the jumper cables will reach,
but do not allow the vehicles to
touch.
2. Avoid fans or any moving parts in the engine compartment at all
times, even when the vehicles are
turned off.
3. Turn off all electrical devices such as radios, lights, air conditioning,
etc. Put the vehicles in P (Park)
and set the parking brake. Turn
both vehicles OFF.
NOTICEJump starting can be danger-
ous if done incorrectly. Follow
the jump starting procedure in
this section to avoid serious
injury or damage to your vehi-
cle. If in doubt about how to
properly jump start your vehi-
cle, we strongly recommend
that you have a service techni-
cian or towing service do it for
you.
CAUTION
Page 408 of 603

6-7
What to do in an emergency
6
4. Connect the jumper cables in theexact sequence shown in the illus-
tration. First connect one jumper
cable to the red, positive (+)
jumper terminal of your vehicle
(1).
5. Connect the other end of the jumper cable to the red, positive
(+) battery/jumper terminal of the
assisting vehicle (2).
6. Connect the second jumper cable to the black, negative (-) battery/
chassis ground of the assisting
vehicle (3). 7. Connect the other end of the sec-
ond jumper cable to the black,
negative (-) chassis ground of
your vehicle (4).
Do not allow the jumper cables to
contact anything except the cor-
rect battery or jumper terminals or
the correct ground. Do not lean
over the battery when making
connections.
8. Press the 12V Battery Resetswitch.
9. Start the engine of the assisting vehicle and let it run for a few min-
utes.
10. Start your vehicle as soon as possible. After starting vehicle
( indicator on), operate the
vehicle safely outdoors in ready
mode stopped and/or drive it for
30 minutes total to charge the
12V battery fully.
OAE066004NOAE046037N
Page 595 of 603
I-7
If the 12 volt battery is discharged (Hybrid vehicle) .......6-4Jump starting ................................................................6-6
Using the 12V battery reset switch ..............................6-5
If the 12 volt battery is discharged (Plug-in hybrid vehicle).................................................6-9
Jump starting ................................................................6-9
If the engine overheats ....................................................6-12
If the engine stalls while driving ......................................6-2
If the vehicle stalls at a crossroad or crossing ..................6-2
If the vehicle will not start Hybrid vehicle ..............................................................6-3
Plug-in hybrid vehicle ..................................................6-4
If you have a flat tire ......................................................6-20
If you have a flat tire while driving ..................................6-3
Impact sensing door unlock ............................................3-12
Improtant safety precautions.............................................2-2 Air bag hazards ............................................................2-2
Always wear your seat belt ..........................................2-2
Control your speed .......................................................2-3
Driver distraction..........................................................2-2
Keep your vehicle in safe condition.............................2-3
Restrain all children .....................................................2-2
In case of emergency while driving..................................6-2
Indicator light..................................................................3-62
Inside rearview mirror ....................................................3-18 Instrument cluster ...........................................................3-54
Gauges and meters .....................................................3-56
Gear shift indicator .....................................................3-61
Icy road warning light ................................................3-75
Instrument panel illumination ....................................3-56
LCD display control ...................................................3-88
LCD display messages ...............................................3-73
LCD modes (for cluster type A).................................3-90
LCD modes (for cluster type B).................................3-98
Shift indicator pop-up ................................................3-62
Warning and indicator lights ......................................3-62
Instrument panel fuse replacement .................................7-50
Interior care .....................................................................7-7\
1
Interior features Bottle holder .............................................................3-152
Cargo security screen ...............................................3-159
Clock ........................................................................\
3-157
Clothes hanger ..........................................................3-157
Cup holder ................................................................3-152
Floor mat anchor(s) ..................................................3-158
Mobile phone charging system ................................3-155
Power outlet..............................................................3-153
Sunvisor ....................................................................3-15\
3
USB charger .............................................................3-154
Wireless cellular phone charging system .................3-155
Interior lamp AUTO cut................................................3-124
I
Index
I