Page 424 of 603

6-23
What to do in an emergency
6
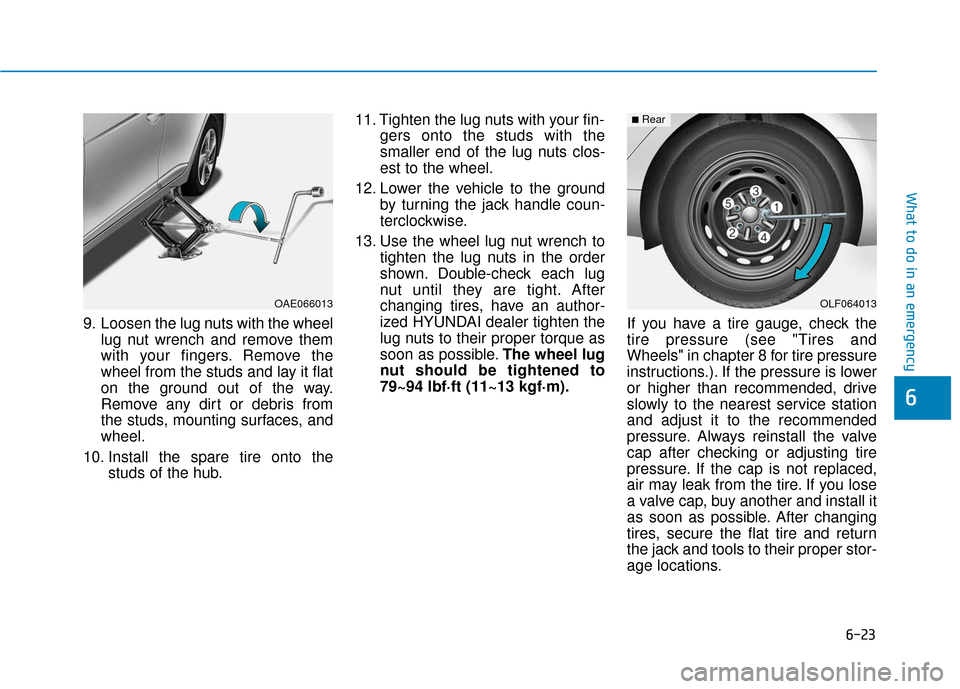
9. Loosen the lug nuts with the wheellug nut wrench and remove them
with your fingers. Remove the
wheel from the studs and lay it flat
on the ground out of the way.
Remove any dirt or debris from
the studs, mounting surfaces, and
wheel.
10. Install the spare tire onto the studs of the hub. 11. Tighten the lug nuts with your fin-
gers onto the studs with the
smaller end of the lug nuts clos-
est to the wheel.
12. Lower the vehicle to the ground by turning the jack handle coun-
terclockwise.
13. Use the wheel lug nut wrench to tighten the lug nuts in the order
shown. Double-check each lug
nut until they are tight. After
changing tires, have an author-
ized HYUNDAI dealer tighten the
lug nuts to their proper torque as
soon as possible. The wheel lug
nut should be tightened to
79~94 lbf·ft (11~13 kgf·m). If you have a tire gauge, check the
tire pressure (see "Tires and
Wheels" in chapter 8 for tire pressure
instructions.). If the pressure is lower
or higher than recommended, drive
slowly to the nearest service station
and adjust it to the recommended
pressure. Always reinstall the valve
cap after checking or adjusting tire
pressure. If the cap is not replaced,
air may leak from the tire. If you lose
a valve cap, buy another and install it
as soon as possible. After changing
tires, secure the flat tire and return
the jack and tools to their proper stor-
age locations.
OAE066013OLF064013
■Rear
Page 425 of 603

6-24
What to do in an emergency
Check the tire pressure as soon
as possible after installing a spare
tire. Adjust it to the recommended
pressure.
If any of the equipment such as the
jack, lug nuts, studs, or other equip-
ment is damaged or in poor condi-
tion, do not attempt to change the
tire and call for assistance.
Use of compact spare tires
(if equipped)
Compact spare tires are designed for
emergency use only. Drive carefully
on the compact spare tire and
always follow the safety precautions. When driving with the compact spare
tire mounted to your vehicle:
Check the tire pressure after
installing the compact spare tire.
The compact spare tire should be
inflated to 60 psi (420 kPa).
Do not take this vehicle through an automatic car wash while the com-
pact spare tire is installed.
Do not use the compact spare tire on any other vehicle because this
tire has been designed especially
for your vehicle.
The compact spare tire’s tread life is shorter than a regular tire.
Inspect your compact spare tire
regularly and replace worn com-
pact spare tires with the same size
and design, mounted on the same
wheel.
Do not use more than one compact spare tire at a time.
NOTICE
Your vehicle has metric threads
on the studs and lug nuts. Make
certain during tire changing
that the same nuts that were
removed are reinstalled. If you
have to replace your lug nuts
make sure they have metric
threads to avoid damaging the
studs and ensure the wheel is
properly secured to the hub.
Consult an authorized
HYUNDAI dealer for assistance.
CAUTION
To prevent compact spare tire
failure and loss of control pos-
sibly resulting in an accident:
Use the compact spare tire
only in an emergency.
NEVER operate your vehicle
over 50 mph (80 km/h).
Do not exceed the vehicle's
maximum load rating or the
load carrying capacity shown
on the sidewall of the com-
pact spare tire.
Do not use the compact spare
tire continuously. Repair or
replace the original tire as
soon as possible to avoid fail-
ure of the compact spare tire.
WARNING
Page 431 of 603
6-30
What to do in an emergency
5. Unscrew the valve cap from the valve of the defective wheel and
screw the filling hose (3) of the
sealant bottle onto the valve.
6. Ensure that the compressor is switched OFF. 7. Plug the compressor power cord
(4) into the vehicle power outlet.
8. With the vehicle ON ( indica- tor ON), switch on the compressor
and let it run for approximately
5~7 minutes to fill the sealant up
to proper pressure. (refer to the
Tire and Wheels, chapter 8). The
inflation pressure of the tire after
filling is unimportant and will be
checked/corrected later.
Be careful not to overinflate the
tire and stay away from the tire
when filling it.
OAEPH067016
Securely install the sealant fill-
ing hose to the valve. If not,
sealant may flow backward,
possibly clogging the filling
hose.
CAUTION
OAE066027
OAE067040
Page 438 of 603
6-37
What to do in an emergency
6
4. Unscrew the valve cap from thevalve of the defective wheel and
screw the filling hose (3) of the
sealant bottle onto the valve. 5. Plug the compressor power cord
(4) into the vehicle power outlet.
6. With the vehicle ON ( indica- tor ON), switch on the compressor
and let it run for approximately
5~7 minutes to fill the sealant up
to proper pressure. (refer to the
Tire and Wheels, chapter 8). The
inflation pressure of the tire after
filling is unimportant and will be
checked/corrected later.
Be careful not to overinflate the
tire and stay away from the tire
when filling it.
OAE067040OAEPH067016
Securely install the sealant fill-
ing hose to the valve. If not,
sealant may flow backward,
possibly clogging the filling
hose.
CAUTION
OAE066027
Page 442 of 603
6-41
What to do in an emergency
6
When towing your vehicle in an
emergency without wheel dollies :
1. Place the Engine Start/Stop but-ton in the ACC position.
2. Place the shift lever in N (Neutral).
3. Release the parking brake.Removable Towing Hook
1. Open the liftgate, and take the towing hooks out from the tool
case.
2. Remove the hole cover by press-ing the lower part of the cover on
the front or rear bumper.
3. Install the towing hook by turning it clockwise into the hole until it is
fully secured.
4. Remove the towing hook and install the cover after use.
Failure to place the transmis-
sion shift lever in N (Neutral)
may cause internal damage to
the transmission.
CAUTION
OAE066021N
OAE066022N
OAE066028N
■Front
■Rear
Page 443 of 603

6-42
What to do in an emergency
Emergency Towing
(if equipped)
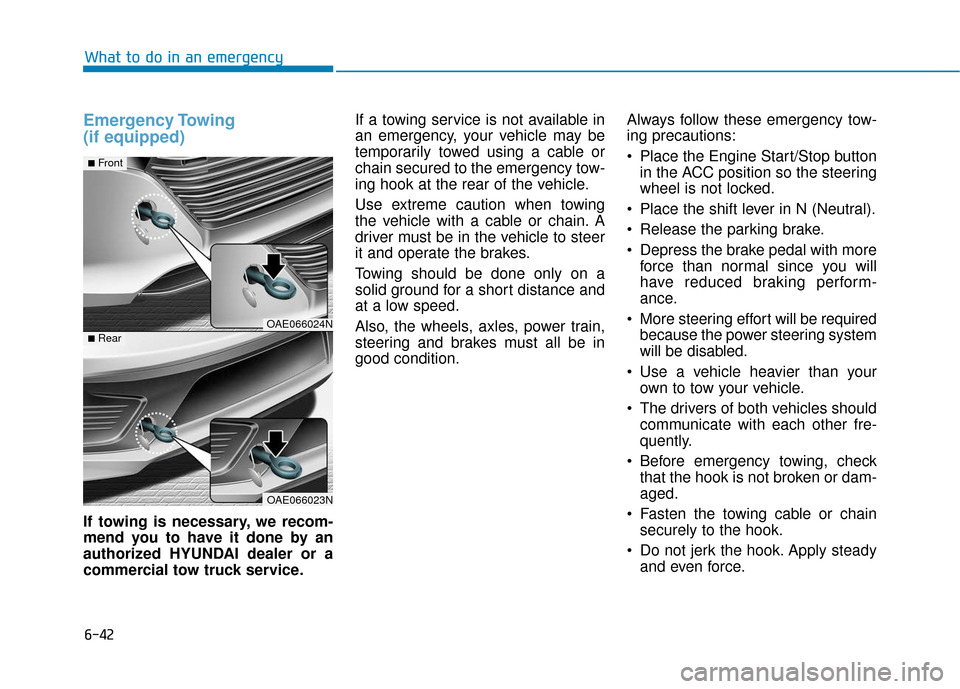
If towing is necessary, we recom-
mend you to have it done by an
authorized HYUNDAI dealer or a
commercial tow truck service.If a towing service is not available in
an emergency, your vehicle may be
temporarily towed using a cable or
chain secured to the emergency tow-
ing hook at the rear of the vehicle.
Use extreme caution when towing
the vehicle with a cable or chain. A
driver must be in the vehicle to steer
it and operate the brakes.
Towing should be done only on a
solid ground for a short distance and
at a low speed.
Also, the wheels, axles, power train,
steering and brakes must all be in
good condition.
Always follow these emergency tow-
ing precautions:
Place the Engine Start/Stop button
in the ACC position so the steering
wheel is not locked.
Place the shift lever in N (Neutral).
Release the parking brake.
Depress the brake pedal with more force than normal since you will
have reduced braking perform-
ance.
More steering effort will be required because the power steering system
will be disabled.
Use a vehicle heavier than your own to tow your vehicle.
The drivers of both vehicles should communicate with each other fre-
quently.
Before emergency towing, check that the hook is not broken or dam-
aged.
Fasten the towing cable or chain securely to the hook.
Do not jerk the hook. Apply steady and even force.
OAE066024N
OAE066023N
■Front
■Rear
Page 465 of 603
7-20
Maintenance
The electric motor for the cooling fan
is controlled by engine coolant tem-
perature, refrigerant pressure and
vehicle speed. As the engine coolant
temperature decreases, the electric
motor will automatically shut off. This
is a normal condition. If your vehicle
is equipped with GDI, the electric
motor for the cooling fan may begin
to operate at any time and continue
to operate until you disconnect the
negative battery cable. Make sure the coolant cap is
properly closed after refilling
coolant. Otherwise the engine
could be overheated while driv-
ing.
1. Check if the coolant cap label
is straight In front.
(Continued)
WARNING
OTL075062
■Engine room front view
(Continued)
2. Make sure that the tiny pro-
trusions inside the coolant
cap is securely interlocked.
OAE076050
■Engine compartment rear view
Page 469 of 603
7-24
Maintenance
P
PA
A R
RK
K I
IN
N G
G
B
B R
RA
A K
KE
E
Checking the Parking Brake
Check whether the stroke is within
specification when the parking brake
pedal is depressed with 44 lb (20 kg,
196 N) of force. Also, the parking
brake alone should securely hold the
vehicle on a fairly steep grade. If the
stroke is more or less than specified,
have the parking brake adjusted by
an authorized HYUNDAI dealer.
Stroke : 4~5 notch
Filter Replacement
The air cleaner filter can be cleaned
for inspection using compressed air.
Do not attempt to wash or to rinse it,
as water will damage the filter.
If soiled, the air cleaner filter must be
replaced. 1. Loosen the air cleaner cover
attaching clips and open the
cover.
OAE056014
A
AI
IR
R
C
C L
LE
E A
A N
N E
ER
R
OAEPH076010
OAEPH076011