Page 447 of 603
7
Wheel Replacement ........................................................7-39
Tire Traction .....................................................................7-3\
9
Tire Maintenance ............................................................7-40
Tire Sidewall Labeling ....................................................7-40
Tire Terminology and Definitions................................7-44
All Season Tires ...............................................................7-47
Summer Tires ...................................................................7-47
Snow Tires ........................................................................\
7-47
Radial-Ply Tires ...............................................................7-47
Low Aspect Ratio Tires..................................................7-48
Fuses ......................................................................7-\
49
Instrument Panel Fuse Replacement..........................7-50
Engine Compartment Panel Fuse Replacement.......7-51
Fuse/Relay Panel Description ......................................7-53
Light Bulbs ............................................................7-55
Headlamp, Parking Lamp, Turn Signal Lamp
and Side Marker ..............................................................7-55
Daytime Running Light (DRL).......................................7-60
Side Repeater Lamp Replacement ..............................7-61
Rear Combination Light Bulb Replacement ..............7-61
High Mounted Stop Lamp Replacement ....................7-64
License Plate Light Bulb Replacement ......................7-65
Interior Light Bulb Replacement .................................7-65
Appearance Care..................................................7-67
Exterior Care ....................................................................7-67\
Interior Care .....................................................................7-7\
1
Emission Control System ....................................7-74
Crankcase Emission Control System ..........................7-74
Evaporative Emission Control System Including
Onboard Refueling Vapor Recovery (ORVR)............7-74
Exhaust Emission Control System ..............................7-75
California Perchlorate Notice.............................7-78
Page 453 of 603
7-8
Maintenance
At least monthly:
Check coolant level in the enginecoolant reservoir.
Check the operation of all exterior lights, including the brake lights,
turn signals and hazard warning
flashers.
Check the inflation pressures of all tires including the spare for tires
that are worn, show uneven wear,
or are damaged.
Check for loose wheel lug nuts.
At least twice a year: (i.e., every Spring and Fall)
Check radiator, heater and air con-
ditioning hoses for leaks or dam-
age.
Check windshield washer spray and wiper operation. Clean wiper
blades with a clean cloth damp-
ened with washer fluid.
Check headlamp alignment.
Check muffler, exhaust pipes, shields and clamps.
Check the seat belts for wear and function.
At least once a year:
Clean body and door drain holes.
Lubricate door hinges and hoodhinges.
Lubricate door and hood locks and latches.
Lubricate door rubber weather strips.
Lubricate door checker.
Check the air conditioning system.
Inspect and lubricate transmission linkage and controls.
Clean the battery and terminals.
Check the brake fluid level. Follow Normal Maintenance Schedule
if the vehicle is usually operated where
none of the following conditions apply.
If any of the following conditions apply,
you must follow the Maintenance
Under Severe Usage Conditions.
Repeated short distance driving.
Driving in dusty conditions or
sandy areas.
Extensive use of brakes.
Driving in areas where salt or other corrosive materials are used.
Driving on rough or muddy roads.
Driving in mountainous areas.
Extended periods of idling or low speed operation.
Driving for a prolonged period in cold temperatures and/or extreme-
ly humid climates.
More than 50% driving in heavy city traffic during hot weather
above 90°F (32°C).
For additional information or assis-
tance see your authorized HYUNDAI
dealer.
S S C
C H
H E
ED
D U
U L
LE
E D
D
M
M A
AI
IN
N T
TE
EN
N A
AN
N C
CE
E
S
S E
E R
R V
V I
IC
C E
E S
S
Page 500 of 603
7-55
7
Maintenance
L
LI
IG
G H
H T
T
B
B U
U L
LB
B S
S
Consult an authorized HYUNDAI
dealer to replace most vehicle light
bulbs. It is difficult to replace vehicle
light bulbs because other parts of the
vehicle must be removed before you
can get to the bulb. This is especially
true for removing the headlamp
assembly to get to the bulb(s).
Removing/installing the headlamp
assembly can result in damage to
the vehicle.
Information
After heavy driving rain or washing,
lamps could appear frosty. This condi-
tion is caused by the temperature dif-
ference between the lamp inside and
the outside temperature. This is simi-
lar to the condensation on your win-
dows inside your vehicle when raining
and doesn 't indicate a problem with
your vehicle. If the water leaks into
the lamp bulb circuitry, have your
vehicle checked by an authorized
HYUNDAI dealer.
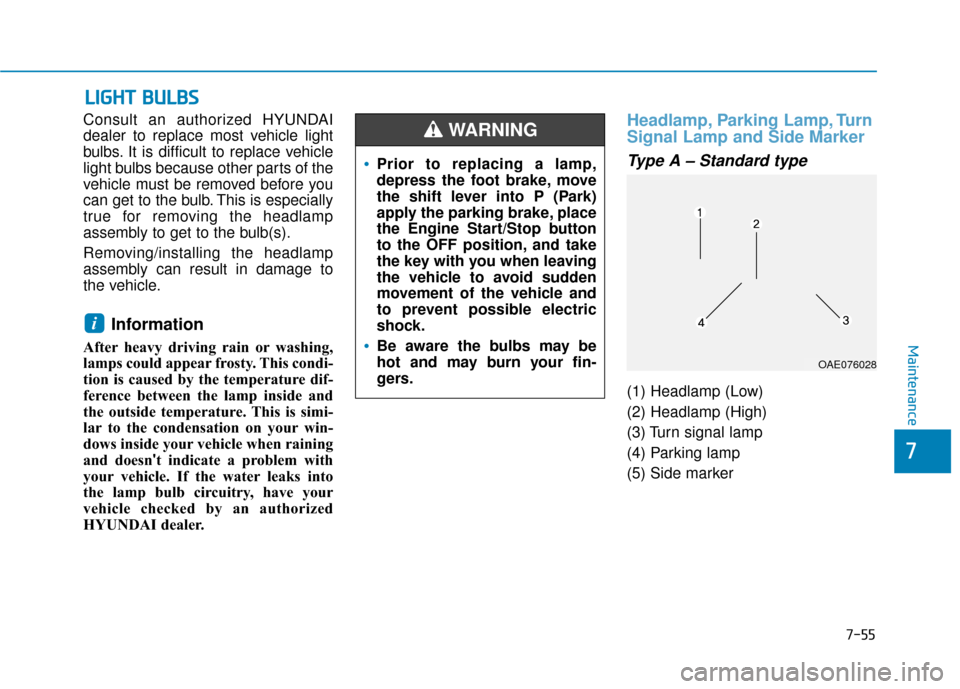
Headlamp, Parking Lamp, Turn
Signal Lamp and Side Marker
Type A – Standard type
(1) Headlamp (Low)
(2) Headlamp (High)
(3) Turn signal lamp
(4) Parking lamp
(5) Side marker
i
Prior to replacing a lamp,
depress the foot brake, move
the shift lever into P (Park)
apply the parking brake, place
the Engine Start/Stop button
to the OFF position, and take
the key with you when leaving
the vehicle to avoid sudden
movement of the vehicle and
to prevent possible electric
shock.
Be aware the bulbs may be
hot and may burn your fin-
gers.
WARNING
OAE076028
Page 502 of 603
7-57
7
Maintenance
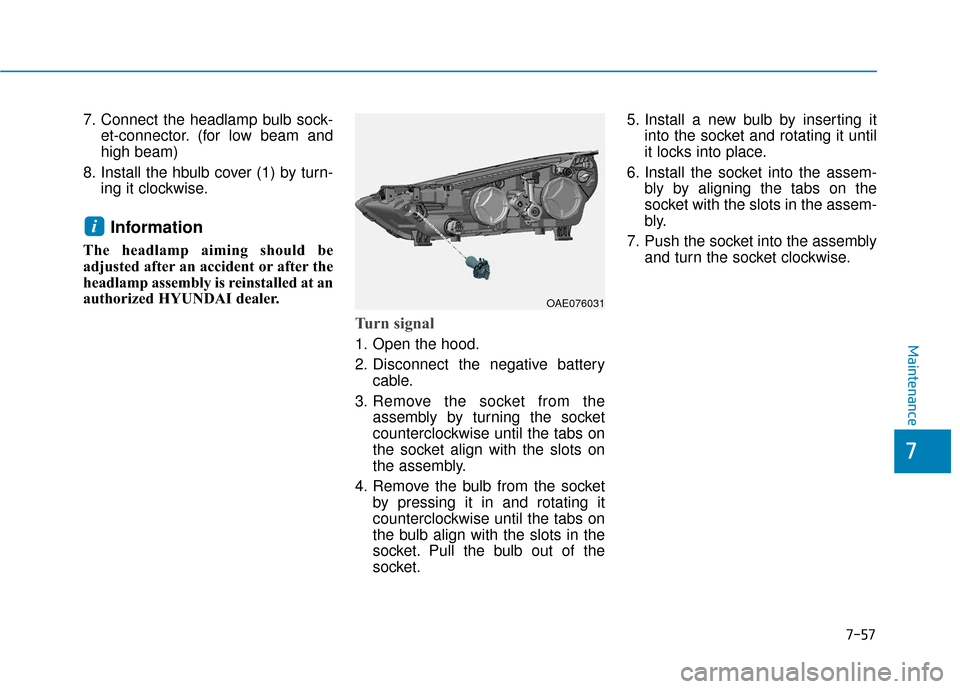
7. Connect the headlamp bulb sock-et-connector. (for low beam and
high beam)
8. Install the hbulb cover (1) by turn- ing it clockwise.
Information
The headlamp aiming should be
adjusted after an accident or after the
headlamp assembly is reinstalled at an
authorized HYUNDAI dealer.
Turn signal
1. Open the hood.
2. Disconnect the negative batterycable.
3. Remove the socket from the assembly by turning the socket
counterclockwise until the tabs on
the socket align with the slots on
the assembly.
4. Remove the bulb from the socket by pressing it in and rotating it
counterclockwise until the tabs on
the bulb align with the slots in the
socket. Pull the bulb out of the
socket. 5. Install a new bulb by inserting it
into the socket and rotating it until
it locks into place.
6. Install the socket into the assem- bly by aligning the tabs on the
socket with the slots in the assem-
bly.
7. Push the socket into the assembly and turn the socket clockwise.
i
OAE076031
Page 503 of 603
7-58
Maintenance
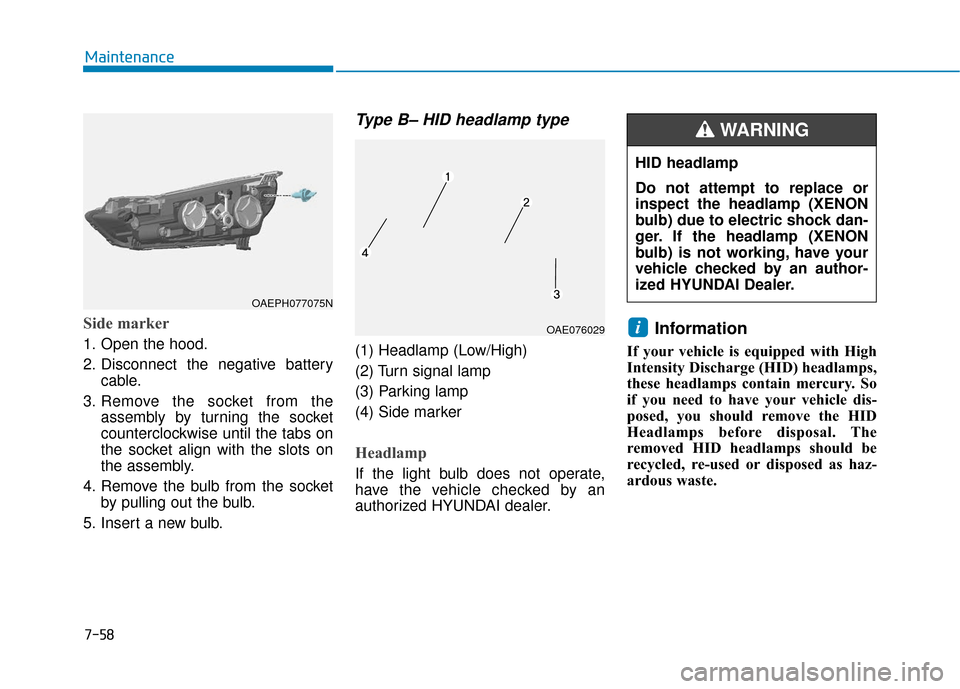
Side marker
1. Open the hood.
2. Disconnect the negative batterycable.
3. Remove the socket from the assembly by turning the socket
counterclockwise until the tabs on
the socket align with the slots on
the assembly.
4. Remove the bulb from the socket by pulling out the bulb.
5. Insert a new bulb.
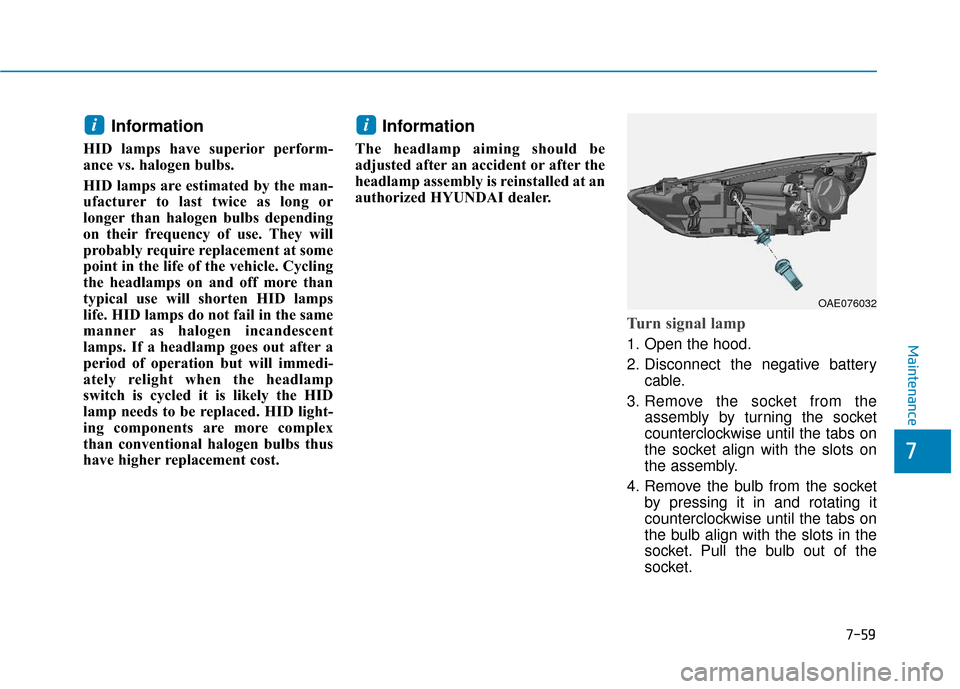
Type B– HID headlamp type
(1) Headlamp (Low/High)
(2) Turn signal lamp
(3) Parking lamp
(4) Side marker
Headlamp
If the light bulb does not operate,
have the vehicle checked by an
authorized HYUNDAI dealer.
Information
If your vehicle is equipped with High
Intensity Discharge (HID) headlamps,
these headlamps contain mercury. So
if you need to have your vehicle dis-
posed, you should remove the HID
Headlamps before disposal. The
removed HID headlamps should be
recycled, re-used or disposed as haz-
ardous waste.
iOAE076029
HID headlamp
Do not attempt to replace or
inspect the headlamp (XENON
bulb) due to electric shock dan-
ger. If the headlamp (XENON
bulb) is not working, have your
vehicle checked by an author-
ized HYUNDAI Dealer.
WARNING
OAEPH077075N
Page 504 of 603
7-59
7
Maintenance
Information
HID lamps have superior perform-
ance vs. halogen bulbs.
HID lamps are estimated by the man-
ufacturer to last twice as long or
longer than halogen bulbs depending
on their frequency of use. They will
probably require replacement at some
point in the life of the vehicle. Cycling
the headlamps on and off more than
typical use will shorten HID lamps
life. HID lamps do not fail in the same
manner as halogen incandescent
lamps. If a headlamp goes out after a
period of operation but will immedi-
ately relight when the headlamp
switch is cycled it is likely the HID
lamp needs to be replaced. HID light-
ing components are more complex
than conventional halogen bulbs thus
have higher replacement cost.
Information
The headlamp aiming should be
adjusted after an accident or after the
headlamp assembly is reinstalled at an
authorized HYUNDAI dealer.
Turn signal lamp
1. Open the hood.
2. Disconnect the negative batterycable.
3. Remove the socket from the assembly by turning the socket
counterclockwise until the tabs on
the socket align with the slots on
the assembly.
4. Remove the bulb from the socket by pressing it in and rotating it
counterclockwise until the tabs on
the bulb align with the slots in the
socket. Pull the bulb out of the
socket.
ii
OAE076032
Page 506 of 603
7-61
7
Maintenance
Side Repeater Lamp
Replacement
Your vehicle is equipped with LED
lamps. LED lamps do not have
replaceable bulbs. If the LED lamp
does not operate, have the vehicle
checked by an authorized HYUNDAI
dealer.
Rear Combination Light Bulb
Replacement
Type A
(1) Tail/Stop lamp
(2) Turn signal lamp
(3) Tail lamp
(4) Back-up lamp
(5) Side marker
Tail/Stop lamp, turn signal lamp
and side marker lamp
1. Open the liftgate.
2. Open the lamp assembly retainingscrew covers.
3. Loosen the lamp assembly retain- ing screws with a cross-tip screw-
driver.OAE077035N
OAE076037
OAE076034
Page 507 of 603
7-62
Maintenance
4. Remove the rear combination lamp assembly from the body of
the vehicle.
5. Remove the socket from theassembly by turning the socket
counterclockwise until the tabs on
the socket align with the slots on
the assembly. 6. Remove the bulb from the socket
by pressing it in and rotating it
counterclockwise until the tabs on
the bulb align with the slots in the
socket. Pull the bulb out of the
socket.
7. Insert a new bulb by inserting it into the socket and rotating it until
it locks into place.
8. Install the socket into the assem- bly by aligning the tabs on the
socket with the slots in the assem-
bly. Push the socket into the
assembly and turn the socket
clockwise.
9. Reinstall the lamp assembly to the body of the vehicle.
OAE076039
OTLA075071
Turn signal lamp
Tail/Stop lamp
Side marker
OAE076038