2019 Hyundai Ioniq Hybrid BATTERY CHARGE
[x] Cancel search: BATTERY CHARGEPage 216 of 603
3-124
Convenient features of your vehicle
Interior Lights
Do not use the interior lights for
extended periods when the vehi-
cle is turned off or the battery will
discharge.
Interior lamp AUTO cut
The interior lamps will automatically
go off approximately 20 minutes after
the vehicle is turned off and the
doors are closed. If a door is opened,
the lamp will go off 40 minutes after
the vehicle is turned off. If the doors
are locked by the smart key and the
vehicle enters the armed stage of the
theft alarm system, the lamps will go
off five seconds later.
Front lamps
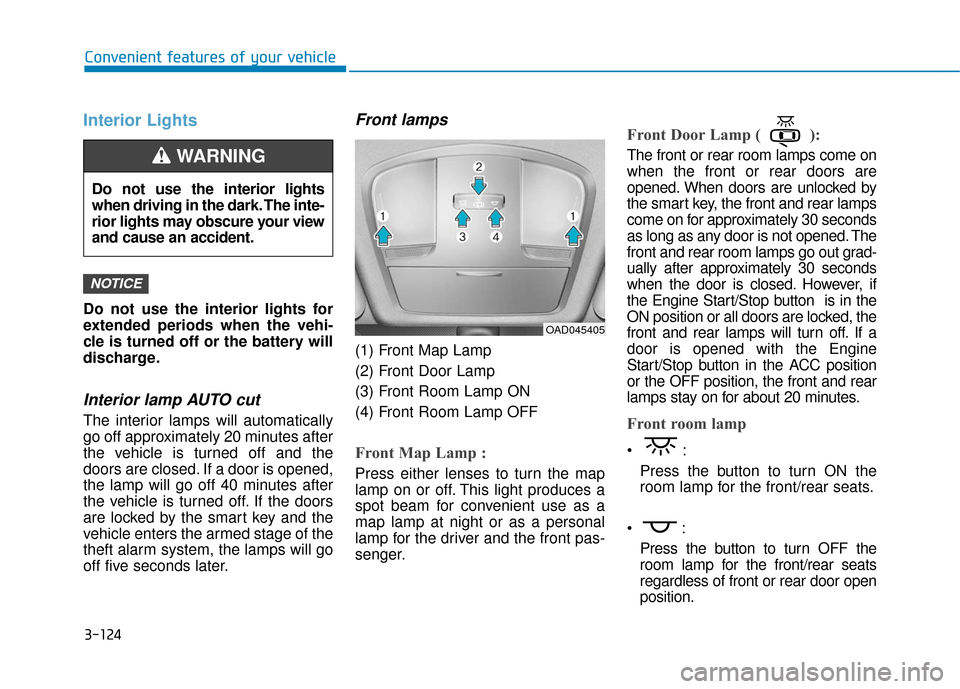
(1) Front Map Lamp
(2) Front Door Lamp
(3) Front Room Lamp ON
(4) Front Room Lamp OFF
Front Map Lamp :
Press either lenses to turn the map
lamp on or off. This light produces a
spot beam for convenient use as a
map lamp at night or as a personal
lamp for the driver and the front pas-
senger.
Front Door Lamp ( ):
The front or rear room lamps come on
when the front or rear doors are
opened. When doors are unlocked by
the smart key, the front and rear lamps
come on for approximately 30 seconds
as long as any door is not opened. The
front and rear room lamps go out grad-
ually after approximately 30 seconds
when the door is closed. However, if
the Engine Start/Stop button is in the
ON position or all doors are locked, the
front and rear lamps will turn off. If a
door is opened with the Engine
Start/Stop button in the ACC position
or the OFF position, the front and rear
lamps stay on for about 20 minutes.
Front room lamp
Press the button to turn ON the
room lamp for the front/rear seats.
Press the button to turn OFF the
room lamp for the front/rear seats
regardless of front or rear door open
position.
NOTICE
Do not use the interior lights
when driving in the dark. The inte-
rior lights may obscure your view
and cause an accident.
WARNING
OAD045405
Page 217 of 603
3-125
Convenient features of your vehicle
3
Rear lamp
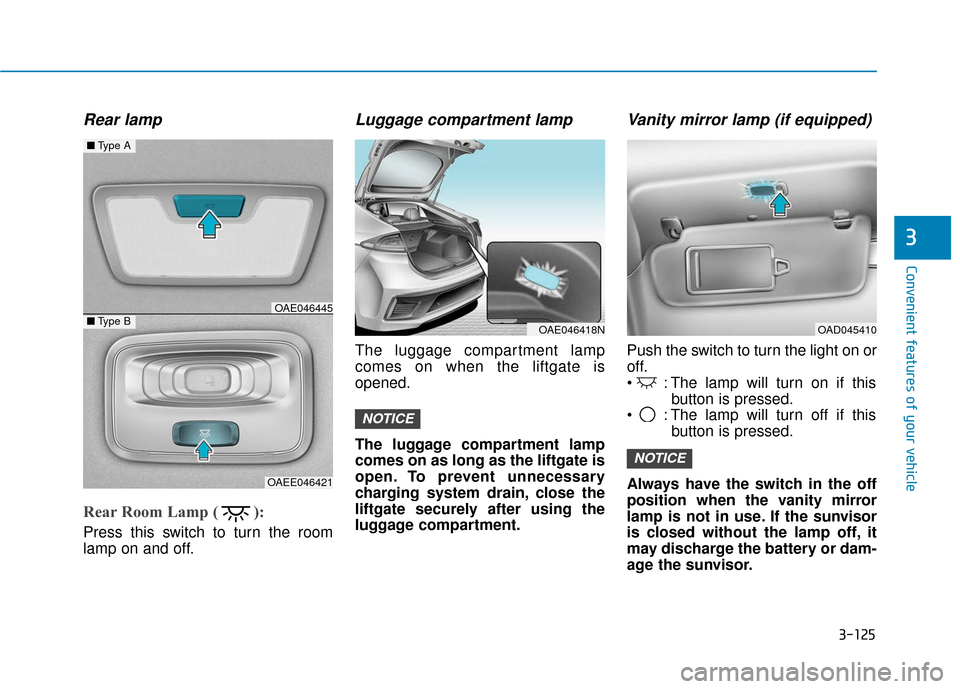
Rear Room Lamp ( ):
Press this switch to turn the room
lamp on and off.
Luggage compartment lamp
The luggage compartment lamp
comes on when the liftgate is
opened.
The luggage compartment lamp
comes on as long as the liftgate is
open. To prevent unnecessary
charging system drain, close the
liftgate securely after using the
luggage compartment.
Vanity mirror lamp (if equipped)
Push the switch to turn the light on or
off.
: The lamp will turn on if thisbutton is pressed.
: The lamp will turn off if this button is pressed.
Always have the switch in the off
position when the vanity mirror
lamp is not in use. If the sunvisor
is closed without the lamp off, it
may discharge the battery or dam-
age the sunvisor.
NOTICE
NOTICE
■ Type A
■Type BOAE046445
OAEE046421
OAE046418NOAD045410
Page 230 of 603
3-138
Convenient features of your vehicle
Temperature control
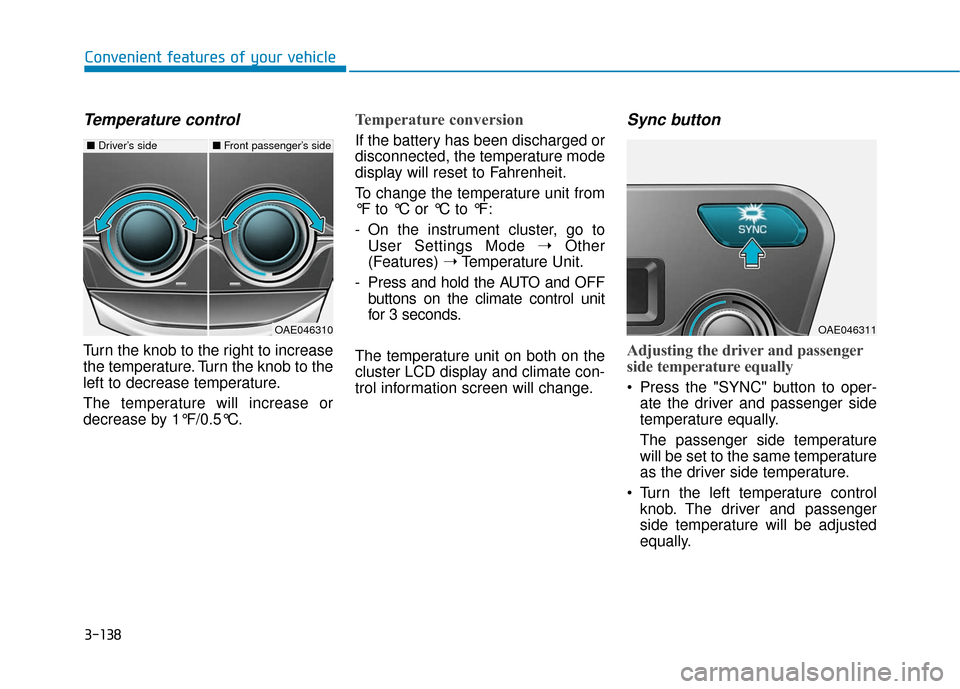
Turn the knob to the right to increase
the temperature. Turn the knob to the
left to decrease temperature.
The temperature will increase or
decrease by 1°F/0.5°C.
Temperature conversion
If the battery has been discharged or
disconnected, the temperature mode
display will reset to Fahrenheit.
To change the temperature unit from
°F to °C or °C to °F:
- On the instrument cluster, go toUser Settings Mode ➝ Other
(Features) ➝Temperature Unit.
- Press and hold the AUTO and OFF buttons on the climate control unit
for 3 seconds.
The temperature unit on both on the
cluster LCD display and climate con-
trol information screen will change.
Sync button
Adjusting the driver and passenger
side temperature equally
Press the "SYNC" button to oper- ate the driver and passenger side
temperature equally.
The passenger side temperature
will be set to the same temperature
as the driver side temperature.
Turn the left temperature control knob. The driver and passenger
side temperature will be adjusted
equally.
■ Driver’s side■Front passenger’s side
OAE046310OAE046311
Page 238 of 603
3-146
Convenient features of your vehicle
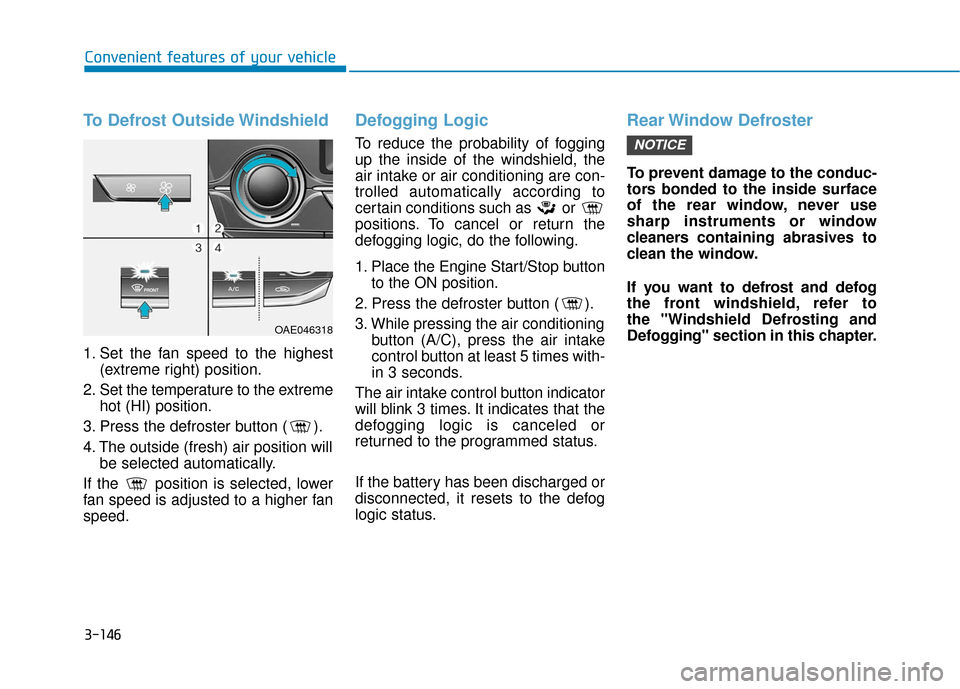
To Defrost Outside Windshield
1. Set the fan speed to the highest(extreme right) position.
2. Set the temperature to the extreme hot (HI) position.
3. Press the defroster button ( ).
4. The outside (fresh) air position will be selected automatically.
If the position is selected, lower
fan speed is adjusted to a higher fan
speed.
Defogging Logic
To reduce the probability of fogging
up the inside of the windshield, the
air intake or air conditioning are con-
trolled automatically according to
certain conditions such as or
positions. To cancel or return the
defogging logic, do the following.
1. Place the Engine Start/Stop button to the ON position.
2. Press the defroster button ( ).
3. While pressing the air conditioning button (A/C), press the air intake
control button at least 5 times with-
in 3 seconds.
The air intake control button indicator
will blink 3 times. It indicates that the
defogging logic is canceled or
returned to the programmed status.
If the battery has been discharged or
disconnected, it resets to the defog
logic status.
Rear Window Defroster
To prevent damage to the conduc-
tors bonded to the inside surface
of the rear window, never use
sharp instruments or window
cleaners containing abrasives to
clean the window.
If you want to defrost and defog
the front windshield, refer to
the "Windshield Defrosting and
Defogging" section in this chapter.
NOTICE
OAE046318
Page 246 of 603

3-154
Convenient features of your vehicle
To prevent damage to the Power
Outlets :
Use the power outlet only when the vehicle is in the ready ( )
mode and remove the accessory
plug after use. Using the acces-
sory plug for prolonged periods
of time with the vehicle off could
cause the battery to discharge.
Only use 12V electric acces- sories which are less than 180 W
(Watts) in electric capacity.
Adjust the air-conditioner or heater to the lowest operating
level when using the power outlet.
Close the cover when not in use. (Continued)(Continued)
Some electronic devices can
cause electronic interference
when plugged into a vehicle’s
power outlet. These devices may
cause excessive audio static
and malfunctions in other elec-
tronic systems or devices used
in your vehicle.
Push the plug in as far as it will go. If good contact is not made,
the plug may overheat and the
fuse may open.
Plug in battery equipped electri- cal/electronic devices with
reverse current protection. The
current from the battery may
flow into the vehicle’s electri-
cal/electronic system and cause
system malfunction.
USB Charger (if equipped)
The USB charger is located inside
the console box between the driver's
seat and the front passenger's seat.
Insert the USB charger into the USB
port, and re-charge a smart phone or
a tablet PC.
A charging status/charging comple-
tion message will be displayed on
the screen of your device.
Your device may get warm during the
re-charging process. This does not
indicate any malfunction with the
charging system.
NOTICE
OAE046427
Page 267 of 603
4-15
Multimedia System
4
Information
Turn on the car ignition before using
this device. Do not operate the audio
system for long periods of time with
the ignition turned off as such opera-
tions may lead to battery discharge. Do not subject the device to
severe shock or impact. Direct
pressure onto the front side of
the monitor may cause damage
to the LCD or touch screen.
When cleaning the device, make sure to turn off the device and
use a dry and smooth cloth.
Never use rough materials,
chemical cloths, or solvents
(alcohol, benzene, thinners,
etc.). As such materials may
damage the device panel or
cause color/quality deteriora-
tion.
Do not place beverages close to the audio system. Spilling bever-
ages may lead to system mal-
function.
Placing the audio system within an electromagnetic environment
may result in noise interference.
Information
In this case of product malfunction,
please contact your dealer or vehicle
service center.
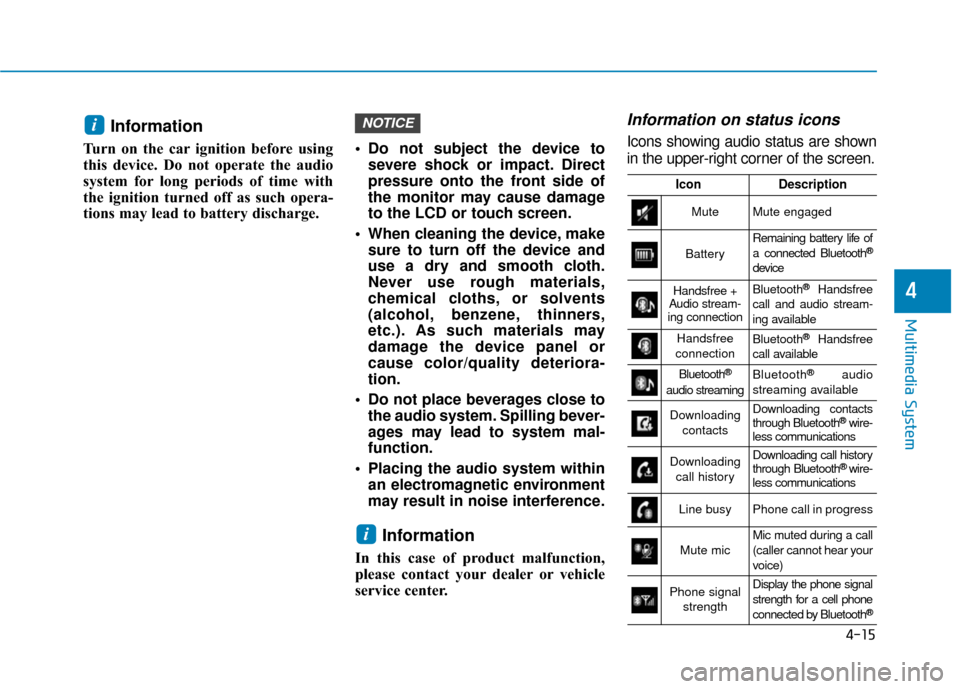
Information on status icons
Icons showing audio status are shown
in the upper-right corner of the screen.
i
NOTICEi
IconDescription
MuteMute engaged
Battery
Remaining battery life of
a connected Bluetooth®
device
Handsfree +
Audio stream-
ing connectionBluetooth®Handsfree
call and audio stream-
ing available
Handsfree
connectionBluetooth®Handsfree
call available
Bluetooth®
audio streaming
Bluetooth®audio
streaming available
Downloading contactsDownloading contacts
through Bluetooth®wire-
less communications
Downloading
call historyDownloading call history
through Bluetooth® wire-
less communications
Line busyPhone call in progress
Mute micMic muted during a call
(caller cannot hear your
voice)
Phone signal
strengthDisplay the phone signal
strength for a cell phone
connected by Bluetooth
®
Page 276 of 603
![Hyundai Ioniq Hybrid 2019 Owners Manual 4-24
Multimedia System
(4) Save: Save the selected file(s)
.
- Select the files you want to save, and select [Save]. This saves the
selected files to My Music.
- Saving is canceled if phone calls are Hyundai Ioniq Hybrid 2019 Owners Manual 4-24
Multimedia System
(4) Save: Save the selected file(s)
.
- Select the files you want to save, and select [Save]. This saves the
selected files to My Music.
- Saving is canceled if phone calls are](/manual-img/35/14928/w960_14928-275.png)
4-24
Multimedia System
(4) Save: Save the selected file(s)
.
- Select the files you want to save, and select [Save]. This saves the
selected files to My Music.
- Saving is canceled if phone calls are received or made while saving.
- If Siri is activated, phone calls are received or made while sav-
ing, saving will be canceled.
- Up to 6,000 files can be saved.
- The currently playing file on the USB device cannot be changed
while saving.
- My Music cannot be used while saving.
- Up to 700 MB can be saved.
Information: Detailed information on the currently playing song is dis-
played.
Sound Settings: Audio sound set- tings can be changed.Information
-
Using the iPod®Devices
• To use the audio system’s iPod
®con-
trol function, use the dedicated
cable provided with your iPod
®.
• Connecting the iPod
®to the vehicle
during play may result in a loud
noise that lasts about one to two sec-
onds. Connect the iPod
®to the vehi-
cle after stopping or pausing play.
• Connect the iPod
®with the vehicle in
the ACC ON state to begin charging.
• When connecting the iPod
®cable,
be sure to fully push the cable into
the port.
• When EQ effects are enabled simul- taneously on external devices, such
as iPod
®s and the audio system, the
EQ effects may overlap, causing
sound quality deterioration or dis-
tortion. Deactivate the EQ function
for all external devices, if possible.
• Noise may occur when your iPod
®
or the AUX port is connected.
Disconnect and store separately
when not in use. (Continued)(Continued)
• There may be noise if the audio sys-
tem is used with an iPod
®or AUX
external device connected to the
power jack. In these cases, discon-
nect the iPod
®or external device
from the power jack.
• Play may be interrupted, or device malfunctions may occur depending
on the characteristics of your
iPod
®/iPhone®.
• Play may fail if your iPhone
®is con-
nected through both Bluetooth®
Wireless Technology and USB. In
this case, select Dock connector or
Bluetooth
®Wireless Technology on
your iPhone®to change the sound
output settings.
• If your software version does not support the communication proto-
col or your iPod
®is not recognized
due to device failure, anomalies or
defects, iPod
®mode cannot be used.
• iPod
®nano (5th generation) devices
may not be recognized if the battery
is low. Charge sufficiently before use.
(Continued)
i
Page 320 of 603
5-24
Driving your vehicle
Do not depress the brake pedal
continuously without the " "
indicator ON. The battery may be
discharged.
Some noise and vibration may occur during braking. This is
normal.
In below cases, some electric brake pump noise and motor
vibration may occur temporarily.
This is normal operation.
- When the pedal is depressedvery quickly
- When the pedal is depressed multiple times in short inter-
vals
- When the ABS function is acti- vated during braking
Disc Brake Wear Indicator
When your brake pads are worn and
new pads are required, you will hear
a high pitched warning sound from
your front or rear brakes. You may
hear this sound come and go or it
may occur whenever you depress
the brake pedal.
Note that some driving conditions or
climates may cause a brake squeal
when you first apply (or lightly apply)
the brakes. This is normal and does
not indicate a problem with your
brakes.
To avoid costly brake repairs, do
not continue to drive with worn
brake pads.
Information
Always replace brake pads as com-
plete front or rear axle sets.
Parking Brake
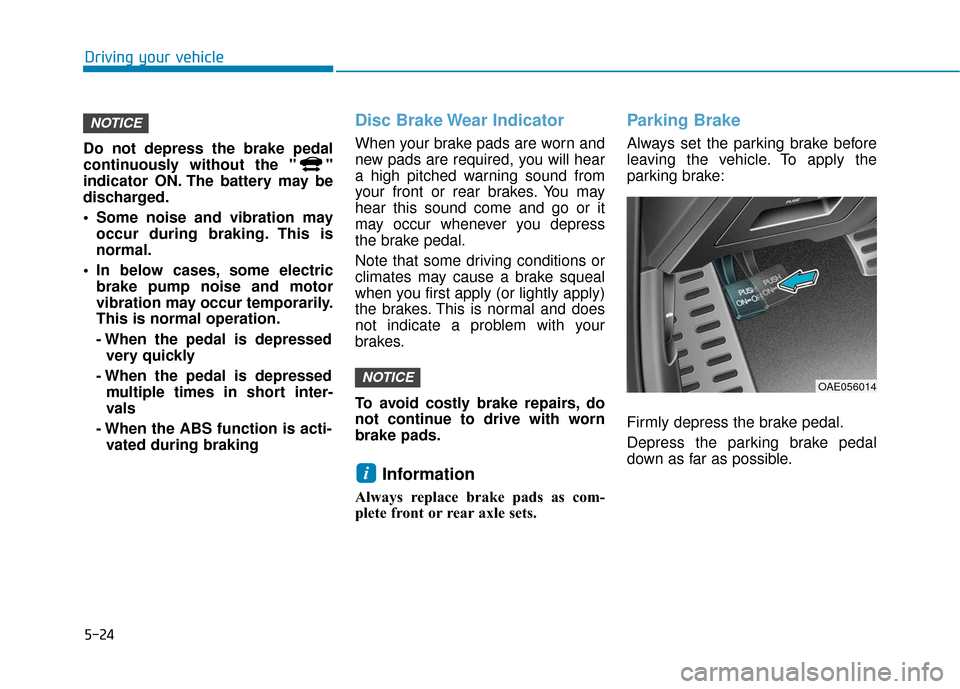
Always set the parking brake before
leaving the vehicle. To apply the
parking brake:
Firmly depress the brake pedal.
Depress the parking brake pedal
down as far as possible.
i
NOTICE
NOTICE
OAE056014