2019 Hyundai Ioniq Electric parking brake
[x] Cancel search: parking brakePage 302 of 555
5-35
Driving your vehicle
5
Good Braking Practices
Wet brakes can be dangerous! The
brakes may get wet if the vehicle is
driven through standing water or if it
is washed. Your vehicle will not stop
as quickly if the brakes are wet. Wet
brakes may cause the vehicle to pull
to one side.To dry the brakes, apply the brakes
lightly until the braking action returns
to normal. If the braking action does
not return to normal, stop as soon as
it is safe to do so and call an author-
ized HYUNDAI dealer for assistance.
DO NOT drive with your foot resting
on the brake pedal. Even light, but
constant pedal pressure can result in
the brakes overheating, brake wear,
and possibly even brake failure.
If a tire goes flat while you are driv-
ing, apply the brakes gently and
keep the vehicle pointed straight
ahead while you slow down. When
you are moving slowly enough for it
to be safe to do so, pull off the road
and stop in a safe location.
Keep your foot firmly on the brake
pedal when the vehicle is stopped to
prevent the vehicle from rolling for-
ward.
Whenever leaving the vehicle or
parking, always come to a com-
plete stop and continue to
depress the brake pedal. Shift
to the P (Park) position, then
apply the parking brake, and
place the POWER button in the
OFF position.
Vehicles parked with the park-
ing brake not applied or not
fully engaged may roll inadver-
tently and may cause injury to
the driver and others. ALWAYS
apply the parking brake before
exiting the vehicle.
WARNING
Page 349 of 555
5-82
Driving your vehicle
Smart Cruise Control will betemporarily cancelled when:
Cancelled manually
Depressing the brake pedal.
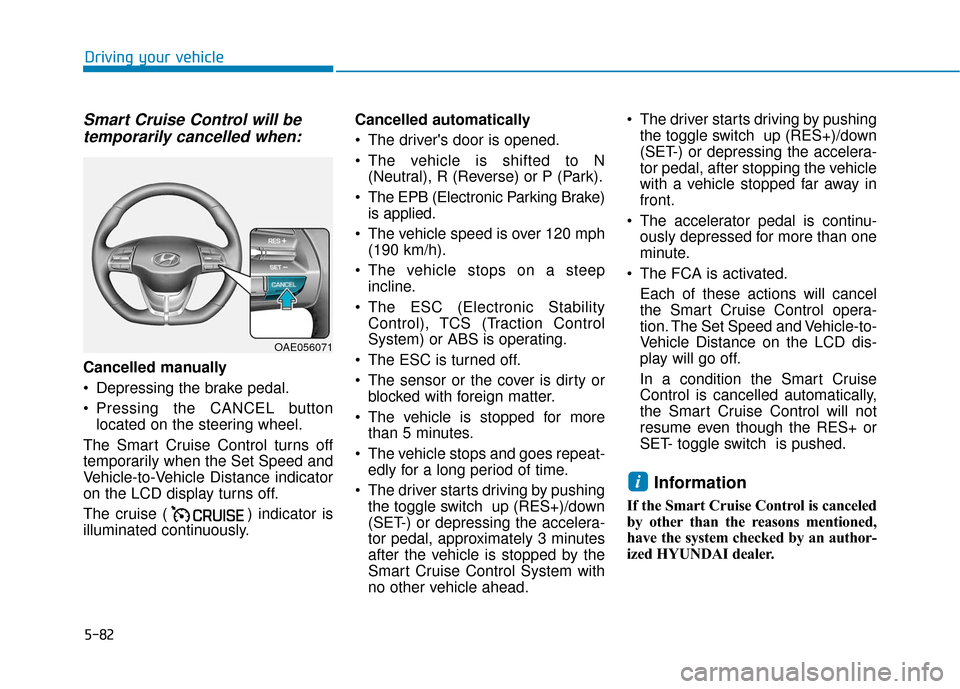
Pressing the CANCEL button
located on the steering wheel.
The Smart Cruise Control turns off
temporarily when the Set Speed and
Vehicle-to-Vehicle Distance indicator
on the LCD display turns off.
The cruise ( ) indicator is
illuminated continuously. Cancelled automatically
The driver's door is opened.
The vehicle is shifted to N
(Neutral), R (Reverse) or P (Park).
The EPB (Electronic Parking Brake) is applied.
The vehicle speed is over 120 mph (190 km/h).
The vehicle stops on a steep incline.
The ESC (Electronic Stability Control), TCS (Traction Control
System) or ABS is operating.
The ESC is turned off.
The sensor or the cover is dirty or blocked with foreign matter.
The vehicle is stopped for more than 5 minutes.
The vehicle stops and goes repeat- edly for a long period of time.
The driver starts driving by pushing the toggle switch up (RES+)/down
(SET-) or depressing the accelera-
tor pedal, approximately 3 minutes
after the vehicle is stopped by the
Smart Cruise Control System with
no other vehicle ahead. The driver starts driving by pushing
the toggle switch up (RES+)/down
(SET-) or depressing the accelera-
tor pedal, after stopping the vehicle
with a vehicle stopped far away in
front.
The accelerator pedal is continu- ously depressed for more than one
minute.
The FCA is activated. Each of these actions will cancel
the Smart Cruise Control opera-
tion. The Set Speed and Vehicle-to-
Vehicle Distance on the LCD dis-
play will go off.
In a condition the Smart Cruise
Control is cancelled automatically,
the Smart Cruise Control will not
resume even though the RES+ or
SET- toggle switch is pushed.
Information
If the Smart Cruise Control is canceled
by other than the reasons mentioned,
have the system checked by an author-
ized HYUNDAI dealer.
i
OAE056071
Page 366 of 555
5-99
Driving your vehicle
5
Information
• Install tire chains only in pairs andon the front tires. It should be noted
that installing tire chains on the
tires will provide a greater driving
force, but will not prevent side
skids.
• Do not install studded tires without first checking local, state and
municipal regulations for possible
restrictions against their use.
Chain Installation
When installing tire chains, follow the
manufacturer's instructions and
mount them as tightly possible. Drive
slowly (less than 20 mph (30 km/h))
with chains installed. If you hear the
chains contacting the body or chas-
sis, stop and tighten them. If they still
make contact, slow down until the
noise stops. Remove the tire chains
as soon as you begin driving on
cleared roads.
When mounting snow chains, park
the vehicle on level ground away
from traffic. Turn on the vehicle
Hazard Warning Flasher and place a
triangular emergency warning device
behind the vehicle (if available).
Always place the vehicle in P (Park),
apply the parking brake and turn off
the vehicle before installing snow
chains.i
The use of tire chains may
adversely affect vehicle han-
dling:
Drive less than 20 mph (30
km/h) or the chain manufac-
turer's recommended speed
limit, whichever is lower.
Drive carefully and avoid
bumps, holes, sharp turns,
and other road hazards, which
may cause the vehicle to
bounce.
Avoid sharp turns or locked
wheel braking.
WARNING
Page 368 of 555
5-101
Driving your vehicle
5
Use approved window washeranti-freeze in system
To keep the water in the window
washer system from freezing, add an
approved window washer anti-freeze
solution in accordance with instruc-
tions on the container. Window wash-
er anti-freeze is available from an
authorized HYUNDAI dealer and
most auto parts outlets. Do not use
coolant or other types of anti-freeze
as these may damage the paint fin-
ish.
Do not let your parking brakefreeze
Under some conditions your parking
brake can freeze in the engaged
position. This is most likely to happen
when there is an accumulation of
snow or ice around or near the rear
brakes or if the brakes are wet. If
there is a risk the parking brake may
freeze, apply it only temporarily while
you shift to P (Park) and block the
rear wheels so the car cannot roll.
Then release the parking brake.
Do not let ice and snow accu-mulate underneath
Under some conditions, snow and
ice can build up under the fenders
and interfere with the steering. When
driving in severe winter conditions
where this may happen, you should
periodically check underneath the
car to be sure the movement of the
front wheels and the steering com-
ponents is not obstructed.
Don't place foreign objects ormaterials in the motor compart-ment
Placement of foreign object or mate-
rials which prevent cooling of the
vehicle, in the motor compartment,
may cause a failure. The manufactur-
er is not responsible for the damage
caused by such placement.
To keep locks from freezing
To keep the locks from freezing,
squirt an approved de-icer fluid or
glycerine into the key opening. If a
lock is covered with ice, squirt it with
an approved de-icing fluid to remove
the ice. If the lock is frozen internally,
you may be able to thaw it out by
using a heated key. Handle the heat-
ed key with care to avoid injury.
Page 376 of 555
6-3
What to do in an emergency
If you Have a Flat Tire While
Driving
If a tire goes flat while you are driving:
Take your foot off the acceleratorpedal and let the vehicle slow down
while driving straight ahead. Do not
apply the brakes immediately to
slow down the vehicle, but use the
paddle shifter (left side lever) to
increase regenerative braking con-
trol. Also, do not or attempt to pull
off the road as this may cause loss
of vehicle control resulting in an
accident. When the vehicle has
slowed to such a speed that it is
safe to do so, brake carefully and
pull off the road. Drive off the road
as far as possible and park on firm,
level ground. If you are on a divided
highway, do not park in the median
area between the two traffic lanes.
When the vehicle is stopped, press the hazard warning flasher button,
shift to P(Park), apply the parking
brake, and place the POWER but-
ton in the OFF position. Have all passengers get out of the
vehicle. Be sure they all get out on
the side of the vehicle that is away
from traffic.
When changing a flat tire, follow the instructions provided later in
this chapter.
Confirm the EV Battery Is Not
Low on the Charge Gauge
Be sure the gear is in P (Park). The
vehicle starts only when the gear is
in P (Park).
Check the 12-volt battery connec- tions to be sure they are clean and
tight.
Turn on the interior light. If the light dims or goes out when you operate
the starter, the battery is drained.
Do not push or pull the vehicle to
start it. This could cause damage to
your vehicle. See instructions for
"Jump Starting" provided in this
chapter.
6
I I F
F
T
T H
H E
E
V
V E
EH
H I
IC
C L
LE
E
W
W I
IL
L L
L
N
N O
O T
T
S
S T
T A
A R
RT
T
Page 378 of 555
6-5
What to do in an emergency
6
Information
An inappropriately disposedbattery can be harmful to the
environment and human
health. Dispose the battery
according to your local law(s)
or regulations.
To prevent damage to your vehi-
cle:
Only use a 12-volt power supply (battery or jumper system) to
jump start your vehicle.
Do not attempt to jump start your vehicle by push-starting.
Jump starting procedure
1. Position the vehicles close enough that the jumper cables will reach,
but do not allow the vehicles to
touch.
2. Avoid fans or any moving parts in the motor compartment at all
times, even when the vehicles are
turned off.
3. Turn off all electrical devices such as radios, lights, air conditioning,
etc. Put the vehicles in P (Park)
and set the parking brakes. Turn
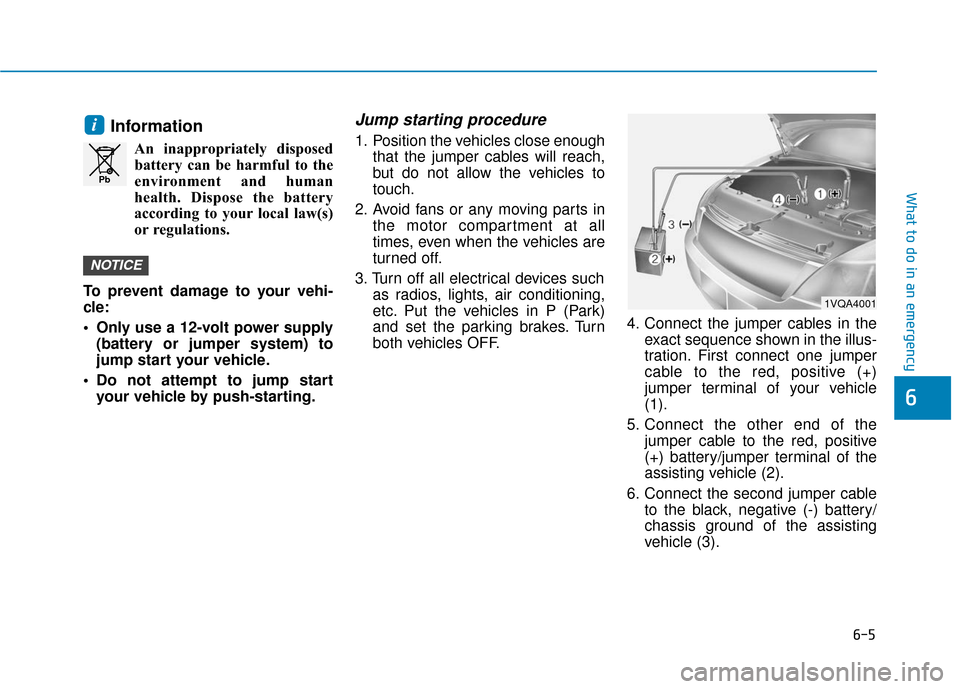
both vehicles OFF. 4. Connect the jumper cables in the
exact sequence shown in the illus-
tration. First connect one jumper
cable to the red, positive (+)
jumper terminal of your vehicle
(1).
5. Connect the other end of the jumper cable to the red, positive
(+) battery/jumper terminal of the
assisting vehicle (2).
6. Connect the second jumper cable to the black, negative (-) battery/
chassis ground of the assisting
vehicle (3).
NOTICE
i
Pb
1VQA4001
Page 395 of 555
6-22
What to do in an emergency
When towing your vehicle in an
emergency without wheel dollies:
1. While depressing the brake pedal shift to the N (Neutral) position
and turn the vehicle off. The
POWER button will be in the ACC
position.
2. Release the parking brake.
Failure to shift to N (Neutral) may
cause internal damage to the vehi-
cle.
Removable Towing Hook
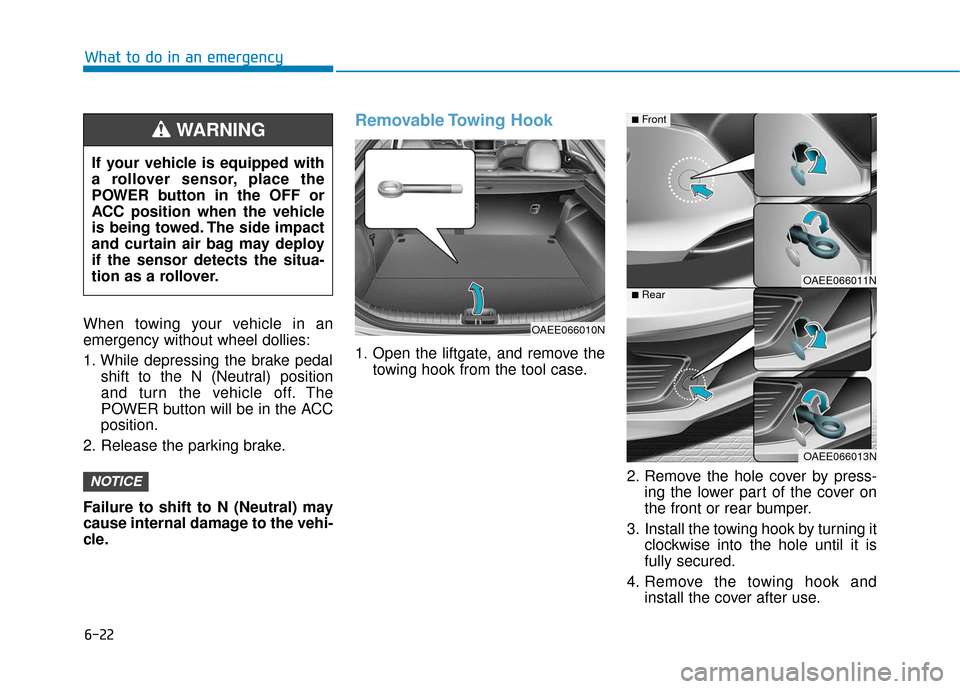
1. Open the liftgate, and remove the towing hook from the tool case.
2. Remove the hole cover by press-ing the lower part of the cover on
the front or rear bumper.
3. Install the towing hook by turning it clockwise into the hole until it is
fully secured.
4. Remove the towing hook and install the cover after use.
NOTICE
If your vehicle is equipped with
a rollover sensor, place the
POWER button in the OFF or
ACC position when the vehicle
is being towed. The side impact
and curtain air bag may deploy
if the sensor detects the situa-
tion as a rollover.
WARNING
OAEE066010N
OAEE066011N
OAEE066013N
■Front
■Rear
Page 396 of 555
6-23
What to do in an emergency
6
Emergency Towing
If towing is necessary, we recom-
mend you have it done by an author-
ized HYUNDAI dealer or a commer-
cial tow truck service.
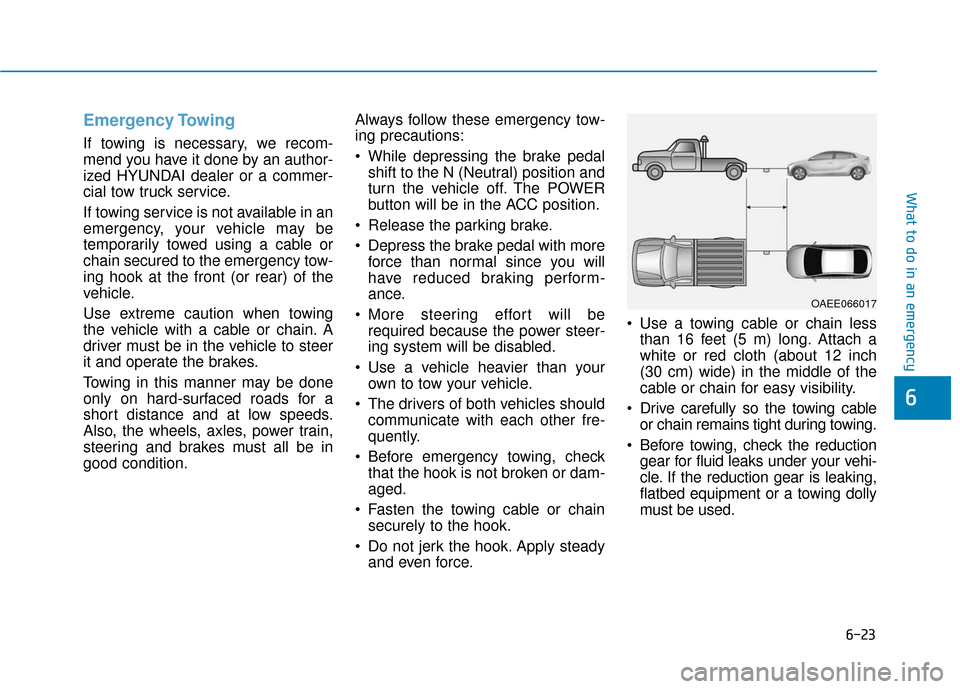
If towing service is not available in an
emergency, your vehicle may be
temporarily towed using a cable or
chain secured to the emergency tow-
ing hook at the front (or rear) of the
vehicle.
Use extreme caution when towing
the vehicle with a cable or chain. A
driver must be in the vehicle to steer
it and operate the brakes.
Towing in this manner may be done
only on hard-surfaced roads for a
short distance and at low speeds.
Also, the wheels, axles, power train,
steering and brakes must all be in
good condition.Always follow these emergency tow-
ing precautions:
While depressing the brake pedal
shift to the N (Neutral) position and
turn the vehicle off. The POWER
button will be in the ACC position.
Release the parking brake.
Depress the brake pedal with more force than normal since you will
have reduced braking perform-
ance.
More steering effort will be required because the power steer-
ing system will be disabled.
Use a vehicle heavier than your own to tow your vehicle.
The drivers of both vehicles should communicate with each other fre-
quently.
Before emergency towing, check that the hook is not broken or dam-
aged.
Fasten the towing cable or chain securely to the hook.
Do not jerk the hook. Apply steady and even force. Use a towing cable or chain less
than 16 feet (5 m) long. Attach a
white or red cloth (about 12 inch
(30 cm) wide) in the middle of the
cable or chain for easy visibility.
Drive carefully so the towing cable or chain remains tight during towing.
Before towing, check the reduction gear for fluid leaks under your vehi-
cle. If the reduction gear is leaking,
flatbed equipment or a towing dolly
must be used.
OAEE066017