Page 472 of 659

6-2
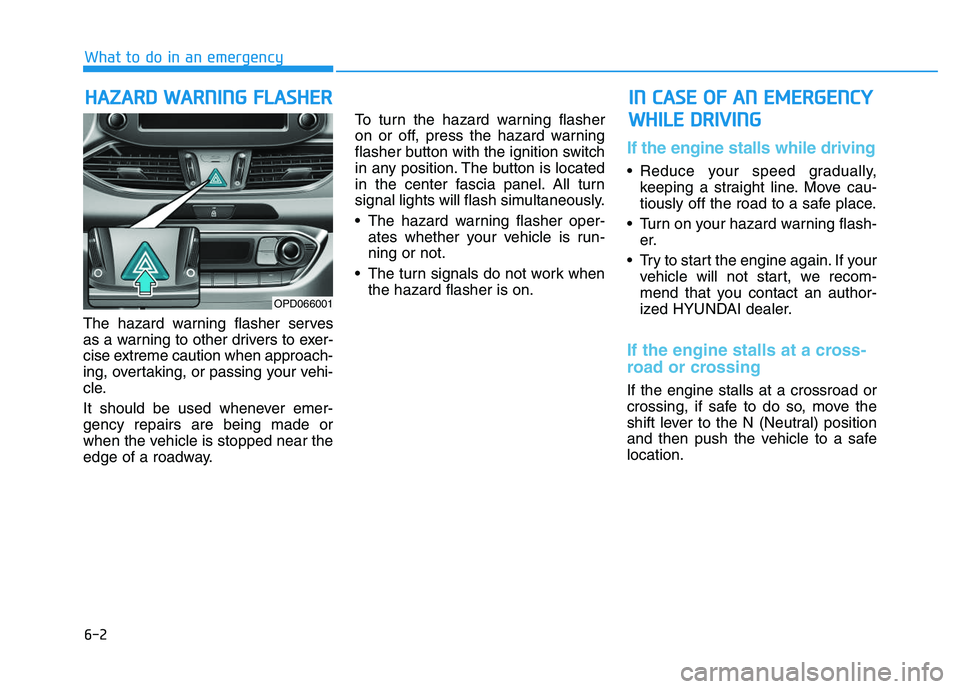
The hazard warning flasher serves
as a warning to other drivers to exer-
cise extreme caution when approach-
ing, overtaking, or passing your vehi-
cle.
It should be used whenever emer-
gency repairs are being made or
when the vehicle is stopped near the
edge of a roadway.To turn the hazard warning flasher
on or off, press the hazard warning
flasher button with the ignition switch
in any position. The button is located
in the center fascia panel. All turn
signal lights will flash simultaneously.
• The hazard warning flasher oper-
ates whether your vehicle is run-
ning or not.
The turn signals do not work when the hazard flasher is on.
If the engine stalls while driving
Reduce your speed gradually,keeping a straight line. Move cau-
tiously off the road to a safe place.
Turn on your hazard warning flash- er.
Try to start the engine again. If your vehicle will not start, we recom-
mend that you contact an author-
ized HYUNDAI dealer.
If the engine stalls at a cross-
road or crossing
If the engine stalls at a crossroad or
crossing, if safe to do so, move the
shift lever to the N (Neutral) position
and then push the vehicle to a safe
location.
H
H A
A Z
Z A
A R
R D
D
W
W A
A R
R N
N I
I N
N G
G
F
F L
L A
A S
S H
H E
E R
R
What to do in an emergency
I
I N
N
C
C A
A S
S E
E
O
O F
F
A
A N
N
E
E M
M E
E R
R G
G E
E N
N C
C Y
Y
W
W H
H I
I L
L E
E
D
D R
R I
I V
V I
I N
N G
G
OPD066001
Page 473 of 659

6-3
What to do in an emergency
If you have a flat tire while
driving
If a tire goes flat while you are driving:
Take your foot off the acceleratorpedal and let the vehicle slow
down while driving straight ahead.
Do not apply the brakes immedi-
ately or attempt to pull off the road
as this may cause loss of vehicle
control resulting in an accident.
When the vehicle has slowed to
such a speed that it is safe to do
so, brake carefully and pull off the
road. Drive off the road as far as
possible and park on firm, level
ground. If you are on a divided
highway, do not park in the median
area between the two traffic lanes. When the vehicle is stopped, press
the hazard warning flasher button,
move the shift lever into P (Park,
for automatic transmission/dual
clutch transmission vehicle) or neu-
tral (for manual transmission vehi-
cle), apply the parking brake, and
place the ignition switch in the
LOCK/OFF position.
Have all passengers get out of the vehicle. Be sure they all get out on
the side of the vehicle that is away
from traffic.
When changing a flat tire, follow the instructions provided later in
this chapter.If the engine doesn't turn over
or turns over slowly
Be sure the shift lever is in N(Neutral) or P (Park) if it is an auto-
matic transmission/dual clutch
transmission vehicle. The engine
starts only when the shift lever is in
N (Neutral) or P (Park).
Check the battery connections to be sure they are clean and tight.
Turn on the interior light. If the light dims or goes out when you operate
the starter, the battery is drained.
Do not push or pull the vehicle to start
it. This could cause damage to your
vehicle. See instructions for "Jump
Starting" provided in this chapter.
6
I
I F
F
T
T H
H E
E
E
E N
N G
G I
I N
N E
E
W
W I
I L
L L
L
N
N O
O T
T
S
S T
T A
A R
R T
T
Push or pull starting the vehicle
may cause the catalytic con-
verter to overload which can
lead to damage to the emission
control system.
CAUTION
Page 475 of 659

6-5
What to do in an emergency
To prevent damage to your vehi-
cle:
Only use a 12-volt power supply(battery or jumper system) to
jump start your vehicle.
Do not attempt to jump start your vehicle by push-starting.
Information
An inappropriately disposedbattery can be harmful to the
environment and human
health. Dispose the battery
according to your local law(s)
or regulations.
Jump starting procedure
1. Position the vehicles close enough that the jumper cables will reach,
but do not allow the vehicles to
touch.
2. Avoid fans or any moving parts in the engine compartment at all
times, even when the vehicles are
turned off.
3. Turn off all electrical devices such as radios, lights, air conditioning,
etc. Put the vehicles in P (Park, for
automatic transmission/dual
clutch transmission vehicle) or
neutral (for manual transmission
vehicle), and set the parking
brakes. Turn both vehicles OFF.
i
NOTICE
6
(Continued)
When lifting a plastic-cased
battery, excessive pressure
on the case may cause battery
acid to leak. Lift with a battery
carrier or with your hands on
opposite corners.
Do not attempt to jump start
your vehicle if your battery is
frozen.
NEVER attempt to recharge
the battery when the vehicle’s
battery cables are connected
to the battery.
The electrical ignition system
works with high voltage.
NEVER touch these compo-
nents with the engine running
or when the ignition switch is
in the ON position.
Do not allow the (+) and (-)
jumper cables to touch. It may
cause sparks.
The battery may rupture or
explode when you jump start
with a low or frozen battery.
Pb
Page 487 of 659
6-17
What to do in an emergency
6
Follow these steps to change your
vehicle’s tire:
1. Park on a level, firm surface.
2. Move the shift lever into P (Park,for automatic transmission/dual
clutch transmission vehicle) or neu-
tral (for manual transmission vehi-
cle), apply the parking brake, and
place the ignition switch in the
LOCK/OFF position.
3. Press the hazard warning flasher button.
4. Remove the wheel lug nut wrench, jack, jack handle, and spare tire
from the vehicle. 5. Block both the front and rear of the
tire diagonally opposite of the tire
you are changing. 6. Loosen the wheel lug nuts coun-
terclockwise one turn each in the
order shown above, but do not
remove any lug nuts until the tire
has been raised off of the ground.
OPDE066030
B
B
B
B
l
l
l
l
o
o
o
o
c
c
c
c
k
k
k
k
OPDE066031
Page 498 of 659

6-28
What to do in an emergency
8. With the ignition switch in the ON position, switch on the compres-
sor and let it run for approximately
5~7 minutes to fill the sealant up
to proper pressure. (refer to the
Tire and Wheels, chapter 8). The
inflation pressure of the tire after
filling is unimportant and will be
checked/corrected later.
Be careful not to overinflate the
tire and stay away from the tire
when filling it. 9. Switch off the compressor.
10. Detach the hoses from the
sealant bottle connector and
from the tire valve.
Return the Tire Mobility Kit to its stor-
age location in the vehicle.
Distributing the sealant
11. Immediately drive approximately 7~10 km (4~6 miles or, about
10min) to evenly distribute the
sealant in the tire.
Tire pressure
Do not attempt to drive your
vehicle if the tire pressure is
below 200 kPa (29 psi). This
could result in an accident due
to sudden tire failure.CAUTION
Carbon monoxide
Do not leave your vehicle run-
ning in a poorly ventilated area
for extended periods of time.
Carbon monoxide poisoning
and suffocation can occur.
WARNING
OLMF064106
Page 499 of 659

6-29
What to do in an emergency
6
Do not exceed a speed of 80 km/h
(50 mph). If possible, do not fall
below a speed of 20 km/h (12 mph).
While driving, if you experience any
unusual vibration, ride disturbance or
noise, reduce your speed and drive
with caution until you can safely pull
off of the side of the road.
Call for road side service or towing.
When you use the Tire Mobility Kit,
the tire pressure sensors and wheel
may be damaged by sealant, remove
the sealant stained with tire pressure
sensors and wheel and inspect in
authorized dealer.Checking the tire inflation pres-sure
1. After driving approximately 7~10
km (4~6 miles or about 10 min),
stop at a safety location.
2. Connect the filling hose (2) of the compressor directly to the tire
valve.
3. Plug the compressor power cord into the vehicle power outlet.
4. Adjust the tire inflation pressure to the recomended tire inflation.
With the ignition swithched on, proceed as follows. - To increase the inflation pres-
sure : Switch on the compres-
sor, position I. To check the cur-
rent inflation pressure setting,
briefly switch off the compressor.
- To reduce the inflation pres- sure: Press the button (8) on the
compressor.
Do not let the compressor run for
more than 10 minutes, otherwise
the device will overheat and may
be damaged.
Information
The pressure gauge may show higher
than actual reading when the com-
pressor is running. To get an accurate
tire reading, the compressor needs to
be turned off.
i
NOTICE
OPDE066015
Page 506 of 659

6-36
7. Plug the compressor power cord(3) into the vehicle power outlet.
Only use the front passenger side
power outlet when connecting the
power cord. 8. With the ignition switch in the ON
position, switch on the compres-
sor and let it run for approximately
5~7 minutes to fill the sealant up
to proper pressure. (refer to the
Tire and Wheels, chapter 8). The
inflation pressure of the tire after
filling is unimportant and will be
checked/corrected later.
Be careful not to overinflate the
tire and stay away from the tire
when filling it. 9. Switch off the compressor.
10. Detach the hoses from the
sealant bottle connector and
from the tire valve.
Return the Tire Mobility Kit to its stor-
age location in the vehicle.
NOTICE
What to do in an emergency
OPD066017
Tire pressure
Do not attempt to drive your
vehicle if the tire pressure is
below 200 kPa (29 psi). This
could result in an accident due
to sudden tire failure.
CAUTION
Carbon monoxide
Do not leave your vehicle run-
ning in a poorly ventilated area
for extended periods of time.
Carbon monoxide poisoning
and suffocation can occur.
WARNING
Page 507 of 659

6-37
What to do in an emergency
Distributing the sealant
11. Immediately drive approximately7~10 km (4~6 miles or, about
10min) to evenly distribute the
sealant in the tire. Do not exceed a speed of 80 km/h
(50 mph). If possible, do not fall
below a speed of 20 km/h (12 mph).
While driving, if you experience any
unusual vibration, ride disturbance or
noise, reduce your speed and drive
with caution until you can safely pull
off of the side of the road.
Call for road side service or towing.
When you use the Tire Mobility Kit,
the tire pressure sensors and wheel
may be damaged by sealant, remove
the sealant stained with tire pressure
sensors and wheel and inspect in
authorized dealer.
Checking the tire inflation pres-
sure
1. After driving approximately 7~10
km (4~6 miles or about 10 min),
stop at a safety location.
2. Connect the connection hose (9) of the compressor directly to the
tire valve.
3. Plug the compressor power cord into the vehicle power outlet.
4. Adjust the tire inflation pressure to the recomended tire inflation.
With the ignition swithched on, proceed as follows.
6
OLMF064106
OPDE066015