Page 22 of 767
20
Quick Reference Guide
Features (P259)
Audio System (P260)
MENU/CLOCK Button
Selector Knob
(Day/Night) Button
(Back) Button
(Sound) Button
VOL
/ (Volume/Power)
Knob
Preset Buttons (1-6) (Phone) Button
RADIO
Button
/
(Seek/Skip) Buttons
MEDIA Button Audio/Information Screen
(P 267)Models with color audio system
19 ODYSSEY-31THR6120.book 20 ページ 2018年12月6日 木曜日 午後4時35分
Page 24 of 767

22
Quick Reference Guide
Audio Remote Controls
(P264)
●
(+ / ( - Bar
Press to adjust the volume up/down.
● SOURCE Button
Press to change the audio mode:
FM1/FM2/AM/USB/iPod/
Bluetooth ® Audio/AUX
● / Buttons
Radio: Press to change the preset station. Press and hold to select the next or
previous strong station.
USB device/ Bluetooth® Audio:
Press to skip to the beginning of
the next song or return to the
beginning of the current song.
Press and hold to change a folder.
Models with color audio system
( + / (- Bar
SOURCE
Button / Buttons
●(
+ / (- Bar
Press to adjust the volume up/down.
● / / / /ENTER Buttons
Press or to select Now Playing on
the home screen of the driver
information interface, and then press the
ENTER button.
Press or to cycle through the audio
mode as follows:
Android Auto/Apple CarPlay/SiriusXM ®
*/
Rear Entertainment*/AUX Input/AM/
Bluetooth ® Audio/Social Playlist/FM/My
Honda Music/USB/iPod/CD
*
Models with Display Audio
ENTER Button
/ / / Buttons34
(+ / (- Bar
34
34
34
Radio: Press / to change the
preset station.
CD
*/USB device/My Honda Music/
Bluetooth ® Audio:
Press / to skip to the
beginning of the next song or
return to the beginning of the
current song.
19 ODYSSEY-31THR6120.book 22 ページ 2018年12月6日 木曜日 午後4時35分
Page 74 of 767

uuChild Safety uSafety of Infants and Small Children
72
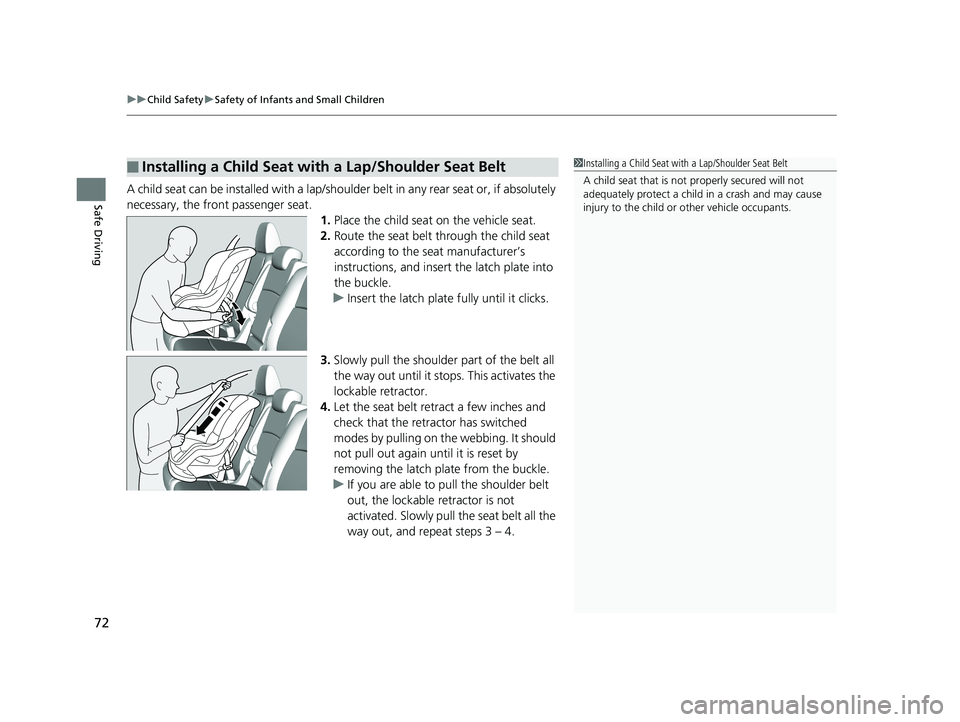
Safe DrivingA child seat can be installed with a lap/should er belt in any rear seat or, if absolutely
necessary, the front passenger seat. 1.Place the child seat on the vehicle seat.
2. Route the seat belt through the child seat
according to the seat manufacturer’s
instructions, and insert the latch plate into
the buckle.
u Insert the latch plate fully until it clicks.
3. Slowly pull the shoulder part of the belt all
the way out until it stops. This activates the
lockable retractor.
4. Let the seat belt retract a few inches and
check that the retractor has switched
modes by pulling on the webbing. It should
not pull out again until it is reset by
removing the latch plate from the buckle.
u If you are able to pull the shoulder belt
out, the lockable retractor is not
activated. Slowly pull the seat belt all the
way out, and repeat steps 3 – 4.
■Installing a Child Seat with a Lap/Shoulder Seat Belt1Installing a Child Seat with a Lap/Shoulder Seat Belt
A child seat that is not properly secured will not
adequately protect a child in a crash and may cause
injury to the child or other vehicle occupants.
19 ODYSSEY-31THR6120.book 72 ページ 2018年12月6日 木曜日 午後4時35分
Page 127 of 767

Continued125
uuGauges and Displays uDriver Information Interface
Instrument Panel
■Distance
Shows the total number of miles or kilomete rs driven since the last reset. Meters A
and B can be used to measure two separate trips.
Resetting distance
To reset the Distance, display it and then press and hold the ENTER button until the
Distance is reset to 0.0.
■Average fuel economy (Avg. Fuel)
Shows the estimated average fuel economy of each Distance in mpg or l/100 km.
The display is updated at set intervals. When a Distance is reset, the average fuel
economy is also reset.
■Instant fuel economy
Shows the instant fuel economy as a bar graph in mpg or l/100 km.
■Range
Shows the estimated distance you can trave l on the remaining fuel. This estimated
distance is based on the vehicle’s current fuel economy.
1 Distance
Switch between Distance A and Distance B by
pressing the ENTER button.
1Average fuel economy ( Avg. Fuel)
You can change when the average fuel economy is
reset.
2 Vehicle Customization P. 133
2 Customized Features P. 445
Models with color audio system
Models with Display Audio
19 ODYSSEY-31THR6120.book 125 ページ 2018年12月6日 木曜日 午後4時35分
Page 136 of 767
134
uuGauges and Displays uDriver Information Interface
Instrument Panel
Customization flow
Press the (home) button.
ENTER“Trip B” Reset Timing
Reverse Alert Tone
Fuel Efficiency Backlight
“Trip A” Reset Timing
Language Selection
Adjust Alarm VolumeMeter Setup
ENTERSettings
Arrange Apps
Show Tachometer3
4
3
4
3
4
3
4
3
4
Vehicle Customization
ENTER
P. 131
P. 132
Interior Light Dimming Time
Headlight Auto OFF Timer
ENTERLighting Setup3
4ENTER
19 ODYSSEY-31THR6120.book 134 ページ 2018年12月6日 木曜日 午後4時35分
Page 138 of 767

136
uuGauges and Displays uDriver Information Interface
Instrument Panel
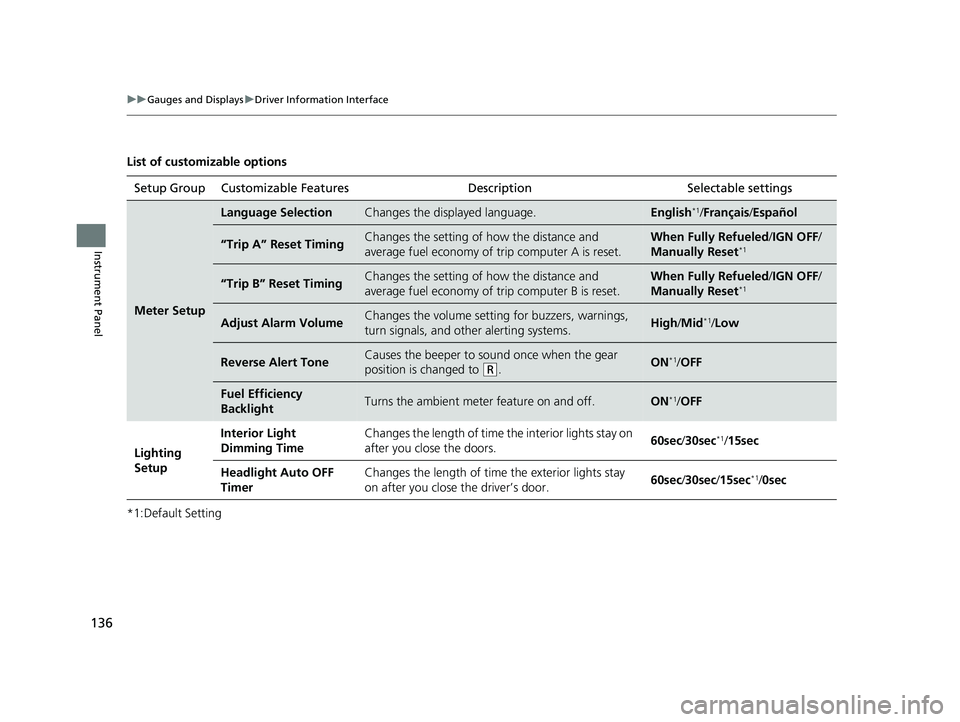
List of customizable options
*1:Default SettingSetup Group Customizable Features
Description Selectable settings
Meter Setup
Language SelectionChanges the displayed language.English*1/Français /Español
“Trip A” Reset TimingChanges the setting of how the distance and
average fuel economy of trip computer A is reset.When Fully Refueled /IGN OFF /
Manually Reset*1
“Trip B” Reset TimingChanges the setting of how the distance and
average fuel economy of trip computer B is reset.When Fully Refueled/IGN OFF /
Manually Reset*1
Adjust Alarm VolumeChanges the volume setting for buzzers, warnings,
turn signals, and other alerting systems.High /Mid*1/Low
Reverse Alert ToneCauses the beeper to s ound once when the gear
position is changed to
( R.ON*1/ OFF
Fuel Efficiency
BacklightTurns the ambient meter feature on and off.ON*1/OFF
Lighting
Setup Interior Light
Dimming Time
Changes the length of time the interior lights stay on
after you close the doors.
60sec
/30sec
*1/15sec
Headlight Auto OFF
Timer Changes the length of time the exterior lights stay
on after you close the driver’s door.
60sec
/30sec/ 15sec
*1/0sec
19 ODYSSEY-31THR6120.book 136 ページ 2018年12月6日 木曜日 午後4時35分
Page 140 of 767
138
uuGauges and Displays uDriver Information Interface
Instrument Panel
Example of how to customize a setting
Below are steps that explai n how to change the reset timing for trip A from the
default setting (manual) so that it resets automatically when the vehicle is fully
refueled. 1.Press the (home) button and then the
/ button to select Settings, then
press the ENTER button.
2. Press the / button to select Vehicle
Customization , then press the ENTER
button.
34
34
19 ODYSSEY-31THR6120.book 138 ページ 2018年12月6日 木曜日 午後4時35分
Page 141 of 767
139
uuGauges and Displays uDriver Information Interface
Continued
Instrument Panel
3. Press the / button to select Meter
Setup , then press the ENTER button.
u Language Selection appears first in the
display.
4. Press the / button to select “Trip A”
Reset Timing , then press the ENTER
button.
u The display swit ches to the
customization setup screen, where you
can select When Fully Refueled , IGN
OFF , Manually Reset , or Exit.
5. Press the / button to select When
Fully Refueled, then press the ENTER
button.
u The SETUP “When Fully Refueled”
screen appears, then the display returns
to the customizat ion menu screen.34
34
34
19 ODYSSEY-31THR6120.book 139 ページ 2018年12月6日 木曜日 午後4時35分