2019 HONDA ODYSSEY display
[x] Cancel search: displayPage 254 of 767
252
Controls
Climate Control System
Using Automatic Climate Control
The automatic climate control system maintains the interior temperature you select.
The system also selects the proper mix of heated or cooled air that raises or lowers
the interior temperature to your pr eference as quickly as possible.
Use the system when the engine is running.
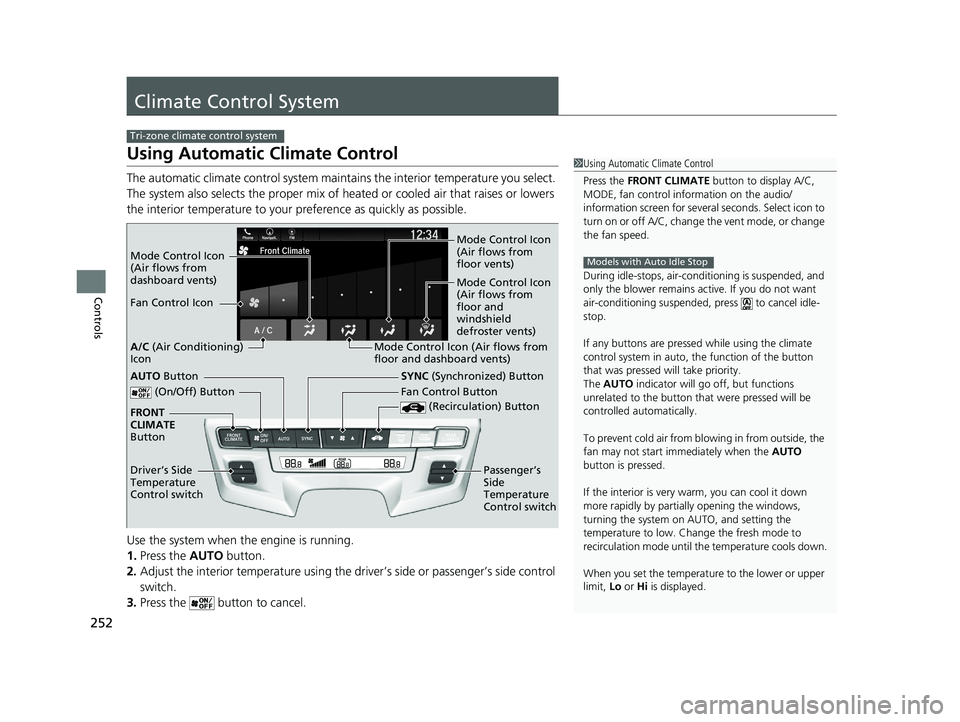
1. Press the AUTO button.
2. Adjust the interior temperature using the dr iver’s side or passenger’s side control
switch.
3. Press the butto n to cancel.
Tri-zone climate control system
1Using Automatic Climate Control
Press the FRONT CLIMATE button to display A/C,
MODE, fan control information on the audio/
information screen for several seconds. Select icon to
turn on or off A/C, change the vent mode, or change
the fan speed.
During idle-stops, air-conditioning is suspended, and
only the blower remains ac tive. If you do not want
air-conditioning suspended, press to cancel idle-
stop.
If any buttons are presse d while using the climate
control system in auto, the function of the button
that was pressed will take priority.
The AUTO indicator will go off, but functions
unrelated to the button that were pressed will be
controlled automatically.
To prevent cold air from bl owing in from outside, the
fan may not start i mmediately when the AUTO
button is pressed.
If the interior is very warm, you can cool it down
more rapidly by partial ly opening the windows,
turning the system on AUTO, and setting the
temperature to low. Change the fresh mode to
recirculation mode until the temperature cools down.
When you set the temperat ure to the lower or upper
limit, Lo or Hi is displayed.
Models with Auto Idle StopMode Control Icon
(Air flows from
dashboard vents) Mode Control Icon
(Air flows from
floor vents)
Mode Control Icon
(Air flows from
floor and
windshield
defroster vents)
Fan Control Icon
Mode Control Icon (Air flows from
floor and dashboard vents)
A/C
(Air Conditioning)
Icon
(On/Off) Button
(Recirculation) Button
SYNC (Synchronized) Button
FRONT
CLIMATE
Button
Driver’s Side
Temperature
Control switch Fan Control Button
Passenger’s
Side
Temperature
Control switchAUTO Button
19 ODYSSEY-31THR6120.book 252 ページ 2018年12月6日 木曜日 午後4時35分
Page 257 of 767
255
uuClimate Control System uRear Climate Control System
Continued
Controls
Rear Climate Control System
Use the system when the engine is running.
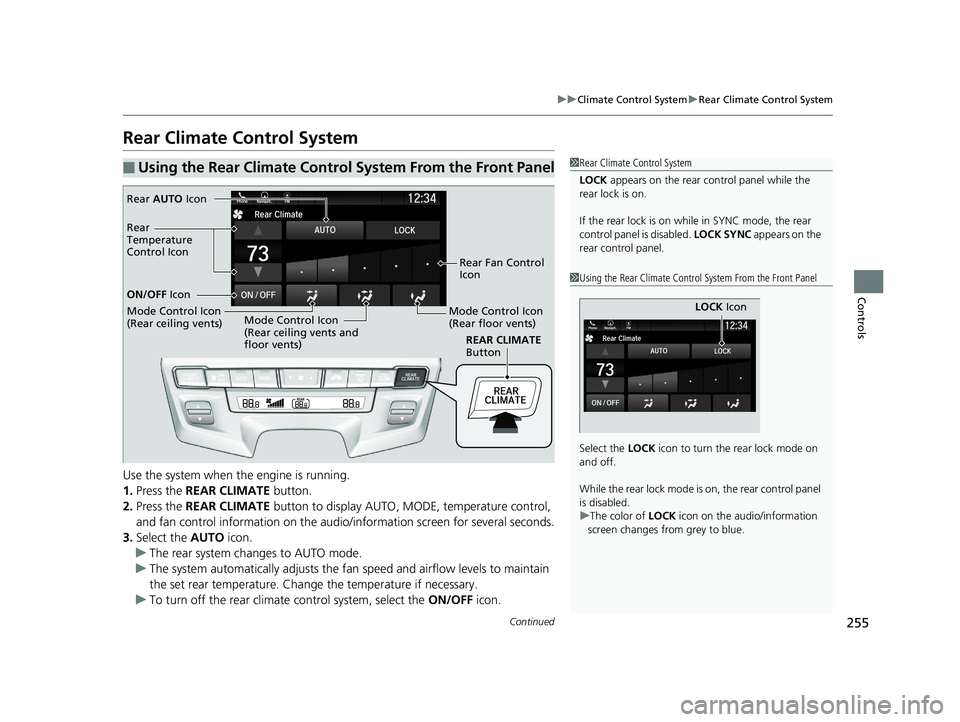
1. Press the REAR CLIMATE button.
2. Press the REAR CLIMATE button to display AUTO, MO DE, temperature control,
and fan control information on the audio/information screen for several seconds.
3. Select the AUTO icon.
u The rear system changes to AUTO mode.
u The system automatically adjusts the fan speed and airfl ow levels to maintain
the set rear temperature. Change the temperature if necessary.
u To turn off the rear climat e control system, select the ON/OFF icon.
■Using the Rear Climate Control System From the Front Panel1Rear Climate Control System
LOCK appears on the rear control panel while the
rear lock is on.
If the rear lock is on while in SYNC mode, the rear
control panel is disabled. LOCK SYNC appears on the
rear control panel.
1 Using the Rear Climate Control System From the Front Panel
Select the LOCK icon to turn the rear lock mode on
and off.
While the rear lock mode is on, the rear control panel
is disabled.
u The color of LOCK icon on the audio/information
screen changes from grey to blue.
LOCK Icon
REAR CLIMATE
Button
Rear AUTO Icon
Rear Fan Control
Icon
Mode Control Icon
(Rear floor vents)
Mode Control Icon
(Rear ceiling vents and
floor vents)
Mode Control Icon
(Rear ceiling vents) ON/OFF
Icon
Rear
Temperature
Control Icon
19 ODYSSEY-31THR6120.book 255 ページ 2018年12月6日 木曜日 午後4時35分
Page 261 of 767

259
Features
This chapter describes how to operate technology features.
Audio SystemAbout Your Audio System ................ 260
USB Ports ......................................... 261
Auxiliary Input Jack .......................... 262
Audio System Theft Protection ......... 263
Audio Remote Controls .................... 264
Audio System Basic Operation ........ 267
Audio/Information Screen ................ 268
Adjusting the Sound ........................ 272
Display Setup ................................... 273
Playing AM/FM Radio ....................... 274
Playing an iPod ................................ 276
Playing a USB Flash Drive ................. 279
Playing Bluetooth ® Audio ................. 282
Models with color audio system
Audio System Basic Operation ........ 285
Audio/Information Screen ................ 286
System Updates ............................... 300
File Manager .................................... 306
Adjusting the Sound ........................ 312
Display Setup ................................... 313
Voice Control Operation .................. 315
Playing AM/FM Radio ....................... 318
Playing SiriusXM ® Radio
*................. 322
Playing a CD*.................................. 332
Playing an iPod ................................ 335
Playing a USB Flash Drive ................. 338
Playing My Honda Music .................. 341
Playing Bluetooth ® Audio................. 345
Models with Display AudioPlaying Social Playlist........................ 347
HondaLink ®..................................... 349
Wi-Fi Connection ............................. 354
Near Field Communication (NFC)
*... 356
Siri Eyes Free .................................... 359
Apple CarPlay .................................. 360
Android Auto .................................. 363
Audio Error Messages ...................... 367
General Information on the Audio System..... 372Blu-ray/DVD Rear Entertainment System*...... 396Customized Features............................. 445
HomeLink ® Universal Transceiver*....... 470
Bluetooth ® HandsFreeLink ®.......... 473 , 498
CabinWatch
TM *....................................... 523
CabinTalkTM *........................................... 524
* Not available on all models
19 ODYSSEY-31THR6120.book 259 ページ 2018年12月6日 木曜日 午後4時35分
Page 262 of 767

260
Features
Audio System
About Your Audio System
The audio system features AM/FM radio and SiriusXM ® Radio* service. It can also
play audio CDs*, WMA/MP3/AAC files*, USB flash drives, and iPod, iPhone, iPad*
and Bluetooth ® devices.
You can operate the audi o system from the buttons
* and knobs on the panel, the
remote controls on the steering wheel, or the icons on the touchscreen interface*.
1About Your Audio System
iPod, iPad, iPhone and iT unes are trademarks of
Apple Inc.
State or local laws may pr ohibit the operation of
handheld electronic devi ces while operating a
vehicle.
Video CDs, DVDs
*1, Blu-ray Discs*1, and 3-inch (8-cm)
mini CDs are not supported.
*1: Models with CD player
SiriusXM ® Radio
* is available on a subscription basis
only. For more information on SiriusXM ® Radio*,
contact a dealer.
2 General Information on the Audio System
P. 372
SiriusXM ® Radio
* is available in the United States and
Canada, except Ha waii, Alaska, and Puerto Rico.
SiriusXM ®
* is a registered trademark of SiriusXM
Radio*, Inc.
After you set the power m ode to VEHICLE OFF, you
can use the audio system for up to 30 minutes per
driving cycle, or until opening the driver’s door.
However, whether you can continue using the audio
system depends on the batter y condition. Repeatedly
using this feature ma y drain the battery.
Models with Blu-rayTM or CD player
Models with Display AudioRemote Controls iPod
USB Flash Drive*1 : Models with color audio system
*2 : Models with Display Audio
*1
*2
* Not available on all models
19 ODYSSEY-31THR6120.book 260 ページ 2018年12月6日 木曜日 午後4時35分
Page 263 of 767

261
uuAudio System uUSB Ports
Features
USB Ports
Install the iPod USB connector or the USB flash drive to the USB port.
■In the consol e compartment
The USB port (1.0A) on the right side is for
playing audio files on a USB flash drive,
connecting a cell phone, and charging
devices.
The USB port (2.5A) on the left side is only for
charging devices.
The USB port (2.5A) on the right side is for
charging devices, playing audio files and
connecting compatible phones with Apple
CarPlay or Android Auto.
The USB port (2.5A) on the left side is only for
charging devices.
■On the back of the console
compartment*
The USB ports (2.5A) are only for charging
devices.
1 USB Ports
•Do not leave the iPod or USB flash drive in the
vehicle. Direct sunlight and high temperatures may
damage it.
•We recommend using an ex tension cable with the
USB port.
•Do not connect the iPod or USB flash drive using a
hub.
•Do not use a device such as a card reader or hard
disk drive, as the device or your files may be
damaged.
•We recommend keeping y our data backed up
before using the device in your vehicle.
•Displayed messages may vary depending on the
device model and software version.
If the audio system does not recognize the iPod, try
reconnecting it a few times or reboot the device. To
reboot, follow the manufac turer’s instructions
provided with the iPod or visit www.apple.com/ipod.
The USB port can supply up to 1.0A/2.5A of power. It
does not output 1.0A/2.5A unless the device
requests.
For amperage details, read the operating manual of
the device that ne eds to be charged.
Set the power mode to ACCESSORY or ON first.
Under certain condi tions, a device connected to the
port may generate noise in the radio you are listening
to.
USB charge
Models
with color
audio
system
Models
with
Display
Audio
Models with color audio system
Models with Display Audio
* Not available on all models
19 ODYSSEY-31THR6120.book 261 ページ 2018年12月6日 木曜日 午後4時35分
Page 264 of 767
262
uuAudio System uAuxiliary Input Jack
Features
Auxiliary Input Jack
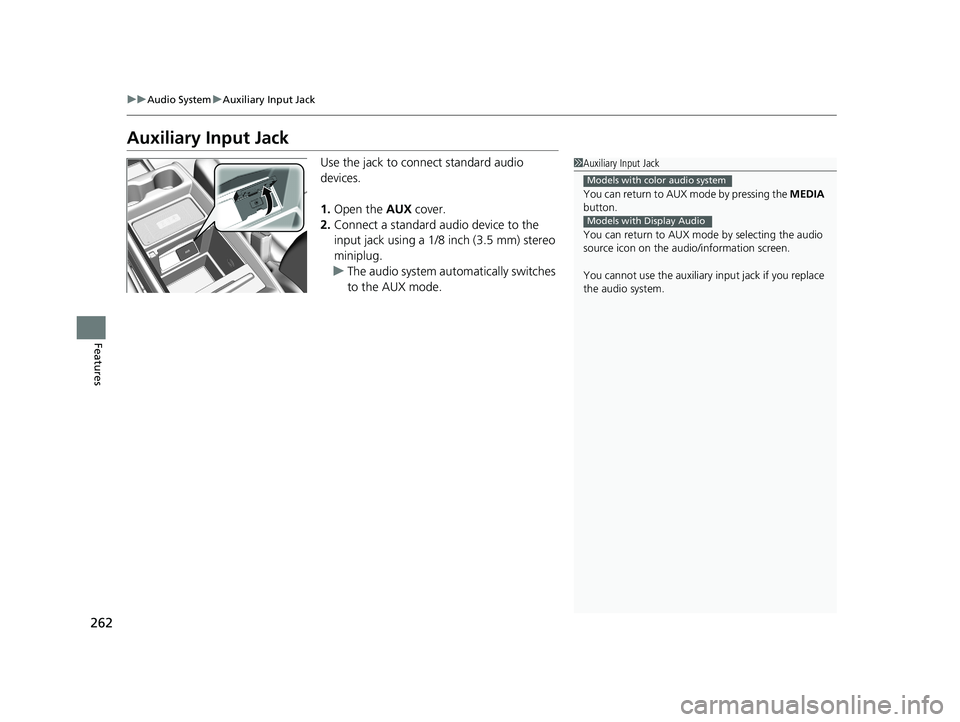
Use the jack to connect standard audio
devices.
1. Open the AUX cover.
2. Connect a standard audio device to the
input jack using a 1/8 inch (3.5 mm) stereo
miniplug.
u The audio system automatically switches
to the AUX mode.1Auxiliary Input Jack
You can return to AUX mode by pressing the MEDIA
button.
You can return to AUX mode by selecting the audio
source icon on the audio/information screen.
You cannot use the auxiliary input jack if you replace
the audio system.
Models with color audio system
Models with Display Audio
19 ODYSSEY-31THR6120.book 262 ページ 2018年12月6日 木曜日 午後4時35分
Page 265 of 767
263
uuAudio System uAudio System Theft Protection
Features
Audio System Theft Protection
The audio system is disabled when it is disconnected from the power source, such as
when the battery is disconnected or goes dead. In certain conditions, the system
may display a code entry screen. If this occurs, reactivate the audio system.
■Reactivating the audio system
1. Set the power mode to ON.
2. Turn on the audio system.
3. Press and hold the audio system powe r knob for more than two seconds.
u The audio system is reac tivated when the audio co ntrol unit establishes a
connection with the vehicl e control unit. If the control unit fails to recognize
the audio unit, you must go to a deal er and have the audio unit checked.
19 ODYSSEY-31THR6120.book 263 ページ 2018年12月6日 木曜日 午後4時35分
Page 267 of 767
Continued265
uuAudio System uAudio Remote Controls
Features
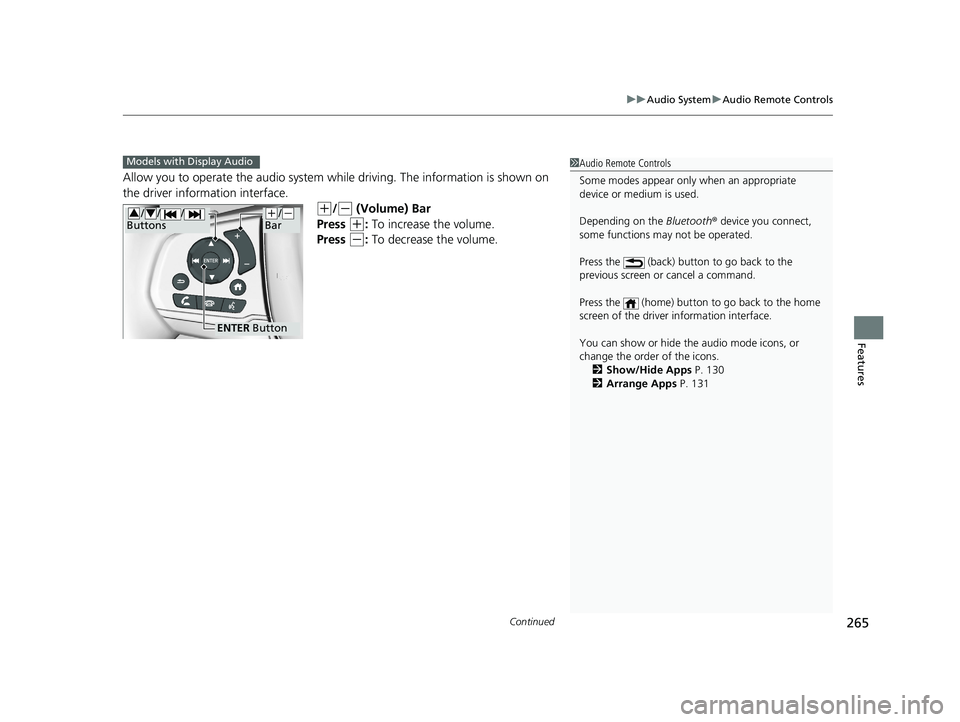
Allow you to operate the audio system whil e driving. The information is shown on
the driver information interface.
(+/(- (Volume) Bar
Press
(+: To increase the volume.
Press
(-: To decrease the volume.
1 Audio Remote Controls
Some modes appear only when an appropriate
device or medium is used.
Depending on the Bluetooth® device you connect,
some functions ma y not be operated.
Press the (back) button to go back to the
previous screen or cancel a command.
Press the (home) button to go back to the home
screen of the driver information interface.
You can show or hide the audio mode icons, or
change the order of the icons. 2 Show/Hide Apps P. 130
2 Arrange Apps P. 131Models with Display Audio
ENTER Button
(+/(-
Bar// /
Buttons34
19 ODYSSEY-31THR6120.book 265 ページ 2018年12月6日 木曜日 午後4時35分