2019 HONDA ACCORD SEDAN power steering
[x] Cancel search: power steeringPage 237 of 727
Continued235
uuInterior Lights/Interior Convenience Items uInterior Convenience Items
Controls
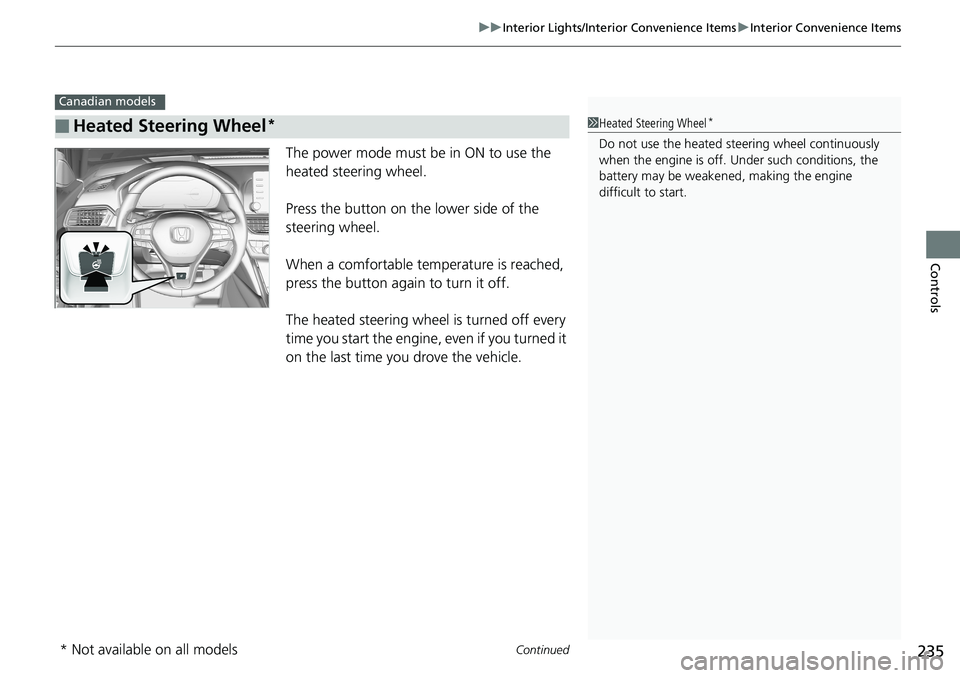
The power mode must be in ON to use the
heated steering wheel.
Press the button on the lower side of the
steering wheel.
When a comfortable temperature is reached,
press the button again to turn it off.
The heated steering wheel is turned off every
time you start the engine, even if you turned it
on the last time yo u drove the vehicle.
■Heated Steering Wheel*
Canadian models
1Heated Steering Wheel*
Do not use the heated st eering wheel continuously
when the engine is off. Under such conditions, the
battery may be weaken ed, making the engine
difficult to start.
* Not available on all models
Page 254 of 727
252
Features
Audio System Basic Operation
To use the audio system function, the power mode must be in ACCESSORY or ON.
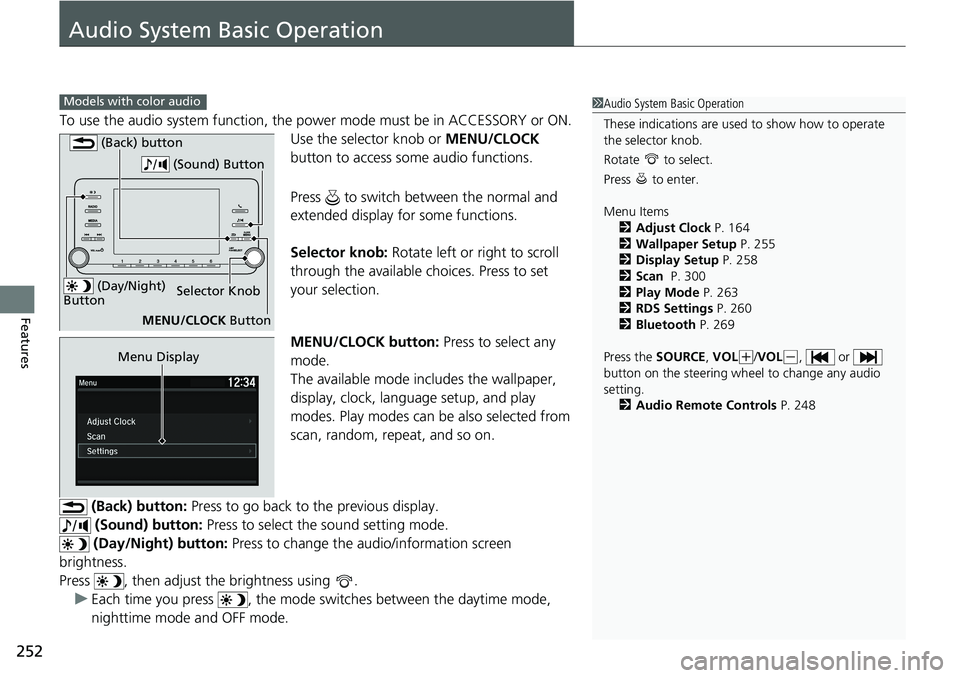
Use the selector knob or MENU/CLOCK
button to access some audio functions.
Press to switch between the normal and
extended display fo r some functions.
Selector knob: Rotate left or right to scroll
through the available ch oices. Press to set
your selection.
MENU/CLOCK button: Press to select any
mode.
The available mode includes the wallpaper,
display, clock, langu age setup, and play
modes. Play modes can be also selected from
scan, random, repeat, and so on.
(Back) button: Press to go back to the previous display.
(Sound) button: Press to select the sound setting mode.
(Day/Night) button: Press to change the audio/information screen
brightness.
Press , then adjust the brightness using . u Each time you press , the mode sw itches between the daytime mode,
nighttime mode and OFF mode.
Models with color audio1 Audio System Basic Operation
These indications are used to show how to operate
the selector knob.
Rotate to select.
Press to enter.
Menu Items
2 Adjust Clock P. 164
2 Wallpaper Setup P. 255
2 Display Setup P. 258
2 Scan P. 300
2 Play Mode P. 263
2 RDS Settings P. 260
2 Bluetooth P. 269
Press the SOURCE, VOL
(+/VOL(-, or
button on the steering whee l to change any audio
setting. 2 Audio Remote Controls P. 248
(Day/Night)
ButtonSelector Knob
MENU/CLOCK Button
(Back) button
(Sound) Button
Menu Display
Page 465 of 727
463
uuTowing a Trailer uTowing Your Vehicle
Continued
Driving
Towing Your Vehicle
Your vehicle is not designed to be towed behind a motorhome. If your vehicle needs
to be towed in an emergency, refer to the emergency towing information.
2Emergency Towing P. 693
Your vehicle can be towed behind a motorhome.
Perform the following procedure before towing your vehicle.
1. Put the transmission into neutral.
2. Release the parking brake.
3. Set the power mode to ACCESSORY.
u Make sure the steering wheel does not lock.
4. Turn off all the electric devices. Do not use any accessory power sockets.
u This can prevent the battery from running down.
■Extended towing
If you tow more than eight hours in one day, you should repeat the “When Your
Vehicle is Towed Behind a Motor home” at least every eight hours.
You also need to perform the following procedure to prevent the battery from
running down.
■When Your Vehicle is Towed Behind a Motorhome
1 Towing Your Vehicle
Do not exceed 65 mph (100 km/h).
Consult your towing parts sales or rental agency if
any other items are recommended or required for
your towing situation.
Manual transmission models
Automatic transmission/Continuousl y variable transmission models
Manual transmission models
Manual transmission models
Page 475 of 727
473
uuWhen Driving uPrecautions While Driving
Driving
Precautions While Driving
Avoid driving in deep water and on flooded roads. This can damage the engine or
driveline, or cause electrical component failure.
If there is a strong impact with something un der the vehicle, stop in a safe location.
Check the underside of the vehicle for damage or any fluid leaks.
■In Rain
■Other Precautions
1 Precautions While Driving
NOTICE
Do not change the transmission while pressing the
accelerator pedal. You could damage the
transmission.
NOTICE
If you repeatedly turn the steering wheel at an
extremely low speed, or hold the steering wheel in
the full left or right position for a while, the electric
power steering (EPS) system heats up. The system
goes into a protective mode, and limits its
performance. The steering wheel becomes harder
and harder to operate. Once the system cools down,
the EPS system is restored.
Repeated operation under these conditions can
eventually damage the system.
If the power mode is set to ACCESSORY while
driving, the engine will shut down and all steering
and brake power assist functi ons will stop, making it
difficult to control the vehicle.
Do not put the transmission into
( N, as you will lose
engine braking (and acce leration) performance.
During the first 600 miles (1,000 km) of operation,
avoid sudden acceleration or full throttle operation so
as not to damage the engine or powertrain.
Avoid hard braking for the first 200 miles (300 km).
You should also follow this when the brake pads are
replaced.
Page 499 of 727
497
uuWhen Driving uTire Pressure Monitoring System (TPMS)
Continued
Driving
Tire Pressure Monitoring System (TPMS)
Instead of directly measuring the pressure in each tire, the TPMS on this vehicle
monitors and compares the rolling radius and rotational characteristics of each
wheel and tire while you are driving to determine if one or more tires are
significantly under-inflated. This will caus e the low tire pressure/TPMS indicator to
come on and a message to appear on the driver information interface.
You must start TPMS calibration every time you:
• Adjust the pressure in one or more tires.
• Rotate the tires.
• Replace one or more tires.
Before calibrating the TPMS:
• Set the cold tire pressure in all four tires.
2 Checking Tires P. 642
Make sure:
•The vehicle is at a complete stop.
• The transmission is in neutral.
• The transmission is in
(P.
• The power mode is in ON.
■TPMS Calibration
1Tire Pressure Monitoring System (TPMS)
The system does not monitor the tires when driving
at low speed.
Conditions such as low ambient temperature and
altitude change directly a ffect tire pressure and can
trigger the low tire pressure/TPMS indicator to come on.
Tire pressure checked and inflated in:
•Warm weather can beco me under-inflated in
colder weather.
•Cold weather can become over-inflated in warmer
weather.
The low tire pressure/TPMS indicator will not come
on as a result of over inflation.
The TPMS may not function pr operly if tire type and
size are mixed. Make sure to use the same size and
type of tire. 2 Checking and Maintaining Tires P. 642
The low tire pressure/TPMS indicator may come on
with a delay or may not come on at all when:
•You rapidly accelerate, decelerate, or turn the
steering wheel.
•You drive on snowy or slippery roads.
•Snow chains* are used.
Manual transmission models
Automatic transmission/Continuousl y variable transmission models
All models
* Not available on all models
Page 523 of 727
Continued521
uuHonda Sensing ®u Adaptive Cruise Control (ACC) with Low Speed Follow (LSF)*
Driving
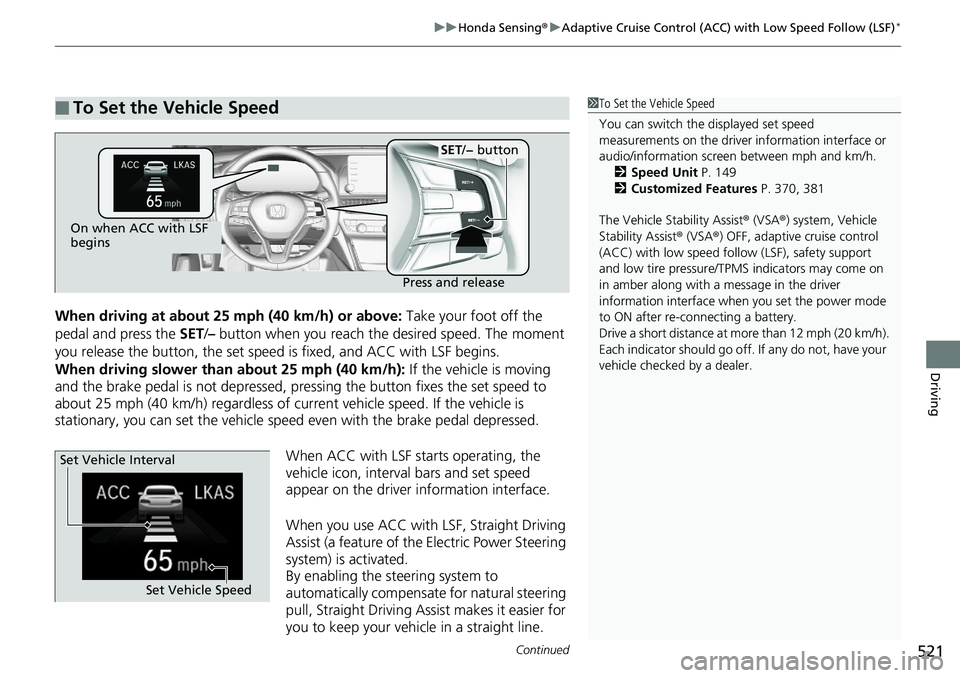
When driving at about 25 mph (40 km/h) or above: Take your foot off the
pedal and press the SET/– button when you reach th e desired speed. The moment
you release the button, th e set speed is fixed, and ACC with LSF begins.
When driving slower than about 25 mph (40 km/h): If the vehicle is moving
and the brake pedal is not depressed, pressing the button fixes the set speed to
about 25 mph (40 km/h) regardless of current vehicle speed. If the vehicle is
stationary, you can set the vehicle speed even with the brake pedal depressed.
When ACC with LSF starts operating, the
vehicle icon, interval bars and set speed
appear on the driver information interface.
When you use ACC with LSF, Straight Driving
Assist (a feature of the Electric Power Steering
system) is activated.
By enabling the steering system to
automatically compensate for natural steering
pull, Straight Driving Assist makes it easier for
you to keep your vehicle in a straight line.
■To Set the Vehicle Speed1 To Set the Vehicle Speed
You can switch the displayed set speed
measurements on the driver information interface or
audio/information screen between mph and km/h.
2 Speed Unit P. 149
2 Customized Features P. 370, 381
The Vehicle Stability Assist ® (VSA ®) system, Vehicle
Stability Assist ® (VSA ®) OFF, adaptive cruise control
(ACC) with low speed follow (LSF), safety support
and low tire pressure/TPM S indicators may come on
in amber along with a message in the driver
information interface when you set the power mode
to ON after re-connecting a battery.
Drive a short distance at mo re than 12 mph (20 km/h).
Each indicator should go off. If any do not, have your
vehicle checked by a dealer.
On when ACC with LSF
begins
Press and release
SET/− button
Set Vehicle Speed
Set Vehicle Interval
Page 535 of 727
Continued533
uuHonda Sensing ®u Adaptive Cruise Control (ACC) with Low Speed Follow (LSF)*
Driving
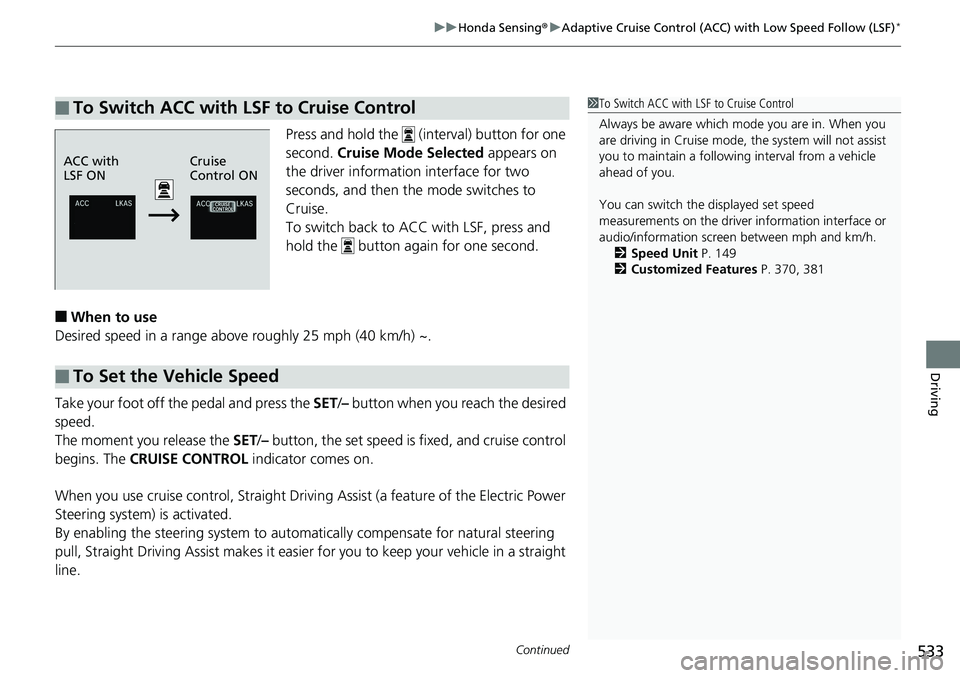
Press and hold the (interval) button for one
second. Cruise Mode Selected appears on
the driver informatio n interface for two
seconds, and then th e mode switches to
Cruise.
To switch back to ACC with LSF, press and
hold the button again for one second.
■When to use
Desired speed in a range above roughly 25 mph (40 km/h) ~.
Take your foot off the pedal and press the SET/– button when you reach the desired
speed.
The moment you release the SET/– button, the set speed is fixed, and cruise control
begins. The CRUISE CONTROL indicator comes on.
When you use cruise control, Straight Drivin g Assist (a feature of the Electric Power
Steering system) is activated.
By enabling the steering system to automa tically compensate for natural steering
pull, Straight Driv ing Assist makes it easier for you to keep your vehicle in a straight
line.
■To Switch ACC with LSF to Cruise Control1 To Switch ACC with LSF to Cruise Control
Always be aware which mode you are in. When you
are driving in Cruise mode, the system will not assist
you to maintain a followi ng interval from a vehicle
ahead of you.
You can switch the displayed set speed
measurements on the driver information interface or
audio/information screen between mph and km/h. 2 Speed Unit P. 149
2 Customized Features P. 370, 381
ACC with
LSF ON Cruise
Control ON
■To Set the Vehicle Speed
Page 539 of 727
Continued537
uuHonda Sensing ®u Adaptive Cruise Control (ACC)*
Driving
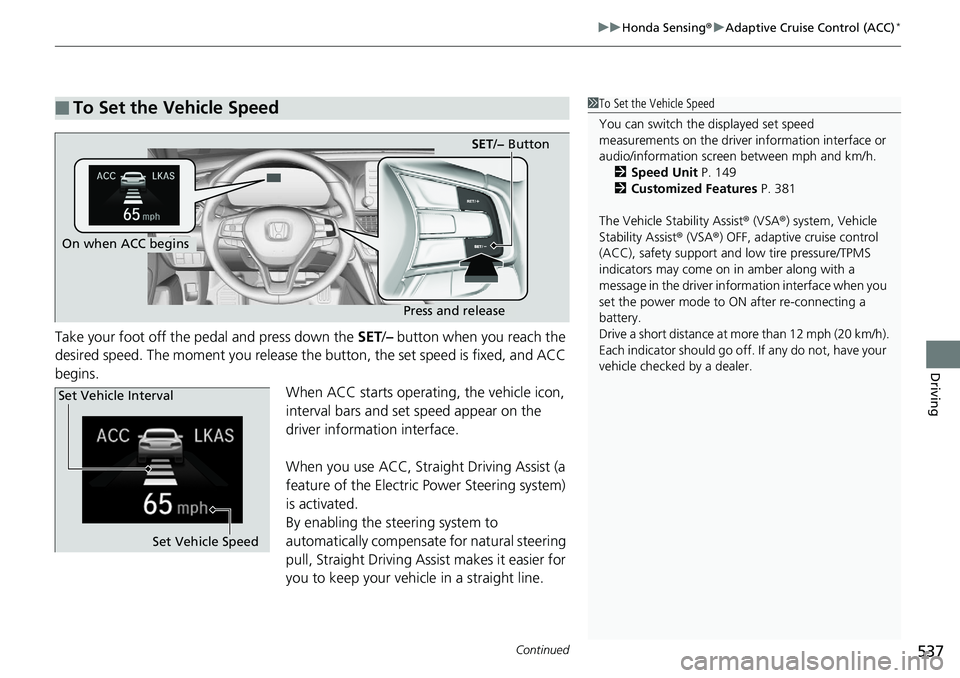
Take your foot off the pedal and press down the SET/– button when you reach the
desired speed. The moment you release the button, the set speed is fixed, and ACC
begins.
When ACC starts operating, the vehicle icon,
interval bars and set speed appear on the
driver information interface.
When you use ACC, Straight Driving Assist (a
feature of the Electric Power Steering system)
is activated.
By enabling the steering system to
automatically compensate for natural steering
pull, Straight Driving Assist makes it easier for
you to keep your vehicle in a straight line.
■To Set the Vehicle Speed1To Set the Vehicle Speed
You can switch the displayed set speed
measurements on the driver information interface or
audio/information screen between mph and km/h.
2 Speed Unit P. 149
2 Customized Features P. 381
The Vehicle Stability Assist ® (VSA ®) system, Vehicle
Stability Assist ® (VSA ®) OFF, adaptive cruise control
(ACC), safety support and low tire pressure/TPMS
indicators may come on in amber along with a
message in the driver information interface when you
set the power mode to ON after re-connecting a
battery.
Drive a short distance at mo re than 12 mph (20 km/h).
Each indicator should go off. If any do not, have your
vehicle checked by a dealer.
On when ACC begins
Press and release
SET /− Button
Set Vehicle Speed
Set Vehicle Interval