2019 HONDA ACCORD SEDAN low beam
[x] Cancel search: low beamPage 199 of 727
197
uuOperating the Switches Around the Steering Wheel uAuto High-Beam
Continued
Controls
Auto High-Beam
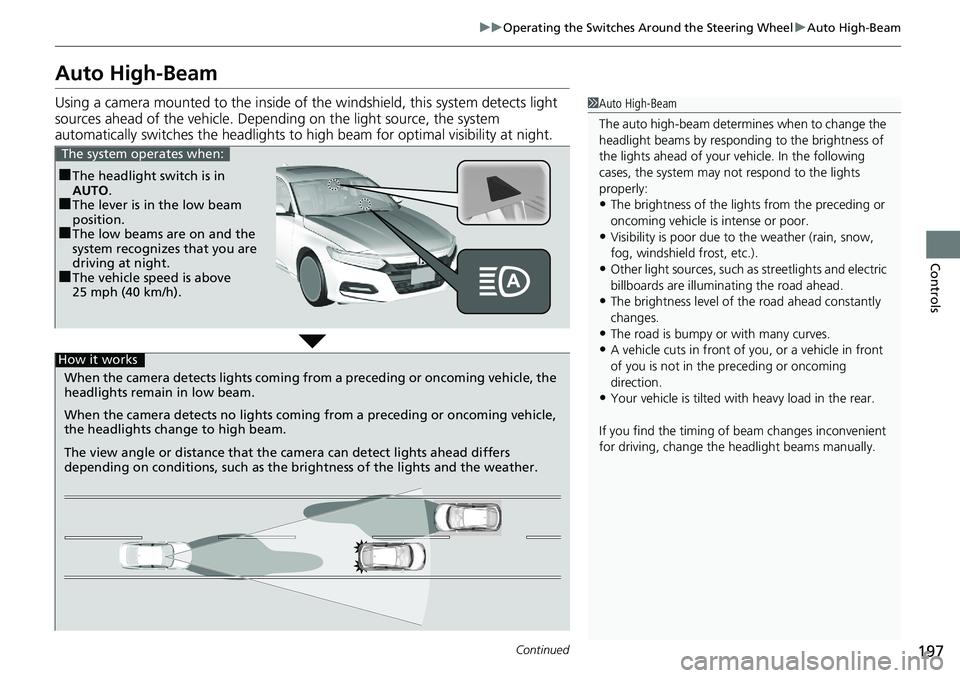
Using a camera mounted to the inside of the windshield, this system detects light
sources ahead of the vehicle. Depend ing on the light source, the system
automatically switches the headlights to hi gh beam for optimal visibility at night.1Auto High-Beam
The auto high-beam determines when to change the
headlight beams by responding to the brightness of
the lights ahead of your vehicle. In the following
cases, the system may not respond to the lights
properly:
•The brightness of the lights from the preceding or
oncoming vehicle is intense or poor.
•Visibility is poor due to the weather (rain, snow,
fog, windshield frost, etc.).
•Other light sources, such as streetlights and electric
billboards are illumina ting the road ahead.
•The brightness level of th e road ahead constantly
changes.
•The road is bumpy or with many curves.
•A vehicle cuts in front of you, or a vehicle in front
of you is not in the preceding or oncoming
direction.
•Your vehicle is tilted with heavy load in the rear.
If you find the timing of beam changes inconvenient
for driving, change the headlight beams manually.
■The headlight switch is in
AUTO.
■The lever is in the low beam
position.
■The low beams are on and the
system recognizes that you are
driving at night.
■The vehicle speed is above
25 mph (40 km/h).
The system operates when:
When the camera detects lig hts coming from a preceding or oncoming vehicle, the
headlights remain in low beam.
When the camera detects no lights coming from a preceding or oncoming vehicle,
the headlights change to high beam.
The view angle or distance that the camera can detect lights ahead differs
depending on conditions, such as the brightness of the lights and the weather.
How it works
Page 200 of 727
uuOperating the Switches Around the Steering Wheel uAuto High-Beam
198
Controls
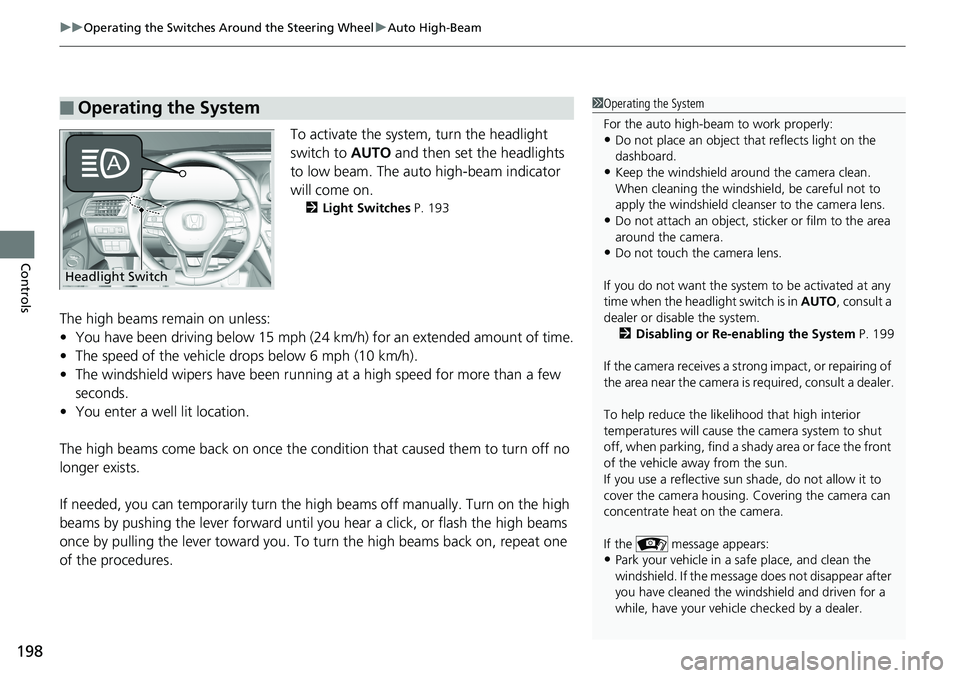
To activate the system, turn the headlight
switch to AUTO and then set the headlights
to low beam. The auto high-beam indicator
will come on.
2 Light Switches P. 193
The high beams remain on unless:
•You have been driving below 15 mph (24 km/h) for an extended amount of time.
• The speed of the vehicle drops below 6 mph (10 km/h).
• The windshield wipers have been running at a high speed for more than a few
seconds.
• You enter a well lit location.
The high beams come back on once the condition that caused them to turn off no
longer exists.
If needed, you can temporarily turn the high beams off manually. Turn on the high
beams by pushing the lever forward until yo u hear a click, or flash the high beams
once by pulling the lever toward you. To turn the high beams back on, repeat one
of the procedures.
■Operating the System1 Operating the System
For the auto high-beam to work properly:
•Do not place an object that reflects light on the
dashboard.
•Keep the windshield around the camera clean.
When cleaning the windshield, be careful not to
apply the windshield cleans er to the camera lens.
•Do not attach an object, sticker or film to the area
around the camera.
•Do not touch the camera lens.
If you do not want the system to be activated at any
time when the headlight switch is in AUTO, consult a
dealer or disable the system. 2 Disabling or Re-enabling the System P. 199
If the camera receives a st rong impact, or repairing of
the area near the camera is required, consult a dealer.
To help reduce the likel ihood that high interior
temperatures will cause the camera system to shut
off, when parking, find a sh ady area or face the front
of the vehicle away from the sun.
If you use a reflective sun shade, do not allow it to
cover the camera housing. Covering the camera can
concentrate heat on the camera.
If the message appears:
•Park your vehicle in a sa fe place, and clean the
windshield. If the message does not disappear after
you have cleaned the winds hield and driven for a
while, have your vehicle checked by a dealer.
Headlight Switch
Page 334 of 727
332
uuAudio System Basic Operation uNear Field Communication (NFC)*
Features
Near Field Comm unication (NFC)*
Near Field Communication (NFC) allows you to connect your phone to the audio
system easily via Bluetooth®.
NFC enables two devices to communicate in close proximity, within about 0.6 inch
(15 mm).
The following features are available:
• Bluetooth ® setup
• Image transfer for wallpaper
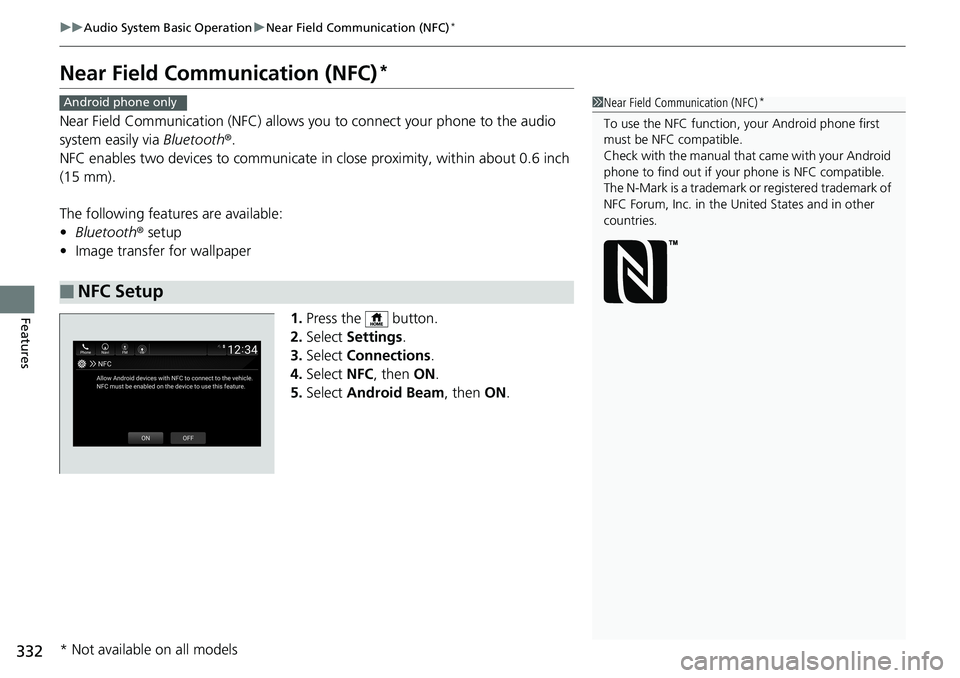
1.Press the button.
2. Select Settings .
3. Select Connections .
4. Select NFC, then ON.
5. Select Android Beam , then ON.
■NFC Setup
1Near Field Communication (NFC)*
To use the NFC function, your Android phone first
must be NFC compatible.
Check with the manual that came with your Android
phone to find out if your phone is NFC compatible.
The N-Mark is a trademark or registered trademark of
NFC Forum, Inc. in the United States and in other
countries.
Android phone only
* Not available on all models
Page 572 of 727

570
uuHonda Sensing ®u Radar Sensor
Driving
Radar Sensor
The radar sensor is at the lower part of the
front bumper.
• Do not change the position of the radar
sensor or any of the surrounding parts.
• Do not apply paint, stickers, or attach non-
genuine accessories to the front part of the
radar sensor or the surrounding area. Be
particularly careful that any custom license
plate frame or other accessory does not
block any part of the radar beam path (see
adjacent illustration).1Radar Sensor
Avoid strong impacts to the radar sensor cover.
For the CMBS
TM to work properly:
•Always keep the radar sensor cover clean.•Never use chemical solvents or polishing powder
for cleaning the sensor cove r. Clean it with water
or a mild detergent.
•Do not put a sticker on th e radar sensor cover or
replace the radar sensor cover.
If you need the radar sensor to be repaired, or
removed, or the radar se nsor cover is strongly
impacted, turn off the syst em by using the safety
support switch and take y our vehicle to a dealer.
2 CMBS
TM On and Off P. 513
If the vehicle is involved in any of the following
situations, the radar sensor may not work properly.
Have your vehicle checked by a dealer:
•Your vehicle is involved in a frontal collision.•Your vehicle drives th rough deep water or is
submerged in deep water.
•Your vehicle strongly strikes a bump, curb, chock,
or embankment that coul d jar the radar sensor.
Radar
Sensor
The radar sensor is
at the lower part of
the front bumper.
Do not apply paint, stickers, or
attach accessories to the front
part of the radar sensor or the
surrounding area.
Page 633 of 727
631Continued
Maintenance
Replacing Light Bulbs
Headlight Bulbs
When replacing, use the following bulbs.
High beam headlight: LED type*
High beam headlight: 60 W (HB3 for halogen bulb type)*
Low beam headlight: LED type
1Headlight Bulbs
NOTICE
Halogen bulbs get very hot when lit.
Oil, perspiration, or a scratch on the glass can cause
the bulb to overhe at and shatter.
The headlight aim is set by the factory, and does not
need to be adjusted. Howeve r, if you regularly carry
heavy items in the tr unk or tow a trailer
*, have the
aiming readjusted at a de aler or by a qualified
technician.
When replacing a halogen bulb, handle it by its base,
and protect the glass from c ontact with your skin or
hard objects. If you touch the glass, clean it with
denatured alcohol and a clean cloth.
Models with halogen high beam headlights
All models
Models with halogen high beam headlights
* Not available on all models
Page 634 of 727
uuReplacing Light Bulbs uHeadlight Bulbs
632
Maintenance
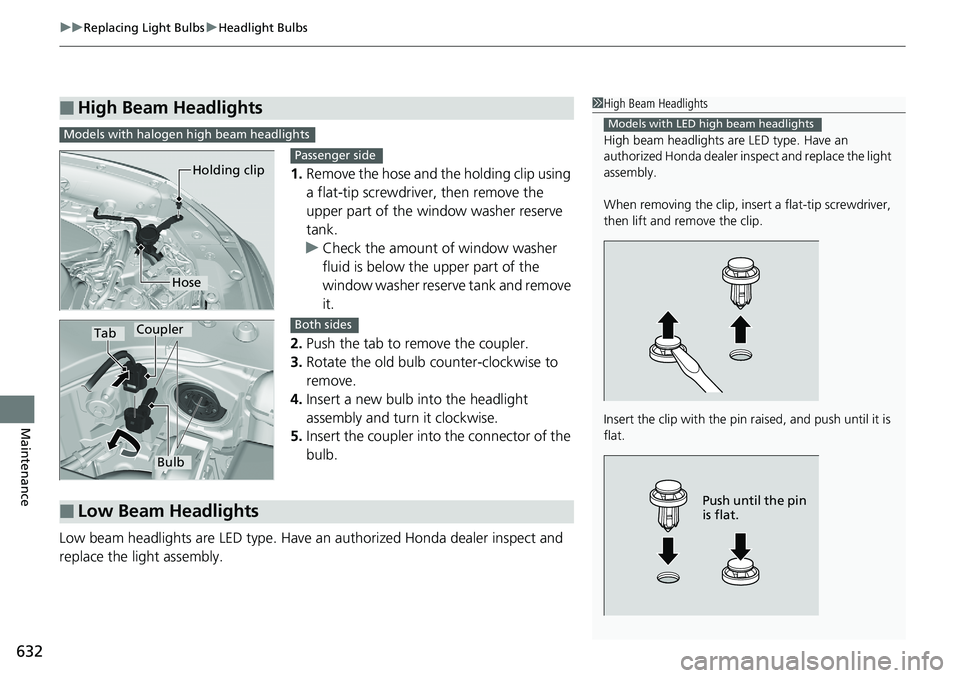
1. Remove the hose and the holding clip using
a flat-tip screwdriver, then remove the
upper part of the window washer reserve
tank.
u Check the amount of window washer
fluid is below the upper part of the
window washer reserve tank and remove
it.
2. Push the tab to remove the coupler.
3. Rotate the old bulb counter-clockwise to
remove.
4. Insert a new bulb into the headlight
assembly and turn it clockwise.
5. Insert the coupler into the connector of the
bulb.
Low beam headlights are LED type. Have an authorized Honda dealer inspect and
replace the light assembly.
■High Beam Headlights1 High Beam Headlights
High beam headlights ar e LED type. Have an
authorized Honda dealer in spect and replace the light
assembly.
When removing the clip, insert a flat-tip screwdriver,
then lift and remove the clip.
Insert the clip with the pin raised, and push until it is
flat.
Models with LED high beam headlights
Push until the pin
is flat.
Models with halogen high beam headlights
Holding clip
Hose
Passenger side
TabCoupler
Bulb
Both sides
■Low Beam Headlights
Page 702 of 727
700
Information
Specifications
■Vehicle Specifications
■ Air Conditioning
ModelACCORD
No. of Passengers:
Front 2
Rear 3
Total 5
Weights:Gross Vehicle
Weight Rating See the certification label on the driver’s
doorjamb
Gross Axle Weight
Rating (Front)See the certification label on the driver’s
doorjamb
Gross Axle Weight
Rating (Rear)See the certification label on the driver’s
doorjamb
Refrigerant TypeHFO-1234yf (R-1234yf)
Charge Quantity 13.9 – 15.7 oz (395 – 445 g)
Lubricant TypeND-OIL 14
Quantity 5.6 – 6.5 cu-in (92 – 107 cm3)
1.5 L engine models■ Engine Specifications
■ Fuel
■ Washer Fluid
Displacement91.38 cu-in (1,498 cm3)
Spark Plugs NGK DILKAR8P8SY
TypeUnleaded gasoline, Pump octane number
of 87 or higher
Fuel Tank Capacity 14.8 US gal (56 L)
Tank CapacityU.S.: 2.6 US qt (2.5 L)
Canada: 4.8 US qt (4.5 L)
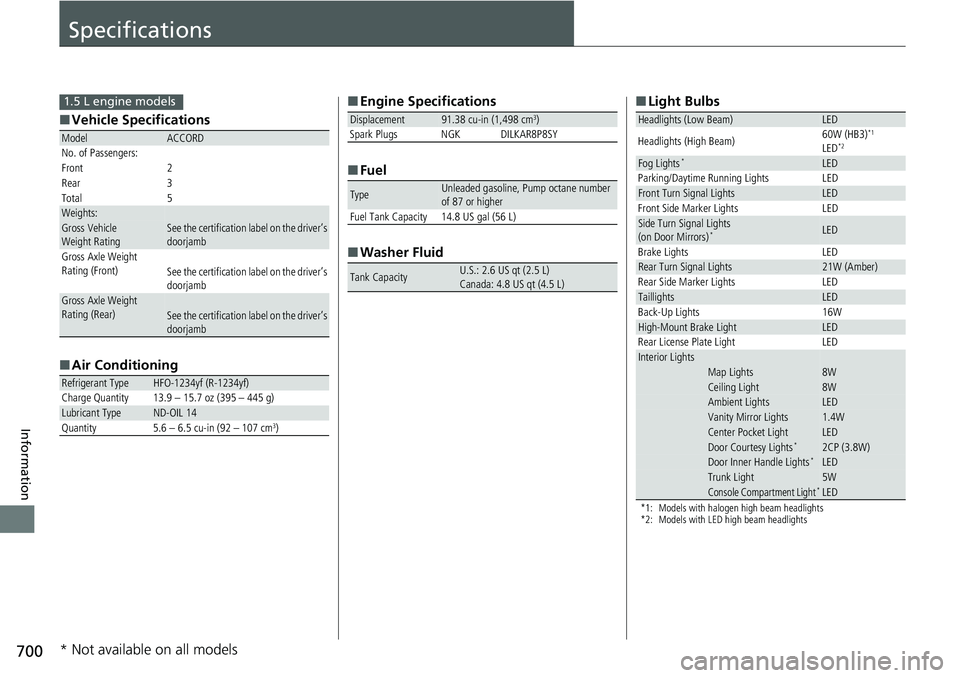
■ Light Bulbs
*1: Models with halogen high beam headlights
*2: Models with LED high beam headlights
Headlights (Low Beam)LED
Headlights (High Beam) 60W (HB3)*1
LED*2
Fog Lights*LED
Parking/Daytime Running Lights LED
Front Turn Signal LightsLED
Front Side Marker Lights LED
Side Turn Signal Lights
(on Door Mirrors)*LED
Brake Lights LED
Rear Turn Signal Lights21W (Amber)
Rear Side Marker Lights LED
TaillightsLED
Back-Up Lights 16W
High-Mount Brake LightLED
Rear License Plate Light LED
Interior LightsMap Lights8WCeiling Light8WAmbient LightsLEDVanity Mirror Lights1.4WCenter Pocket LightLEDDoor Courtesy Lights*2CP (3.8W)Door Inner Handle Lights*LEDTrunk Light5WConsole Compartment Light*LED
* Not available on all models
Page 704 of 727
702
uuSpecifications u
Information
■Vehicle Specifications
■ Air Conditioning
ModelACCORD
No. of Passengers:
Front 2
Rear 3
Total 5
Weights:Gross Vehicle
Weight Rating See the certification label on the driver’s
doorjamb
Gross Axle Weight
Rating (Front)See the certification label on the driver’s
doorjamb
Gross Axle Weight
Rating (Rear)See the certification label on the driver’s
doorjamb
Refrigerant TypeHFO-1234yf (R-1234yf)
Charge Quantity 13.9 – 15.7 oz (395 – 445 g)
Lubricant TypeND-OIL 14
Quantity 5.6 – 6.5 cu-in (92 – 107 cm3)
2.0 L engine models■ Engine Specifications
■ Fuel
■ Washer Fluid
Displacement121.76 cu-in (1,996 cm3)
Spark Plugs NGK DILKAR8P8SY
TypeUnleaded gasoline, Pump octane number
of 87 or higher
Fuel Tank Capacity 14.8 US gal (56 L)
Tank CapacityU.S.: 2.6 US qt (2.5 L)
Canada: 4.8 US qt (4.5 L)
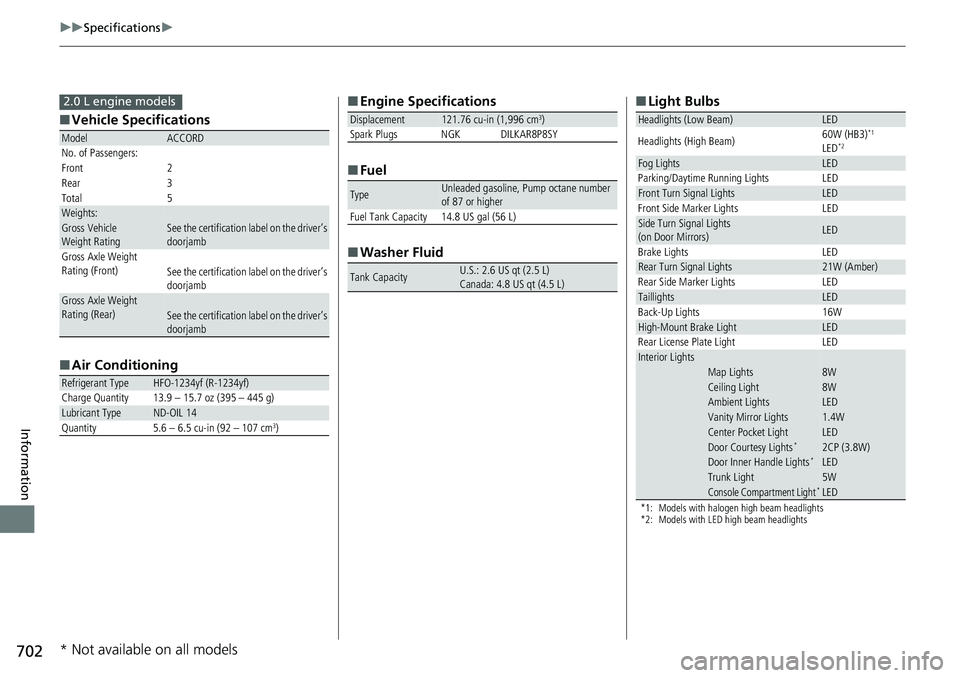
■ Light Bulbs
*1: Models with halogen high beam headlights
*2: Models with LED high beam headlights
Headlights (Low Beam)LED
Headlights (High Beam) 60W (HB3)*1
LED*2
Fog LightsLED
Parking/Daytime Running Lights LED
Front Turn Signal LightsLED
Front Side Marker Lights LED
Side Turn Signal Lights
(on Door Mirrors)LED
Brake Lights LED
Rear Turn Signal Lights21W (Amber)
Rear Side Marker Lights LED
TaillightsLED
Back-Up Lights 16W
High-Mount Brake LightLED
Rear License Plate Light LED
Interior LightsMap Lights8WCeiling Light8WAmbient LightsLEDVanity Mirror Lights1.4WCenter Pocket LightLEDDoor Courtesy Lights*2CP (3.8W)Door Inner Handle Lights*LEDTrunk Light5WConsole Compartment Light*LED
* Not available on all models