Page 614 of 727

612
uuMaintenance MinderTMuTo Use Maintenance MinderTM
Maintenance
1Maintenance Service Items
•Adjust the valves during services A, 0, 9, 1, 2, or 3
if they are noisy.
Canadian models
*1: If a Maintenance Minder Message does not appear more than 12 months after the display is reset,
change the engine oil every year.
*2: If you drive in dusty conditions, replace the air cleaner element every 15,000 miles (24,000 km).
*3: If you drive primarily in urban areas that have high concentrations of soot in the air from industry and from diesel-powered vehicles, replace the dust and pollen filter every 15,000 miles (24,000 km).
*4: Driving in mountainous areas at very low vehicle speeds results in higher transmission temperatures.
This requires transmission fluid changes more frequently than recommended by the Maintenance
Minder. If you regularly drive your vehicle under these conditions, have the transmission fluid changed
every 25,000 miles (40,000 km).
*5: If a Maintenance Minder Message does not appear more than 36 months after the display for item 7 is reset, change the brake fluid every 3 years.
# : See information on maintenance and emissions warranty in the first column on page 709.
CODEMaintenance Main Items
A
●Replace engine oil*1
0●Replace engine oil*1 and oil filter
Continuously variable transmission models
CODEMaintenance Sub Items
1
●Rotate tires
2●Replace air cleaner element*2
●Replace dust and pollen filter*3
●Inspect drive belt
3
●Replace transmission fluid*4
4●Replace spark plugs●Inspect valve clearance
5
●Replace engine coolant
7●Replace brake fluid*6
9●Service front and rear brakes●Inspect tie rod ends, steering gear box, and boots●Inspect suspension components●Inspect driveshaft boots●Inspect brake hoses and li nes (including ABS/VSA®)●Inspect all fluid levels and condition of fluids●Inspect exhaust system #
●Inspect fuel lines and connections #
Page 616 of 727
614
Maintenance
Maintenance Under the Hood
Maintenance Items Under the Hood
1.5 L engine models
Brake/Clutch* Fluid
(Black Cap)
Engine Coolant
Reserve Tank
Radiator Cap
Washer Fluid
(Blue Cap) Engine Oil Dipstick
(Orange) Engine Oil Fill Cap
Battery
* Not available on all models
Page 617 of 727
615
uuMaintenance Under the Hood uMaintenance Items Under the Hood
Maintenance
2.0 L engine models
Engine Oil Dipstick
(Orange)
Washer Fluid
(Blue Cap) Engine Coolant
Reserve Tank
Radiator Cap Brake/Clutch
* Fluid
(Black Cap)
Engine Oil Fill Cap
Battery
* Not available on all models
Page 618 of 727

616
uuMaintenance Under the Hood uOpening the Hood
Maintenance
Opening the Hood
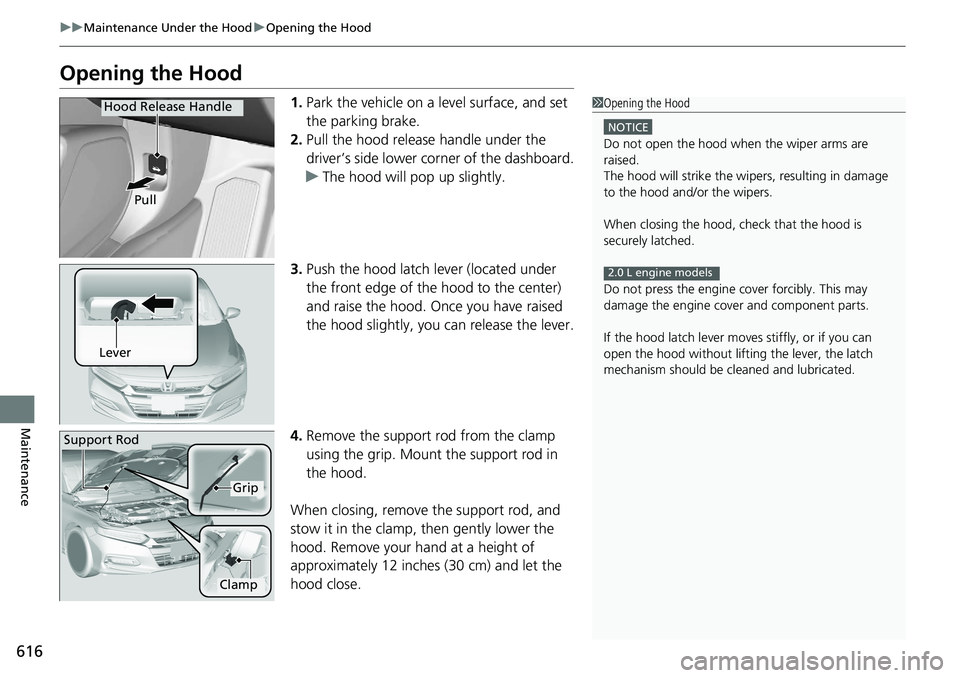
1. Park the vehicle on a level surface, and set
the parking brake.
2. Pull the hood release handle under the
driver’s side lower co rner of the dashboard.
u The hood will pop up slightly.
3. Push the hood latch lever (located under
the front edge of the hood to the center)
and raise the hood. Once you have raised
the hood slightly, you can release the lever.
4. Remove the support rod from the clamp
using the grip. Mount the support rod in
the hood.
When closing, remove the support rod, and
stow it in the clamp, then gently lower the
hood. Remove your hand at a height of
approximately 12 inches (30 cm) and let the
hood close.1 Opening the Hood
NOTICE
Do not open the hood when the wiper arms are
raised.
The hood will strike the wipe rs, resulting in damage
to the hood and/or the wipers.
When closing the hood, check that the hood is
securely latched.
Do not press the engine cover forcibly. This may
damage the engine cover and component parts.
If the hood latch lever moves stiffly, or if you can
open the hood without lifti ng the lever, the latch
mechanism should be cl eaned and lubricated.
2.0 L engine models
Hood Release Handle
Pull
Lever
Support Rod
Grip
Clamp
Page 631 of 727

629
uuMaintenance Under the Hood uBrake/Clutch* Fluid
Maintenance
Brake/Clutch* Fluid
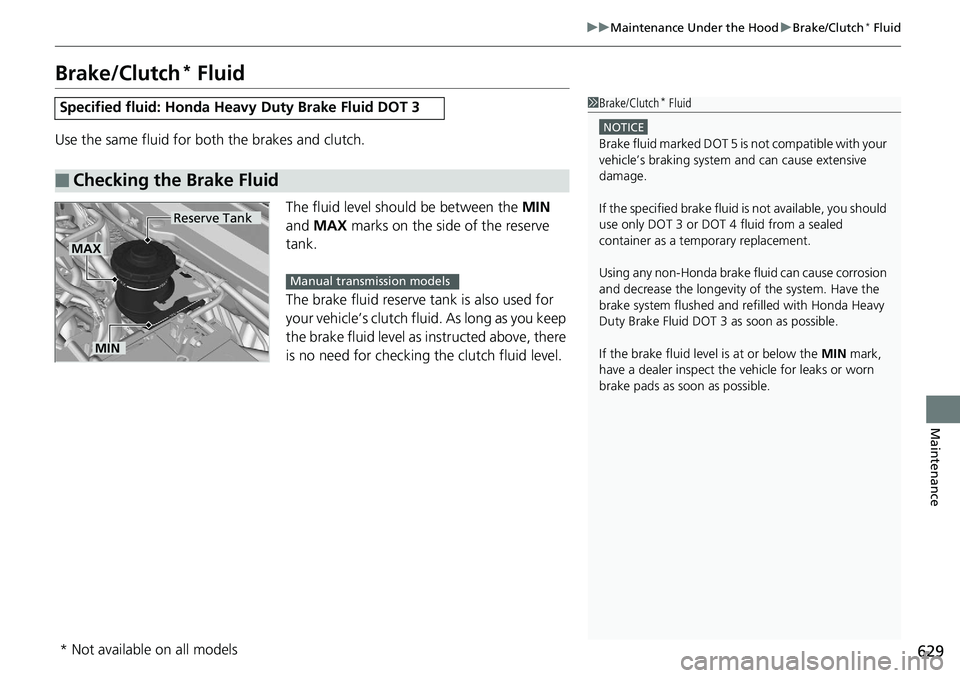
Use the same fluid for bo th the brakes and clutch.
The fluid level should be between the MIN
and MAX marks on the side of the reserve
tank.
The brake fluid reserve tank is also used for
your vehicle’s clutch fluid. As long as you keep
the brake fluid level as instructed above, there
is no need for checking the clutch fluid level.
Specified fluid: Honda Heavy Duty Brake Fluid DOT 3
■Checking the Brake Fluid
1Brake/Clutch* Fluid
NOTICE
Brake fluid marked DOT 5 is not compatible with your
vehicle’s braking system and can cause extensive
damage.
If the specified brake fluid is not available, you should
use only DOT 3 or DOT 4 fluid from a sealed
container as a temporary replacement.
Using any non-Honda brake fluid can cause corrosion
and decrease the longevity of the system. Have the
brake system flushed and re filled with Honda Heavy
Duty Brake Fluid DOT 3 as soon as possible.
If the brake fluid level is at or below the MIN mark,
have a dealer inspect the vehicle for leaks or worn
brake pads as soon as possible.
Reserve Tank
MIN
MAX
Manual transmission models
* Not available on all models
Page 636 of 727
634
uuReplacing Light Bulbs uBrake, Taillight, Rear Side Marker Li ghts and Rear Turn Signal Light Bulbs
Maintenance
Brake, Taillight, Rear Side Marker Lights and Rear
Turn Signal Light Bulbs
When replacing, use the following bulbs.
1.Pry on the edge of the cover using a flat-tip
screwdriver to remove the covers.
u Wrap the flat-tip screwdriver with a cloth
to prevent scratches.
2. Remove the bolts.
3. Pull the light assembly out of the rear pillar.
Brake Light: LED
Taillight: LED
Rear Side Marker Light: LED
Rear Turn Signal Light: 21 W (Amber)
1Brake, Taillight, Rear Side Marker Lights and Rear Turn Signal
Light Bulbs
Brake and rear side marker/taillights are LED type.
Have an authorized Honda dealer inspect and replace
the light assembly.
Cover
Bolts
Page 637 of 727
635
uuReplacing Light Bulbs uBrake, Taillight, Rear Side Marker Lights and Rear Turn Signal Light Bulbs
Maintenance
4. Turn the socket co unter-clockwise and
remove it.
5. Push and turn the ol d bulb clockwise and
remove it, and insert a new bulb.
Bulb
Socket
Page 638 of 727
636
uuReplacing Light Bulbs uTaillight, Brake Light* and Back-Up Light Bulbs
Maintenance
Taillight, Brake Light* and Back-Up Light Bulbs
When replacing, use the following bulbs.
1.Remove the holding clips using a flat-tip
screwdriver, then pull the lining back.
2. Turn the socket counter-clockwise and
remove it.
3. Remove the old bulb and insert a new bulb.
Taillight: LED
Brake Light*: LED
Back-Up Light: 16 W
1 Taillight, Brake Light* and Back-Up Light Bulbs
Taillights and brake lights
* are LED type. Have an
authorized Honda dealer in spect and replace the light
assembly.
When removing the clip, insert a flat-tip screwdriver,
then lift and remove the clip.
Insert the clip with the pin raised, and push until it is flat.
Clip
Push until the
pin is flat.
Holding Clip
BulbSocket
Driver side
* Not available on all models