2019 GMC SIERRA DENALI stop start
[x] Cancel search: stop startPage 332 of 472
GMC Sierra/Sierra Denali Owner Manual (GMNA-Localizing-U.S./Canada/
Mexico-1500-11698638) - 2019 - crc - 5/15/18
Vehicle Care 331CautionFailure to follow the specific
coolant fill procedure could cause
the engine to overheat and could
cause system damage. If coolant
is not visible in the surge tank,
contact your dealer.
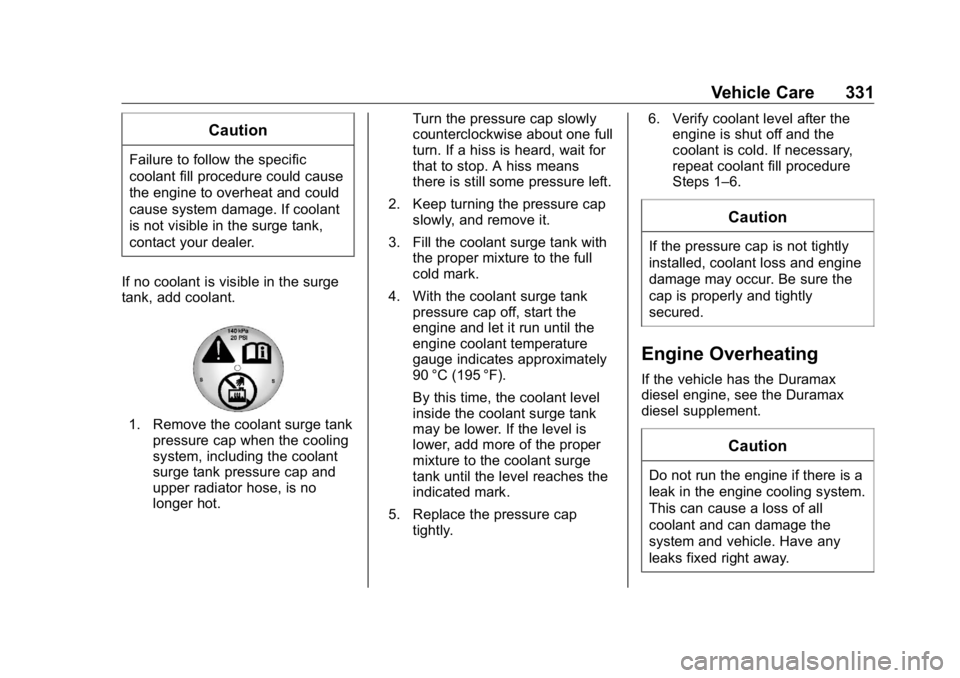
If no coolant is visible in the surge
tank, add coolant.
1. Remove the coolant surge tank
pressure cap when the cooling
system, including the coolant
surge tank pressure cap and
upper radiator hose, is no
longer hot. Turn the pressure cap slowly
counterclockwise about one full
turn. If a hiss is heard, wait for
that to stop. A hiss means
there is still some pressure left.
2. Keep turning the pressure cap
slowly, and remove it.
3. Fill the coolant surge tank with
the proper mixture to the full
cold mark.
4. With the coolant surge tank
pressure cap off, start the
engine and let it run until the
engine coolant temperature
gauge indicates approximately
90 °C (195 °F).
By this time, the coolant level
inside the coolant surge tank
may be lower. If the level is
lower, add more of the proper
mixture to the coolant surge
tank until the level reaches the
indicated mark.
5. Replace the pressure cap
tightly. 6. Verify coolant level after the
engine is shut off and the
coolant is cold. If necessary,
repeat coolant fill procedure
Steps 1 – 6.
CautionIf the pressure cap is not tightly
installed, coolant loss and engine
damage may occur. Be sure the
cap is properly and tightly
secured.
Engine Overheating If the vehicle has the Duramax
diesel engine, see the Duramax
diesel supplement.
Caution
Do not run the engine if there is a
leak in the engine cooling system.
This can cause a loss of all
coolant and can damage the
system and vehicle. Have any
leaks fixed right away.
Page 338 of 472
GMC Sierra/Sierra Denali Owner Manual (GMNA-Localizing-U.S./Canada/
Mexico-1500-11698638) - 2019 - crc - 5/15/18
Vehicle Care 337.
A fluid leak in the brake
hydraulic system. Have the
brake hydraulic system fixed.
With a leak, the brakes will not
work well.
Always clean the brake fluid
reservoir cap and the area around
the cap before removing it.
Do not top off the brake fluid.
Adding fluid does not correct a leak.
If fluid is added when the linings are
worn, there will be too much fluid
when new brake linings are
installed. Add or remove fluid, as
necessary, only when work is done
on the brake hydraulic system.
{ Warning
If too much brake fluid is added, it
can spill on the engine and burn,
if the engine is hot enough. You
or others could be burned, and
the vehicle could be damaged.
Add brake fluid only when work is
done on the brake hydraulic
system. When the brake fluid falls to a low
level, the brake warning light comes
on. See Brake System Warning
Light 0 151 .
Brake fluid absorbs water over time
which degrades the effectiveness of
the brake fluid. Replace brake fluid
at the specified intervals to prevent
increased stopping distance. See
Maintenance Schedule 0 415 .
What to Add
Use only GM approved DOT 4
brake fluid from a clean, sealed
container. See Recommended
Fluids and Lubricants 0 425 .
{ Warning
The wrong or contaminated brake
fluid could result in damage to the
brake system. This could result in
the loss of braking leading to a
possible injury. Always use the
proper GM approved brake fluid. CautionIf brake fluid is spilled on the
vehicle's painted surfaces, the
paint finish can be damaged.
Immediately wash off any painted
surface.
Battery - North America The original equipment battery is
maintenance free. Do not remove
the cap and do not add fluid.
Refer to the replacement number
shown on the original battery label
when a new battery is needed. See
Engine Compartment Overview
0 316 for battery location.
Stop/Start System
Vehicles equipped with a 2.7L L3B,
3.0L LM2, 5.3L L84 or 6.2L L87 are
equipped with a Stop/Start system
to shut off the engine to help
conserve fuel. See Stop/Start
System 0 222 .
Page 339 of 472
GMC Sierra/Sierra Denali Owner Manual (GMNA-Localizing-U.S./Canada/
Mexico-1500-11698638) - 2019 - crc - 5/15/18
338 Vehicle Care Vehicles with the Stop/Start system
have an Absorbed Glass Mat (AGM)
12-volt battery. Installation of a
standard 12-volt battery will result in
reduced 12-volt battery life. When
using a 12-volt battery charger on
the 12-volt AGM battery, some
chargers have an AGM battery
setting on the charger. If available,
use the AGM setting on the charger
to limit charge voltage to 14.8 volts.
Follow the charger manufacturer ’ s
instructions.
{ WarningWARNING: Battery posts,
terminals, and related
accessories contain lead and lead
compounds, chemicals known to
the State of California to cause
cancer and birth defects or other
reproductive harm. Batteries also
contain other chemicals known to
the State of California to cause
cancer. WASH HANDS AFTER
HANDLING. For more information
go to www.P65Warnings.ca.gov/
passenger-vehicle. See California Proposition
65 Warning 0 313 and the back
cover.
Vehicle Storage
{ WarningBatteries have acid that can burn
you and gas that can explode.
You can be badly hurt if you are
not careful. See Jump Starting -
North America 0 395 for tips on
working around a battery without
getting hurt.
Infrequent Usage: Remove the
black, negative ( − ) cable from the
battery to keep the battery from
running down.
Extended Storage: Remove the
black, negative ( − ) cable from the
battery or use a battery trickle
charger. Negative Battery Cable
Disconnection
{ WarningBefore disconnecting the negative
battery cable, turn off all features,
turn the ignition off, and remove
the key, if equipped, from the
vehicle. If this is not done, you or
others could be injured, and the
vehicle could be damaged.
CautionIf the battery is disconnected with
the ignition on or the vehicle in
Retained Accessory Power
(RAP), the OnStar back-up
battery will be permanently
discharged and will need to be
replaced.
1. Make sure the lamps, features,
and accessories are turned off.
2. Turn the ignition off and
remove the key, if equipped.
Page 340 of 472
GMC Sierra/Sierra Denali Owner Manual (GMNA-Localizing-U.S./Canada/
Mexico-1500-11698638) - 2019 - crc - 5/15/18
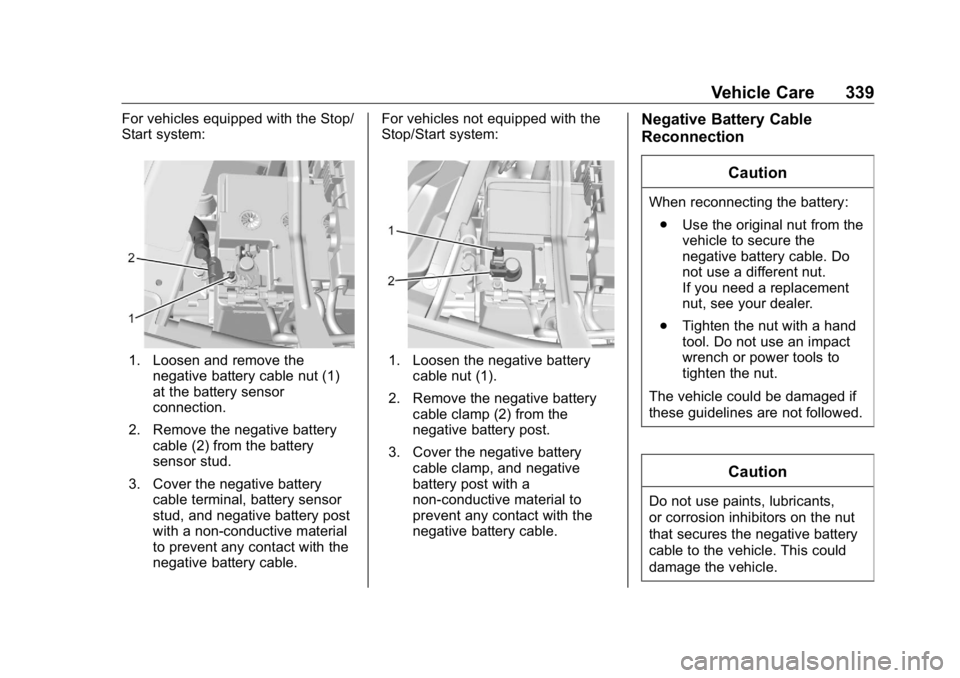
Vehicle Care 339For vehicles equipped with the Stop/
Start system:
1. Loosen and remove the
negative battery cable nut (1)
at the battery sensor
connection.
2. Remove the negative battery
cable (2) from the battery
sensor stud.
3. Cover the negative battery
cable terminal, battery sensor
stud, and negative battery post
with a non-conductive material
to prevent any contact with the
negative battery cable. For vehicles not equipped with the
Stop/Start system:
1. Loosen the negative battery
cable nut (1).
2. Remove the negative battery
cable clamp (2) from the
negative battery post.
3. Cover the negative battery
cable clamp, and negative
battery post with a
non-conductive material to
prevent any contact with the
negative battery cable. Negative Battery Cable
Reconnection
CautionWhen reconnecting the battery:
.
Use the original nut from the
vehicle to secure the
negative battery cable. Do
not use a different nut.
If you need a replacement
nut, see your dealer.
.
Tighten the nut with a hand
tool. Do not use an impact
wrench or power tools to
tighten the nut.
The vehicle could be damaged if
these guidelines are not followed.
Caution
Do not use paints, lubricants,
or corrosion inhibitors on the nut
that secures the negative battery
cable to the vehicle. This could
damage the vehicle.
Page 341 of 472
GMC Sierra/Sierra Denali Owner Manual (GMNA-Localizing-U.S./Canada/
Mexico-1500-11698638) - 2019 - crc - 5/15/18
340 Vehicle Care For vehicles equipped with the Stop/
Start system:
1. Install the negative battery
cable to the battery
sensor stud.
2. Install the negative battery
cable nut to the battery sensor
stud and tighten.
3. Turn the ignition on.
For vehicles not equipped with the
Stop/Start system:
1. Install the negative battery
cable clamp to the negative
battery post.
2. Tighten the negative battery
cable nut.
3. Turn the ignition on.
Four-Wheel Drive Transfer Case
When to Check Lubricant
Refer to Maintenance Schedule
0 415 to determine when to check
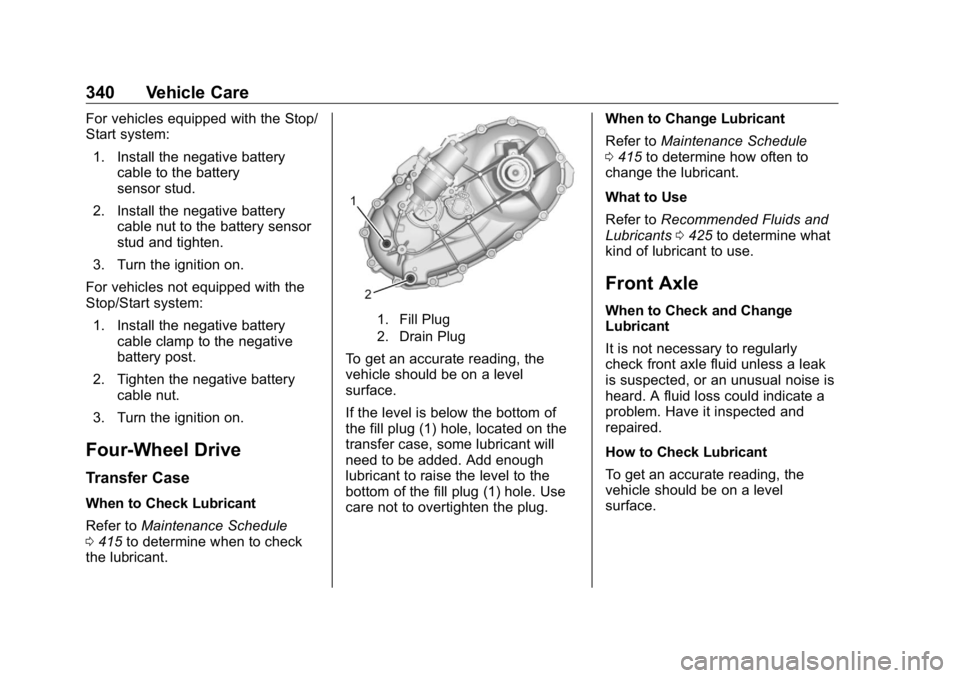
the lubricant. 1. Fill Plug
2. Drain Plug
To get an accurate reading, the
vehicle should be on a level
surface.
If the level is below the bottom of
the fill plug (1) hole, located on the
transfer case, some lubricant will
need to be added. Add enough
lubricant to raise the level to the
bottom of the fill plug (1) hole. Use
care not to overtighten the plug. When to Change Lubricant
Refer to Maintenance Schedule
0 415 to determine how often to
change the lubricant.
What to Use
Refer to Recommended Fluids and
Lubricants 0 425 to determine what
kind of lubricant to use.
Front Axle When to Check and Change
Lubricant
It is not necessary to regularly
check front axle fluid unless a leak
is suspected, or an unusual noise is
heard. A fluid loss could indicate a
problem. Have it inspected and
repaired.
How to Check Lubricant
To get an accurate reading, the
vehicle should be on a level
surface.
Page 351 of 472
GMC Sierra/Sierra Denali Owner Manual (GMNA-Localizing-U.S./Canada/
Mexico-1500-11698638) - 2019 - crc - 5/15/18
350 Vehicle Care Windshield Wipers If the wiper motor overheats due to
heavy snow or ice, the windshield
wipers will stop until the motor cools
and will then restart.
Although the circuit is protected
from electrical overload, overload
due to heavy snow or ice may
cause wiper linkage damage.
Always clear ice and heavy snow
from the windshield before using the
windshield wipers.
If the overload is caused by an
electrical problem and not snow or
ice, be sure to get it fixed.
Fuses and Circuit
Breakers The wiring circuits in the vehicle are
protected from short circuits by a
combination of fuses and circuit
breakers. This greatly reduces the
chance of damage caused by
electrical problems. { DangerFuses and circuit breakers are
marked with their ampere rating.
Do not exceed the
specified amperage rating when
replacing fuses and circuit
breakers. Use of an oversized
fuse or circuit breaker can result
in a vehicle fire. You and others
could be seriously injured or
killed.
To check a fuse, look at the
silver-colored band inside the fuse.
If the band is broken or melted,
replace the fuse. Be sure to replace
a bad fuse with a new one of the
identical size and rating.
Fuses of the same amperage can
be temporarily borrowed from
another fuse location, if a fuse goes
out. Replace the fuse as soon as
possible. Engine Compartment
Fuse Block If the vehicle has a diesel engine,
see the Duramax diesel
supplement.
The engine compartment fuse block
is in the engine compartment, on
the passenger side of the vehicle.
Lift the cover to access the fuse
block.
Page 353 of 472
GMC Sierra/Sierra Denali Owner Manual (GMNA-Localizing-U.S./Canada/
Mexico-1500-11698638) - 2019 - crc - 5/15/18
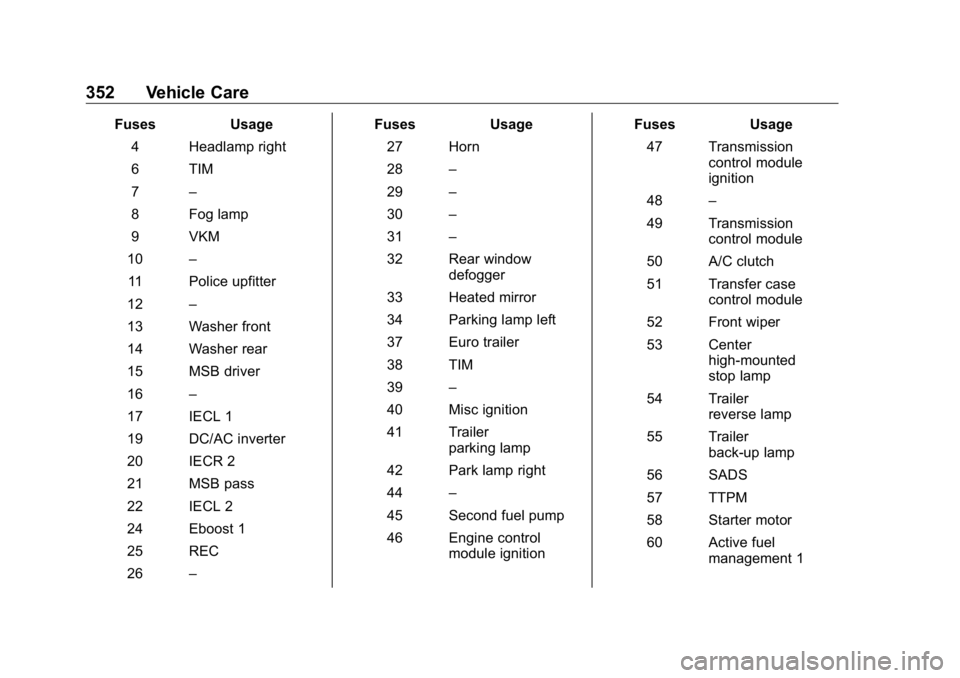
352 Vehicle Care Fuses Usage
4 Headlamp right
6 TIM
7 –
8 Fog lamp
9 VKM
10 –
11 Police upfitter
12 –
13 Washer front
14 Washer rear
15 MSB driver
16 –
17 IECL 1
19 DC/AC inverter
20 IECR 2
21 MSB pass
22 IECL 2
24 Eboost 1
25 REC
26 – Fuses Usage
27 Horn
28 –
29 –
30 –
31 –
32 Rear window
defogger
33 Heated mirror
34 Parking lamp left
37 Euro trailer
38 TIM
39 –
40 Misc ignition
41 Trailer
parking lamp
42 Park lamp right
44 –
45 Second fuel pump
46 Engine control
module ignition Fuses Usage
47 Transmission
control module
ignition
48 –
49 Transmission
control module
50 A/C clutch
51 Transfer case
control module
52 Front wiper
53 Center
high-mounted
stop lamp
54 Trailer
reverse lamp
55 Trailer
back-up lamp
56 SADS
57 TTPM
58 Starter motor
60 Active fuel
management 1
Page 354 of 472
GMC Sierra/Sierra Denali Owner Manual (GMNA-Localizing-U.S./Canada/
Mexico-1500-11698638) - 2019 - crc - 5/15/18
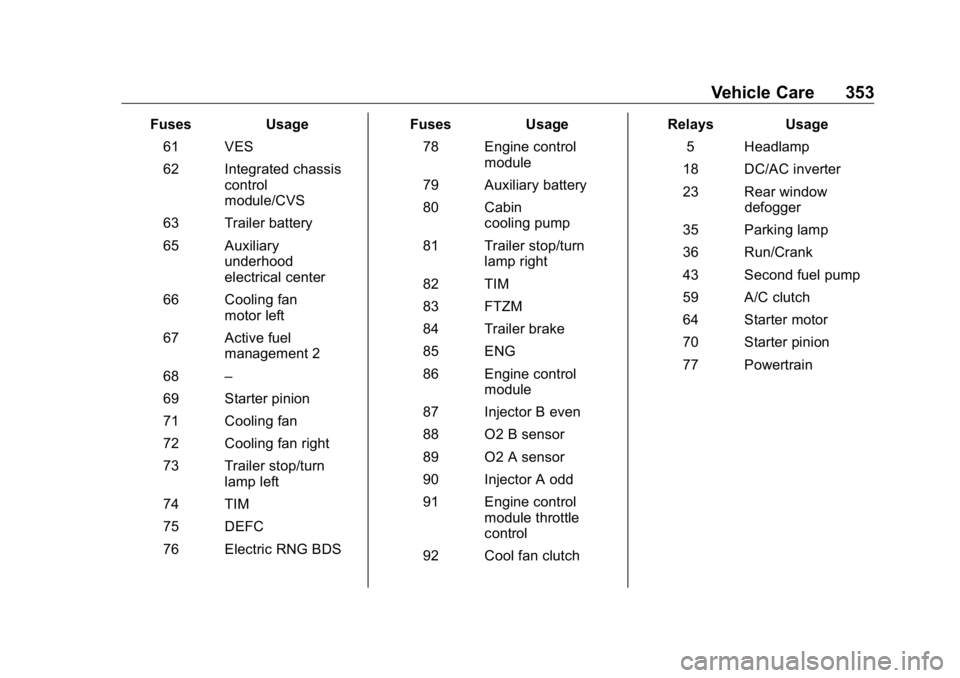
Vehicle Care 353Fuses Usage
61 VES
62 Integrated chassis
control
module/CVS
63 Trailer battery
65 Auxiliary
underhood
electrical center
66 Cooling fan
motor left
67 Active fuel
management 2
68 –
69 Starter pinion
71 Cooling fan
72 Cooling fan right
73 Trailer stop/turn
lamp left
74 TIM
75 DEFC
76 Electric RNG BDS Fuses Usage
78 Engine control
module
79 Auxiliary battery
80 Cabin
cooling pump
81 Trailer stop/turn
lamp right
82 TIM
83 FTZM
84 Trailer brake
85 ENG
86 Engine control
module
87 Injector B even
88 O2 B sensor
89 O2 A sensor
90 Injector A odd
91 Engine control
module throttle
control
92 Cool fan clutch Relays Usage
5 Headlamp
18 DC/AC inverter
23 Rear window
defogger
35 Parking lamp
36 Run/Crank
43 Second fuel pump
59 A/C clutch
64 Starter motor
70 Starter pinion
77 Powertrain