2019 FORD RANGER remove seats
[x] Cancel search: remove seatsPage 27 of 512

Note:
The automatic locking mode is
available on the front passenger and rear
seats. This vehicle does not require the use
of a locking clip.
6. Allow the belt to retract to remove slack. The belt clicks as it retracts to
indicate it is in the automatic locking
mode.
7. Try to pull the seatbelt out of the retractor to make sure the retractor is
in the automatic locking mode (you
should not be able to pull more belt
out). If the retractor is not locked,
unbuckle the belt and repeat Steps 5
and 6. 8.
Remove remaining slack from the belt.
Force the seat down with extra weight,
for example, by pressing down or
kneeling on the child restraint as you
pull up on the shoulder belt to force
slack from the belt. This is necessary
to remove the remaining slack that
exists once you add the extra weight
of the child to the child restraint. It also
helps to achieve the proper snugness
of the child restraint to your vehicle.
Sometimes, a slight lean toward the
buckle helps to remove remaining slack
from the belt.
9. Attach the tether strap (if the child restraint is equipped). 10. Before placing the child in the seat,
forcibly move the seat forward and
back to make sure the seat is securely
held in place.
To check this, grab the seat at the belt path
and attempt to move it side to side and
forward and back. There should be no
more than 1 in (2.5 cm) of movement for
proper installation.
We recommend checking with a NHTSA
Certified Child Passenger Safety
Technician to make certain the child
restraint is properly installed. In Canada,
check with Transport Canada for referral
to a Child Car Seat Clinic.
Using Lower Anchors and Tethers
for CHildren (LATCH) WARNING:
Do not attach two
child safety restraints to the same
anchor. In a crash, one anchor may not
be strong enough to hold two child
safety restraint attachments and may
break, causing serious injury or death.
24
Ranger (TFG) Canada/United States of America, enUSA, Edition date: 201809, Fourth-Printing Child SafetyE142533 E142534
Page 33 of 512

If your backless booster seat has a
removable shield, remove the shield. If a
vehicle seating position has a low seat
backrest or no head restraint, a backless
booster seat may place your child's head
(as measured at the tops of the ears)
above the top of the seat. In this case,
move the backless booster to another
seating position with a higher seat backrest
or head restraint and lap and shoulder
belts, or consider using a high back booster
seat. •
High back booster seats
If, with a backless booster seat, you cannot
find a seating position that adequately
supports your child's head, a high back
booster seat would be a better choice.
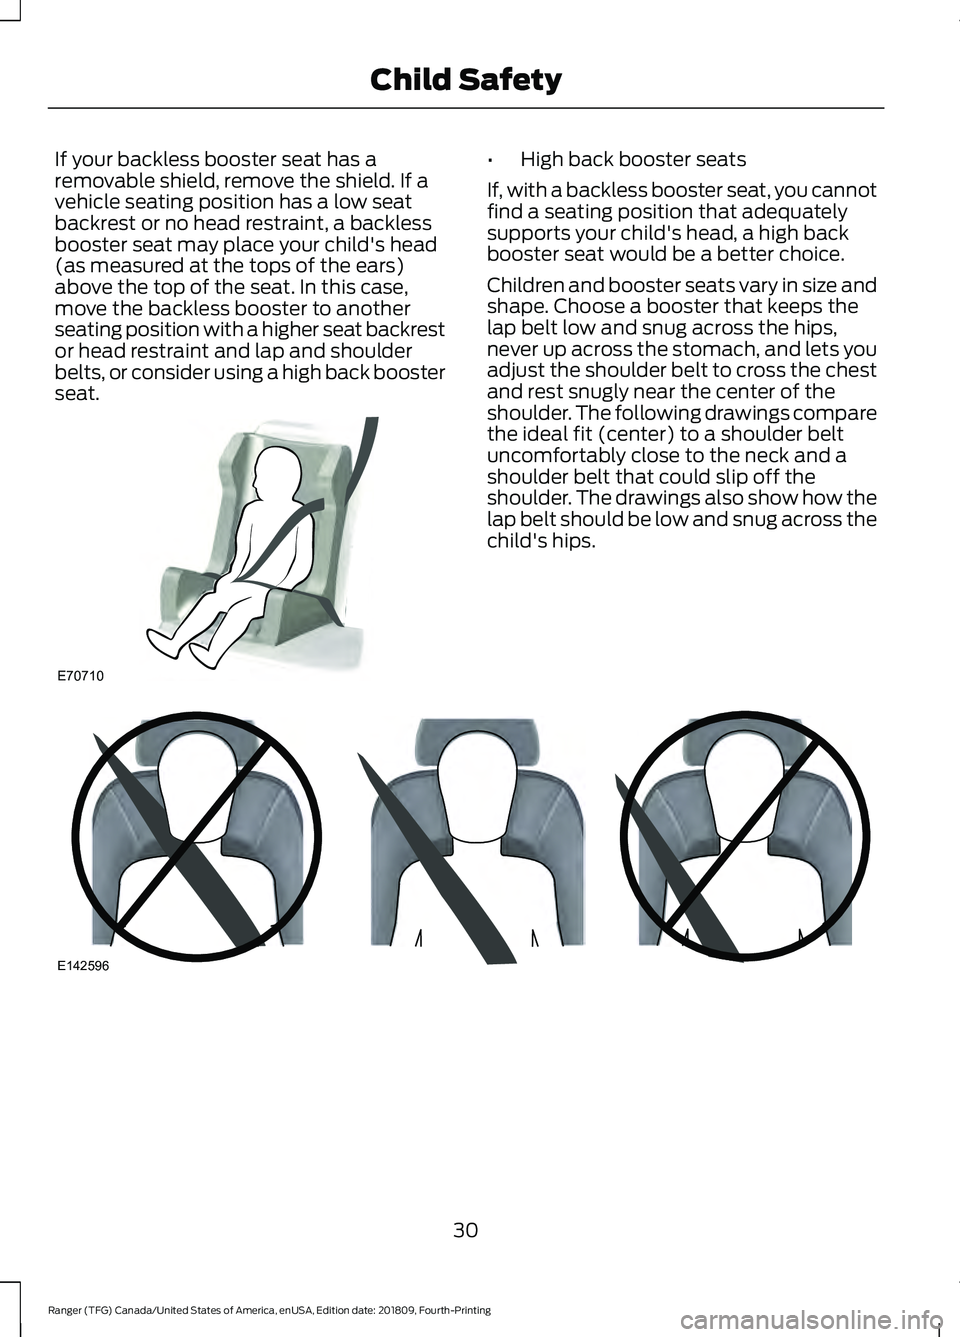
Children and booster seats vary in size and
shape. Choose a booster that keeps the
lap belt low and snug across the hips,
never up across the stomach, and lets you
adjust the shoulder belt to cross the chest
and rest snugly near the center of the
shoulder. The following drawings compare
the ideal fit (center) to a shoulder belt
uncomfortably close to the neck and a
shoulder belt that could slip off the
shoulder. The drawings also show how the
lap belt should be low and snug across the
child's hips. 30
Ranger (TFG) Canada/United States of America, enUSA, Edition date: 201809, Fourth-Printing Child SafetyE70710 E142596
Page 36 of 512

Note:
The child restraint must rest tightly
against the vehicle seat upon which it is
installed. It may be necessary to lift or
remove the head restraint. See Seats (page
118).
CHILD SAFETY LOCKS
(IF
EQUIPPED)
When these locks are set, the rear doors
cannot be opened from the inside. The childproof locks are located on the
rear edge of each rear door and must be
set separately for each door.
Left-Hand Side
Turn counterclockwise to lock and
clockwise to unlock.
Right-Hand Side
Turn clockwise to lock and
counterclockwise to unlock.
33
Ranger (TFG) Canada/United States of America, enUSA, Edition date: 201809, Fourth-Printing Child SafetyE112197
Page 48 of 512

Note:
When you first switch the ignition on,
the passenger airbag status indicator off
and on lamps illuminate for a short period
to confirm they are functional.
The front passenger sensing system is
designed to disable (will not inflate) the
front passenger frontal airbag under
certain conditions:
• The front passenger seat is
unoccupied.
• The system determines an infant is
present in a child restraint.
• A passenger takes their weight off of
the seat for a period of time.
• If there is a problem with the airbag
system or the passenger sensing
system.
Even with this technology, parents are
strongly encouraged to always properly
restrain children in the rear seat.
• When the front passenger sensing
system disables (will not inflate) the
front passenger frontal airbag, the
passenger airbag status indicator
illuminates the off lamp and stays lit
to remind you that the front passenger
frontal airbag is disabled.
• If you have installed the child restraint
and the passenger airbag status
indicator illuminates the on lamp, then
switch your vehicle off, remove the
child restraint from your vehicle and
reinstall the restraint following the
child restraint manufacturer's
instructions.
The front passenger sensing system works
with sensors that are part of the front
passenger seat and seatbelt. The sensors
are designed to detect the presence of a
properly seated occupant and determine
if the front passenger frontal airbag should
be enabled. •
When the front passenger sensing
system enables the front passenger
frontal airbag (may inflate), the
passenger airbag status indicator
illuminates the on lamp and remains
illuminated.
If a person of adult size is sitting in the front
passenger seat, but the passenger airbag
status indicator off lamp is lit, it is possible
that the person is not sitting properly in the
seat. If this happens:
• Switch your vehicle off and ask the
person to place the seat backrest in an
upright position.
• Have the person sit upright in the seat,
centered on the seat cushion, with the
person's legs comfortably extended.
• Restart your vehicle and have the
person remain in this position for about
two minutes. This allows the system
to detect that person and enable the
passenger frontal airbag.
• If the indicator off lamp remains lit
even after this, you should advise the
person to ride in the rear seat.
After all occupants have adjusted their
seats and put on seatbelts, it is very
important that they continue to sit
properly. A properly seated occupant sits
upright, leaning against the seat backrest,
and centered on the seat cushion, with
their feet comfortably extended on the
floor. Sitting improperly can increase the
chance of injury in a crash event. For
example, if an occupant slouches, lies
down, turns sideways, sits forward, leans
forward or sideways, or puts one or both
feet up, the chance of injury during a crash
greatly increases.
If you think that the state of the passenger
airbag status indicator lamp is incorrect,
check for the following:
• Objects lodged underneath the seat.
• Objects between the seat cushion and
the center console.
45
Ranger (TFG) Canada/United States of America, enUSA, Edition date: 201809, Fourth-Printing Supplementary Restraints System
Page 117 of 512

Note:
To reduce humidity build-up inside
your vehicle, do not drive with the system
switched off or with recirculated air always
switched on.
Note: Do not place objects under the front
seats as this may interfere with the airflow
to the rear seats.
Note: Remove any snow, ice or leaves from
the air intake area at the base of the
windshield.
Note: To improve the time to reach a
comfortable temperature in hot weather,
drive with the windows open until you feel
cold air through the air vents.
Manual Climate Control
Note: To reduce fogging of the windshield
during humid weather, adjust the air
distribution control to the windshield air
vents position. Automatic Climate Control
Note:
Adjusting the settings when your
vehicle interior is extremely hot or cold is
not necessary. The system automatically
adjusts to heat or cool the interior to your
selected temperature as quickly as possible.
For the system to function efficiently, the
instrument panel and side air vents should
be fully open.
Note: If you select AUTO during cold
temperatures, the system directs airflow to
the windshield and side window vents. In
addition, the fan may run at a slower speed
until the engine warms up.
Note: If you select
AUTO during hot
temperatures and the inside of the vehicle
is hot, the system automatically uses
recirculated air to maximize interior cooling.
Fan speed may also reduce until the air
cools.
Quickly Heating the Interior Automatic climate control
Manual climate control
Press
AUTO.
Adjust the fan speed to the highest
setting.
1
Adjust the temperature control to the
desired setting.
Adjust the temperature control to the
full heat setting.
2
Direct air to the footwell using the air
distribution buttons.
3
114
Ranger (TFG) Canada/United States of America, enUSA, Edition date: 201809, Fourth-Printing Climate Control
Page 122 of 512

WARNING: The head restraint is
a safety device. Whenever possible it
should be installed and properly
adjusted when the seat is occupied.
Failure to adjust the head restraint
properly could reduce its effectiveness
during certain impacts.
Note: Adjust the seat backrest to an upright
driving position before adjusting the head
restraint. Adjust the head restraint so that
the top of it is level with the top of your head
and as far forward as possible. Make sure
that you remain comfortable. If you are
extremely tall, adjust the head restraint to
its highest position.
Front Seat Head Restraint Rear Seat Outermost Head Restraints Rear Seat Center Head Restraint
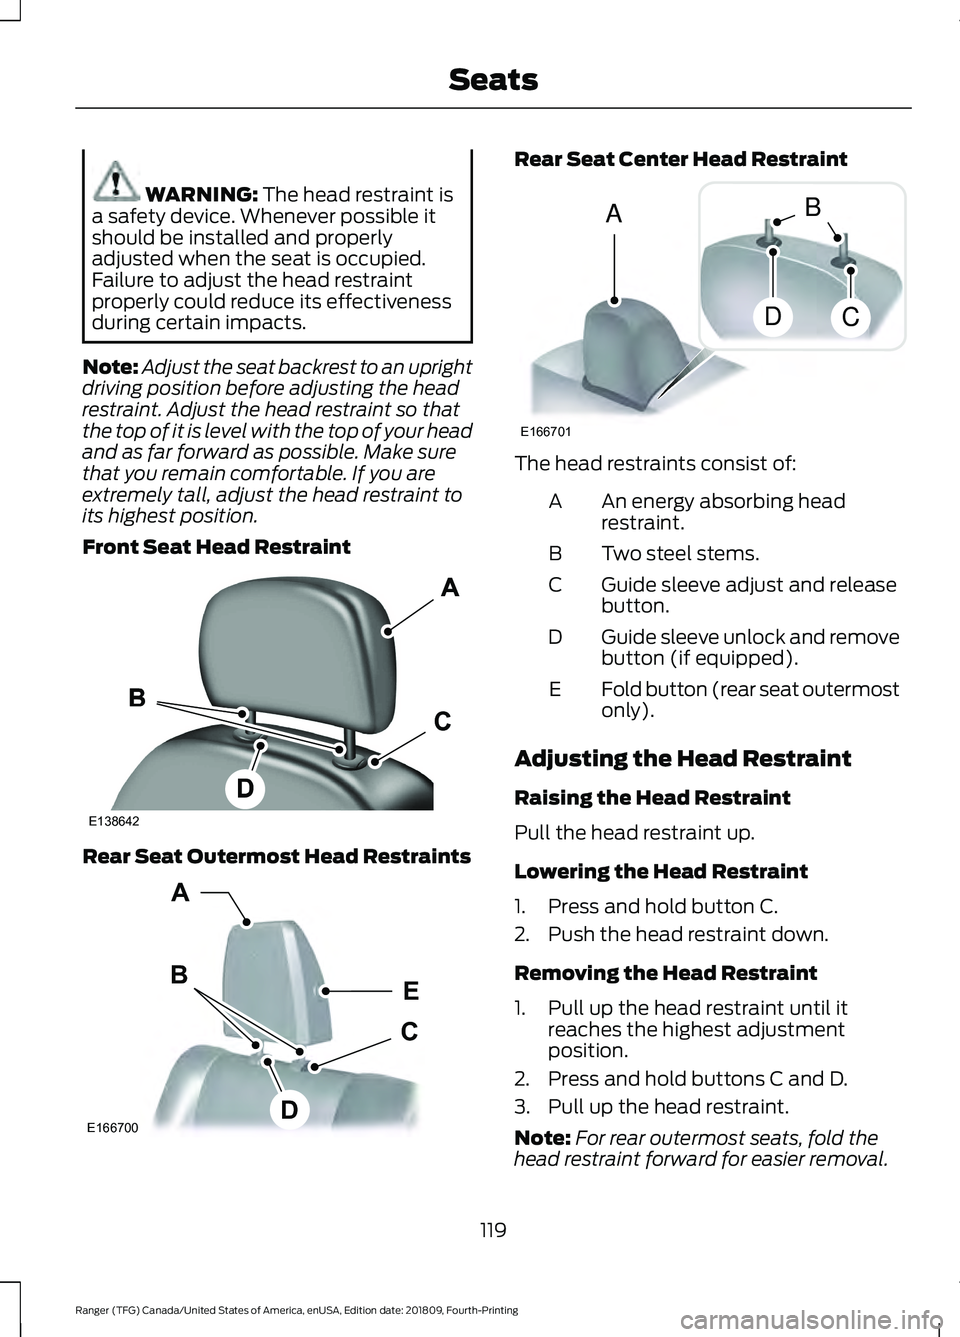
The head restraints consist of:
An energy absorbing head
restraint.
A
Two steel stems.
B
Guide sleeve adjust and release
button.
C
Guide sleeve unlock and remove
button (if equipped).
D
Fold button (rear seat outermost
only).
E
Adjusting the Head Restraint
Raising the Head Restraint
Pull the head restraint up.
Lowering the Head Restraint
1. Press and hold button C.
2. Push the head restraint down.
Removing the Head Restraint
1. Pull up the head restraint until it reaches the highest adjustment
position.
2. Press and hold buttons C and D.
3. Pull up the head restraint.
Note: For rear outermost seats, fold the
head restraint forward for easier removal.
119
Ranger (TFG) Canada/United States of America, enUSA, Edition date: 201809, Fourth-Printing SeatsE138642 E166700
E
D
C
B
A E166701
A
DC
B
Page 126 of 512

Folding the Seat Cushion
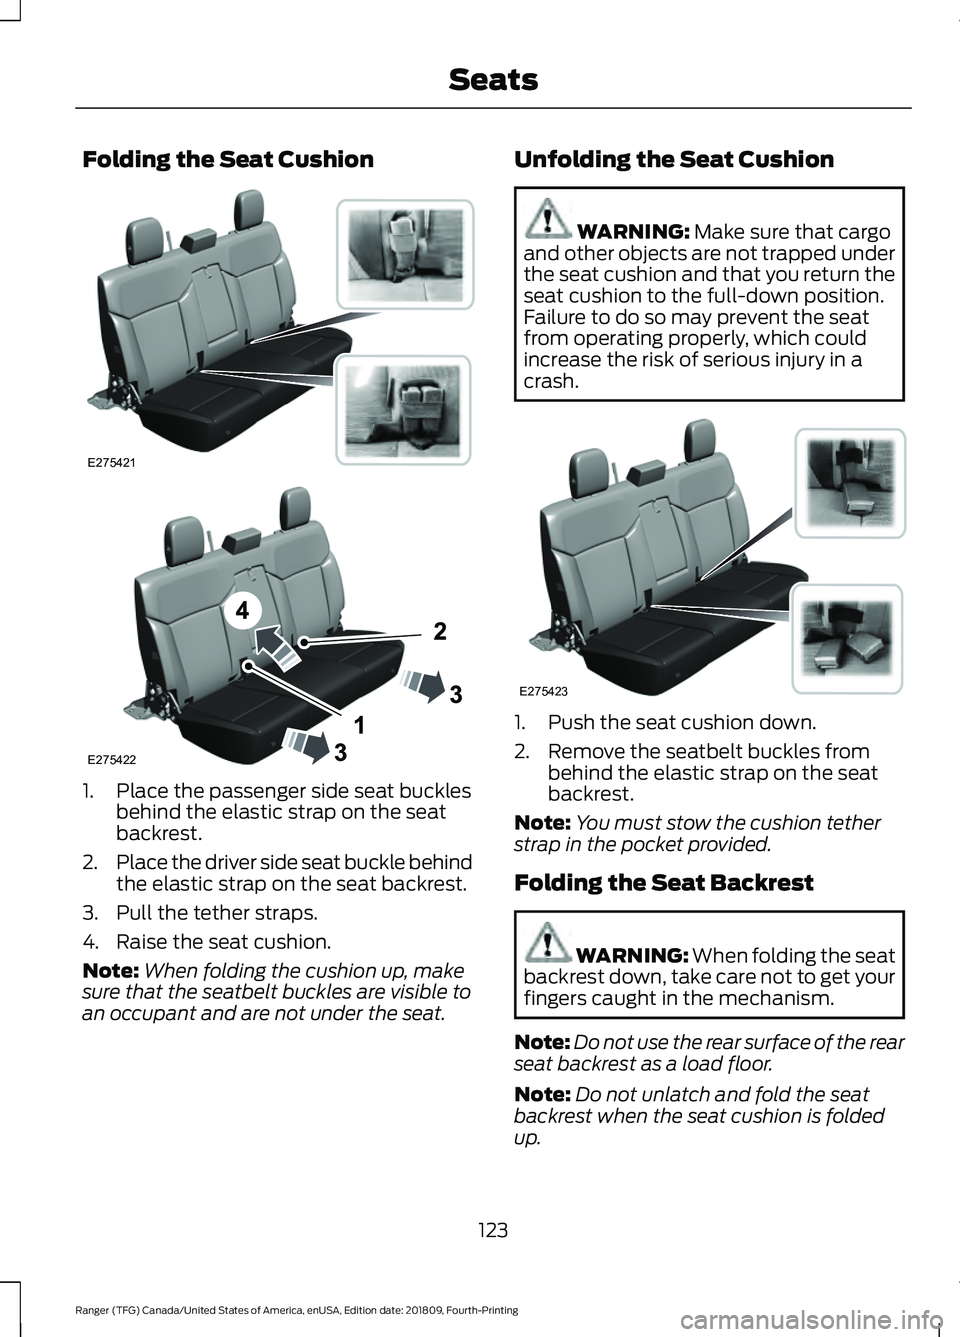
1. Place the passenger side seat buckles
behind the elastic strap on the seat
backrest.
2. Place the driver side seat buckle behind
the elastic strap on the seat backrest.
3. Pull the tether straps.
4. Raise the seat cushion.
Note: When folding the cushion up, make
sure that the seatbelt buckles are visible to
an occupant and are not under the seat. Unfolding the Seat Cushion WARNING: Make sure that cargo
and other objects are not trapped under
the seat cushion and that you return the
seat cushion to the full-down position.
Failure to do so may prevent the seat
from operating properly, which could
increase the risk of serious injury in a
crash. 1. Push the seat cushion down.
2. Remove the seatbelt buckles from
behind the elastic strap on the seat
backrest.
Note: You must stow the cushion tether
strap in the pocket provided.
Folding the Seat Backrest WARNING:
When folding the seat
backrest down, take care not to get your
fingers caught in the mechanism.
Note: Do not use the rear surface of the rear
seat backrest as a load floor.
Note: Do not unlatch and fold the seat
backrest when the seat cushion is folded
up.
123
Ranger (TFG) Canada/United States of America, enUSA, Edition date: 201809, Fourth-Printing SeatsE275421 E275422 E275423
Page 135 of 512

REAR SEAT ARMREST (IF
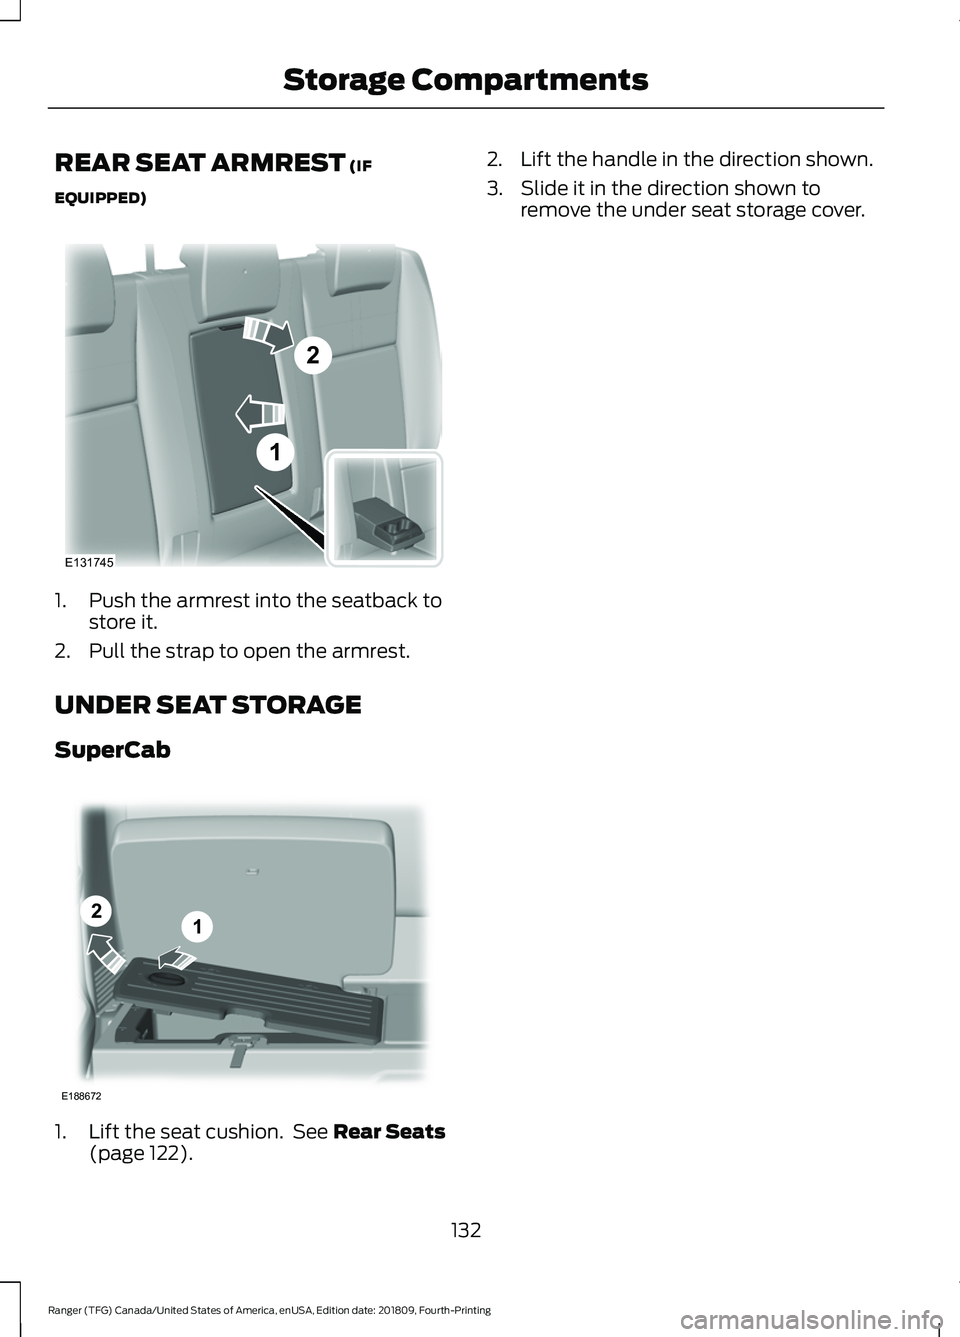
EQUIPPED) 1. Push the armrest into the seatback to
store it.
2. Pull the strap to open the armrest.
UNDER SEAT STORAGE
SuperCab 1. Lift the seat cushion. See
Rear Seats
(page 122). 2. Lift the handle in the direction shown.
3. Slide it in the direction shown to
remove the under seat storage cover.
132
Ranger (TFG) Canada/United States of America, enUSA, Edition date: 201809, Fourth-Printing Storage Compartments1
2
E131745 12
E188672