Page 313 of 512
3.
Pass the bracket and cable through the
wheel opening.
Jacking and Lifting Points WARNING: Use only the specified
jacking points. If you use other positions,
you may damage the body, steering,
suspension, engine, braking system or
the fuel lines. A. Emergency use only.
310
Ranger (TFG) Canada/United States of America, enUSA, Edition date: 201809, Fourth-Printing Wheels and TiresE133590 E301113
Page 314 of 512

Removing a Road Wheel
WARNING: Park your vehicle in
such a position that neither the traffic
nor you are hindered or endangered. WARNING:
Make sure that the
wheels are pointing straight ahead. WARNING:
If your vehicle has a
manual transmission, shift into first or
reverse gear. If your vehicle has an
automatic transmission, shift into park
(P). WARNING: Secure the diagonally
opposite wheel with an appropriate
block or wheel chock. WARNING:
Make sure that the
vehicle jack is vertical to the jacking point
and the base is flat on the ground. WARNING:
Never place anything
between the vehicle jack and your
vehicle.
Note: Do not lay alloy road wheels face
down on the ground. 1. Assemble the jack handle.
Note:
Assemble the three handles to jack
the rear of the vehicle.
2. Ensure screwthread on the jack is adequately lubricated before use.
3. Loosen the wheel nuts.
4. Raise your vehicle until the tire is clear of the ground.
311
Ranger (TFG) Canada/United States of America, enUSA, Edition date: 201809, Fourth-Printing Wheels and Tires E296117 E296118 E266665
Page 315 of 512

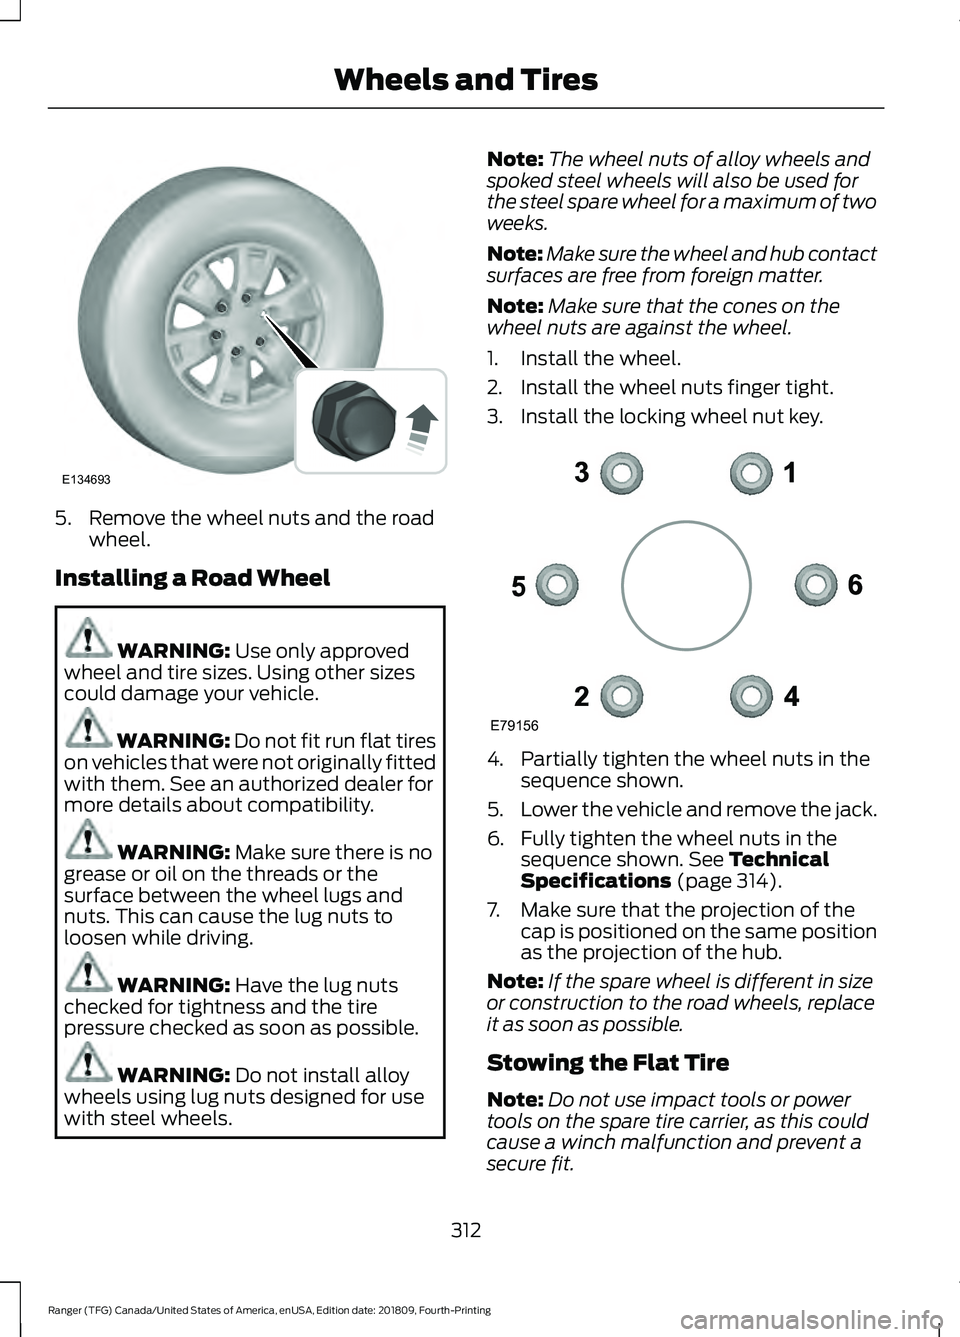
5. Remove the wheel nuts and the road
wheel.
Installing a Road Wheel WARNING: Use only approved
wheel and tire sizes. Using other sizes
could damage your vehicle. WARNING: Do not fit run flat tires
on vehicles that were not originally fitted
with them. See an authorized dealer for
more details about compatibility. WARNING:
Make sure there is no
grease or oil on the threads or the
surface between the wheel lugs and
nuts. This can cause the lug nuts to
loosen while driving. WARNING:
Have the lug nuts
checked for tightness and the tire
pressure checked as soon as possible. WARNING:
Do not install alloy
wheels using lug nuts designed for use
with steel wheels. Note:
The wheel nuts of alloy wheels and
spoked steel wheels will also be used for
the steel spare wheel for a maximum of two
weeks.
Note: Make sure the wheel and hub contact
surfaces are free from foreign matter.
Note: Make sure that the cones on the
wheel nuts are against the wheel.
1. Install the wheel.
2. Install the wheel nuts finger tight.
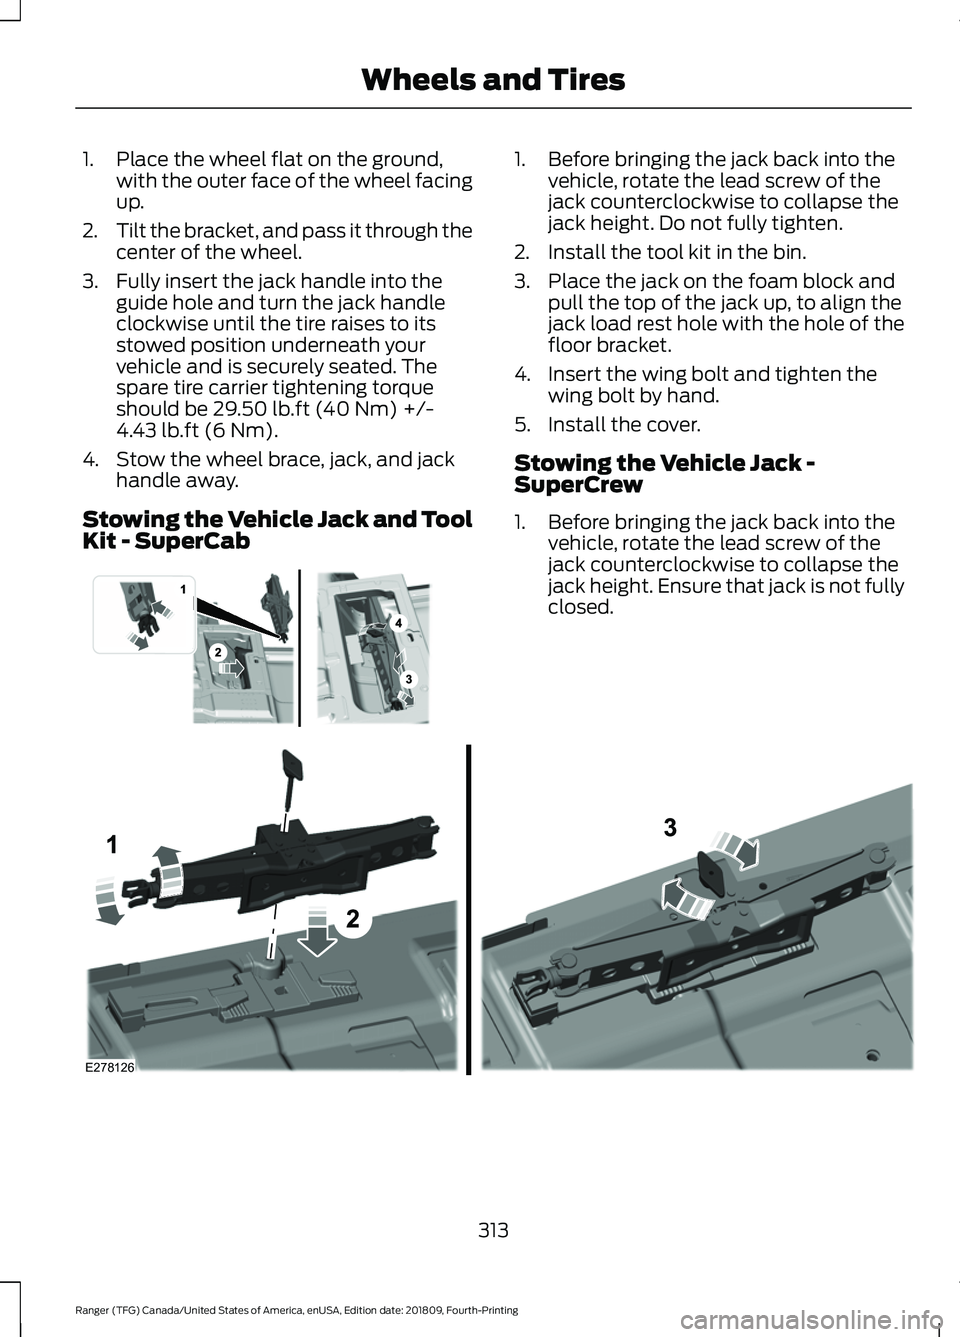
3. Install the locking wheel nut key. 4. Partially tighten the wheel nuts in the
sequence shown.
5. Lower the vehicle and remove the jack.
6. Fully tighten the wheel nuts in the sequence shown.
See Technical
Specifications (page 314).
7. Make sure that the projection of the cap is positioned on the same position
as the projection of the hub.
Note: If the spare wheel is different in size
or construction to the road wheels, replace
it as soon as possible.
Stowing the Flat Tire
Note: Do not use impact tools or power
tools on the spare tire carrier, as this could
cause a winch malfunction and prevent a
secure fit.
312
Ranger (TFG) Canada/United States of America, enUSA, Edition date: 201809, Fourth-Printing Wheels and TiresE134693 E79156
Page 316 of 512

1. Place the wheel flat on the ground,
with the outer face of the wheel facing
up.
2. Tilt the bracket, and pass it through the
center of the wheel.
3. Fully insert the jack handle into the guide hole and turn the jack handle
clockwise until the tire raises to its
stowed position underneath your
vehicle and is securely seated. The
spare tire carrier tightening torque
should be 29.50 lb.ft (40 Nm) +/-
4.43 lb.ft (6 Nm).
4. Stow the wheel brace, jack, and jack handle away.
Stowing the Vehicle Jack and Tool
Kit - SuperCab 1. Before bringing the jack back into the
vehicle, rotate the lead screw of the
jack counterclockwise to collapse the
jack height. Do not fully tighten.
2. Install the tool kit in the bin.
3. Place the jack on the foam block and pull the top of the jack up, to align the
jack load rest hole with the hole of the
floor bracket.
4. Insert the wing bolt and tighten the wing bolt by hand.
5. Install the cover.
Stowing the Vehicle Jack -
SuperCrew
1. Before bringing the jack back into the vehicle, rotate the lead screw of the
jack counterclockwise to collapse the
jack height. Ensure that jack is not fully
closed. 313
Ranger (TFG) Canada/United States of America, enUSA, Edition date: 201809, Fourth-Printing Wheels and Tires E296013 E278126
Page 317 of 512

2. Place the jack on the foam block and
pull the top of the jack up, to align the
jack load rest hole with the hole of the
floor bracket.
3. Insert the wing bolt and tighten the wing bolt by hand.
Stowing the Tool Kit - SuperCrew 1. Place the tools inside the tool bag.
2. Install the tool bag on the plastic bin
by passing them through the D-ring
straps and placing them as shown in
the image.
3. Pull the straps forward to tighten.
TECHNICAL SPECIFICATIONS
Wheel Lug Nut Torque Specifications WARNING: When you install a wheel, always remove any corrosion, dirt or foreign
materials present on the mounting surfaces of the wheel or the surface of the wheel
hub, brake drum or brake disc that contacts the wheel. Make sure to secure any fasteners
that attach the rotor to the hub so they do not interfere with the mounting surfaces of
the wheel. Installing wheels without correct metal-to-metal contact at the wheel
mounting surfaces can cause the wheel nuts to loosen and the wheel to come off while
your vehicle is in motion, resulting in loss of vehicle control, personal injury or death. lb.ft (Nm)
1
Bolt Size
100 lb.ft (135 Nm)
M12 x 1.5
1 Torque specifications are for nut and bolt threads free of dirt and rust. Use only our
recommended replacement fasteners.
Retighten the lug nuts to the specified torque within 100 miles (160 kilometers) after any
wheel disturbance, such as tire rotation, changing a flat tire or wheel removal.
314
Ranger (TFG) Canada/United States of America, enUSA, Edition date: 201809, Fourth-Printing Wheels and TiresE284139
Page 318 of 512
Wheel pilot bore.
A
Inspect the wheel pilot hole and
mounting surface prior to installation.
Remove any visible corrosion or loose
particles.
315
Ranger (TFG) Canada/United States of America, enUSA, Edition date: 201809, Fourth-Printing Wheels and TiresE145950
Page 323 of 512

CAPACITIES AND SPECIFICATIONS
Capacities
WARNING: The air conditioning refrigerant system contains refrigerant under
high pressure. Only qualified personnel should service the air conditioning refrigerant
system. Opening the air conditioning refrigerant system can cause personal injury. Capacity
Item
6.2 qt (5.9 L)
Engine oil (with oil filter).
11.6 qt (11 L)
Engine coolant.
Between MIN/MAX on brake fluid reservoir
Brake fluid.
2.11 pt (1.0 L)
Front axle fluid.
3.70 pt (1.75 L)
Rear axle fluid (standard axle).
3.04 pt (1.44 L)
Rear axle fluid (locking axle).
12.8 qt (12.1 L)1
Automatic transmission fluid.
23.7 fl oz (700 ml)
Power Transfer Unit (PTU) fluid (four-
wheel drive).
Fill as required
Windshield washer fluid.
18.8 gal (71.2 L)
Fuel tank.
1.49 lb (0.675 kg)
A/C refrigerant.
2.7 fl oz (80 ml)
A/C refrigerant compressor oil.
1 Approximate dry fill capacity. Actual amount could vary during fluid changes.
320
Ranger (TFG) Canada/United States of America, enUSA, Edition date: 201809, Fourth-Printing Capacities and Specifications
Page 341 of 512

primary responsibility is the safe
operation of your vehicle. We
recommend against the use of any
hand-held device while driving and
encourage the use of voice-operated
systems when possible. Make sure you
are aware of all applicable local laws
that may affect the use of electronic
devices while driving.
The USB port allows you to plug in media
playing devices, memory sticks and charge
devices.
Note:
Not all USB ports in your vehicle have
data transfer capabilities. See Auxiliary
Power Points (page 129).
USING VOICE RECOGNITION -
VEHICLES WITHOUT: SYNC
Voice Pass Through
This system allows you to use the voice
recognition features of your phone. Press the voice control button
on the steering wheel.
Note: This only works when connected via
Bluetooth. See
Connecting a Bluetooth
Device (page 331).
Note: When using voice pass through use
the language set on the device. MEDIA HUB
(IF EQUIPPED) WARNING:
Driving while
distracted can result in loss of vehicle
control, crash and injury. We strongly
recommend that you use extreme
caution when using any device that may
take your focus off the road. Your
primary responsibility is the safe
operation of your vehicle. We
recommend against the use of any
hand-held device while driving and
encourage the use of voice-operated
systems when possible. Make sure you
are aware of all applicable local laws
that may affect the use of electronic
devices while driving.
The media hub may be on the instrument
panel or center console.
The media hub may contain one or more
of the following inputs:
See
USB Port (page 337).
See
Audio Input Jack (page 337).
338
Ranger (TFG) Canada/United States of America, enUSA, Edition date: 201809, Fourth-Printing Audio SystemE201595 E142599