Page 152 of 370

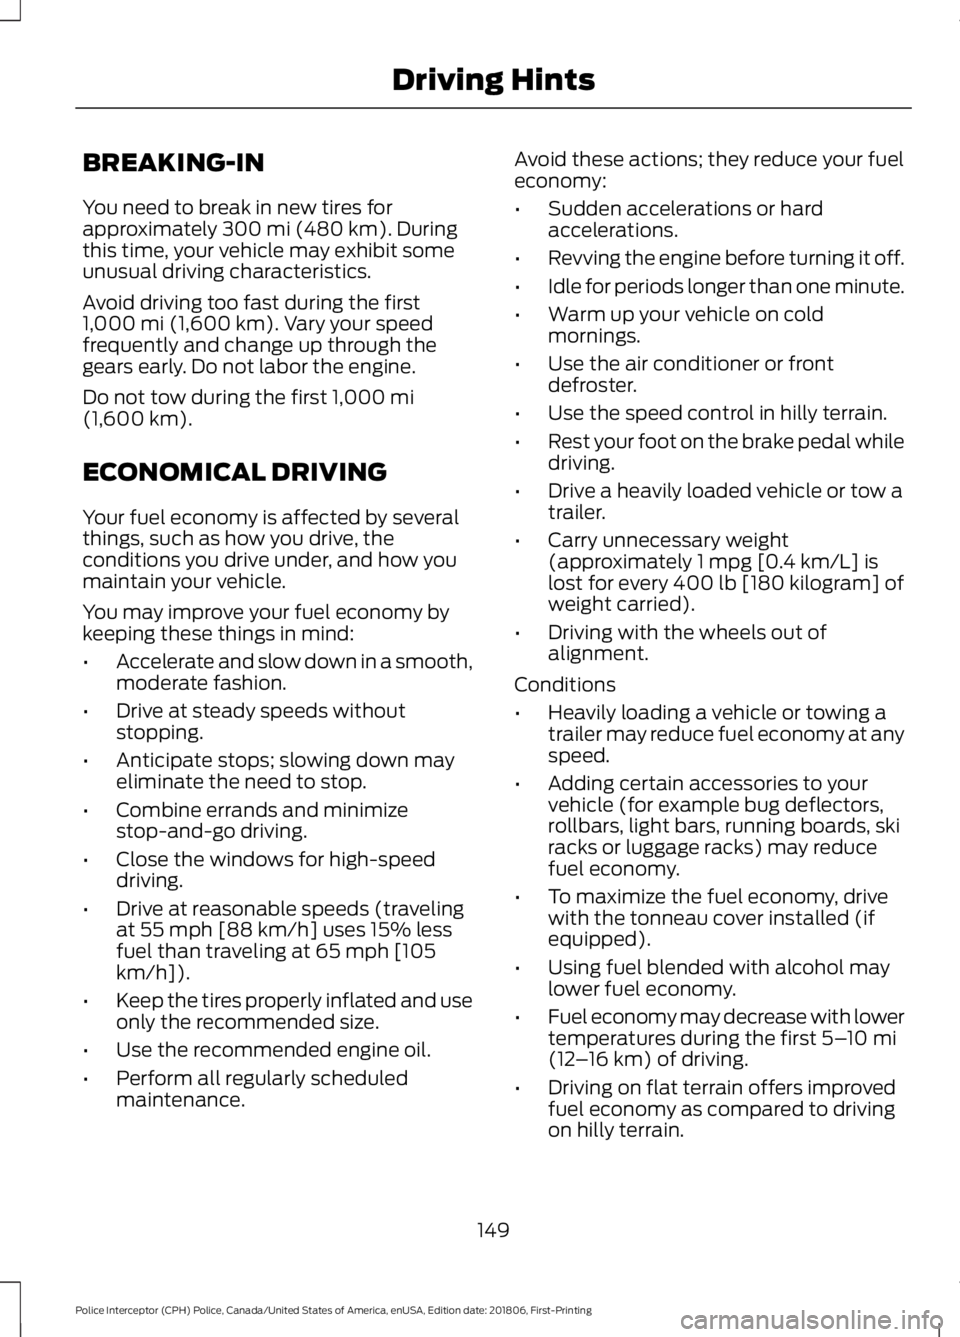
BREAKING-IN
You need to break in new tires for
approximately 300 mi (480 km). During
this time, your vehicle may exhibit some
unusual driving characteristics.
Avoid driving too fast during the first
1,000 mi (1,600 km)
. Vary your speed
frequently and change up through the
gears early. Do not labor the engine.
Do not tow during the first
1,000 mi
(1,600 km).
ECONOMICAL DRIVING
Your fuel economy is affected by several
things, such as how you drive, the
conditions you drive under, and how you
maintain your vehicle.
You may improve your fuel economy by
keeping these things in mind:
• Accelerate and slow down in a smooth,
moderate fashion.
• Drive at steady speeds without
stopping.
• Anticipate stops; slowing down may
eliminate the need to stop.
• Combine errands and minimize
stop-and-go driving.
• Close the windows for high-speed
driving.
• Drive at reasonable speeds (traveling
at 55 mph [88 km/h] uses 15% less
fuel than traveling at 65 mph [105
km/h]).
• Keep the tires properly inflated and use
only the recommended size.
• Use the recommended engine oil.
• Perform all regularly scheduled
maintenance. Avoid these actions; they reduce your fuel
economy:
•
Sudden accelerations or hard
accelerations.
• Revving the engine before turning it off.
• Idle for periods longer than one minute.
• Warm up your vehicle on cold
mornings.
• Use the air conditioner or front
defroster.
• Use the speed control in hilly terrain.
• Rest your foot on the brake pedal while
driving.
• Drive a heavily loaded vehicle or tow a
trailer.
• Carry unnecessary weight
(approximately 1 mpg [0.4 km/L] is
lost for every 400 lb [180 kilogram] of
weight carried).
• Driving with the wheels out of
alignment.
Conditions
• Heavily loading a vehicle or towing a
trailer may reduce fuel economy at any
speed.
• Adding certain accessories to your
vehicle (for example bug deflectors,
rollbars, light bars, running boards, ski
racks or luggage racks) may reduce
fuel economy.
• To maximize the fuel economy, drive
with the tonneau cover installed (if
equipped).
• Using fuel blended with alcohol may
lower fuel economy.
• Fuel economy may decrease with lower
temperatures during the first
5–10 mi
(12 –16 km) of driving.
• Driving on flat terrain offers improved
fuel economy as compared to driving
on hilly terrain.
149
Police Interceptor (CPH) Police, Canada/United States of America, enUSA, Edition date: 201806, First-Printing Driving Hints
Page 170 of 370
Protected Components
Fuse Amp Rating
Fuse or Relay
Number
Heated mirrors.
15A 2
50
Not used.
-
51
Not used.
-
52
Not used.
-
53
Not used.
-
54
Wiper relay.
Relay
55
Not used.
-
56
Not used.
-
57
Alternator A-line.
10A 2
58
Brake on/off switch.
10A 2
59
Not used.
-
60
Not used.
-
61
A/C clutch relay.
10A 2
62
Not used.
-
63
Not used.
-
64
Fuel pump relay.
30A 2
65
Powertrain control module relay.
Relay
66
Oxygen sensor heater.
20A 2
67
Mass airflow sensor.
Variable camshaft timing solenoid valve.
Canister vent solenoid.
Canister purge solenoid.
Ignition coils.
20A 2
68
Vehicle power 1 (powertrain control
module).
20A 2
69
A/C clutch.
15A 2
70
Fan control relay coils 1-3).
167
Police Interceptor (CPH) Police, Canada/United States of America, enUSA, Edition date: 201806, First-Printing Fuses
Page 171 of 370
Protected Components
Fuse Amp Rating
Fuse or Relay
Number
Variable air conditioning compressor.
Auxiliary transmission warmup.
Turbo charge waste-gate control.
Electronic compressor bypass valve.
All-wheel drive module.
Positive crankcase ventilation heater.
Not used.
-
71
Not used.
-
72
Center console run/start feed 1.
20A 2
73
Center console run/start feed 2.
20A 2
74
Diode.
Diode.
75
Not used.
-
76
Not used.
-
77
Not used.
-
78
Not used.
-
79
Police rear flasher.
25A 2
80
Package tray lighting access circuit.
Spot lights.
20A 2
81
Not used.
-
82
Not used.
-
83
Not used.
-
84
Not used.
-
85
Powertrain control module.
7.5A 2
86
Keep alive power and relay.
Canister vent solenoid.
Run/start relay.
5A 2
87
Run/start relay.
Relay
88
Front blower relay coil.
5A 2
89
Electrical power assist steering module.
168
Police Interceptor (CPH) Police, Canada/United States of America, enUSA, Edition date: 201806, First-Printing Fuses
Page 174 of 370

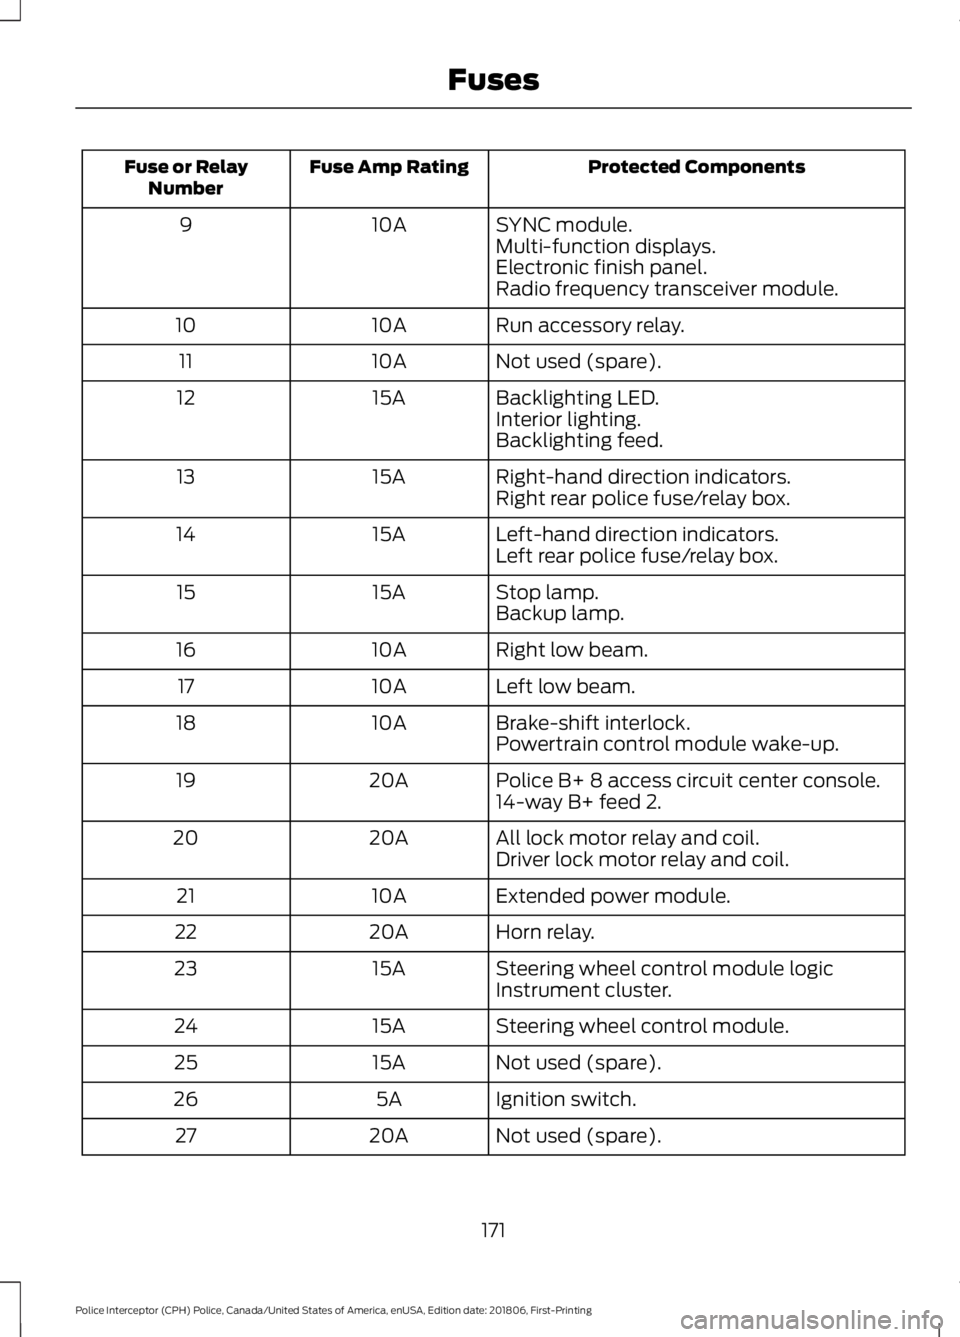
Protected Components
Fuse Amp Rating
Fuse or Relay
Number
SYNC module.
10A
9
Multi-function displays.
Electronic finish panel.
Radio frequency transceiver module.
Run accessory relay.
10A
10
Not used (spare).
10A
11
Backlighting LED.
15A
12
Interior lighting.
Backlighting feed.
Right-hand direction indicators.
15A
13
Right rear police fuse/relay box.
Left-hand direction indicators.
15A
14
Left rear police fuse/relay box.
Stop lamp.
15A
15
Backup lamp.
Right low beam.
10A
16
Left low beam.
10A
17
Brake-shift interlock.
10A
18
Powertrain control module wake-up.
Police B+ 8 access circuit center console.
20A
19
14-way B+ feed 2.
All lock motor relay and coil.
20A
20
Driver lock motor relay and coil.
Extended power module.
10A
21
Horn relay.
20A
22
Steering wheel control module logic
15A
23
Instrument cluster.
Steering wheel control module.
15A
24
Not used (spare).
15A
25
Ignition switch.
5A
26
Not used (spare).
20A
27
171
Police Interceptor (CPH) Police, Canada/United States of America, enUSA, Edition date: 201806, First-Printing Fuses
Page 180 of 370
Engine coolant reservoir. See
Engine Coolant Check (page
181).
A.
Brake fluid reservoir. See
Brake
Fluid Check (page 188).
B.
Battery. See
Changing the 12V
Battery (page 189).
C.
Power distribution box. See
Fuses
(page 164).
D.
Air filter assembly. See
Changing the Engine Air Filter
(page
194).
E.
Automatic transmission dipstick.
See
Automatic Transmission
Fluid Check (page 185).
F.
Engine oil dipstick. See
Engine
Oil Dipstick (page 179).
G. Engine oil filler cap. See Engine
Oil Check
(page 179).
H.
Windshield washer fluid
reservoir. See
Washer Fluid
Check (page 189).
I.
Engine Shield 177
Police Interceptor (CPH) Police, Canada/United States of America, enUSA, Edition date: 201806, First-Printing MaintenanceE270858 E173374
Page 181 of 370
Some vehicles may be equipped with an
aero-shield under the engine. This shield
needs to be removed for service, including
oil and filter changes. The shield has four
quick-release fasteners to secure it in
place.
UNDER HOOD OVERVIEW - 3.5L ECOBOOST™ Engine coolant reservoir. See
Engine Coolant Check (page
181).
A.
Engine oil filler cap. See Engine
Oil Check
(page 179).
B.
Engine oil dipstick. See
Engine
Oil Dipstick (page 179).
C.
Brake fluid reservoir. See
Brake
Fluid Check (page 188).
D.
Battery. See
Changing the 12V
Battery (page 189).
E. Engine compartment fuse box.
See
Fuses (page 164).
F.
Air filter assembly. See
Changing the Engine Air Filter
(page
194).
G.
Automatic transmission dipstick.
See
Automatic Transmission
Fluid Check (page 185).
H.
Washer fluid reservoir. See
Washer Fluid Check (page 189
).
I.
178
Police Interceptor (CPH) Police, Canada/United States of America, enUSA, Edition date: 201806, First-Printing MaintenanceE173375
Page 182 of 370

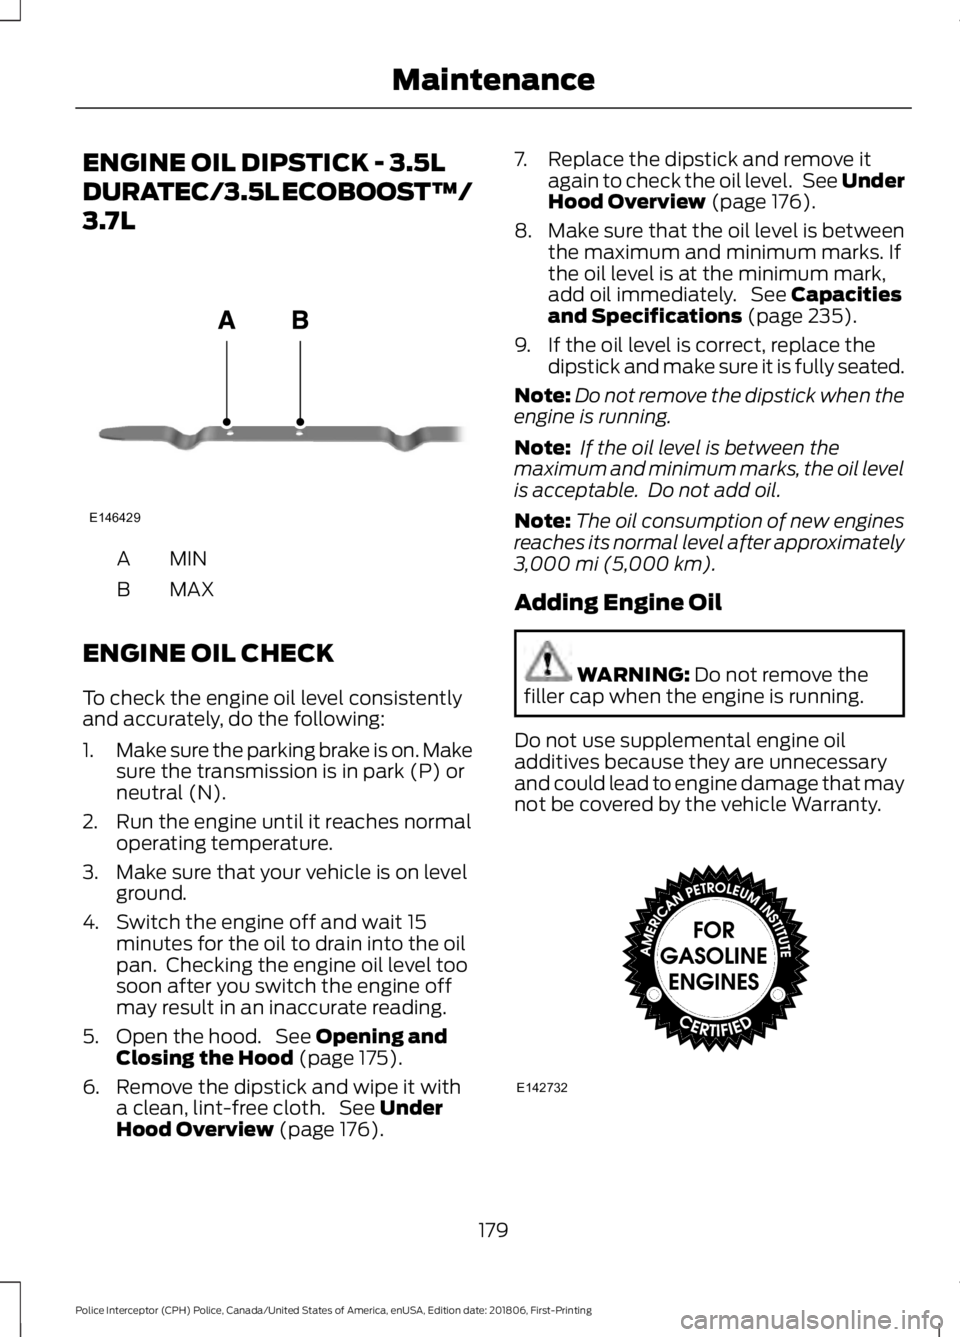
ENGINE OIL DIPSTICK - 3.5L
DURATEC/3.5L ECOBOOST™/
3.7L
MINA
MAX
B
ENGINE OIL CHECK
To check the engine oil level consistently
and accurately, do the following:
1. Make sure the parking brake is on. Make
sure the transmission is in park (P) or
neutral (N).
2. Run the engine until it reaches normal operating temperature.
3. Make sure that your vehicle is on level ground.
4. Switch the engine off and wait 15 minutes for the oil to drain into the oil
pan. Checking the engine oil level too
soon after you switch the engine off
may result in an inaccurate reading.
5. Open the hood. See Opening and
Closing the Hood (page 175).
6. Remove the dipstick and wipe it with a clean, lint-free cloth. See
Under
Hood Overview (page 176). 7. Replace the dipstick and remove it
again to check the oil level. See Under
Hood Overview
(page 176).
8. Make sure that the oil level is between
the maximum and minimum marks. If
the oil level is at the minimum mark,
add oil immediately. See
Capacities
and Specifications (page 235).
9. If the oil level is correct, replace the dipstick and make sure it is fully seated.
Note: Do not remove the dipstick when the
engine is running.
Note: If the oil level is between the
maximum and minimum marks, the oil level
is acceptable. Do not add oil.
Note: The oil consumption of new engines
reaches its normal level after approximately
3,000 mi (5,000 km)
.
Adding Engine Oil WARNING:
Do not remove the
filler cap when the engine is running.
Do not use supplemental engine oil
additives because they are unnecessary
and could lead to engine damage that may
not be covered by the vehicle Warranty. 179
Police Interceptor (CPH) Police, Canada/United States of America, enUSA, Edition date: 201806, First-Printing MaintenanceE146429 E142732
Page 183 of 370

Only use oils certified for gasoline engines
by the American Petroleum Institute (API).
An oil with this trademark symbol
conforms to the current engine and
emission system protection standards and
fuel economy requirements of the
International Lubricants Specification
Advisory Committee (ILSAC).
To top up the engine oil level do the
following:
1. Clean the area surrounding the engine
oil filler cap before you remove it.
2. Remove the engine oil filler cap. See Under Hood Overview (page 176).
Turn it counterclockwise and remove
it.
3. Add engine oil that meets our specifications. See
Capacities and
Specifications (page 235). You may
have to use a funnel to pour the engine
oil into the opening.
4. Recheck the oil level.
5. If the oil level is correct, replace the dipstick and make sure it is fully seated.
6. Replace the engine oil filler cap. Turn it clockwise until you feel a strong
resistance.
Note: Do not add oil further than the
maximum mark. Oil levels above the
maximum mark may cause engine damage.
Note: Make sure you install the oil filler cap
correctly.
Note: Soak up any spillage with an
absorbent cloth immediately.
OIL CHANGE INDICATOR
RESET
Use the information display controls on
the steering wheel to reset the oil change
indicator. From the main menu scroll to: Action and description
Message
Press the right arrow button,
then from this menu scroll
to the following message.
Settings
Press the right arrow button,
then from this menu scroll
to the following message.
Conveni-
ence
Press the right arrow button,
then from this menu scroll
to the following message.
Oil Life
Reset
Press and hold the
OK
button until the instrument
cluster displays the
following message.
Hold OK to
Reset
Reset Successful
When the oil change indic-
ator resets the instrument
cluster displays 100%.
Remaining Life
{00}%
If the instrument cluster
displays one of the following
messages, repeat the
process.
Not Reset
Reset Cancelled
180
Police Interceptor (CPH) Police, Canada/United States of America, enUSA, Edition date: 201806, First-Printing Maintenance