2019 FORD POLICE INTERCEPTOR buttons
[x] Cancel search: buttonsPage 57 of 370
Press and hold both the lock and unlock
buttons on the remote control for three
seconds to change between driver door or
all doors unlock mode. The direction
indicators will flash twice to indicate a
change to the unlocking mode. Driver door
mode only unlocks the driver door when
you press the unlock button once. All door
mode unlocks all doors when you press
the unlock button once. The unlocking
mode applies to the remote control.
Locking the Doors
Press the button to lock all
doors. The direction indicators
will flash. Press the button again
within three seconds to confirm that all
the doors are closed.
The doors will lock again, the horn will
sound and the direction indicators will
flash if all the doors and the luggage
compartment are closed.
Locking and Unlocking the Doors
with the Key Blade
Locking the Doors
Turn the top of the key toward the front of
your vehicle.
Unlocking the Doors
Turn the top of the key toward the rear of
your vehicle.
Opening a Rear Door From the
Inside
Pull the interior door handle to open a rear
door.
Note: If the hidden rear door locks are on
and you pull the interior handle, the rear
door will not open. You can only open the
rear doors using the external door handle. Illuminated Entry (If Equipped)
The interior lamps and some exterior
lamps illuminate when you unlock the
doors with the remote control.
The lamps turn off if:
• The ignition is on.
• You press the remote control lock
button.
• 25 seconds have elapsed.
The lamps do not turn off if:
• You switch them on with the lighting
control.
• Any door is open.
Illuminated Exit
(If Equipped)
The interior lamps and some exterior
lamps illuminate when all doors are closed
and you switch the ignition off.
The lamps will turn off if all the doors
remain closed and:
• 25 seconds have elapsed.
• You lock your vehicle from the outside.
Battery Saver
If you leave the courtesy lamps, interior
lamps or headlamps on, the battery saver
shuts them off 10 minutes after you switch
the ignition off.
Opening the Luggage
Compartment
With the Remote Control Press the button twice within
three seconds.
54
Police Interceptor (CPH) Police, Canada/United States of America, enUSA, Edition date: 201806, First-Printing Doors and LocksE138623 E211694
Page 77 of 370
GENERAL INFORMATION
WARNING: Driving while
distracted can result in loss of vehicle
control, crash and injury. We strongly
recommend that you use extreme
caution when using any device that may
take your focus off the road. Your
primary responsibility is the safe
operation of your vehicle. We
recommend against the use of any
hand-held device while driving and
encourage the use of voice-operated
systems when possible. Make sure you
are aware of all applicable local laws
that may affect the use of electronic
devices while driving.
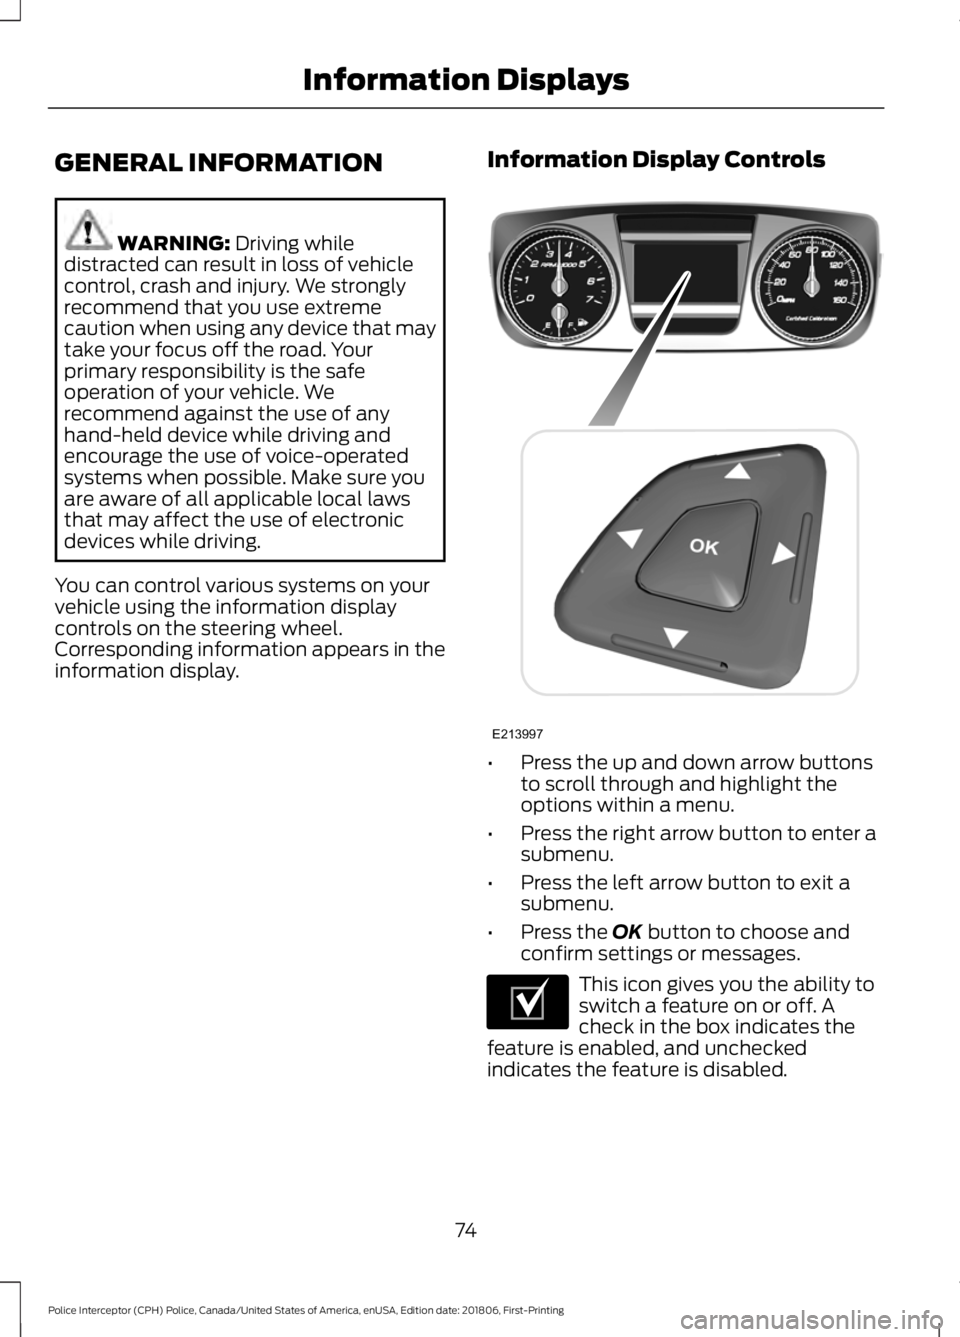
You can control various systems on your
vehicle using the information display
controls on the steering wheel.
Corresponding information appears in the
information display. Information Display Controls •
Press the up and down arrow buttons
to scroll through and highlight the
options within a menu.
• Press the right arrow button to enter a
submenu.
• Press the left arrow button to exit a
submenu.
• Press the
OK button to choose and
confirm settings or messages. This icon gives you the ability to
switch a feature on or off. A
check in the box indicates the
feature is enabled, and unchecked
indicates the feature is disabled.
74
Police Interceptor (CPH) Police, Canada/United States of America, enUSA, Edition date: 201806, First-Printing Information DisplaysE213997 E204495
Page 90 of 370
WARNING: The adjustable head
restraint is a safety device. Whenever
possible it should be installed and
properly adjusted when the seat is
occupied. An improperly adjusted head
restraint may provide reduced protection
to an occupant during certain rear
impacts. WARNING:
Install the head
restraint properly to help minimize the
risk of neck injury in the event of a crash.
Note: Adjust the seatback to an upright
driving position before adjusting the head
restraint. Adjust the head restraint so that
the top of it is level with the top of your head
and as far forward as possible. Make sure
that you remain comfortable. If you are
extremely tall, adjust the head restraint to
its highest position.
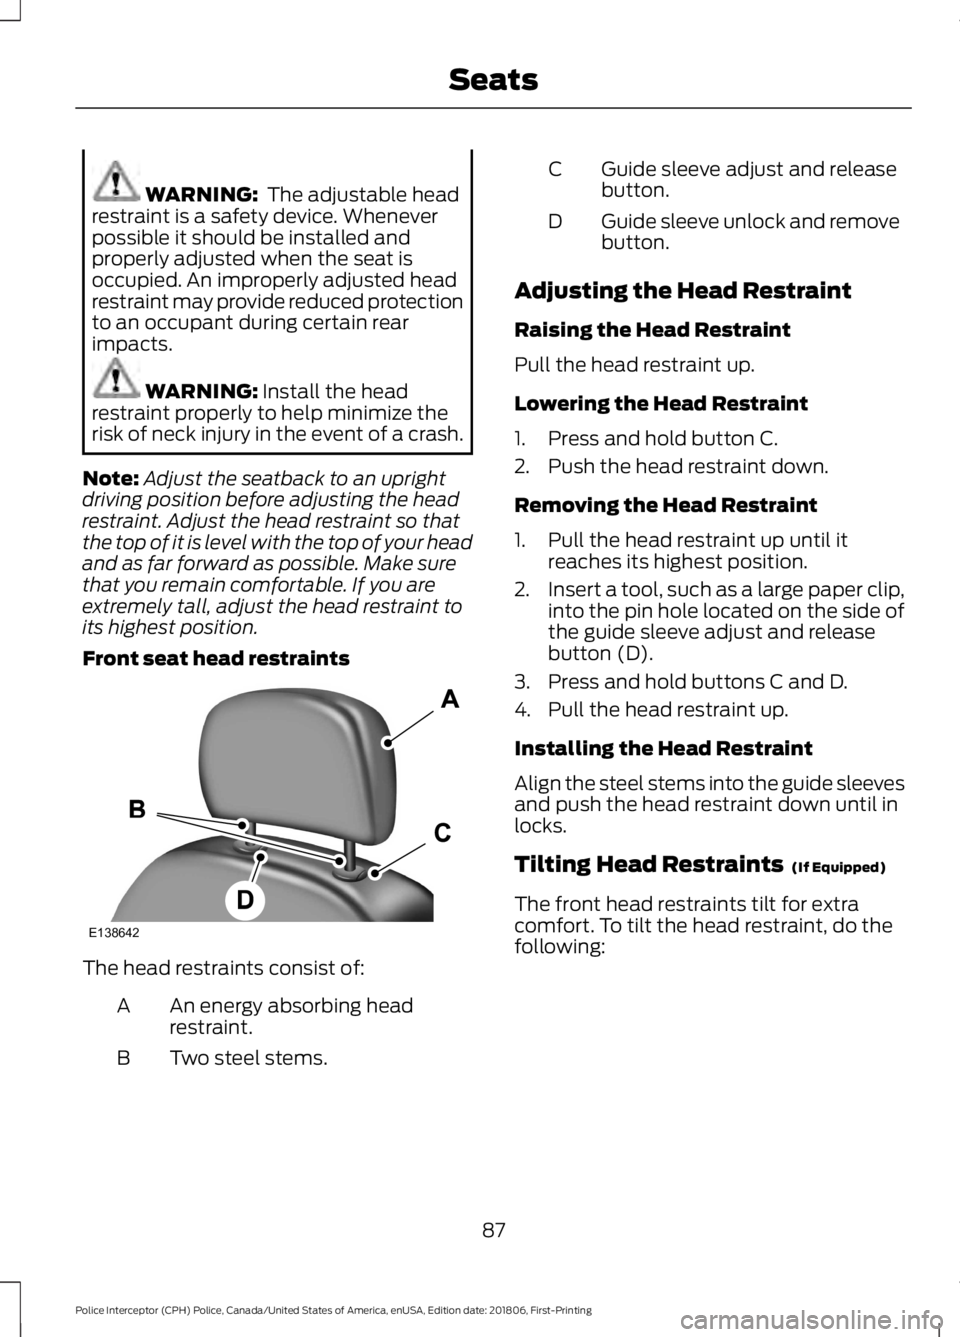
Front seat head restraints The head restraints consist of:
An energy absorbing head
restraint.
A
Two steel stems.
B Guide sleeve adjust and release
button.
C
Guide sleeve unlock and remove
button.
D
Adjusting the Head Restraint
Raising the Head Restraint
Pull the head restraint up.
Lowering the Head Restraint
1. Press and hold button C.
2. Push the head restraint down.
Removing the Head Restraint
1. Pull the head restraint up until it reaches its highest position.
2. Insert a tool, such as a large paper clip,
into the pin hole located on the side of
the guide sleeve adjust and release
button (D).
3. Press and hold buttons C and D.
4. Pull the head restraint up.
Installing the Head Restraint
Align the steel stems into the guide sleeves
and push the head restraint down until in
locks.
Tilting Head Restraints
(If Equipped)
The front head restraints tilt for extra
comfort. To tilt the head restraint, do the
following:
87
Police Interceptor (CPH) Police, Canada/United States of America, enUSA, Edition date: 201806, First-Printing SeatsE138642
Page 195 of 370
CHANGING THE WIPER
BLADES
1. Pull the wiper blade and arm away
from the glass and press the locking
buttons together. 2. Rotate and remove the wiper blade.
3. Attach the new blade to the arm and
snap it into place.
Replace wiper blades at least once per
year for optimum performance.
Poor wiper quality can be improved by
cleaning the wiper blades and the
windshield. See Cleaning the Windows
and Wiper Blades (page 198).
ADJUSTING THE HEADLAMPS
Vertical Aim Adjustment
The headlamps on your vehicle are
properly aimed at the assembly plant. If
your vehicle has been in an accident, have
the alignment of your headlamps checked
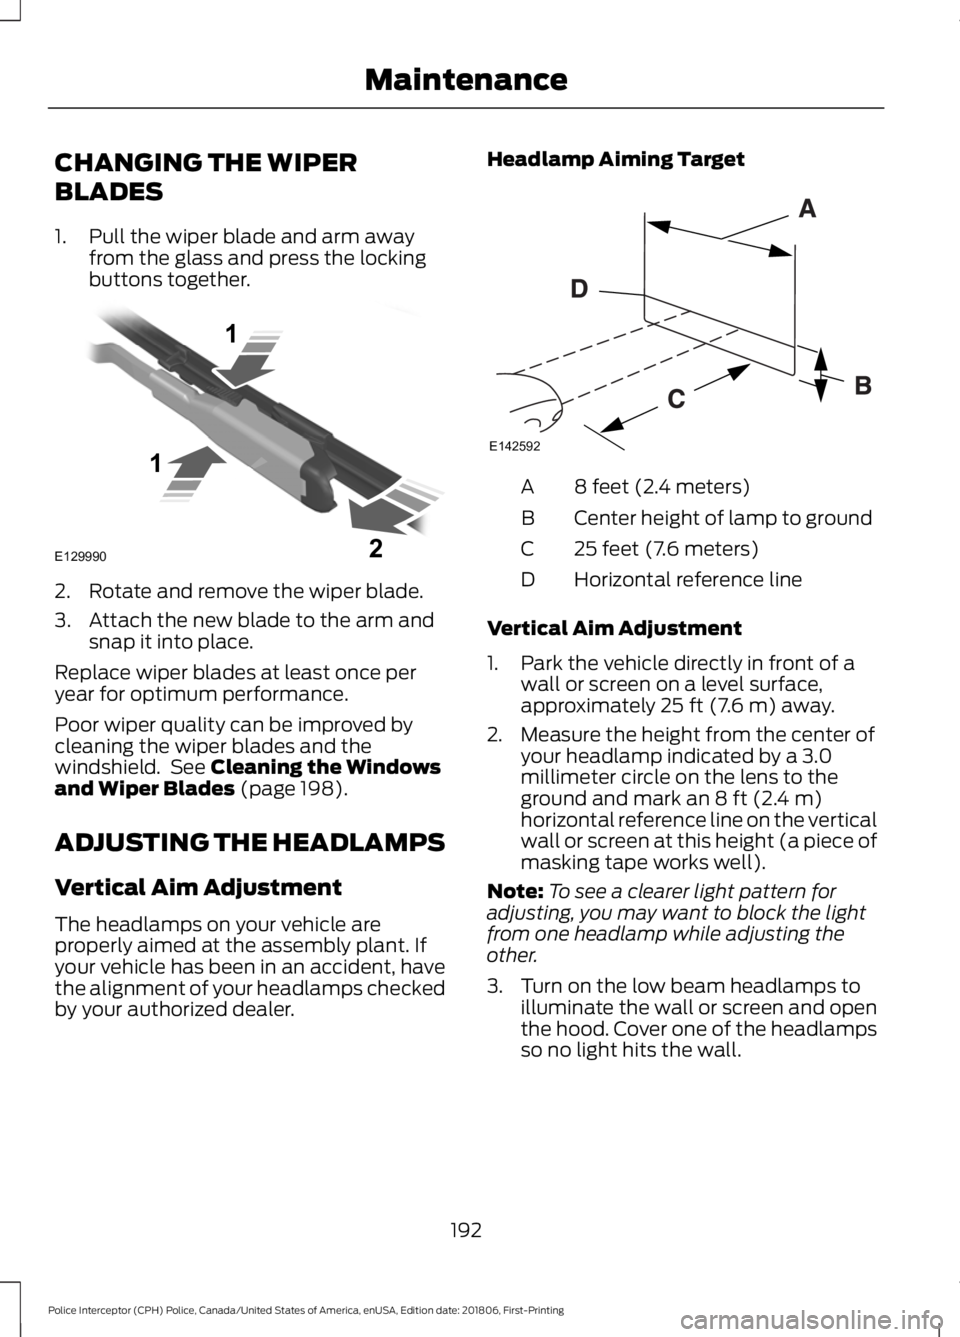
by your authorized dealer. Headlamp Aiming Target
8 feet (2.4 meters)
A
Center height of lamp to ground
B
25 feet (7.6 meters)
C
Horizontal reference line
D
Vertical Aim Adjustment
1. Park the vehicle directly in front of a wall or screen on a level surface,
approximately
25 ft (7.6 m) away.
2. Measure the height from the center of your headlamp indicated by a 3.0
millimeter circle on the lens to the
ground and mark an
8 ft (2.4 m)
horizontal reference line on the vertical
wall or screen at this height (a piece of
masking tape works well).
Note: To see a clearer light pattern for
adjusting, you may want to block the light
from one headlamp while adjusting the
other.
3. Turn on the low beam headlamps to illuminate the wall or screen and open
the hood. Cover one of the headlamps
so no light hits the wall.
192
Police Interceptor (CPH) Police, Canada/United States of America, enUSA, Edition date: 201806, First-Printing MaintenanceE129990
1
1 2 E142592
Page 254 of 370

Accessing the Clock Settings
Press and release to access the
clock setting.
Use the center arrow controls to
change the hours and minutes.
Accessing the Menu Press and release to access
different audio system features.
Accessing the Phone Features Press and release to access the
phone features of the SYNC
system.
Accessing the Sound Settings Press and release to access
settings for Treble, Midrange,
Bass, Fade and Balance.
Use the up and down arrow buttons to
select the various settings. Press OK to
confirm a selection, press the left and right
arrow buttons to change the settings.
Press
OK to set or press MENU to exit.
Sound settings can be set for each audio
source independently. Adjusting the Volume Turn to adjust the volume.
Changing Radio Stations
In radio mode, turn to search through the
radio frequency band.
In satellite radio mode, turn to find the
previous or next available satellite radio
station.
251
Police Interceptor (CPH) Police, Canada/United States of America, enUSA, Edition date: 201806, First-Printing Audio SystemE265278 E265038 E265037 E142611 E265373 E265696
Page 255 of 370
Ejecting the CD
Press and release to eject a CD.
Listening to a CD Press and release to listen to a
CD.
Listening to the Radio Press and release to listen to the
radio or change radio stations.
Listening to Satellite Radio Press and release to listen to
satellite radio.
Muting the Audio Press and release to mute the
playing audio.
Playing or Pausing Media Press and release to either play
or pause the audio.
Switching the Audio Unit On and
Off Press and release the button.
Using the Display Control
Use the up and down arrow buttons to
select the various settings. When you make
your selection, press the left and right
arrow buttons to change the settings. Press and release to confirm a
selection.
Press and release the function buttons
below the display to select different
functions of the audio system depending
on which mode you are in.
Using the Number Block
In radio mode, store and recall your favorite
radio stations. To store a radio station, tune
to the station, then press and hold a preset
button until sound returns. In phone mode,
enter a phone number.
Using Seek, Fast Forward and
Reverse In radio mode, select a frequency band and
press and release either button. The
system stops at the first station it finds in
that direction.
In satellite radio mode, press and release
to select the next or previous satellite radio
station. If you select a specific category,
such as jazz, rock or news, press to find the
next or previous station in the category you
select.
Menu Structure
Press MENU.
Press the up and down arrow buttons to
scroll through the options.
Press the right arrow to enter a menu.
Press the left arrow to exit a menu.
Press
OK to confirm a selection.
Note: Depending on your system, some
options may appear slightly different.
252
Police Interceptor (CPH) Police, Canada/United States of America, enUSA, Edition date: 201806, First-Printing Audio SystemE265032 E265039 E265033 E265034 E265043 E265041
Page 258 of 370
AUDIO INPUT JACK
WARNING: Driving while
distracted can result in loss of vehicle
control, crash and injury. We strongly
recommend that you use extreme
caution when using any device that may
take your focus off the road. Your
primary responsibility is the safe
operation of your vehicle. We
recommend against the use of any
hand-held device while driving and
encourage the use of voice-operated
systems when possible. Make sure you
are aware of all applicable local laws
that may affect the use of electronic
devices while driving. WARNING:
Always place your
device in a secure location in your vehicle
so it does not become a projectile in a
sudden stop or crash. Failure to follow
this instruction could result in personal
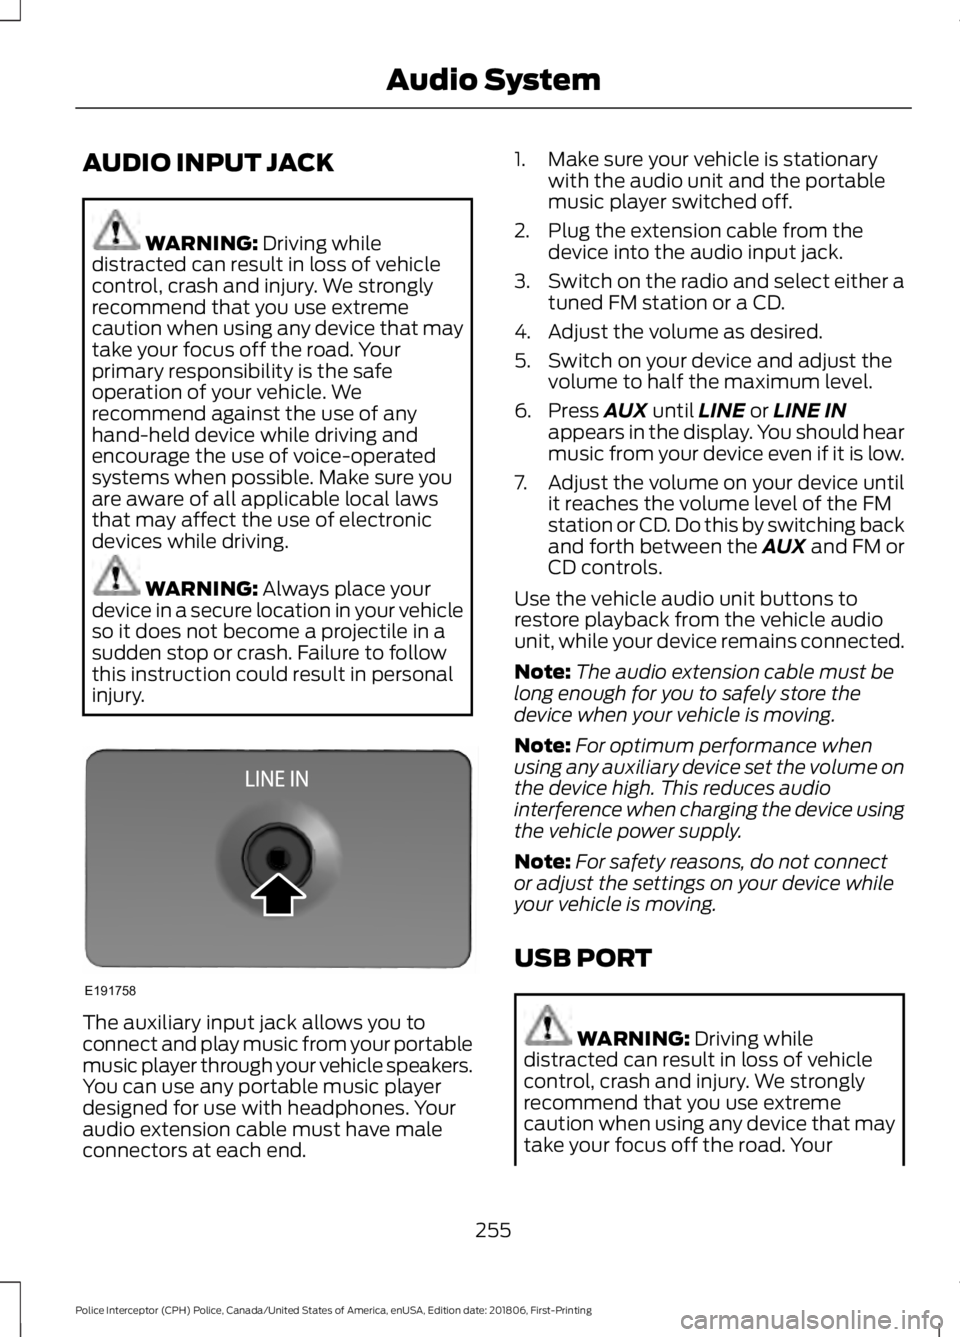
injury. The auxiliary input jack allows you to
connect and play music from your portable
music player through your vehicle speakers.
You can use any portable music player
designed for use with headphones. Your
audio extension cable must have male
connectors at each end. 1. Make sure your vehicle is stationary
with the audio unit and the portable
music player switched off.
2. Plug the extension cable from the device into the audio input jack.
3. Switch on the radio and select either a
tuned FM station or a CD.
4. Adjust the volume as desired.
5. Switch on your device and adjust the volume to half the maximum level.
6. Press
AUX until LINE or LINE IN
appears in the display. You should hear
music from your device even if it is low.
7. Adjust the volume on your device until
it reaches the volume level of the FM
station or CD. Do this by switching back
and forth between the AUX and FM or
CD controls.
Use the vehicle audio unit buttons to
restore playback from the vehicle audio
unit, while your device remains connected.
Note: The audio extension cable must be
long enough for you to safely store the
device when your vehicle is moving.
Note: For optimum performance when
using any auxiliary device set the volume on
the device high. This reduces audio
interference when charging the device using
the vehicle power supply.
Note: For safety reasons, do not connect
or adjust the settings on your device while
your vehicle is moving.
USB PORT WARNING:
Driving while
distracted can result in loss of vehicle
control, crash and injury. We strongly
recommend that you use extreme
caution when using any device that may
take your focus off the road. Your
255
Police Interceptor (CPH) Police, Canada/United States of America, enUSA, Edition date: 201806, First-Printing Audio SystemE191758
Page 268 of 370
Making a Call
Press the voice button and when prompted say:
Action and Description
Voice Command
This command is not available until your cell phone informa-
tion is completely downloaded using Bluetooth.
Call ___
Use to enter a phone number digit by digit.
Dial
When the system confirms the number say one of the following commands:
To confirm the number and initiate the call.
Dial
To erase the last spoken digit. You can also press the left
arrow button.
delete
To erase all spoken digits. You can also press and hold the
left arrow button.
clear
To end a call, press and hold the red phone button.
Receiving Calls
When receiving a call, you can:
• Answer the call by pressing the phone
button.
• Reject the call by pressing and holding
the red phone button.
• Ignore the call by doing nothing. Phone Options during an Active
Call
During an active call, you have more menu
features that become available, for
example putting a call on hold or joining
calls. Use the arrow buttons to scroll
through the menu options.
Press the MENU button during an active call, then scroll to: Action and Description
Message
Press the
OK button.
CALL MENU
Select one of the following:
Press the
OK button to switch a call from an active hands-free envir-
onment to your cell phone for a more private conversation.
PRIVACY
Press the
OK button to put an active call on hold.
CALL HOLD
Join two separate calls. SYNC supports a maximum of three callers
on a multiparty call or conference call.
JOIN CALLS
265
Police Interceptor (CPH) Police, Canada/United States of America, enUSA, Edition date: 201806, First-Printing SYNC™