2019 FORD F650/750 maintenance
[x] Cancel search: maintenancePage 163 of 387
FORD CREDIT
US Only
Ford Credit offers a full range of financing
and lease plans to help you acquire your
vehicle. If you have financed or leased your
vehicle through Ford Credit, thank you for
your business.
We offer a number of convenient ways for
you to contact us, and to manage your
account.
Call 1-800-727-7000.
For more information about Ford Credit
and access to Account Manager, go to
www.ford.com/finance.
GETTING THE SERVICES YOU
NEED
Warranty repairs to your vehicle must be
performed by an authorized dealer. While
any authorized dealer handling your vehicle
line will provide warranty service, we
recommend you return to your selling
authorized dealer who wants to ensure
your continued satisfaction.
Please note that certain warranty repairs
require special training and equipment, so
not all authorized dealers are authorized
to perform all warranty repairs. This means
that, depending on the warranty repair
needed, you may have to take your vehicle
to another authorized dealer.
A reasonable time must be allowed to
perform a repair after taking your vehicle
to the authorized dealer. Repairs will be
made using Ford or Motorcraft® parts, or
remanufactured or other parts that are
authorized by Ford.
Away From Home
If you are away from home when your
vehicle needs service, contact the
Commercial Vehicle Center or use the
online resources listed below to find the
nearest authorized dealer.
In the United States:
Mailing address
Ford Motor Company
Commercial Vehicle Operations
P.O. Box 6248
Dearborn, MI 48121
Telephone
1-800-392-3673 (FORD)
(TDD for the hearing impaired:
1-800-232-5952)
Online
Additional information and resources are
available online at www.fordowner.com
These are some of the items that can be
found online:
•
U.S. dealer locator by Dealer Name,
City/State or Zip Code.
• Owner Manuals.
• Maintenance Schedules.
• Recalls.
• Ford Extended Service Plans.
• Ford Genuine Accessories.
• Service specials and promotions.
In Canada:
Mailing address
Customer Relationship Centre
Ford Motor Company of Canada, Limited
P.O. Box 2000
Oakville, Ontario L6K 0C8
Telephone
1-800-565-3673 (FORD)
Online
160
F650750 (TBC) , enUSA, Edition date: 201804, Second-Printing Customer Assistance
Page 190 of 387
GENERAL INFORMATION
WARNING: Making modifications
to various parts, components and
systems of the vehicle, such as brake and
steering systems, can adversely affect
the quality, reliability and operation of
your vehicle and could result in property
damage, personal injury or death. Such
modifications must be avoided. WARNING:
Failure to properly
perform maintenance and servicing
procedures could result in vehicle
damage, personal injury or death. WARNING:
Take care when
performing any maintenance, system
check or service on your vehicle. Some
of the materials may also be hazardous
if used, serviced or handled improperly
and could result in property damage,
personal injury or death.
If the owner or operator of the vehicle is a
skilled technician and intends on
performing the vehicle maintenance and
service, he is strongly urged to purchase a
service manual.
Always use care when performing vehicle
maintenance, repairs or system checks.
Improper or incomplete service could result
in your vehicle not working properly which
may result in personal injury or damage to
your vehicle or equipment. It is the
operator ’s responsibility to see that your
vehicle receives proper care and
maintenance. If you have any questions
about performing service, have the service
done by a qualified technician.
To help you service your vehicle, we
provide scheduled maintenance
information which makes tracking routine
service easy. See
Scheduled
Maintenance (page 322). If your vehicle requires professional service,
an authorized dealer can provide the
necessary parts and service. Check your
warranty information to find out which
parts and services are covered.
Use only recommended fuels, lubricants,
fluids and service parts conforming to
specifications. Motorcraft® parts are
designed and built to provide the best
performance in your vehicle.
Servicing Guidelines
WARNING:
The use of inferior
parts can adversely affect the quality
and reliability of your vehicle and could
result in property damage, personal injury
or death.
When servicing your vehicle:
• Always wear safety glasses for eye
protection.
• Always set the parking brake or chock
the wheels.
• Always use support stands, not a jack,
when working under a raised vehicle.
• Always turn off the ignition unless a
procedure requires the engine to be
running.
• Always avoid contact with hot metal
parts. Allow the components to cool
before working with, or around, them.
• Always operate the engine in a
well-ventilated area.
• Do not wear loose-fitting clothing,
hanging jewelry, watches or rings.
• Do not smoke.
• Do not work on the brakes or the clutch
unless you take the proper precautions
to avoid inhaling friction material dust.
187
F650750 (TBC) , enUSA, Edition date: 201804, Second-Printing Maintenance
Page 191 of 387
Quality service parts are available through
an authorized dealer. If dealer parts are not
used, make sure the replacement parts are
of equivalent quality.
Working with the Engine Off
1. Set the parking brake and shift to
neutral (N) or park (P).
2. Switch off the engine.
3. Block the wheels.
Working with the Engine On WARNING: To reduce the risk of
vehicle damage and/or personal burn
injuries, do not start your engine with the
air cleaner removed and do not remove
it while the engine is running.
1. Set the parking brake and shift to neutral (N) or park (P).
2. Block the wheels
Supporting Your Vehicle for
Service WARNING:
Do not use a jack when
working under a vehicle. It may give way,
causing the vehicle to fall and result in
property damage, personal injury or
death. Always use floor stands to
support the vehicle.
Prepare your vehicle for service repairs by
doing the following:
1. Park your vehicle on a level, concrete floor.
2. Set the parking brake and block the wheels to prevent your vehicle from
moving. 3. Select a jack with a rated capacity
sufficient to lift and hold up your
vehicle.
4. Raise your vehicle with the jack applied
to the axle(s). Do not use the bumper
as a lifting point.
5. Support your vehicle with floor stands under the axle(s). When servicing the
axle or the suspension, support your
vehicle with floor stands under the
frame side-members, preferably
between the axles.
OPENING AND CLOSING THE
HOOD WARNING:
Always set the parking
brake fully before opening the hood.
Failure to follow this warning could result
in serious personal injury or death. WARNING:
Do not stand under
the hood when you raise or lower it.
Failure to follow this warning could result
in serious personal injury or death. WARNING: If the engine is running
while the hood is open, stay clear of
moving engine components. Failure to
follow this warning could result in serious
personal injury or death.
Opening the Hood
Before opening the hood, set the parking
brake fully, shift into park (P) or neutral
(N) and switch the ignition off.
188
F650750 (TBC) , enUSA, Edition date: 201804, Second-Printing Maintenance
Page 192 of 387
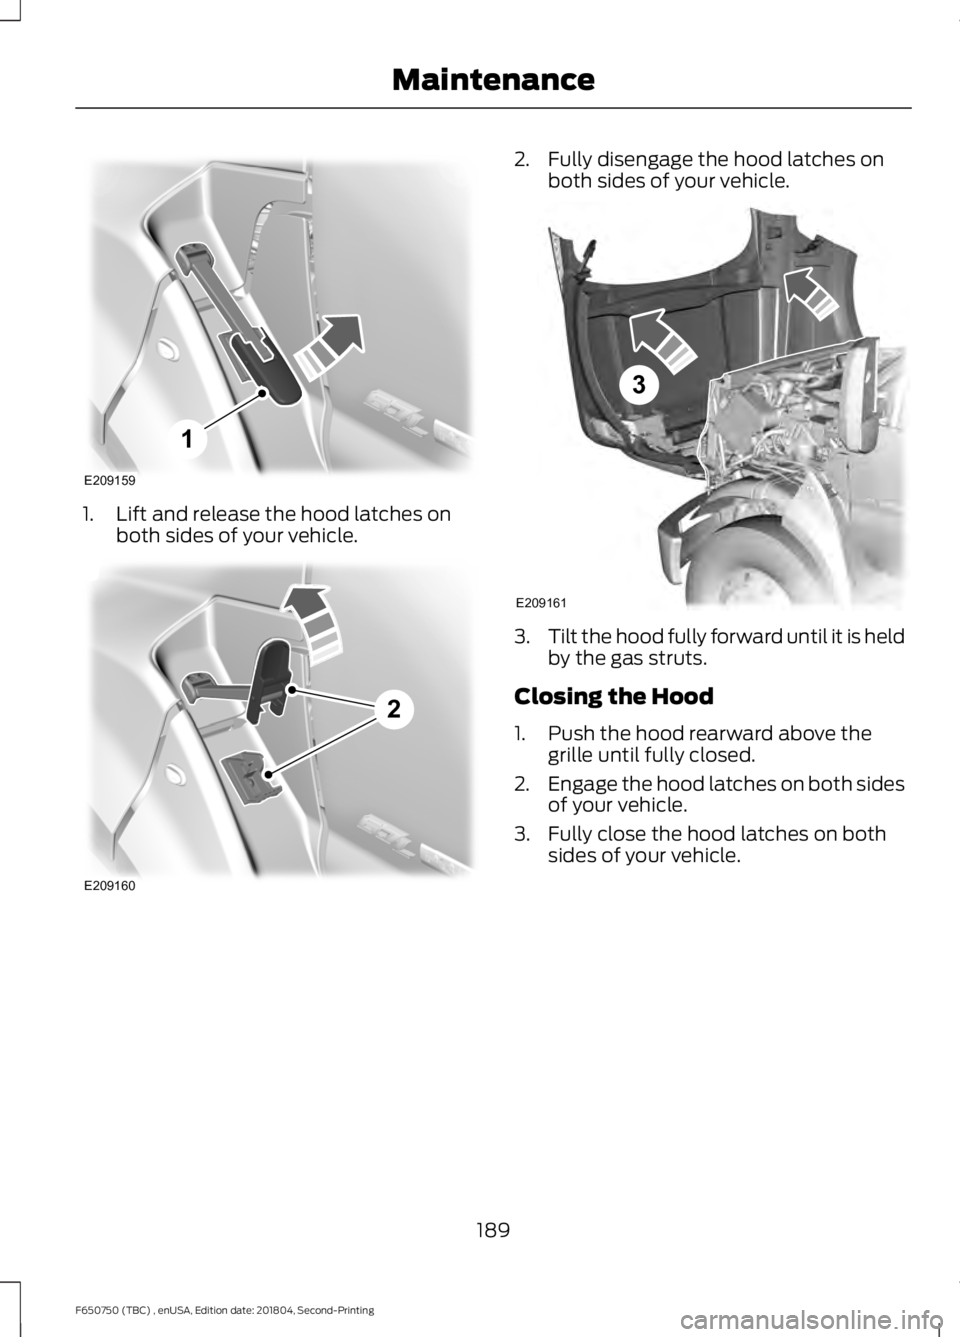
1. Lift and release the hood latches on
both sides of your vehicle. 2. Fully disengage the hood latches on
both sides of your vehicle. 3.
Tilt the hood fully forward until it is held
by the gas struts.
Closing the Hood
1. Push the hood rearward above the grille until fully closed.
2. Engage the hood latches on both sides
of your vehicle.
3. Fully close the hood latches on both sides of your vehicle.
189
F650750 (TBC) , enUSA, Edition date: 201804, Second-Printing MaintenanceE209159
1 E209160
2 E209161
3
Page 193 of 387
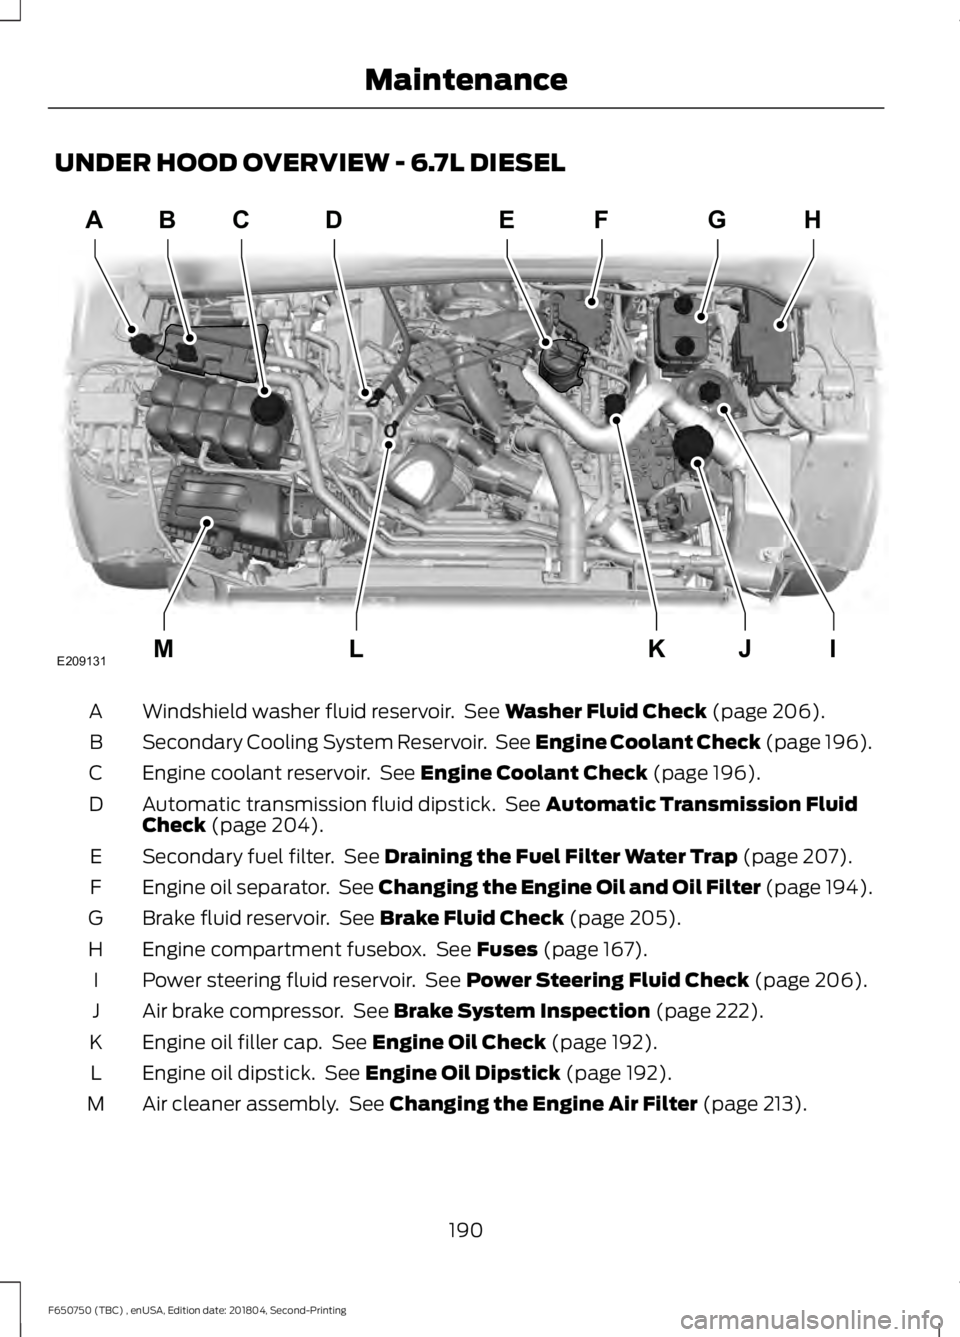
UNDER HOOD OVERVIEW - 6.7L DIESEL
Windshield washer fluid reservoir. See Washer Fluid Check (page 206).
A
Secondary Cooling System Reservoir. See Engine Coolant Check (page 196).
B
Engine coolant reservoir. See
Engine Coolant Check (page 196).
C
Automatic transmission fluid dipstick. See
Automatic Transmission Fluid
Check (page 204).
D
Secondary fuel filter. See
Draining the Fuel Filter Water Trap (page 207).
E
Engine oil separator. See
Changing the Engine Oil and Oil Filter (page 194).
F
Brake fluid reservoir. See
Brake Fluid Check (page 205).
G
Engine compartment fusebox. See
Fuses (page 167).
H
Power steering fluid reservoir. See
Power Steering Fluid Check (page 206).
I
Air brake compressor. See
Brake System Inspection (page 222).
J
Engine oil filler cap. See
Engine Oil Check (page 192).
K
Engine oil dipstick. See
Engine Oil Dipstick (page 192).
L
Air cleaner assembly. See
Changing the Engine Air Filter (page 213).
M
190
F650750 (TBC) , enUSA, Edition date: 201804, Second-Printing MaintenanceABD
IJKLM
FEGH
E209131C
Page 194 of 387
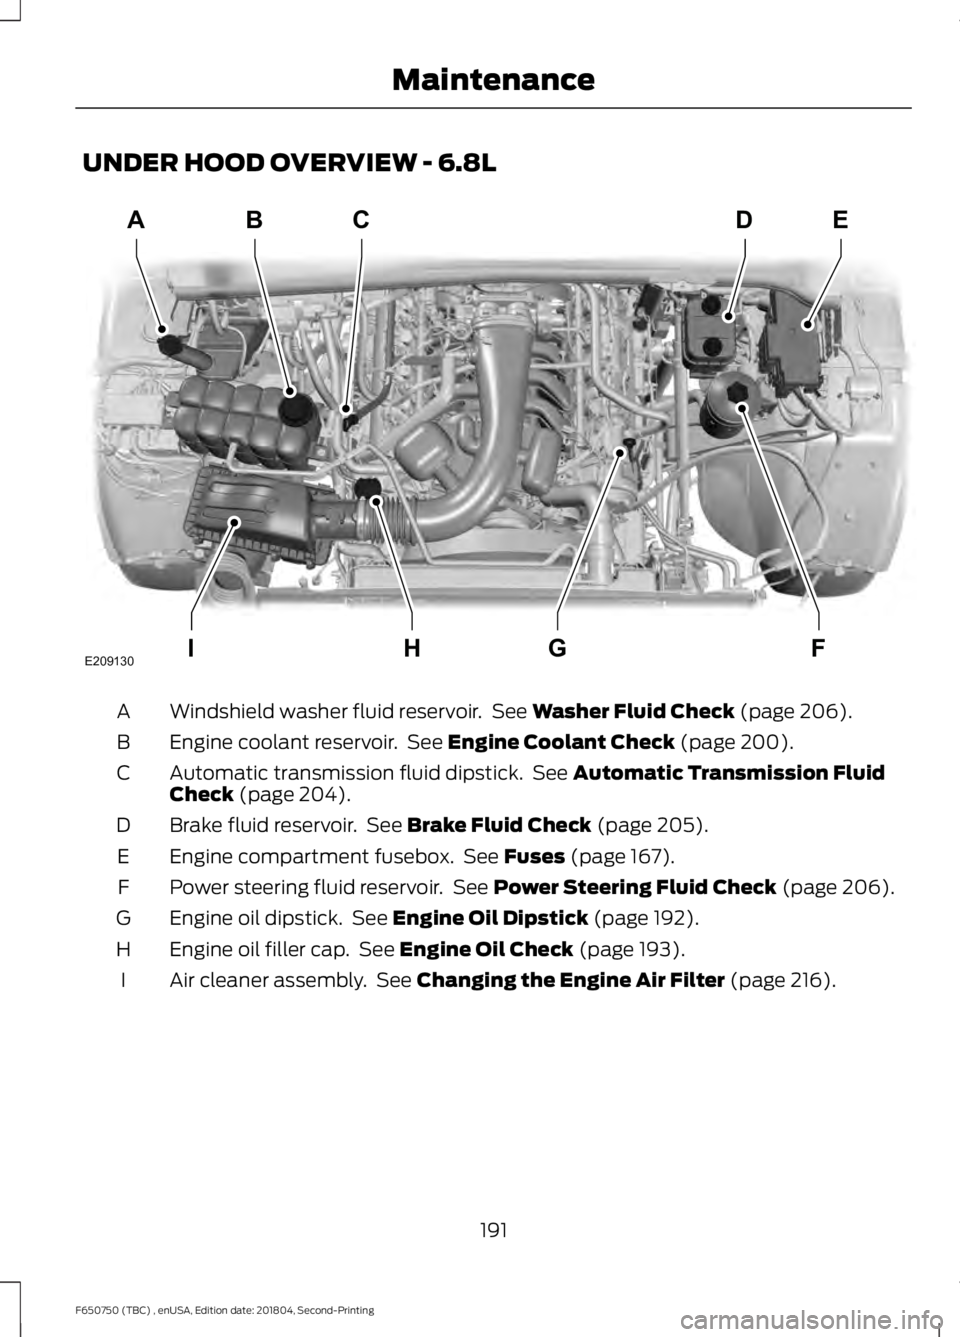
UNDER HOOD OVERVIEW - 6.8L
Windshield washer fluid reservoir. See Washer Fluid Check (page 206).
A
Engine coolant reservoir. See
Engine Coolant Check (page 200).
B
Automatic transmission fluid dipstick. See
Automatic Transmission Fluid
Check (page 204).
C
Brake fluid reservoir. See
Brake Fluid Check (page 205).
D
Engine compartment fusebox. See
Fuses (page 167).
E
Power steering fluid reservoir. See
Power Steering Fluid Check (page 206).
F
Engine oil dipstick. See
Engine Oil Dipstick (page 192).
G
Engine oil filler cap. See
Engine Oil Check (page 193).
H
Air cleaner assembly. See
Changing the Engine Air Filter (page 216).
I
191
F650750 (TBC) , enUSA, Edition date: 201804, Second-Printing MaintenanceABC
FGHI
DE
E209130
Page 195 of 387
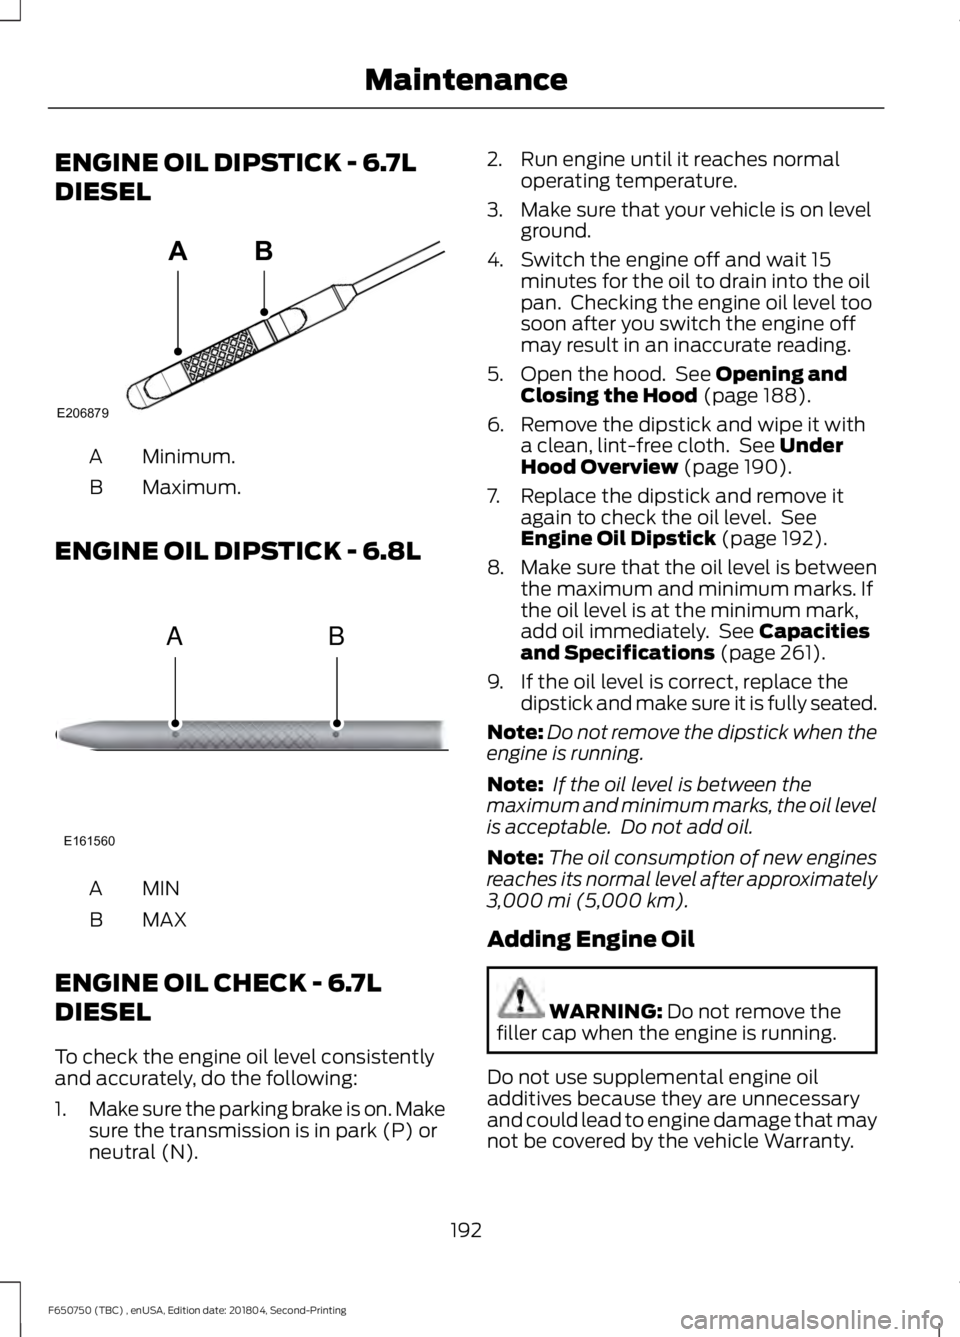
ENGINE OIL DIPSTICK - 6.7L
DIESEL
Minimum.
A
Maximum.
B
ENGINE OIL DIPSTICK - 6.8L MINA
MAX
B
ENGINE OIL CHECK - 6.7L
DIESEL
To check the engine oil level consistently
and accurately, do the following:
1. Make sure the parking brake is on. Make
sure the transmission is in park (P) or
neutral (N). 2. Run engine until it reaches normal
operating temperature.
3. Make sure that your vehicle is on level ground.
4. Switch the engine off and wait 15 minutes for the oil to drain into the oil
pan. Checking the engine oil level too
soon after you switch the engine off
may result in an inaccurate reading.
5. Open the hood. See Opening and
Closing the Hood (page 188).
6. Remove the dipstick and wipe it with a clean, lint-free cloth. See
Under
Hood Overview (page 190).
7. Replace the dipstick and remove it again to check the oil level. See
Engine Oil Dipstick
(page 192).
8. Make sure that the oil level is between
the maximum and minimum marks. If
the oil level is at the minimum mark,
add oil immediately. See
Capacities
and Specifications (page 261).
9. If the oil level is correct, replace the dipstick and make sure it is fully seated.
Note: Do not remove the dipstick when the
engine is running.
Note: If the oil level is between the
maximum and minimum marks, the oil level
is acceptable. Do not add oil.
Note: The oil consumption of new engines
reaches its normal level after approximately
3,000 mi (5,000 km)
.
Adding Engine Oil WARNING:
Do not remove the
filler cap when the engine is running.
Do not use supplemental engine oil
additives because they are unnecessary
and could lead to engine damage that may
not be covered by the vehicle Warranty.
192
F650750 (TBC) , enUSA, Edition date: 201804, Second-Printing MaintenanceE206879
AB E161560
AB
Page 196 of 387
To top up the engine oil level do the
following:
1. Clean the area surrounding the engine
oil filler cap before you remove it.
2. Remove the engine oil filler cap. See Under Hood Overview (page 190).
Turn it counterclockwise and remove
it.
3. Add engine oil of the proper viscosity and grade that meets Ford
specifications. See
Capacities and
Specifications (page 261). You may
have to use a funnel to pour the engine
oil into the opening.
4. Recheck the oil level.
5. If the oil level is correct, replace the dipstick and make sure it is fully seated.
6. Replace the engine oil filler cap. Turn it clockwise until you feel a strong
resistance.
Note: Do not add oil further than the
maximum mark. Oil levels above the
maximum mark may cause engine damage.
Note: Make sure you install the oil filler cap
correctly.
Note: Soak up any spillage with an
absorbent cloth immediately.
Engine lubrication for severe
service operation
The following conditions define severe
operation for which engine operation with
SAE 5W-40 oil which meets Ford
specification, WSS-M2C171-F1, is
recommended. Oil and oil filter change
intervals will be determined by the
Intelligent Oil Life Monitor™ as noted
previously.
ENGINE OIL CHECK - 6.8L
To check the engine oil level consistently
and accurately, do the following: 1.
Make sure the parking brake is on. Make
sure the transmission is in park (P) or
neutral (N).
2. Run the engine until it reaches normal operating temperature.
3. Make sure that your vehicle is on level ground.
4. Switch the engine off and wait 15 minutes for the oil to drain into the oil
pan. Checking the engine oil level too
soon after you switch the engine off
may result in an inaccurate reading.
5. Open the hood. See
Maintenance
(page 187).
6. Remove the dipstick and wipe it with a clean, lint-free cloth. See
Maintenance
(page 187).
7. Replace the dipstick and remove it again to check the oil level. See
Maintenance
(page 187).
8. Make sure that the oil level is between
the maximum and minimum marks. If
the oil level is at the minimum mark,
add oil immediately. See
Capacities
and Specifications (page 255).
9. If the oil level is correct, replace the dipstick and make sure it is fully seated.
Note: Do not remove the dipstick when the
engine is running.
Note: If the oil level is between the
maximum and minimum marks, the oil level
is acceptable. Do not add oil.
Note: The oil consumption of new engines
reaches its normal level after approximately
3,000 mi (5,000 km)
.
Adding Engine Oil WARNING:
Do not remove the
filler cap when the engine is running.
193
F650750 (TBC) , enUSA, Edition date: 201804, Second-Printing Maintenance