2019 FORD F650/750 transmission oil
[x] Cancel search: transmission oilPage 172 of 387

Protected Component
Fuse Rating
Fuse or Relay
Number
Vehicle power 2.
20A 2
34
Vehicle power 3.
10A 2
35
Vehicle power 4.
20A 2
36
Vehicle power 5 (diesel engine).
10A 2
37
Powertrain control module.
Relay
38
Not used.
—
39
Heated mirrors.
15A 2
40
Not used.
—
41
Trailer tow and body builder stop lamps.
20A 2
42
Not used.
—
43
Ancillary translator module.
20A 2
44
Run/start relay coil.
10A 2
45
Transmission control module keep-alive
power (diesel engine).
10A 2
46
A/C clutch.
10A 2
47
Run/start.
Relay
48
Air dryer.
20A 2
49
Blower motor relay coil.
10A 2
50
Not used.
—
51
Powertrain control module run/start
(diesel engine).
10A 2
52
Transmission control module run/start
(diesel engine).
Not used.
—
53
Anti-lock brake system run/start.
10A 2
54
169
F650750 (TBC) , enUSA, Edition date: 201804, Second-Printing Fuses
Page 193 of 387
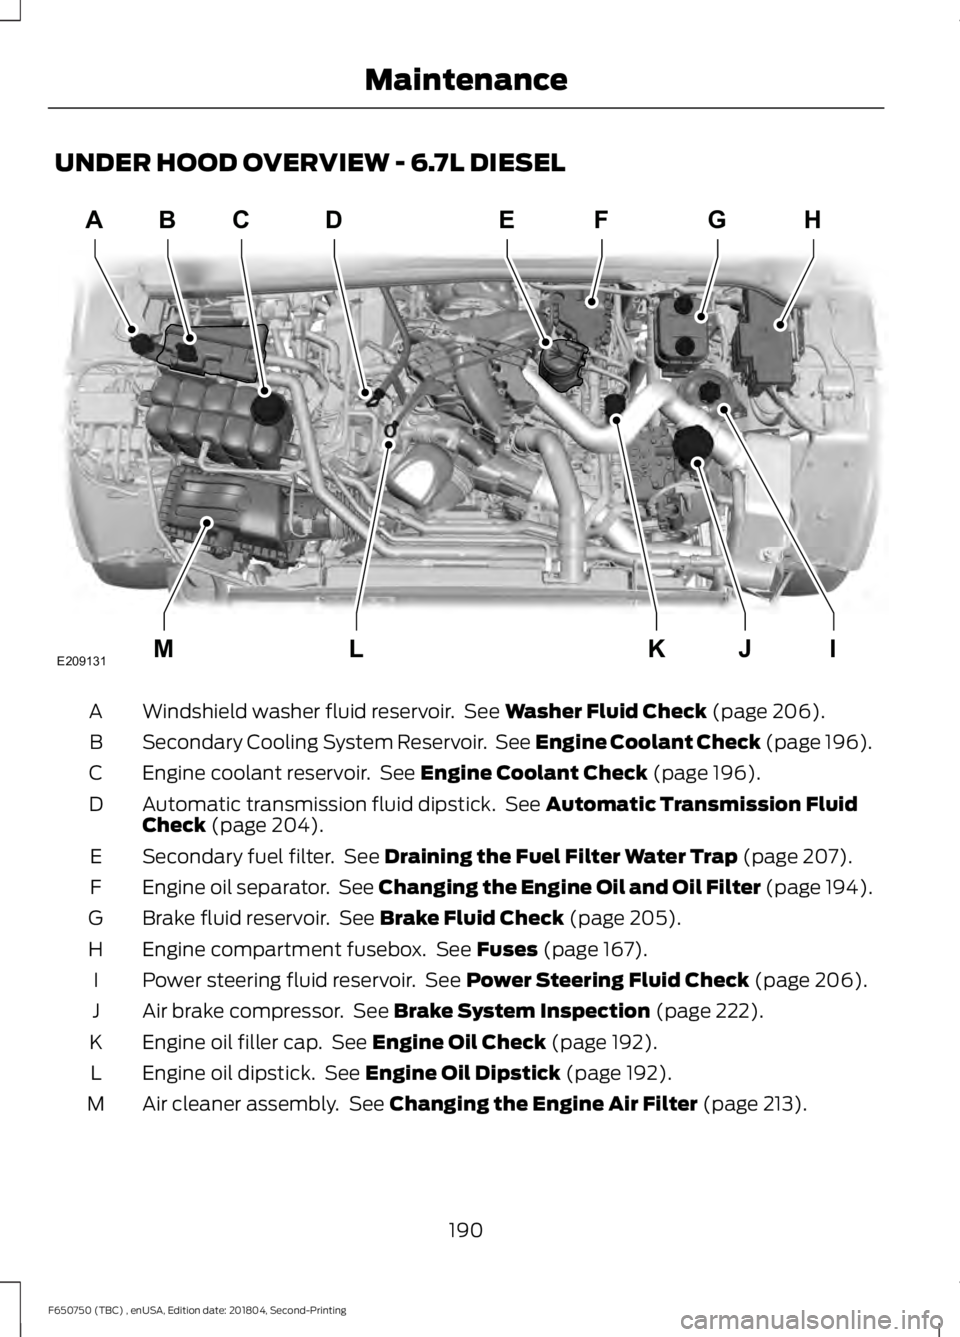
UNDER HOOD OVERVIEW - 6.7L DIESEL
Windshield washer fluid reservoir. See Washer Fluid Check (page 206).
A
Secondary Cooling System Reservoir. See Engine Coolant Check (page 196).
B
Engine coolant reservoir. See
Engine Coolant Check (page 196).
C
Automatic transmission fluid dipstick. See
Automatic Transmission Fluid
Check (page 204).
D
Secondary fuel filter. See
Draining the Fuel Filter Water Trap (page 207).
E
Engine oil separator. See
Changing the Engine Oil and Oil Filter (page 194).
F
Brake fluid reservoir. See
Brake Fluid Check (page 205).
G
Engine compartment fusebox. See
Fuses (page 167).
H
Power steering fluid reservoir. See
Power Steering Fluid Check (page 206).
I
Air brake compressor. See
Brake System Inspection (page 222).
J
Engine oil filler cap. See
Engine Oil Check (page 192).
K
Engine oil dipstick. See
Engine Oil Dipstick (page 192).
L
Air cleaner assembly. See
Changing the Engine Air Filter (page 213).
M
190
F650750 (TBC) , enUSA, Edition date: 201804, Second-Printing MaintenanceABD
IJKLM
FEGH
E209131C
Page 194 of 387
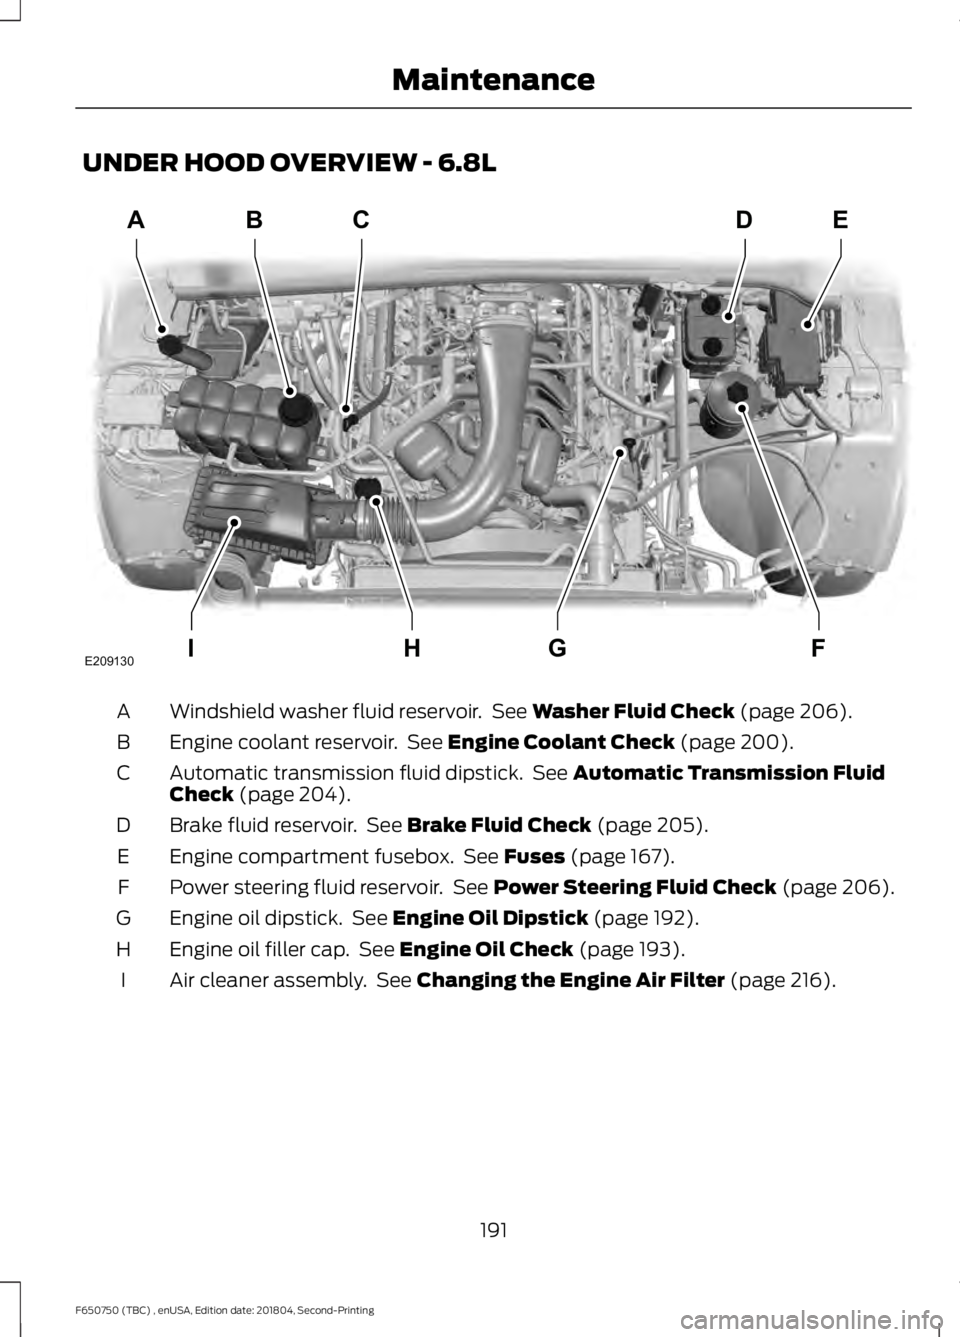
UNDER HOOD OVERVIEW - 6.8L
Windshield washer fluid reservoir. See Washer Fluid Check (page 206).
A
Engine coolant reservoir. See
Engine Coolant Check (page 200).
B
Automatic transmission fluid dipstick. See
Automatic Transmission Fluid
Check (page 204).
C
Brake fluid reservoir. See
Brake Fluid Check (page 205).
D
Engine compartment fusebox. See
Fuses (page 167).
E
Power steering fluid reservoir. See
Power Steering Fluid Check (page 206).
F
Engine oil dipstick. See
Engine Oil Dipstick (page 192).
G
Engine oil filler cap. See
Engine Oil Check (page 193).
H
Air cleaner assembly. See
Changing the Engine Air Filter (page 216).
I
191
F650750 (TBC) , enUSA, Edition date: 201804, Second-Printing MaintenanceABC
FGHI
DE
E209130
Page 195 of 387
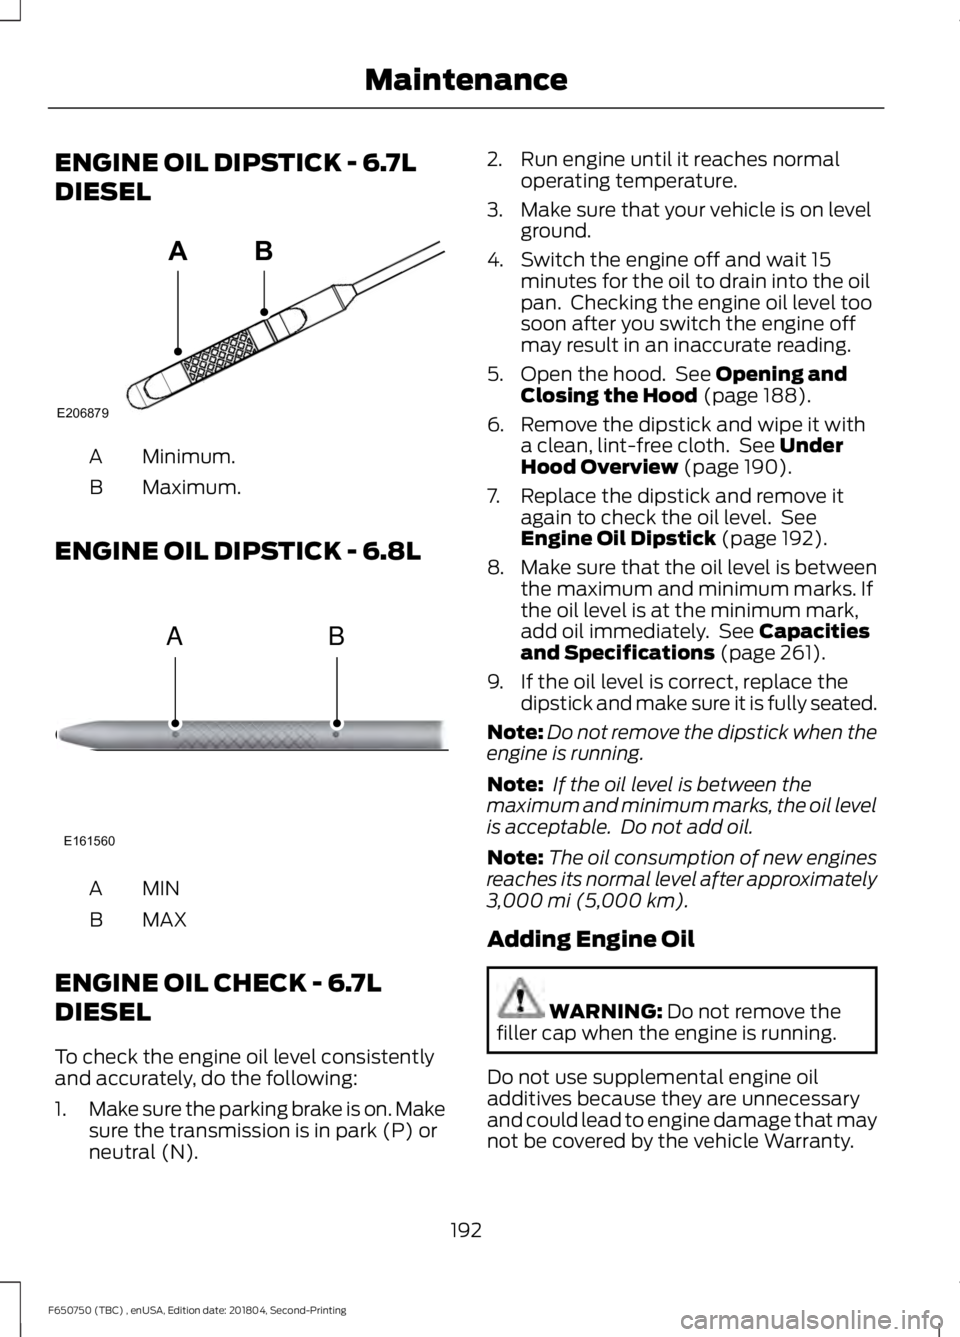
ENGINE OIL DIPSTICK - 6.7L
DIESEL
Minimum.
A
Maximum.
B
ENGINE OIL DIPSTICK - 6.8L MINA
MAX
B
ENGINE OIL CHECK - 6.7L
DIESEL
To check the engine oil level consistently
and accurately, do the following:
1. Make sure the parking brake is on. Make
sure the transmission is in park (P) or
neutral (N). 2. Run engine until it reaches normal
operating temperature.
3. Make sure that your vehicle is on level ground.
4. Switch the engine off and wait 15 minutes for the oil to drain into the oil
pan. Checking the engine oil level too
soon after you switch the engine off
may result in an inaccurate reading.
5. Open the hood. See Opening and
Closing the Hood (page 188).
6. Remove the dipstick and wipe it with a clean, lint-free cloth. See
Under
Hood Overview (page 190).
7. Replace the dipstick and remove it again to check the oil level. See
Engine Oil Dipstick
(page 192).
8. Make sure that the oil level is between
the maximum and minimum marks. If
the oil level is at the minimum mark,
add oil immediately. See
Capacities
and Specifications (page 261).
9. If the oil level is correct, replace the dipstick and make sure it is fully seated.
Note: Do not remove the dipstick when the
engine is running.
Note: If the oil level is between the
maximum and minimum marks, the oil level
is acceptable. Do not add oil.
Note: The oil consumption of new engines
reaches its normal level after approximately
3,000 mi (5,000 km)
.
Adding Engine Oil WARNING:
Do not remove the
filler cap when the engine is running.
Do not use supplemental engine oil
additives because they are unnecessary
and could lead to engine damage that may
not be covered by the vehicle Warranty.
192
F650750 (TBC) , enUSA, Edition date: 201804, Second-Printing MaintenanceE206879
AB E161560
AB
Page 196 of 387
To top up the engine oil level do the
following:
1. Clean the area surrounding the engine
oil filler cap before you remove it.
2. Remove the engine oil filler cap. See Under Hood Overview (page 190).
Turn it counterclockwise and remove
it.
3. Add engine oil of the proper viscosity and grade that meets Ford
specifications. See
Capacities and
Specifications (page 261). You may
have to use a funnel to pour the engine
oil into the opening.
4. Recheck the oil level.
5. If the oil level is correct, replace the dipstick and make sure it is fully seated.
6. Replace the engine oil filler cap. Turn it clockwise until you feel a strong
resistance.
Note: Do not add oil further than the
maximum mark. Oil levels above the
maximum mark may cause engine damage.
Note: Make sure you install the oil filler cap
correctly.
Note: Soak up any spillage with an
absorbent cloth immediately.
Engine lubrication for severe
service operation
The following conditions define severe
operation for which engine operation with
SAE 5W-40 oil which meets Ford
specification, WSS-M2C171-F1, is
recommended. Oil and oil filter change
intervals will be determined by the
Intelligent Oil Life Monitor™ as noted
previously.
ENGINE OIL CHECK - 6.8L
To check the engine oil level consistently
and accurately, do the following: 1.
Make sure the parking brake is on. Make
sure the transmission is in park (P) or
neutral (N).
2. Run the engine until it reaches normal operating temperature.
3. Make sure that your vehicle is on level ground.
4. Switch the engine off and wait 15 minutes for the oil to drain into the oil
pan. Checking the engine oil level too
soon after you switch the engine off
may result in an inaccurate reading.
5. Open the hood. See
Maintenance
(page 187).
6. Remove the dipstick and wipe it with a clean, lint-free cloth. See
Maintenance
(page 187).
7. Replace the dipstick and remove it again to check the oil level. See
Maintenance
(page 187).
8. Make sure that the oil level is between
the maximum and minimum marks. If
the oil level is at the minimum mark,
add oil immediately. See
Capacities
and Specifications (page 255).
9. If the oil level is correct, replace the dipstick and make sure it is fully seated.
Note: Do not remove the dipstick when the
engine is running.
Note: If the oil level is between the
maximum and minimum marks, the oil level
is acceptable. Do not add oil.
Note: The oil consumption of new engines
reaches its normal level after approximately
3,000 mi (5,000 km)
.
Adding Engine Oil WARNING:
Do not remove the
filler cap when the engine is running.
193
F650750 (TBC) , enUSA, Edition date: 201804, Second-Printing Maintenance
Page 230 of 387
SUSPENSION SYSTEM
INSPECTION
Note:
Do not adjust air suspension height
to any setting other than the specified
setting. Altering the height setting changes
the driveline angle and may result in
unwarrantable component damage, such
as transmission component damage.
Verify drive axle air suspension height and
height control valve performance at engine
oil change intervals.
Periodically check:
• Condition of spring leaves for evidence
of fatigue, bending or breakage.
• Condition of suspension mounting
brackets and bushings.
• Torque rod mounting fasteners for
tightness.
• For proper suspension alignment.
Maintain proper alignment at all times.
• U-bolts. After the chassis has been
operating under load for 1,000 mi
(1,600 km) or six months (whichever
comes first), the U-bolt nuts must be
re-torqued. Re-torque the U-bolt nuts
every
37,000 mi (60,000 km)
thereafter. Clean and lubricate the
U-bolt and nut threads and seats to
make sure a like new condition when
re-torqueing. See
Spring U-Bolt
Check (page 228).
FRAME AND TOW HOOK
INSPECTION
Your vehicle's chassis is manufactured
with frame rails of either HSLA steel or
heat-treated steel. Handle each in a
specific manner to make sure maximum
service life. Consult the service manual or
an authorized dealer before attempting
frame repair or modification. It is important, particularly on vehicles that
use tow hooks frequently, to inspect the
front and rear tow hooks for damage or a
loose mounting.
REAR AXLE FLUID CHECK
Your rear axle may have an optional
synthetic lubricant that allows the use of
extended service intervals. A tag on the
filler plug identifies the use of the synthetic
lubricant.
Only use a lubricant that meets
manufacturer specifications. Only use a
lubricant that meets manufacturer
specifications. Use of a non-approved rear
axle lubricant may cause internal axle
component damage. See Capacities and
Specifications
(page 261).
Checking the Fluid Level
1. Park your vehicle on level ground.
2. Set the parking brake and shift into position neutral (N) or park (P). Turn
the engine off.
3. Clean any dirt from around the axle filler plug.
4. Remove the filler plug and inspect the lubricant level. It should be at the
bottom of the filler plug opening.
5. Add lubricant, if necessary, through the
filler plug opening.
6. Clean and install the filler plug securely.
Changing the Fluid
Note: Drain the rear axle while the lubricant
is warm.
1. Park your vehicle on level ground.
2. Set the parking brake and shift into position neutral (N) or park (P). Turn
the engine off.
3. Clean any dirt from around the axle filler and drain plugs.
227
F650750 (TBC) , enUSA, Edition date: 201804, Second-Printing Maintenance
Page 260 of 387
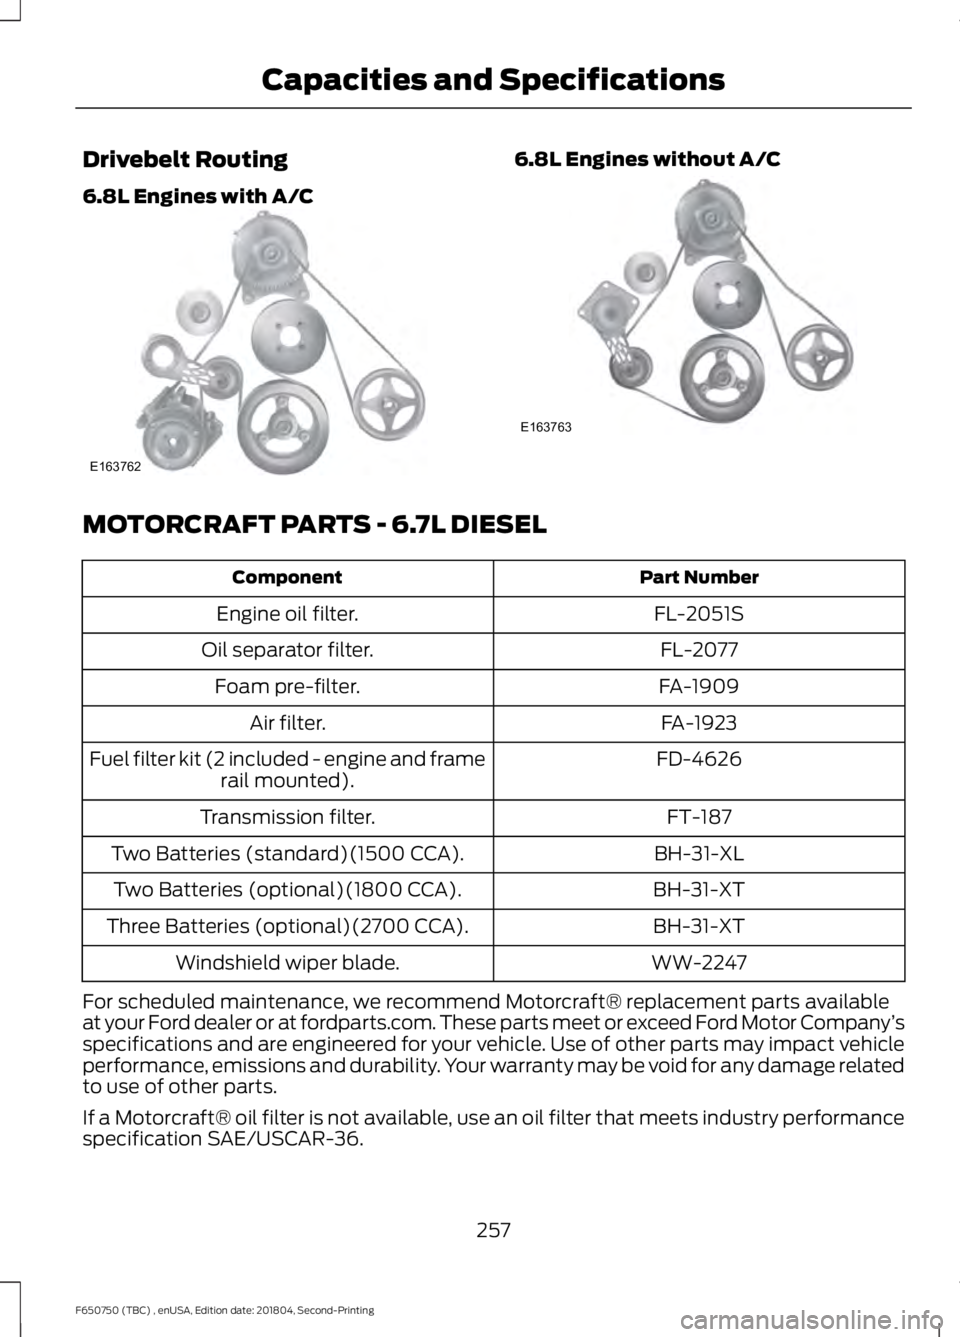
Drivebelt Routing
6.8L Engines with A/C 6.8L Engines without A/C
MOTORCRAFT PARTS - 6.7L DIESEL
Part Number
Component
FL-2051S
Engine oil filter.
FL-2077
Oil separator filter.
FA-1909
Foam pre-filter.
FA-1923
Air filter.
FD-4626
Fuel filter kit (2 included - engine and frame
rail mounted).
FT-187
Transmission filter.
BH-31-XL
Two Batteries (standard)(1500 CCA).
BH-31-XT
Two Batteries (optional)(1800 CCA).
BH-31-XT
Three Batteries (optional)(2700 CCA).
WW-2247
Windshield wiper blade.
For scheduled maintenance, we recommend Motorcraft® replacement parts available
at your Ford dealer or at fordparts.com. These parts meet or exceed Ford Motor Company ’s
specifications and are engineered for your vehicle. Use of other parts may impact vehicle
performance, emissions and durability. Your warranty may be void for any damage related
to use of other parts.
If a Motorcraft® oil filter is not available, use an oil filter that meets industry performance
specification SAE/USCAR-36.
257
F650750 (TBC) , enUSA, Edition date: 201804, Second-Printing Capacities and SpecificationsE163762 E163763
Page 265 of 387
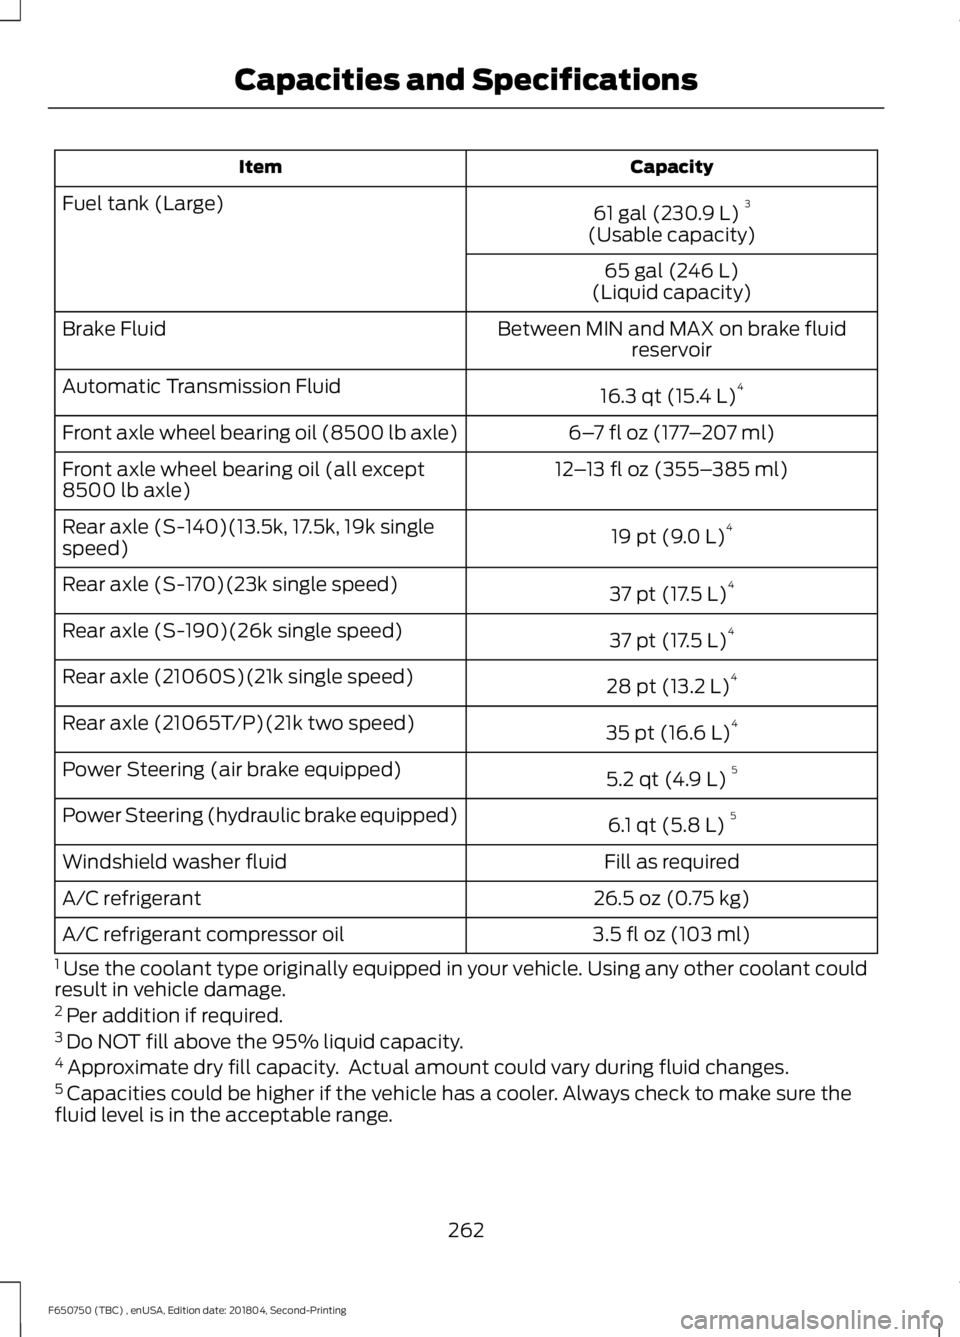
Capacity
Item
61 gal (230.9 L)3
Fuel tank (Large)
(Usable capacity)
65 gal (246 L)
(Liquid capacity)
Between MIN and MAX on brake fluid reservoir
Brake Fluid
16.3 qt (15.4 L)4
Automatic Transmission Fluid
6–7 fl oz (177 –207 ml)
Front axle wheel bearing oil (8500 lb axle)
12–13 fl oz (355– 385 ml)
Front axle wheel bearing oil (all except
8500 lb axle)
19 pt (9.0 L)4
Rear axle (S-140)(13.5k, 17.5k, 19k single
speed)
37 pt (17.5 L)4
Rear axle (S-170)(23k single speed)
37 pt (17.5 L)4
Rear axle (S-190)(26k single speed)
28 pt (13.2 L)4
Rear axle (21060S)(21k single speed)
35 pt (16.6 L)4
Rear axle (21065T/P)(21k two speed)
5.2 qt (4.9 L)5
Power Steering (air brake equipped)
6.1 qt (5.8 L)5
Power Steering (hydraulic brake equipped)
Fill as required
Windshield washer fluid
26.5 oz (0.75 kg)
A/C refrigerant
3.5 fl oz (103 ml)
A/C refrigerant compressor oil
1 Use the coolant type originally equipped in your vehicle. Using any other coolant could
result in vehicle damage.
2 Per addition if required.
3 Do NOT fill above the 95% liquid capacity.
4 Approximate dry fill capacity. Actual amount could vary during fluid changes.
5 Capacities could be higher if the vehicle has a cooler. Always check to make sure the
fluid level is in the acceptable range.
262
F650750 (TBC) , enUSA, Edition date: 201804, Second-Printing Capacities and Specifications