2019 FORD F650/750 manual transmission
[x] Cancel search: manual transmissionPage 162 of 387
We recommend the use of a wheel lift and
dollies or flatbed equipment to tow your
vehicle. Do not tow with a slingbelt. We do
not approve a slingbelt towing procedure.
If you tow your vehicle incorrectly, or by
any other means, vehicle damage may
occur.
We produce a towing manual for all
authorized tow truck operators. Have your
tow truck operator refer to this manual for
proper hook-up and towing procedures for
your vehicle.
It is acceptable to have your two-wheel
drive vehicle towed with the front wheels
on the ground (without dollies) and the
rear wheels off the ground.
We recommend towing a four-wheel drive
vehicle with all wheels off the ground, such
as using a wheel lift and dollies or flatbed
equipment. However, it is acceptable to
use a wheel lift to raise the rear of your
vehicle so long as, depending on vehicle
configuration, you perform the following
before towing:
•
If your vehicle has a manual-shift
transfer case, make sure the front
wheel hub locks are in the FREE
position before towing.
• If your vehicle has an electronic
shift-on-the-fly transfer case, make
sure you switch the four-wheel drive
control to the
2H position before
towing.
Note: Towing an electronic shift-on-the-fly
four-wheel drive vehicle with the front
wheels on the ground without disengaging
the front hubs may cause damage to the
automatic transmission.
Note: Towing a two-wheel drive vehicle or
an electronic shift-on-the-fly four-wheel
drive vehicle with the rear wheels on the
ground for more than
50 mi (80 km) or
faster than 35 mph (56 km/h) may cause
damage to the automatic transmission. Note:
Using wheel lift equipment to tow a
dual rear wheel vehicle requires removing
an outer rear wheel before towing.
Note: If you are towing your vehicle from
the front, disconnect the driveline from the
rear axle or vehicle damage may occur.
159
F650750 (TBC) , enUSA, Edition date: 201804, Second-Printing Roadside Emergencies
Page 224 of 387
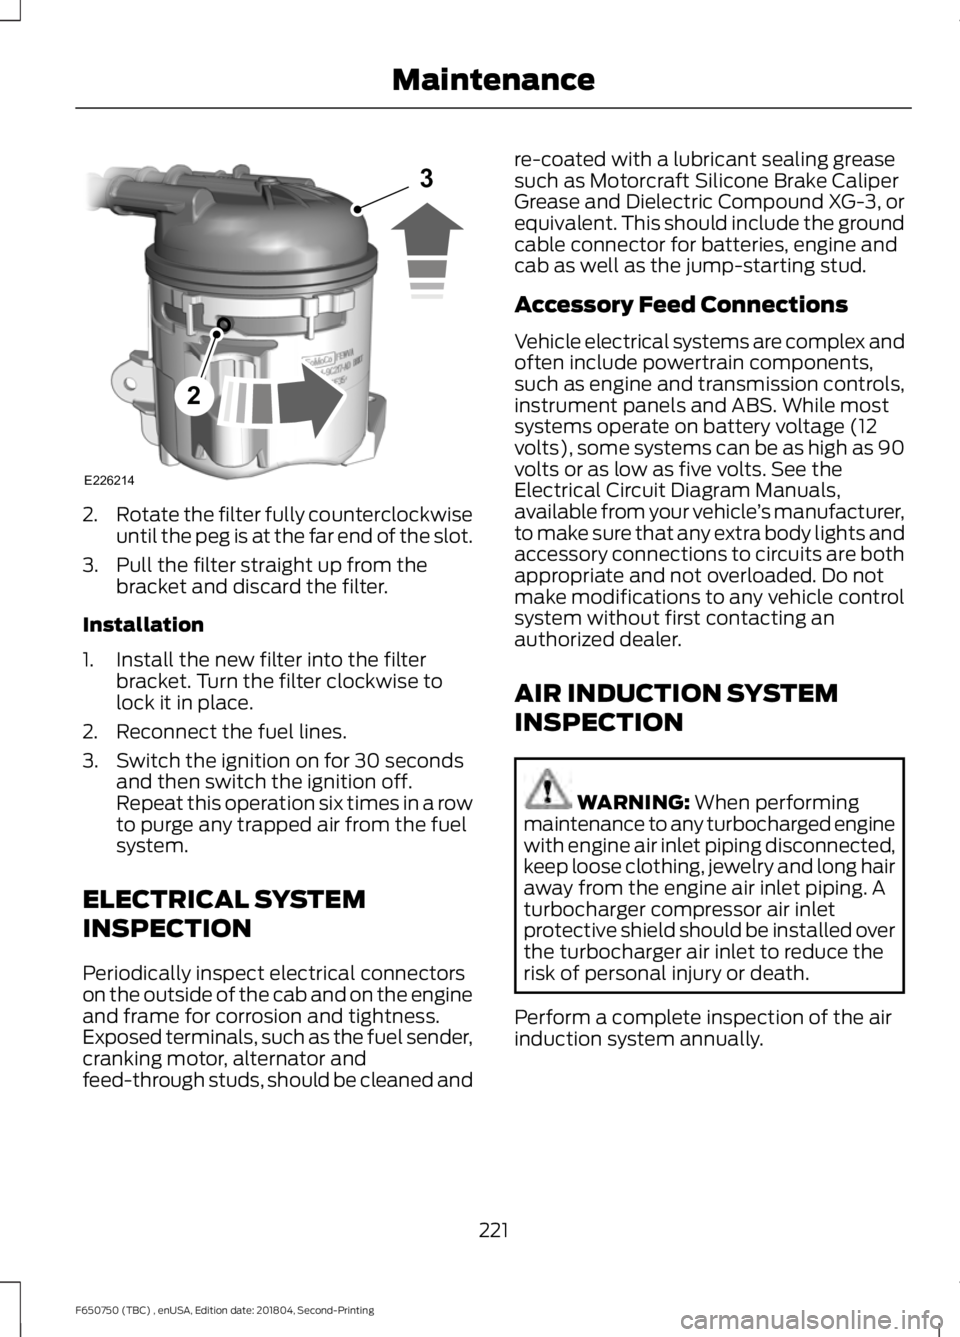
2.
Rotate the filter fully counterclockwise
until the peg is at the far end of the slot.
3. Pull the filter straight up from the bracket and discard the filter.
Installation
1. Install the new filter into the filter bracket. Turn the filter clockwise to
lock it in place.
2. Reconnect the fuel lines.
3. Switch the ignition on for 30 seconds and then switch the ignition off.
Repeat this operation six times in a row
to purge any trapped air from the fuel
system.
ELECTRICAL SYSTEM
INSPECTION
Periodically inspect electrical connectors
on the outside of the cab and on the engine
and frame for corrosion and tightness.
Exposed terminals, such as the fuel sender,
cranking motor, alternator and
feed-through studs, should be cleaned and re-coated with a lubricant sealing grease
such as Motorcraft Silicone Brake Caliper
Grease and Dielectric Compound XG-3, or
equivalent. This should include the ground
cable connector for batteries, engine and
cab as well as the jump-starting stud.
Accessory Feed Connections
Vehicle electrical systems are complex and
often include powertrain components,
such as engine and transmission controls,
instrument panels and ABS. While most
systems operate on battery voltage (12
volts), some systems can be as high as 90
volts or as low as five volts. See the
Electrical Circuit Diagram Manuals,
available from your vehicle
’s manufacturer,
to make sure that any extra body lights and
accessory connections to circuits are both
appropriate and not overloaded. Do not
make modifications to any vehicle control
system without first contacting an
authorized dealer.
AIR INDUCTION SYSTEM
INSPECTION WARNING: When performing
maintenance to any turbocharged engine
with engine air inlet piping disconnected,
keep loose clothing, jewelry and long hair
away from the engine air inlet piping. A
turbocharger compressor air inlet
protective shield should be installed over
the turbocharger air inlet to reduce the
risk of personal injury or death.
Perform a complete inspection of the air
induction system annually.
221
F650750 (TBC) , enUSA, Edition date: 201804, Second-Printing MaintenanceE226214
2
3
Page 230 of 387
SUSPENSION SYSTEM
INSPECTION
Note:
Do not adjust air suspension height
to any setting other than the specified
setting. Altering the height setting changes
the driveline angle and may result in
unwarrantable component damage, such
as transmission component damage.
Verify drive axle air suspension height and
height control valve performance at engine
oil change intervals.
Periodically check:
• Condition of spring leaves for evidence
of fatigue, bending or breakage.
• Condition of suspension mounting
brackets and bushings.
• Torque rod mounting fasteners for
tightness.
• For proper suspension alignment.
Maintain proper alignment at all times.
• U-bolts. After the chassis has been
operating under load for 1,000 mi
(1,600 km) or six months (whichever
comes first), the U-bolt nuts must be
re-torqued. Re-torque the U-bolt nuts
every
37,000 mi (60,000 km)
thereafter. Clean and lubricate the
U-bolt and nut threads and seats to
make sure a like new condition when
re-torqueing. See
Spring U-Bolt
Check (page 228).
FRAME AND TOW HOOK
INSPECTION
Your vehicle's chassis is manufactured
with frame rails of either HSLA steel or
heat-treated steel. Handle each in a
specific manner to make sure maximum
service life. Consult the service manual or
an authorized dealer before attempting
frame repair or modification. It is important, particularly on vehicles that
use tow hooks frequently, to inspect the
front and rear tow hooks for damage or a
loose mounting.
REAR AXLE FLUID CHECK
Your rear axle may have an optional
synthetic lubricant that allows the use of
extended service intervals. A tag on the
filler plug identifies the use of the synthetic
lubricant.
Only use a lubricant that meets
manufacturer specifications. Only use a
lubricant that meets manufacturer
specifications. Use of a non-approved rear
axle lubricant may cause internal axle
component damage. See Capacities and
Specifications
(page 261).
Checking the Fluid Level
1. Park your vehicle on level ground.
2. Set the parking brake and shift into position neutral (N) or park (P). Turn
the engine off.
3. Clean any dirt from around the axle filler plug.
4. Remove the filler plug and inspect the lubricant level. It should be at the
bottom of the filler plug opening.
5. Add lubricant, if necessary, through the
filler plug opening.
6. Clean and install the filler plug securely.
Changing the Fluid
Note: Drain the rear axle while the lubricant
is warm.
1. Park your vehicle on level ground.
2. Set the parking brake and shift into position neutral (N) or park (P). Turn
the engine off.
3. Clean any dirt from around the axle filler and drain plugs.
227
F650750 (TBC) , enUSA, Edition date: 201804, Second-Printing Maintenance
Page 294 of 387
The system creates candidate lists when
it has the same confidence level of several
options based on your voice command.
When turned on, it may prompt you with
as many as four possibilities for
clarification.
For example, say "Say 1 after the tone to
call John Doe at home. Say 2 after the tone
to call Johnny Doe on mobile. Say 3 after
the tone to call Jane Doe at home." You
could also say "Say 1 after the tone to play
John Doe, Say 2 after the tone to play
Johnny Doe."If you want the system to carry out the following
Voice command
Make a best guess from the media candidate list. You may
still occasionally be asked questions.
Media Candidate Lists
Off
Clarify your voice command for media candidates.
Media Candidate Lists On
Make a best guess from the phone candidate list. You may
still occasionally be asked questions.
Phone Candidate Lists
Off
Clarify your voice command for phone candidates.
Phone Candidate Lists
On
USING SYNC™ WITH YOUR
PHONE
Hands-free calling is one of the main
features of SYNC. While the system
supports a variety of features, many are
dependent on your cell phone's
functionality. At a minimum, most cell
phones with Bluetooth wireless technology
support the following functions:
• Answering an incoming call.
• Ending a call.
• Using privacy mode.
• Dialing a number.
• Redialing.
• Call waiting notification.
• Caller ID. Other features, such as text messaging
using Bluetooth and automatic phonebook
download, are cell phone-dependent
features. To check your cell phone's
compatibility, see your cell phone's manual
and visit www.SYNCMyRide.com,
www.SYNCMyRide.ca or
www.syncmaroute.ca.
Pairing a Cell Phone for the First
Time
Note:
SYNC can support downloading up
to approximately 1000 entries per
Bluetooth-enabled cell phone.
Note: Make sure to switch on the ignition
and the radio. Put the transmission in
position park (P).
Note: To scroll through the menus, press
the up and down arrows on your audio
system.
Wirelessly pairing your cell phone with
SYNC allows you to make and receive
hands-free calls.
291
F650750 (TBC) , enUSA, Edition date: 201804, Second-Printing SYNC™
Page 295 of 387
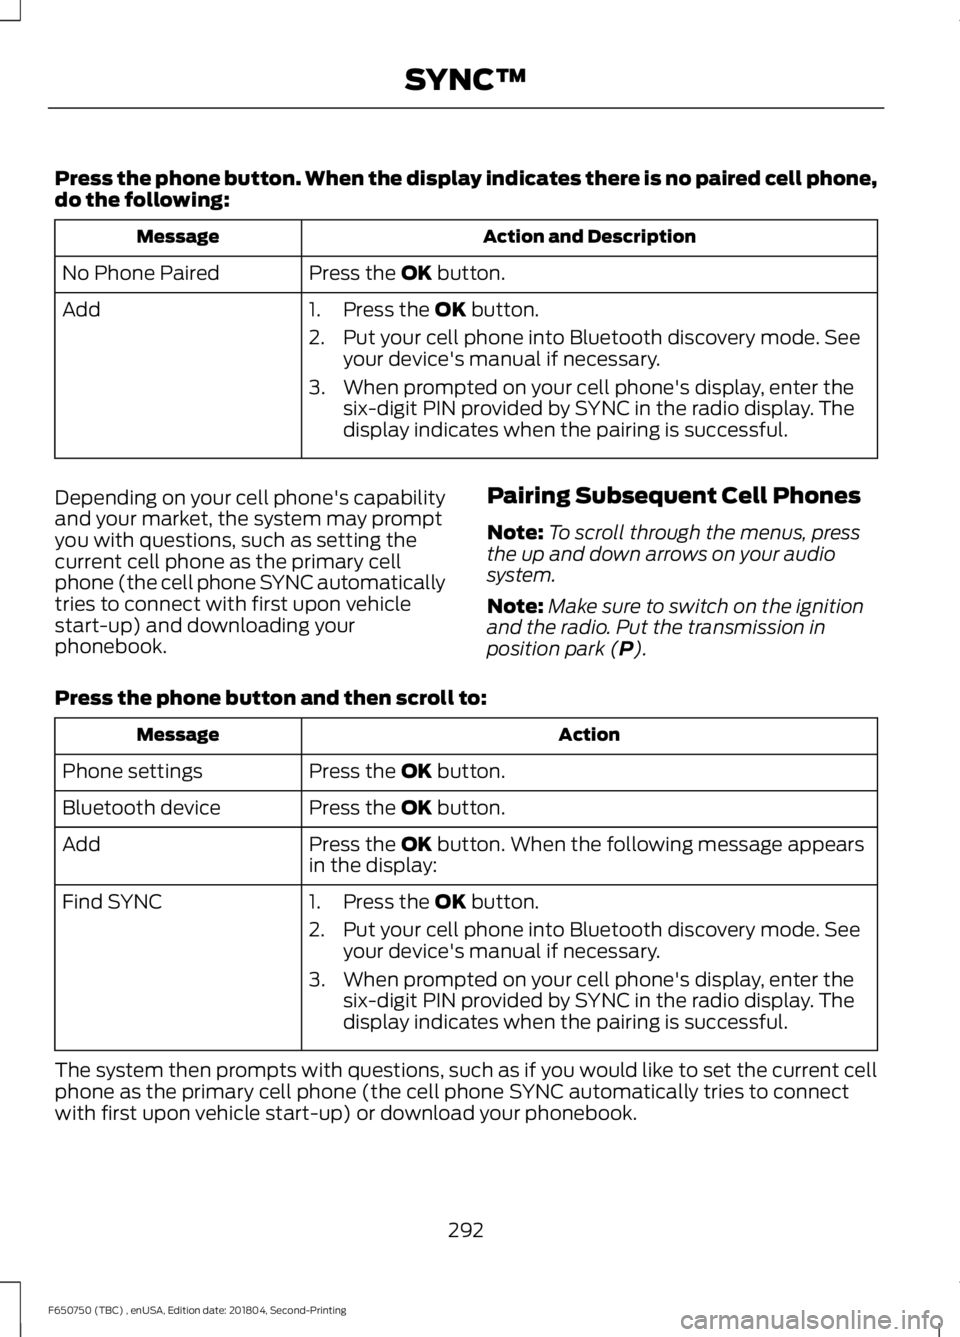
Press the phone button. When the display indicates there is no paired cell phone,
do the following:
Action and Description
Message
Press the OK button.
No Phone Paired
Add 1. Press the
OK button.
2. Put your cell phone into Bluetooth discovery mode. See your device's manual if necessary.
3. When prompted on your cell phone's display, enter the six-digit PIN provided by SYNC in the radio display. The
display indicates when the pairing is successful.
Depending on your cell phone's capability
and your market, the system may prompt
you with questions, such as setting the
current cell phone as the primary cell
phone (the cell phone SYNC automatically
tries to connect with first upon vehicle
start-up) and downloading your
phonebook. Pairing Subsequent Cell Phones
Note:
To scroll through the menus, press
the up and down arrows on your audio
system.
Note: Make sure to switch on the ignition
and the radio. Put the transmission in
position park (
P).
Press the phone button and then scroll to: Action
Message
Press the
OK button.
Phone settings
Press the
OK button.
Bluetooth device
Press the
OK button. When the following message appears
in the display:
Add
Find SYNC
1. Press the
OK button.
2. Put your cell phone into Bluetooth discovery mode. See your device's manual if necessary.
3. When prompted on your cell phone's display, enter the six-digit PIN provided by SYNC in the radio display. The
display indicates when the pairing is successful.
The system then prompts with questions, such as if you would like to set the current cell
phone as the primary cell phone (the cell phone SYNC automatically tries to connect
with first upon vehicle start-up) or download your phonebook.
292
F650750 (TBC) , enUSA, Edition date: 201804, Second-Printing SYNC™
Page 383 of 387
Preparing Your Vehicle.....................................
156
Removing the Jumper Cables........................ 157
K
Keys and Remote Controls........................40
L
Lighting Control..............................................49 Flashing the Headlamp High Beam..............50
Headlamp High Beam........................................ 49
Lighting..............................................................49 General Information............................................ 49
Limited Slip Differential.............................120
Load Carrying..................................................141
Load Limit.........................................................141
Unloaded or Lightly Loaded Vehicles..........141
Locking and Unlocking
.................................42
Autolock................................................................... 42
Battery Saver......................................................... 43
Illuminated Entry.................................................. 43
Power Door Locks................................................ 42
Remote Control..................................................... 42
Smart Unlocks....................................................... 42
Lug Nuts See: Changing a Road Wheel......................... 251
M
Maintenance...................................................187 General Information.......................................... 187
Manual Climate Control
...............................72
Directing the Air..................................................... 72
Setting the Blower Motor Speed.................... 72
Setting the Temperature.................................... 72
Switching Defrost On and Off.......................... 72
Switching Maximum Air Conditioning On and Off................................................................. 73
Switching Recirculated Air On and Off.........73
Switching the Air Conditioning On and Off........................................................................\
.. 72
Switching the Climate Control On and Off........................................................................\
.. 72
Manual Seats....................................................77 Manual Lumbar .................................................... 78
Moving the Seat Backward and Forward................................................................ 77Recline Adjustment..............................................
77
Tilting the Seatback Forward (Two-Passenger Bench Seat).................... 78
Media Hub
......................................................285
Message Center See: Information Displays................................. 64
Mirrors See: Windows and Mirrors................................ 52
Mobile Communications Equipment......14
Motorcraft Parts - 6.7L Diesel..................257
Motorcraft Parts - 6.8L..............................258
N
Noise Pollution Control.................................16 Air Intake System.................................................. 16
Body........................................................................\
... 16
Cooling System...................................................... 16
Engine........................................................................\
16
Exhaust System..................................................... 16
Transmission Enclosure...................................... 16
Normal Scheduled Maintenance..........326 Intelligent Oil-Life Monitor™ (Diesel Engine
Only).................................................................. 326
Normal Maintenance Intervals..................... 328
O
Oil Change Indicator Reset.......................196
Oil Check See: Engine Oil Check - 6.7L Diesel..............192
See: Engine Oil Check - 6.8L.......................... 193
Opening and Closing the Hood..............188 Closing the Hood................................................ 189
Opening the Hood............................................. 188
Ordering Additional Owner's Literature......................................................164
Obtaining a French Owner ’s Manual..........165
Overhead Console
.........................................85
P
Parking Brake..................................................123 Air Brakes............................................................... 124
Hydraulic Brakes.................................................. 123
Passive Anti-Theft System........................44 SecuriLock®........................................................... 44
380
F650750 (TBC) , enUSA, Edition date: 201804, Second-Printing Index